Showing posts with label triple banner punch. Show all posts

Thursday, October 12, 2017

Peace, Joy, and Love

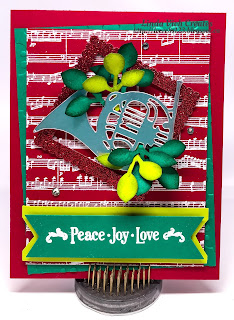
Linda Vich Creates: Peace, Joy, and Love. A colorful and festive card that uses the Musical Instruments Framelits and the Sheet Music stamp set.
When I created the card in my Rustic Musical Season blog post, I had actually planned to create two cards that day, using some of the same stamps and framelits. However, time got away from me and I didn't get the second card finished until now!

I started by using my MISTI to stamp the Sheet Music background stamp with Whisper White onto Real Red card stock. I heat embossed it with White Stampin' Emboss Powder.

Cutting a slightly larger matte from Emerald Envy, I dry embossed it using the Holly Embossing Folder. These were stacked and adhered, haphazardly, onto a Real Red 4.75 x 6" card front.

I used the Musical Instruments Framelits to die cut the French horn from Silver Foil as well as a few more horns from Whisper White. I stacked and adhered the horns together. I used a silver Sharpie to edge the horn.

On Red Glimmer paper I used my #9 scalloped square and #6 plain square from the Layering Squares Framelits to die cut a frame. I adhered the frame at an angle on the card front using Mini Dimensionals. The horn was adhered on top of the frame, again using the Mini Dimensionals.

Using Emerald Envy and Lemon Lime Twist card stock, I punched leaves and then sponged them with either Emerald Envy or Pear Pizzazz. I also shaped them a little with a bone folder. These were adhered around the horn using liquid adhesive.

The sentiment was stamped with Whisper White on Emerald Envy and then heat embossed using White Stampin' Emboss Powder. The Triple Banner Punch was used to flag the ends. A strip of Lemon Lime Twist was used to matte the sentiment and was hand trimmed after adhering it to the sentiment and then adhered to the card front with Dimensionals. A few rhinestones were added for a touch of bling.

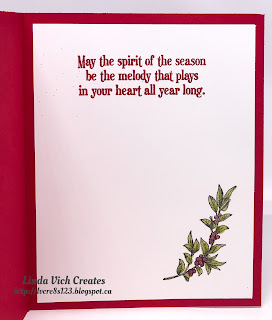
On the Whisper White matte inside the card, the sentiment was stamped with Real Red and heat embossed using the now retired Real Red Glitter Embossing Powder. The leaves were stamped with Memento and then colored using the new Stampin' Blends. Wink of Stella added some glitz to the leaves and berries to complete the card.

Linda Vich Creates: Peace, Joy, and Love. A colorful and festive card that uses the Musical Instruments Framelits and the Sheet Music stamp set.

Linda Vich Creates: Peace, Joy, and Love. A colorful and festive card that uses the Musical Instruments Framelits and the Sheet Music stamp set.


Love how this card turned out! The colors of Real Red, Emerald Envy and Lemon Lime Twist are such a fun combination! Be sure to save the color combo below if you'd like to use it for your own projects!

Linda Vich Creates: Peace, Joy, and Love. A colorful and festive card that uses the Musical Instruments Framelits and the Sheet Music stamp set.


>

Saturday, October 7, 2017

Fall Leaves Birthday

Linda Vich Creates: Fall Leaves Birthday. Multicolored and copper leaves seem to pop right off the embossed Very Vanilla matte on this fall birthday card.
Since the Autumn leaves are so inspiring, I have another fall card for you today!

I started by die cutting three leaves from Watercolor Paper using the Seasonal Layers Thinlits. I also die cut three of the detailed leaves from Copper Foil.

Using sponges, I added Real Red, Pumpkin Pie and Crushed Curry to the leaves. Because I really wanted the colors to pop from beneath the copper die cuts, I used Versamark to heat emboss them with Clear Stampin' Emboss Powder 2X to make them really shiny. I then used liquid adhesive to attach the copper die cuts to the colored leaves.

I cut two mattes–one Copper Foil, one Very Vanilla–and used the Petal Burst Embossing Folder to emboss the Very Vanilla matte. Liquid adhesive was used to adhere the embossed matte to the copper one and then to a Dapper Denim card front.

The Banner Triple Punch was used to flag a strip of copper and another of Dapper Denim. The sentiment from the Sunshine Sayings stamp set was stamped on the copper foil using Jet Black Stazon ink. The strips were adhered to the card front with Fast Fuse and the leaves with Dimensionals.

A Watercolor matte for the inside of the card had the smallest leaf from the Colorful Seasons stamp set stamped in Versamark and then heat embossed using Copper Embossing Powder. Sponges were used to ink the edges using Crushed Curry, Pumpkin Pie and Real Red. The matte was adhered inside the card with Fast Fuse.

Linda Vich Creates: Fall Leaves Birthday. Multicolored and copper leaves seem to pop right off the embossed Very Vanilla matte on this fall birthday card.

Linda Vich Creates: Fall Leaves Birthday. Multicolored and copper leaves seem to pop right off the embossed Very Vanilla matte on this fall birthday card.

I am so pleased with how this card turned out! So many ways to use leaves on a card. What have you created with leaves? Leave me a comment below!


Monday, June 19, 2017

Ornate Orchid

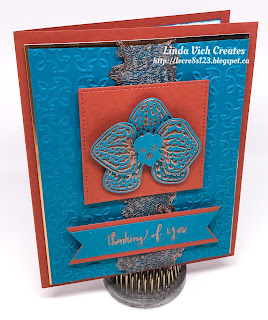
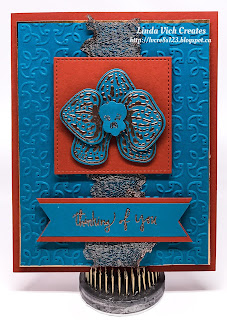
Linda Vich Creates: Ornate Orchid. Copper embossed climbing orchid sits atop a Cajun Craze stitched square. Ruffled copper trim and Island Indigo matte embossed with the Garden Trellis embossing folder as well as some copper foil and this card screams, "ornate!"
I tried a new spin on the Climbing Orchids today by designing a fancy, formal card.

For the orchid, I stamped with Versamark on Island Indigo card stock and then heat embossed using Copper Embossing Powder. After die cutting with the Orchid Builder Framelits, I adhered the flower using Dimensionals.

Next, I die cut a square from Cajun Craze using the #4 square die from the Stitched Shapes Framelits. The orchid was adhered to it using Dimensionals.

A matte of Island Indigo was dry embossed using the new Garden Trellis Embossing Folder and then a strip of the Copper Trim was pulled apart to create a ruffle and then run down the front of the matte and taped in the back. This matte was then adhered with Dimensionals to a Copper Foil matte and then to a Cajun Craze card front.

The stitched square was adhered over top of the Copper Trim using Foam Adhesive Strips. The sentiment was stamped on Island Indigo and heat embossed with copper. The Triple Banner Punch flagged each end and then was matted with a flagged piece of Cajun Craze. It was adhered to the embossed matte using double Dimensionals.

A matte of Very Vanilla was used for the inside of the card. The leaves from the stamp set were stamped on two corners using Versamark and embossed with copper. The edges were then sponged with Island Indigo before adhering the matte to complete the card.

Linda Vich Creates: Ornate Orchid. Copper embossed climbing orchid sits atop a Cajun Craze stitched square. Ruffled copper trim and Island Indigo matte embossed with the Garden Trellis embossing folder as well as some copper foil and this card screams, "ornate!"

Linda Vich Creates: Ornate Orchid. Copper embossed climbing orchid sits atop a Cajun Craze stitched square. Ruffled copper trim and Island Indigo matte embossed with the Garden Trellis embossing folder as well as some copper foil and this card screams, "ornate!"

Linda Vich Creates: Ornate Orchid. Copper embossed climbing orchid sits atop a Cajun Craze stitched square. Ruffled copper trim and Island Indigo matte embossed with the Garden Trellis embossing folder as well as some copper foil and this card screams, "ornate!"


One strange result of the embossing on this card is that the orchid almost looks like a face–spooky!

Do you like the color scheme of this card? I think that Island Indigo and Cajun Craze look wonderful together! If you like, save the color scheme for your own projects.

Linda Vich Creates: Ornate Orchid. Copper embossed climbing orchid sits atop a Cajun Craze stitched square. Ruffled copper trim and Island Indigo matte embossed with the Garden Trellis embossing folder as well as some copper foil and this card screams, "ornate!"


Tuesday, June 6, 2017

2017 Catalog Launch Prep Part 3: First Prize

Linda Vich Creates: 2017 Catalog Launch Prep Part 3: First Prize. Delightful Daisy DSP teams up with the Daisy Punch for this lovely card set and portfolio.
Today brings us to the third and final part of my Catalog Launch Prep series. If you missed the two earlier parts, you can reach them here: 2017 Catalog Launch Prep Part 2: Second Prize and 2017 Catalog Launch Prep Part 1: Third Prize. You can also read about the actual 2017 Catalog Launch Party.

Today I feature the card set that was the First Prize at my Catalog Launch.

I started by creating the cards for the card set. I chose a 4.75 x 6" card base and cut it from Thick Whisper White. I cut a matte from Daffodil Delight and embossed it using the Hexagons Dynamic Embossing Folder and adhered it to the card front using Dimensionals.

I next cut a panel of the Delightful Daisy DSP and
matted it with some Night of Navy. I used half of a Delicate White Doily and adhered it under the Daisy panel which was adhered to the left side of the card front.

Using Night of Navy, the sentiment was stamped on a strip of Thick Whisper White and then it was punched with the Banner Triple Punch. It was adhered to the Daisy Panel with Fast Fuse and to the embossed matte using a Dimensional.

The Daisy Punch was used to punch two Night of Navy Daisies which were curled slightly using a bone folder and then adhered together using liquid adhesive. The 1/2" Circle Punch was used to punch a Daffolil Delight Circle which was adhered to the centre with a Clear Faceted Gem, colored with a sharpie, adhered over top of it. The daisy was adhered to the card front using a Dimensional.

The Envelope Punch Board was used with Daffodil Delight card stock was used to create matching envelopes for the cards.

Linda Vich Creates: 2017 Catalog Launch Prep Part 3: First Prize. Delightful Daisy DSP teams up with the Daisy Punch for this lovely card set and portfolio.


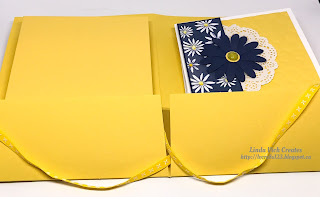
For the card portfolio, I used a 12 x 12" sheet of Daffodil Delight card stock trimmed to 11 x 9.5". I scored the long side at 2.5" from the bottom and at 5.5" on the short side and used a bone folder to really burnish the folds. Inside, I cut on the centre score line for the 2.5" piece and then cut slivers from each side to reduce the bulk when folding the portfolio.

For the front, I matted two pieces of the Delightful Daisy DSP with Night of Navy. Before adhering the mattes to the front and back covers of the portfolio, I used Tear & Tape to adhere a length of Daffodil Delight 1/4" Double Stitched Ribbon across the middle of the back and front. I then adhered the mattes using liquid adhesive.

Three additional daisies were punched, curled, and assembled as for the cards and then adhered to the front cover of the portfolio. The cards and envelopes were added inside and the portfolio tied up with the ribbon.

Linda Vich Creates: 2017 Catalog Launch Prep Part 3: First Prize. Delightful Daisy DSP teams up with the Daisy Punch for this lovely card set and portfolio.

Linda Vich Creates: 2017 Catalog Launch Prep Part 3: First Prize. Delightful Daisy DSP teams up with the Daisy Punch for this lovely card set and portfolio.

I really had a lot of fun preparing these prizes for my Catalog Launch and it was even more fun to share them with the ladies who won them!

I hope you've enjoyed reading about my preparations for the 2017 Catalog Launch. If you have visited, drop me a line below to let me know you stopped by–I'd love to hear from you!


Wednesday, April 12, 2017

Mini Egg Carton Easter Treats

Linda Vich Creates: Mini Egg Carton Easter Treats. Three cheerfully embellished mini egg cartons ready to share some Easter treats!
I was one of the lucky ones who ordered and received the mini egg cartons early into the Occasions Catalog. Today I got to use them and I'm so sorry I didn't buy more even though they are being retired!

Besides being just overly cute in their "mini-ness" they are so much fun to color using the Stampin' Spritzers!

I started by filling a Stampin' Spritzer almost to the top with 70% alcohol and then added 40 drops of Night of Navy reinker (I wanted this color to be really dark rather than muted) and shook it up.

Placing an egg carton in my "spray booth" (an old shoebox) I proceeded to spray the outside of the box. I was surprised by how well it turned out! Spraying the outside of the egg carton took about 2/3 of the mixture.

I labelled the spritzer and then mixed up another one, this time using Sweet Sugarplum and using only 20 drops of reinker. After spraying, I mixed one more batch using Tempting Turquoise, again using 20 drops of reinker. This carton took pretty much the whole batch of color but since I couldn't seem to get all the color out of the Stampin' Spritzer, I labelled it and set it aside for another time.

The cartons dried quite quickly on their own while I cut up paper to embellish the boxes.

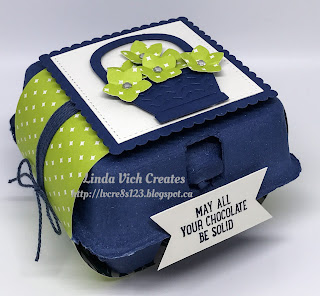
For the Night of Navy box I created a belly band using some of the new Eastern Elegance DSP. I also wound some Night of Navy Baker's Twine around the belly band, securing it with a little Fast Fuse Adhesive. I die cut a stitched square from some of the new Thick Very Vanilla using the Stitched Shapes Framelits and a scalloped square from Night of Navy using a die from the Layering Squares Framelits. These were adhered together using liquid adhesive.

The Basket Builder Framelits were used to cut the basket from Night of Navy and the flowers from the DSP. The basket was assembled using liquid adhesive and the flowers were shaped using a stylus from my Heartfelt Creations Deluxe Flower Shaping Kit.

The basket was adhered to the Very Vanilla square using Dimensionals and the flowers with Glue Dots. Rhinestones were added to the flower centres. The completed square was added to the belly band using Dimensionals. The sentiment was stamped on a strip of Thick Very Vanilla using Night of Navy and then the ends flagged using the Banner Triple Punch. It was adhered to the egg carton using Foam Adhesive Strips. I used Fringe Scissors on Night of Navy card stock to create my own fill for the egg carton.

Linda Vich Creates: Mini Egg Carton Easter Treats. Three cheerfully embellished mini egg cartons ready to share some Easter treats!

Linda Vich Creates: Mini Egg Carton Easter Treats. Three cheerfully embellished mini egg cartons ready to share some Easter treats!

Linda Vich Creates: Mini Egg Carton Easter Treats. Three cheerfully embellished mini egg cartons ready to share some Easter treats!

Linda Vich Creates: Mini Egg Carton Easter Treats. Three cheerfully embellished mini egg cartons ready to share some Easter treats!

For the Sweet Sugarplum egg carton, I started by stamping flowers on Watercolor paper using Basic Black Archival ink. After heat setting, I used my Watercolor Pencils and Clear Wink of Stella to color in the flowers, die cutting them using the Basket Builder Framelits.

The basket pieces were die cut from Tip Top Taupe and Early Espresso and assembled using liquid adhesive. The stitched square was die cut from the Succulent Garden DSP and the scalloped square from Mint Macaron. After adhering them with liquid adhesive, the basket was adhered with Dimensionals and the flowers with Glue Dots. Rhinestones were added to the centres.

Lace doily halves were added to the back of the scalloped square and then a length of the now retired Glitter Ribbon Combo was tied around the egg carton, anchoring the ribbon with a glue dot on top of the box. The squares were then adhered to the top of the box using Dimensionals. A strip of Sweet Sugarplum had its ends flagged and the sentiment was stamped with Tip Top Taupe. It was adhered to the top using Foam Adhesive Strips and rhinestones added. Fringe scissors and Mint Macaron was used for fill.

Linda Vich Creates: Mini Egg Carton Easter Treats. Three cheerfully embellished mini egg cartons ready to share some Easter treats!

Linda Vich Creates: Mini Egg Carton Easter Treats. Three cheerfully embellished mini egg cartons ready to share some Easter treats!

Linda Vich Creates: Mini Egg Carton Easter Treats. Three cheerfully embellished mini egg cartons ready to share some Easter treats!

Finally, the Tempting Turquoise egg carton was created. It was done in the same way as the previous carton but Festive Birthday DSP and Tempting Turquoise was used for the squares, Melon Mambo and Pumpkin Pie for the basket, Pumpkin Pie, Melon Mambo, Tempting Turquoise, Crushed Curry and Emerald Envy for the eggs, Chocolate Chip for the bunny and Melon Mambo 3/8" Stitched Ribbon. The sentiment was stamped with Melon Mambo on Thick Whisper Whtie. Fill was created using Melon Mambo card stock and Fringe Scissors.

Linda Vich Creates: Mini Egg Carton Easter Treats. Three cheerfully embellished mini egg cartons ready to share some Easter treats!

Linda Vich Creates: Mini Egg Carton Easter Treats. Three cheerfully embellished mini egg cartons ready to share some Easter treats!

Linda Vich Creates: Mini Egg Carton Easter Treats. Three cheerfully embellished mini egg cartons ready to share some Easter treats!

Linda Vich Creates: Mini Egg Carton Easter Treats. Three cheerfully embellished mini egg cartons ready to share some Easter treats!

Here's a final look at all three projects, though it's hard to take a photo of all three together in my Foldio 2 setup!

Linda Vich Creates: Mini Egg Carton Easter Treats. Three cheerfully embellished mini egg cartons ready to share some Easter treats!

I'm so pleased with how these all came together–I can't wait to give them to the recipients!


Friday, February 24, 2017

Marblelized Thank You Cards

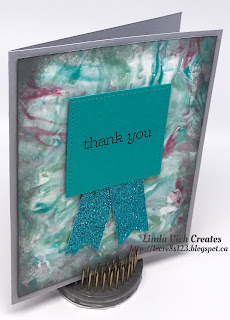
Linda Vich Creates: Shaving Cream Thank You Cards. Simple thank you cards that sport marblelized backgrounds topped with stitched sentiments with glimmer paper banners.
Today's cards use a technique that has been on my to do list for some time but which I just hadn't got around to trying. I had several cards to make so I thought that using shaving cream to produce a marblelized effect would be appropriate since several similar yet different backgrounds can be made at one time. An excellent tutorial can be found here.

The cards also use the 6 x 6" Glimmer Paper Assortment Pack, one of the new FREE Sale-A-Bration items that can be earned by placing a $60 order!

I started by cutting 4 x 5.25" mattes from Whisper White. I then sprayed shaving cream onto a foam plate (one that was larger than my matte) and smoothed the surface of the cream with a piece of cardboard saved from some packaging.

Next, I placed drops of reinker–Mint Macaron, Bermuda Bay, and Sweet Sugarplum–randomly on the shaving cream. I used a wooden dowel to drag through the drops both vertically and horizontally (and sometimes circularly). There is no right way of doing this–feel free to experiment!

I placed one of my mattes face down into the shaving cream and then removed it, checking to be sure I had color in all areas of the matte. If not, I re-dipped the matte.

I let the matte sit for a minute or two and then scraped off the shaving cream, leaving behind a marbled ink pattern. The matte was then set aside to dry while I repeated the process with other mattes.

Because the ink pattern tends to lose its crispness after producing a few mattes, I rinsed off the plate and began again. It was fun to try different "patterns" created with the wooden dowel. Sometimes I would only apply drops of Mint Macaron and Bermuda Bay, stir it with the dowel, and then add a few drops of the Sweet Sugarplum and stir it briefly with the dowel. It is important when working with colors that are complements on the color wheel, (red and green; blue and orange, purple and yellow) not to stir them together too much because the color will quickly turn to mud.

After my mattes were dry, I sponged the edges with Basic Gray ink and then adhered the mattes to standard card fronts cut from Smoky Slate.

The sentiment, from the now retired Happy Watercolor stamp set was stamped on either Sweet Sugarplum, Mint Macaron or Bermuda Bay card stock and then die cut using a square from the Stitched Shapes Framelits.

The Triple Banner Punch was used to flag the ends of Glimmer paper that matched the card stock used for the sentiment and these strips were adhered behind the sentiment. The sentiment piece was adhered to the card front using Dimensionals to complete each card.

Linda Vich Creates: Shaving Cream Thank You Cards. Simple thank you cards that sport marblelized backgrounds topped with stitched sentiments with glimmer paper banners.

Linda Vich Creates: Shaving Cream Thank You Cards. Simple thank you cards that sport marblelized backgrounds topped with stitched sentiments with glimmer paper banners.

I hope you will give this technique a try! Between colors and patterns, the possibilities are endless! What colors will you use and what patterns will you produce?


Thursday, December 29, 2016

Dragonfly Dreams Thank You

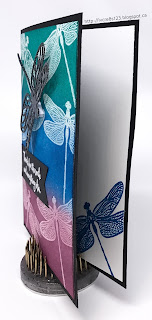
Linda Vich Creates: Dragonfly Dreams Thank You. A vibrantly blended background with emboss resist dragonflies sets the stage for a magnificent shimmery die cut black dragonfly on this thank you card.It was easy to figure out that the Dragonfly Dreams Bundle was going to be one of my "go to" sets from the 2017 Occasions Catalog! Not only is the stamp set and its sentiments beautiful but the thinlits are superb! I chose this set recently when creating a thank you card for a friend.

I started by cutting a 4.75 x 6" Basic Black card base and a Watercolor paper matte to go on top of it. Using Versamark, I stamped several dragonflies, offset, on the watercolor paper and then heat embossed them using Clear Embossing Powder.

For my next step I blended Bermuda Bay, Pacific Point and Rich Razzleberry onto the watercolor paper using Stamping Sponges. I used a paper towel to buff up the dragonflies to remove any lingering ink from them.

I die cut a dragonfly from Basic Black and then used Versamark and Clear Embossing Powder to make it really shiny. I then wanted to add some shimmer so I used the now retired Iridescent Embossing Powder.

The watercolor matte was adhered to the card front using Fast Fuse and then I popped up the dragonfly by using an adhesive strip.

The sentient was heat embossed in white on a strip of Basic Black and then the Triple Banner Punch was used to flag the end. It was adhered to the card front.

A matte was cut from Whisper White and a dragonfly was stamped in the bottom right corner using Pacific Point. The matte was adhered inside the card to complete it.

Linda Vich Creates: Dragonfly Dreams Thank You. A vibrantly blended background with emboss resist dragonflies sets the stage for a magnificent shimmery die cut black dragonfly on this thank you card.

Linda Vich Creates: Dragonfly Dreams Thank You. A vibrantly blended background with emboss resist dragonflies sets the stage for a magnificent shimmery die cut black dragonfly on this thank you card.
Close up details of the shimmer on the dragonfly.

Linda Vich Creates: Dragonfly Dreams Thank You. A vibrantly blended background with emboss resist dragonflies sets the stage for a magnificent shimmery die cut black dragonfly on this thank you card.

I'm pleased with how this card turned out and I look forward to using this set with my classes!


Wednesday, October 12, 2016

Paisley and Copper Times Three

Linda Vich Creates: Paisley Thank You. Copper embossed paisley stamps serve as the backdrop to a copper acorn on this lovely thank you card.
It happened again last night.

Lying in bed, just about asleep, I got the idea for today's card. I roused myself enough to jot down the pertinent details in my Notes app and then went back to sleep.

I was really looking forward to completing the card today but my daughter texted me early this morning to ask if I could watch Raine because she wasn't feeling too good.

Needless to say, I didn't get much done on the card today though there were a few moments when Raine felt a little better and was watching Pet Patrol on tv that I got to sneak into my craft room to start my card.

Raine appeared a little later and wanted to watch me stamp and emboss and then she decided to get out her stamping set and bring it to the craft room. I moved her table and chair in and she happily stamped beside me for about a half hour!

Linda Vich Creates: Paisley Thank You. Copper embossed paisley stamps serve as the backdrop to a copper acorn on this lovely thank you card.

Linda Vich Creates: Paisley Thank You. Copper embossed paisley stamps serve as the backdrop to a copper acorn on this lovely thank you card.

Linda Vich Creates: Paisley Thank You. Copper embossed paisley stamps serve as the backdrop to a copper acorn on this lovely thank you card.

That was the high point of the day. Later, Raine started feeling miserable again and then about half an hour before Steffan came to pick her up, she fell asleep! Poor little thing! She wasn't too happy when she had to wake up and go home.

Linda Vich Creates: Paisley Thank You. Copper embossed paisley stamps serve as the backdrop to a copper acorn on this lovely thank you card.

After supper, I finished making my card using the following steps.

To begin with, I used my Judikins Color Dusters to brush areas of Pumpkin Pie and Tempting Turquoise onto a Very Vanilla matte. Next, I used my MISTI to line up the stamps from the Paisleys & Posies on top of the matte. After using my Embossing Buddy, I stamped in Versamark and then heat embossed it with Copper Embossing Powder.

Next, I used the Acorn Builder Punch to punch the parts of the acorn from Copper Foil and Pumpkin Pie. I used the now retired Decorative Dots Embossing Folder to emboss the copper piece and then used my Score Tool to emboss lines on the top piece of the acorn. I adhered the pieces together using liquid adhesive.

I glued the paisley matte to a copper one and then to a standard Tempting Turquoise card front. Using the now retired Finishing Touches Edgelits, I die cut a strip of Tempting Turquoise. I used two Dimensionals to adhere it to the front of the card front.

A nest of Copper Metallic Thread was made and adhered to the left side of the strip. The acorn was adhered with Dimensionals over it.

I cut a small strip of Tempting Turquoise and flagged one end using the Banner Triple Punch. The sentiment, from the now retired Another Thank You stamp set, was stamped in Versamark and then Heat embossed in copper. The strip was adhered at the top of the card front using a Fast Fuse.

A Very Vanilla matte was embossed with copper and adhered inside to complete the card.

Linda Vich Creates: Paisley Thank You. Copper embossed paisley stamps serve as the backdrop to a copper acorn on this lovely thank you card.

Linda Vich Creates: Paisley Thank You. Copper embossed paisley stamps serve as the backdrop to a copper acorn on this lovely thank you card.

I'm really pleased with the final result! I love the combination of turquoise, orange and copper and the paisley stamps just are so magical!


Tuesday, August 23, 2016

Copper Congratulations

Linda Vich Creates: Copper Congratulations. A simple, masculine card, rich in both texture and color.
Today I designed a congratulatory card with hopes of giving it to my son-in-law who is waiting on the results of a job interview.

If Steffan gets the job, it will be a wonderful change for him. It will be closer to home so he can save on gas,  there will be lots of training (he would get to go to Minneapolis for two weeks!) and good opportunities for advancement. Even better, he would not have to lift a lot of heavy items so it would be better for his back.

The card itself is quite simple but I think that it makes an effective masculine card because it incorporates a lot of texture with its simplicity.

I started with a standard card base of Island Indigo. On a small piece of Island Indigo, I stamped with Versamark the sentiment from the stamp set that comes with the Watercolor Wishes Card Kit. I heat embossed it with Copper Stampin' Emboss Powder and then flagged the end using the Triple Banner Punch. I also wrapped the non-flagged end with Linen Thread and added a bow.

Cutting a piece of Copper Foil Sheet, I used the punch again and then then embossed the piece using the Petal Burst Embossing Folder.

To add even more texture to the card, I cut two pieces of the 5/8" Burlap Ribbon and angled the ends, fraying them a little. These were adhered to the middle of the card front using Fast Fuse. The embossed copper banner was adhered using Dimensionals with the sentiment banner on top.

For the inside of the card, I cut a matte from the now retired Naturals Ivory card stock. I added a further sentiment as well as some grunge from the Touches of Texture stamp set; both the sentiment and grunge were heat embossed with copper. I adhered the matte with Fast Fuse to complete the card.

Linda Vich Creates: Copper Congratulations. A simple, masculine card, rich in both texture and color.
This photo shows off the copper to its best.

Linda Vich Creates: Copper Congratulations. A simple, masculine card, rich in both texture and color.

I think that the copper works wonderfully well with the Island Indigo. I'm hopeful that Steffan will hear soon about the job and that I can give him this card!


Friday, July 1, 2016

Pop of Paradise For My Daughter

Linda Vich Creates: Pop of Paradise For My Daughter. An inked and embossed brick matte serves as the backdrop for this stunning Pop of Paradise flamingo card.
I couldn't wait to begin my summer holidays, on Canada Day, by designing a card for my daughter Courtney.

Courtney has just finished her first year of a two year course to become a Licensed Practical Nurse. Her course is actually four years compressed into two and she has been working very hard to maintain her "A" grades which is no small feat considering she and her boyfriend are also raising their own soon to be three-year-old daughter!

For Courtney's final practicum of the year, she was placed in a care home in the south end of Winnipeg. When she learned of her placement, she was a little nervous about accidentally doing something wrong there because the home was for Jewish patients and there were strict rules about not bringing any food or water into the facility unless it was kosher.

She was also worried that she might inadvertently offend a patient by doing procedures, etc. that might conflict with their beliefs.

As it turned out, the staff at the care home were completely impressed with her and could not stop telling her how well she was doing and that they had never had a student like her before!

Just before she finished her practicum, the Director of Care took Courtney aside to tell her how impressed she was with her and offered her a summer job! Unfortunately, Courtney was unable to take it because she had to look after her own daughter during the summer (as well as preparing assignments ahead of starting classes in September so she could then concentrate on studying for tests) while her daughter's daycare provider took holidays.

When Courtney explained this to the Director of Care, she was told to return after she completed her nurse training because they would offer her a job at that time! Of the group of students that did their practicum at the same care home, she was the only one who was offered a job!

We are so very proud of her so I wanted to create a special card for her.

Choosing my Brick Wall Embossing Folder, I inked up the top flap with Melon Mambo using my now retired Brayer. I did this in order to create pink grout lines between the bricks.

I carefully placed a matte of Thick Whisper White card stock on the opposite flap of the folder and closed the folder. I ran it through my Big Shot and then carefully removed the embossed and inked matte to work with it.

Oh oh . . . I'd done it again! I was making a vertical card but needed the bricks in a horizontal format. Unfortunately, I had not placed the matte in the folder correctly. So, what to do? I used this first matte as my test piece for coloring the bricks!

I used Sponge Daubers with Smoky Slate, Basic Gray, Basic Black and Melon Mambo to color the bricks. At the end, I used a Stampin' Sponge to sponge softly around the whole matte with Basic Black. I was quite pleased with how the bricks turned out!

Linda Vich Creates: Pop of Paradise For My Daughter. An inked and embossed brick matte serves as the backdrop for this stunning Pop of Paradise flamingo card.
Love the color I achieved on the bricks but too bad the
bricks were the wrong orientation for my card!
After inking/embossing another matte, I set forth to color bricks again. So what happens this time? I liked the first matte better! Oh well! I'll use the first matte in a future project.

I used my MISTI to stamp the flamingo from the Pop of Paradise stamp set in Melon Mambo on Thick Whisper White card stock. Next, I used a tip learned from fellow demonstrator, Bibi Cameron in a video on her site. I cleaned the stamp without moving it and then took a Rose Red Stampin' Write Marker and added color to the stamp on the wing, neck, body, and legs to provide shadowing.

I also used the Basic Black marker to color the end of the flamingo's beak to make it look like a real flamingo. The MISTI ensured that I was able to stamp successfully in the exact same place each time.

Linda Vich Creates: Pop of Paradise For My Daughter. An inked and embossed brick matte serves as the backdrop for this stunning Pop of Paradise flamingo card.

I then used Versamark to stamp three leaves and heat embossed them using Silver Stampin' Emboss Powder. And then came the fun part–fussy cutting the flamingo and leaves. Not so fun but effective! I applied liquid glue to the bottom of the leaves and adhered them to the matte.

The Layering Circles Framelits were used to cut a Melon Mambo scalloped matte and a plain circular matte from Silver Glimmer Paper. These were glued together with liquid glue.

Thick Melon Mambo Baker's Twine was wrapped around the matte and taped to the back. Glue dots were used to adhere a circular arrangement made from the now retired Silver Cording Trim. The circle mattes were adhered on top of this using Dimensionals and the flamingo adhered on top, also with Dimensionals.

The sentiment from the Crazy About You stamp set was stamped in Versamark on Basic Black card stock and heat embossed with White Stampin' Emboss Powder. The ends of the strip were flagged using the Banner Triple Punch. The strip was attached to the bottom of the matte with Dimensionals.
The finished brick matte was adhered with Dimensionals to a Melon Mambo matte, and then that to the front of a Basic Black card base.

I stamped with Melon Mambo on a Whisper White matte using the grunge stamp from the Touches of Texture stamp set. The sentiment was stamped with Basic Black to complete the card.

Linda Vich Creates: Pop of Paradise For My Daughter. An inked and embossed brick matte serves as the backdrop for this stunning Pop of Paradise flamingo card.

Linda Vich Creates: Pop of Paradise For My Daughter. An inked and embossed brick matte serves as the backdrop for this stunning Pop of Paradise flamingo card.

Linda Vich Creates: Pop of Paradise For My Daughter. An inked and embossed brick matte serves as the backdrop for this stunning Pop of Paradise flamingo card.

I am so very pleased with how this card turned out and can't wait to give it to my daughter!