Showing posts with label card challenges. Show all posts

Monday, February 1, 2016

Beautiful Bold Botanicals

Got the chance to play with the Botanical Builder Framelits today!

I had planned to incorporate the last woodgrain background I had created in my Rustic Wooden Valentine post but working with the woodgrain piece, I found out that it was too "heavy" for my design. Once I simplified my design idea, things came together quite quickly!

I cut a standard Basic Black card base and then a Melon Mambo matte. I chose a piece of Smoky Slate card stock to be the top matte and this is the piece I cut with the leaf edgelit die from the set.

I used Fast Fuse Adhesive to adhere the die cut matte to the Melon Mambo matte and then used glue dots to adhere a strip of the Silver Sequin Trim along the curve of the die cut edge to add a bit of zing to the design.

I knew that I wanted to create a flower and leaf cluster for the top left of the card and balance it with a smaller cluster on the bottom right of the card. Rather than waste card stock, I die cut several pieces from scrap paper. Once I had my design figured out, I cut the pieces from card stock.

I die cut the largest flower (the one that has pop up pieces on the petals) from Basic Black card stock and cut the fancy stamen piece from Melon Mambo. I also cut two ferns from the Melon Mambo.
I used my McGill Paper Blossom Tool Kit to help me shape the petals a bit. This kit has proved invaluable to me since I really like to use flowers on my cards! Unfortunately, my tweezers from the set have gone missing :(

I also used my bone folder to give a little shape to the fern fronds. I adhered the flower using a Dimensional and then adhered the flower centre and the ferns with the Fine Tip Glue Pen. I added one of the Iced Rhinestones to the very centre of the flower.

For the arrangement on the bottom right of the card, I die cut one of the smaller flowers from Basic Black card stock as well as three little flower centres that I made into tiny flowers! I cut three tiny leaves from Smoky Slate and the twisted stamen centre from Melon Mambo. The flower was adhered with a Dimensional and all other pieces were adhered with the Fine Tip Glue Pen. I added rhinestones to the centres of each flower.

I stamped the sentiment, from the Bloomin' Love Stamp set, using Jet Black Stazon because I wanted it to be really black next to the black card stock flower.

For inside the card, I cut a matte from Whisper White and used a sponge to add Smoky Slate ink to the outer edges. I used the largest "leaf vein" stamp from the Botanical Blooms Stamp Set to stamp with Basic Black Archival ink and then used Melon Mambo and the tiny flower grouping stamp to stamp over top, stamping a few times before re-inking to give depth to the stamping. The matte was adhered with Fast Fuse Adhesive to finish the card.


Once the flower design was decided, this card went together quite quickly. I like the play of contrasts in the colors and the sparkle added by the rhinestones!

I'm submitting this card for The Paper Players Challenge #280.


I'm experimenting a bit with my pictures for my blog posts. I recently purchased a Foldio 2 for taking better photos of my cards. I am liking it very much, especially since it gives better lighting to the front of my cards than my other photo setup did.

For these photos I chose a black background, for a change, which may not be the best for a black card base but from where I am viewing the images, the two blacks are different and the black card can be distinguished from its black background. I hope this translates well on the web. Please drop me a comment below about my card photos to let me know what you think!


Thursday, January 28, 2016

Have A Cuppa Valentine

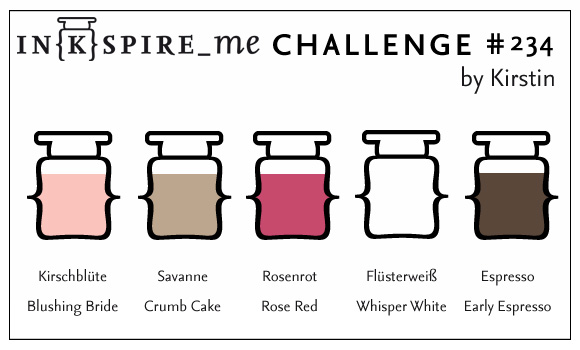
This morning I drew inspiration from the colors in the Inkspire_Me Challenge. The colors were lovely and coincided nicely with the Love Blossoms Designer Series Paper Stack. Of course they were also awesome colors for a valentine!


For this challenge, I knew I wanted to use the Cups & Kettle Framelits to create a card that represented a couple. To do this I wanted to use two cups facing each other with the steam wafting up to a heart above the cups.

The biggest challenge in creating this card was deciding on the patterned papers! Of course, all the papers in the Love Blossoms Designer Series Paper Stack coordinated but designing with patterns can be tricky. You have to choose colors and patterns wisely so that they don't overpower each other or look too busy. I finally decided on a Crumb Cake pattern for a strip at the bottom of the card and two Rose Red patterns for the cups.

I planned to divide the bottom and top by using a Blushing Bride ribbon from the Love Blossoms Embellishment Kit. This kit has all kinds of goodness in it! Satin ribbon, pearl trim, metallic doilies, sequins, glittered enamel dots as well as beautiful Rose Red bow clips!

For the upper part of the card, I needed to stamp on it so I would have chosen Whisper White but somehow all that bare whiteness was too much! That's when I got the idea to do a color wash on the background using Blushing Bride. This would give a lovely rest from the patterned paper while still providing some lovely texture.

I initially tried using the Watercolor Wash background stamp but it wasn't quite right. In the end, I decided to do a freehand wash so that I could control the amount of color I put onto the watercolor paper.

Using a flat paintbrush, I stroked on plain water to wet the watercolor paper. I then mixed clean water with some Blushing Bride reinker to create a very soft color and brushed it onto the paper. I used my heat tool to dry it and reshape it to its former flat state.

I used my heat tool to thoroughly dry the paper and then adhered a strip of Crumb Cake patterned paper to the bottom of it. I adhered a length of the ribbon over the top part of the patterned paper–it was starting to look really nice!

I used a cup die from the Cups & Kettle Framelits to die cut two cups, flipping one so that I had two cups that faced each other. I then also die cut some self-adhesive fun foam and adhered this to the back of each cup because I wanted added thickness for the cups. I used a sponge dauber and Early Espresso to ink all the edges to provide dimension and cover the white edges.

Using a Crumb Cake Stampin' Write Marker, I colored the modern heart from the A Nice Cuppa Stamp Set and stamped it at the top of the watercolor panel. I used the marker rather than the stamp pad because I wanted a looser looking, imperfect heart–one that could have been formed from steam perhaps?

At this point, I used foam tape to adhere the panel to a Crumb Cake card base. I chose the foam tape because I feel it works better with painted watercolor paper to keep it flat but popped up.

I cut a length of Metallic Gold Baker's Twine and unravelled it to get the gold thread. I placed a few glue dots on the spots that would be covered by the cups and then cut little pieces of the thread and stuck them down. Using Dimensionals, I adhered the cups and then played with the threads until they sort of stuck up like steam.

Using the banner die from the Large Numbers Framelits I cut a piece of watercolor paper. I gave it a Blushing Bride wash and dried it thoroughly. I then used Rose Red ink to stamp the sentiment. Because the sentiment stamp also contained a heart, I masked that with tape before inking and then removed it to stamp the sentiment itself. I inked the edges of the banner with Early Espresso and then adhered it across the two cups using Dimensionals.

I used the Confetti Hearts Border Punch to punch out hearts from both Crumb Cake and Rose Red card stock. I used glue to adhere them to the watercolor paper. My final task was to add little glimmer to the hearts by using my Clear Wink of Stella Glitter Brush.


I'm pleased with how this card turned out and it gave me a chance to use up a lot of patterned paper!


Wednesday, January 27, 2016

Rustic Wooden Valentine

So, have you tried the latest paper crafting trend–creating your own wood grain? A lady in my Stamping Enablers Facebook group posted a tutorial for creating your own wood grain panels using Distress inks and glue and several people have been trying the technique.

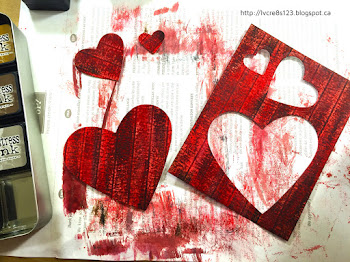
Basically, you score a piece of watercolor paper to look like planks, flip the sheet over and rub distress inks over it. You can add water to help the colors blend but that's it! I hadn't given my new mini distress inks a good work out yet so this was a good project for them!

I knew before starting that I would be using one of my panels to make a Valentine so for my first effort, I assembled a number of red inks as well as some of my neutrals. I used a strip of watercolor paper to swatch out my inks as a reference before beginning.

I wanted to use the rough side of the watercolor paper for my wood so I scored on the opposite side. I decided to use a score of every half inch.

I then started dragging my lightest red down the panel. I then alternated between my other reds, adding strips of color around the panel until I was totally satisfied. During the process, I also sprayed water a few times and blotted with a paper towel and then added more ink. I also added in some of my neutrals. In the end, I used all of these: Candied Apple, Barn Door, Fired Brick, Aged Mahogany, Hickory Smoke, Ground Espresso, and Black Soot.

This is what my first attempt looked like:

First attempt at wood tutorial

My first try and I was hooked on this technique! I decided to try a few other color combinations while I had the inks at hand. You'll probably see these used in other projects sometime soon!

Here are some more that I did:

Second attempt with additional, smaller scale, scored panel
Third attempt. I'm definitely hooked!
Eventually, I turned back to my first red panel and die cut three hearts from it, angling my hearts so that the planks ran at an angle. For the smaller hearts, it would have been better if I had had a smaller scale of wood panel because you can't see much more than one or two planks in the die cuts. I learned from this so I created a smaller scale panel for the teal color that I wanted to work with on a future project.

Die cuts from panel.
After die cutting the hearts, I inked the edges with Aged Mahogany and then used my Distress Glaze to seal the colors so that they wouldn't come off on anything else as I worked with them.

I cut a matte from Coastal Cabana and embossed it using the Happy Heart Embossing Folder. I inked the edges using Early Espresso.

On a piece of Thick Whisper White I stamped the sentiment, using my MISTI; I used Early Espresso and then Versamark, heat embossing it with Clear Stampin' Emboss Powder. To give the tag a little interest, I used the Curvy Corner Trio Punch on the corners. I then inked the edges using both Aged Mahogany and Candied Apple.

I adhered both the tag and the heart die cut to the embossed matte using Dimensionals. I tied a length of Thick Coastal Cabana Twine around the matte and then adhered it to a Early Espresso card base using Dimensionals.

For the inside, I sponged the edges of a Whisper White matte using Coastal Cabana and then adhered the two smaller hearts using Fast Fuse Adhesive and Glue Dots.


To complete the card, I added a variety of sequins to the heart and a single red heart sequin to the tag.


My card will be entered in the following challenges:


Love Theme Challenge 179 for the Paper Craft Crew.


I encourage you to try the woodgrain tutorial and then link me to your results. It's so much fun!


Tuesday, January 26, 2016

Valentine For Global Design Project

I am off work until Saturday so I am looking forward to some creative time in my craft room!

With Valentine's Day just around the corner, hearts seem to be front and centre on cards!

My card today is a 5 x 7" card designed for the Global Design Project #20.

The assignment this week is to CASE the Designer. While CASE generally means Copy And Share Everything, for the Global Design Project it translates as Copy And Selectively Edit. This enables the participants to be inspired by various things–colors, pattern or even the theme of the card–and truly make a design of their own.

I actually have a couple of ideas in mind for this challenge which I hope to work on this week but today's card has me focusing on the large heart, little hearts, and the twine from Connie's card design.

I cut a 5 x 7" card base from Crumb Cake card stock as well as a matte of 4.25 x 6.25". I cut 4.5 x 6.5" and 3.75 x 4" mattes from Very Vanilla. I also cut a small piece of Blushing Bride to go behind the smaller Very Vanilla matte.

Using a heart from the Hearts Collection Framelits Dies I die cut the smaller Very Vanilla matte. I then die cut five of the smallest heart die and punched several hearts using a punch from the Itty Bitty Accents Punch Pack. In addition, I used the Confetti Hearts Border Punch to punch some tiny hearts from Blushing Bride card stock.

I used one of my Tsukineko Fastastix Brushes to ink the edges of all the small hearts and used a Stampin' Sponge to ink the edges of both Very Vanilla mattes with Blushing Bride ink. Glue dots were used to adhere the Very Vanilla hearts around the cut out heart on the matte and then I used my Fine Tip Glue Pen to adhere the tiniest Blushing Bride hearts. I added some Wink of Stella to each Blushing Bride heart for a hint of glimmer.

Dimensionals were used to adhere the heart-encrusted matte to the Blushing Bride matte. The smaller Crumb Cake matte was adhered to the larger Very Vanilla matte using Fast Fuse Adhesive.

Linen thread was wrapped around the two mattes and secured with tape. Two Blushing Bride card stock hearts were punched and another die cut. They had their edges inked and a coat of Wink of Stella was applied to each. Once dry, the hearts were adhered on top of the linen thread using Dimensionals and glue dots. The mattes were then adhered tot he card front using Fast Fuse Adhesive.

Using my MISTI, the sentiment was stamped with Crumb Cake and Versamark on Very Vanilla and heat embossed with Clear Stampin' Emboss Powder. The sentiment was die cut using the banner die from the Large Numbers Framelits Dies. The sentiment was adhered to the bottom of the card front using Dimensionals.

A matte of Very Vanilla was cut for inside the card. A border stamp and Crumb Cake ink was used at the bottom and was heat embossed with Clear Stampin' Emboss Powder. The edges were inked with Blushing Bride and then the matte was adhered with Fast Fuse Adhesive.


I love the color scheme of this card but I'm not sure if I really like the card. I am somewhat troubled by the large Blushing Bride area inside the heart cut out but not sure what else to do with it.

Sometimes it is difficult to decide when a card is "finished!" Does this ever happen to you? Do you think this card is finished or do you have a suggestion for how I could improve it? Leave me a comment below!