Showing posts with label hearts collection. Show all posts

Friday, February 12, 2016

Final Valentine Projects

I'm finally finished! Made some treat baskets and a card for Courtney and Steffan and that's it for 2016 Valentines!

The Valentine treat baskets were very easy to assemble. I used the Berry Basket Bigz L Die with various colors of card stock and then embellished each basket by cutting four , 2 1/2" squares of patterned paper, folding each over a side of the basket. They were easily adhered with glue dots.

I made shredded paper for each basket by using my Fringe Scissors to cut strips of card stock and then crinkled the resulting pieces–so easy to make coordinated baskets this way!

Each basket had a few heart embellishments and a ribbon-tied Gusseted Cellophane Bag filled with Hershey's Kisses.

For Steffan's basket, I used Basic Black card stock with a striped patterned paper from the Neutrals Backgrounds DSP Stack. Shredded paper was white. Hearts were cut from both red and black Glimmer paper using the Hearts Collection Framelits Dies.


Courtney's basket was Garden Green and decorated with paper from the Love Blossoms DSP Stack. Rose Red shredded paper and Glimmer paper hearts–Blushing Bride and Dazzling Diamonds sponged with Rose Red– as well as Blushing Bride Sequin Trim and a Watermelon Wonder flower from the In Color Blossom Accents.


Finally, Raine's basket was made with Melon Mambo card stock and patterned paper from the Have A Cuppa DSP Stack. Bermuda Bay shredded paper was used to match the patterned paper and the hearts were all cut from Dazzling Diamonds paper and sponged with Melon Mambo and Bermuda Bay inks. A Melon Mambo 3/8" Stitched Ribbon tied in a double bow was the final embellishment.


The card that I made for Courtney and Steffan was a direct case from the card by Dawn Griffith and uses the Beautiful Ride Stamp Set. Her card was so perfect, I didn't want to change a thing! It was a fun technique to use and I can see myself using this for other cards in the future. I'll let you view Dawn's excellent video tutorial rather than repeat the directions for the card here.


I hope you enjoyed viewing my Valentine's Day projects. Hope you enjoy your February 14!


Tuesday, February 9, 2016

Punch Art Valentine

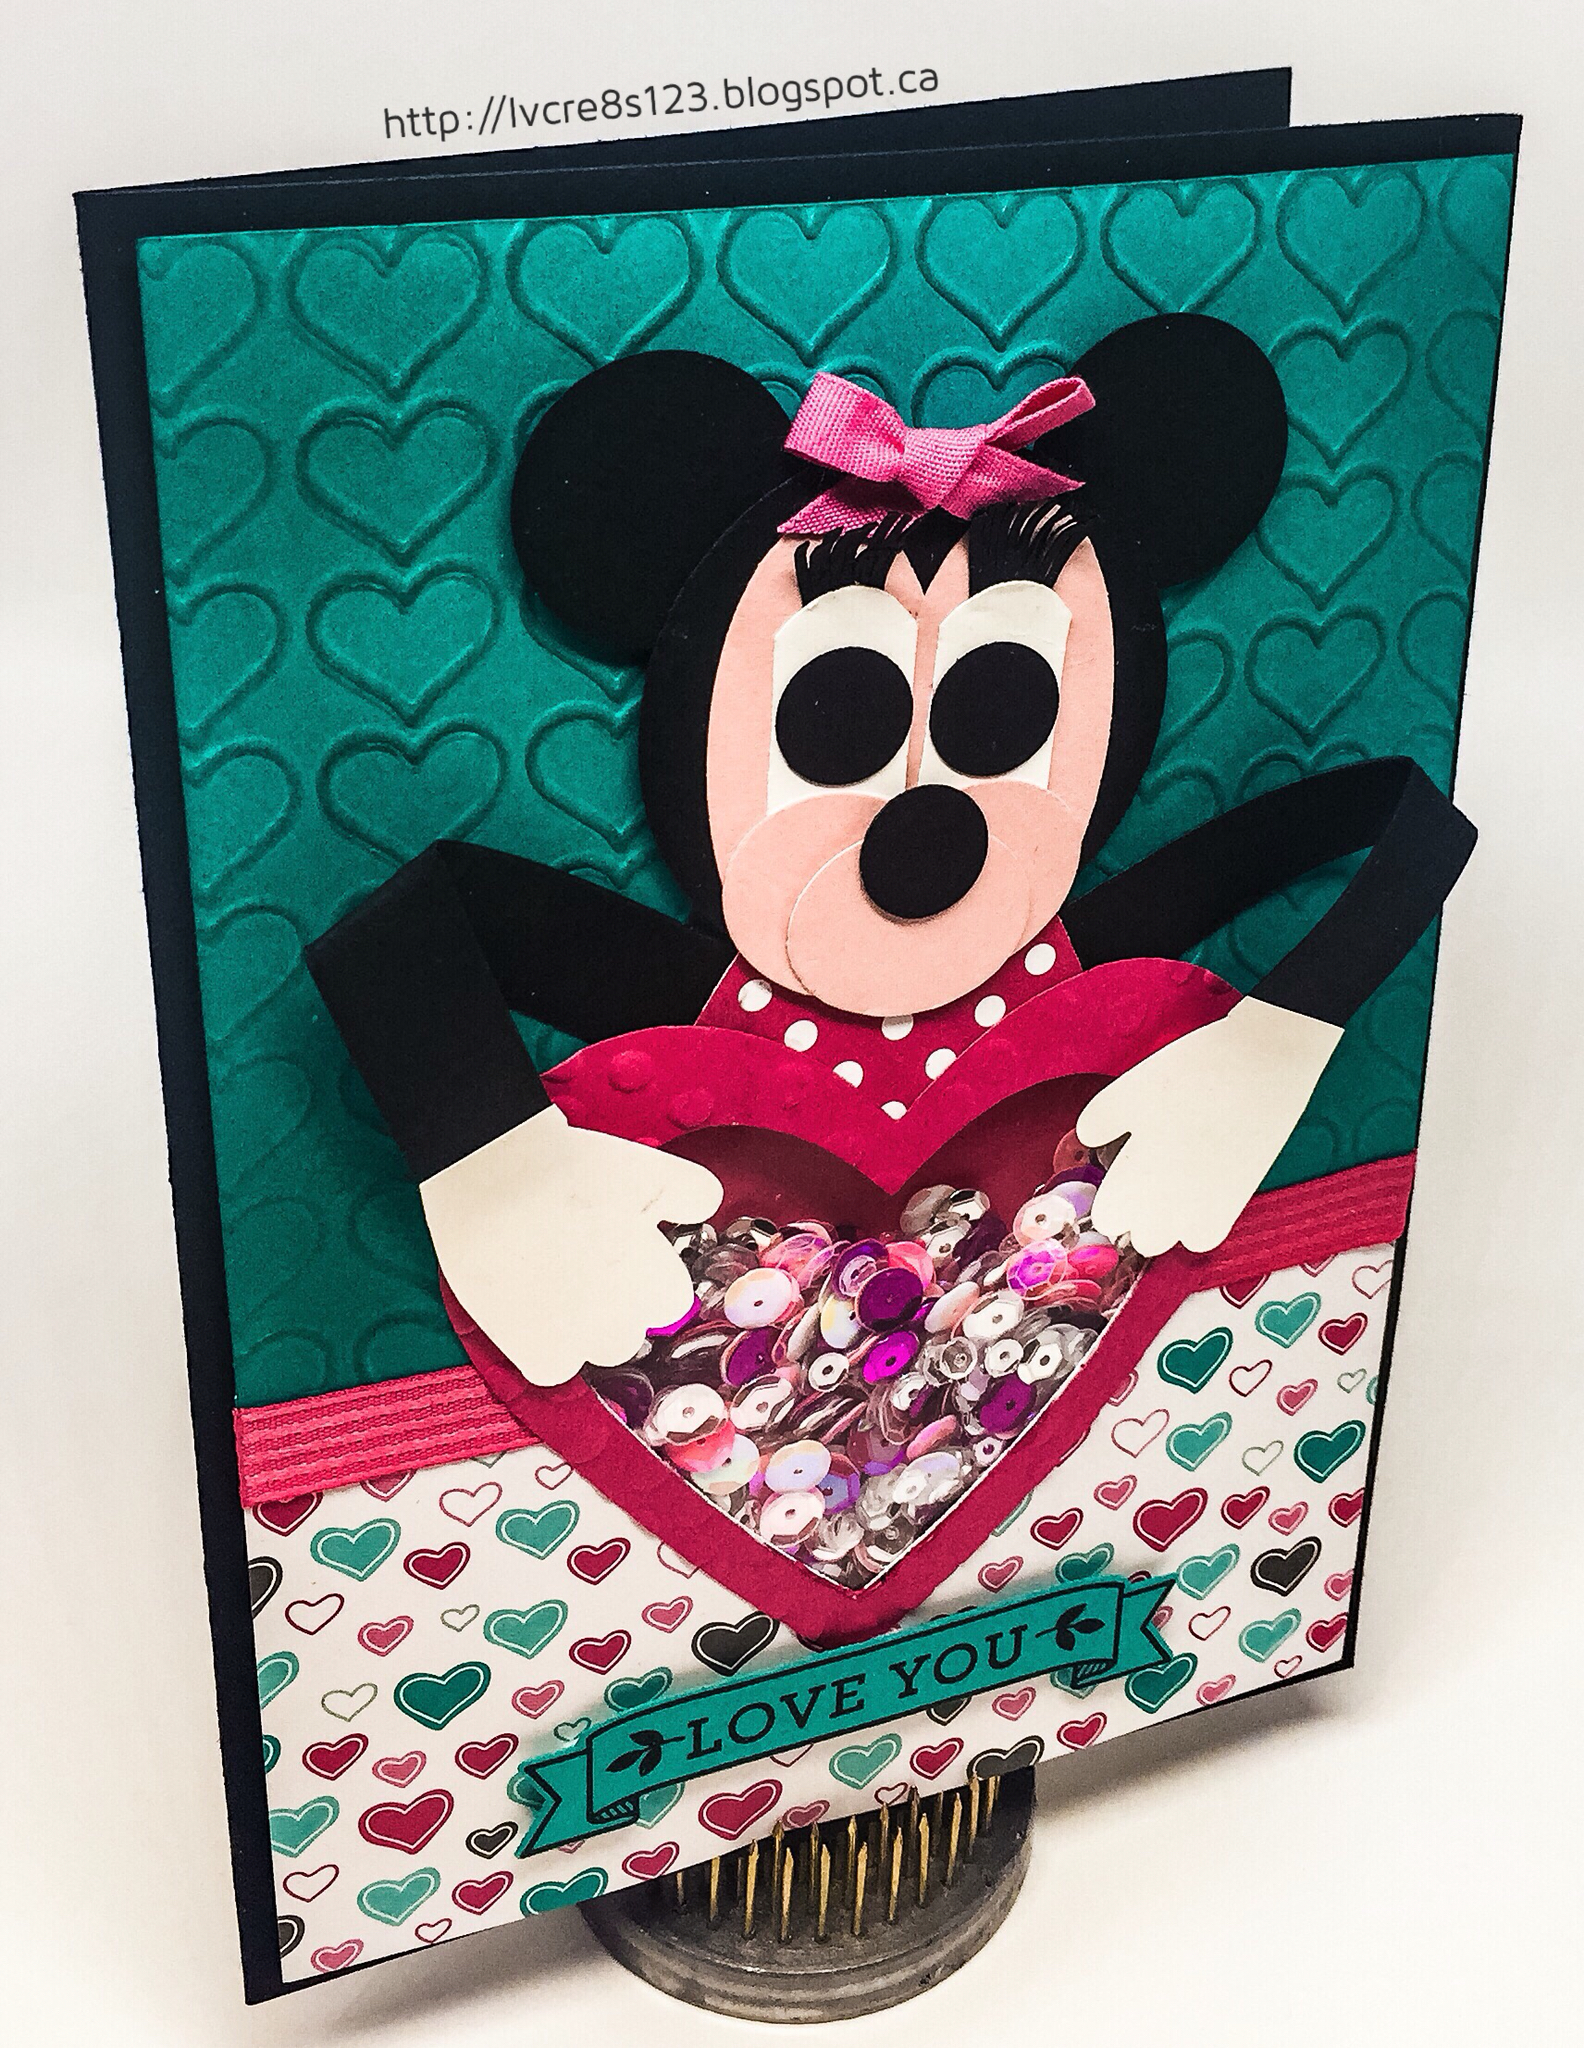
With Valentine's Day fast approaching, I sat down today to work on my personal Valentines. Of course, the first one I wanted to create was for my granddaughter, Raine.

I knew that I wanted to make a shaker card and I also knew that Minnie Mouse would be involved but I wasn't yet sure of the design.

In the last couple of days I had scoured Pinterest in search of Minnie Mouse punch art. I pinned a few but the best I found was at Sharon's Scrappy Space.

I grabbed a bunch of punches as well as Basic Black, Whisper White and Blushing Bride card stock and got ready to create. I started by punching shapes from scrap paper. Once I had settled on my design, I started punching the real stuff.

Here's the list of the punches I used to create Minnie Mouse:
  1. Head–2" Circle Punch
  2. Ears–1" Circle Punch
  3. Face–Large Oval Punch
  4. Cheeks and Snout–Small Oval Punch
  5. Whites of the Eyes–Large Oval Punch trimmed two times with the 1 1/4" Square Punch
  6. Eyes and Nose–1/2" Circle Punch
  7. Hands–Mitten Builder Punch trimmed with the 1 1/4" Scalloped Circle Punch
  8. Eyelashes–Word Window Punch trimmed with the 1" Circle Punch and scissors
  9. Arms–1/2" Basic Black strips
All parts of Minnie were adhered using Multipurpose Liquid Glue. Basic Black 1/2" strips were used for arms and The Dress Up Framelits Dies were used to cut a dress, which was later trimmed, from the Brights Backgrounds DSP Stack. A glue dot was used to adhere a Melon Mambo 1/4" Cotton Ribbon bow.

After assembling Minnie, it was evident that a 5 x 7" card was needed. I chose Basic Black for the card base. I cut a matte from Whisper White and used a strip of heart paper from the Have A Cuppa DSP Stack on the bottom of it. I chose to use Bermuda Bay card stock on the upper portion of the matte to match the designer paper.

I used the Happy Heart Embossing Folder to emboss the Bermuda Bay card stock and then sponged on some Bermuda Bay ink to bring out the texture of the raised image. I adhered both it and the designer paper to the matte using Fast Fuse.

Using Minnie and a heart die from the Hearts Collection Framelits to determine placement, I die cut a heart from the matte. In addition, I used two heart dies together to die cut a heart frame from Melon Mambo card stock. I embossed it using the Decorative Dots Embossing Folder.

I used my Fuse Tool and a square die from the Squares Collection Framelits to create shaker pocket. I inserted a piece of Melon Mambo card stock and an assortment of sequins. I used tape to adhere the pocket to the back of the die cut matte.

A length of Melon Mambo 3/8" Stitched Ribbon  was cut and it was laid across the seam made by the two papers. The ends were taped at the back of the matte and then scissors were used to cut the ribbon in half in front of the heart shaker. The excess ribbon was cut off and Tear & Tape was used to adhere the remaining ribbon pieces to the card front.

I adhered Minnie to the die cut heart frame and then used both liquid glue and Dimensionals to adhere them to the matte. The matte was adhered to the card front using Dimensionals.

The sentiment from the Bloomin' Love Stamp Set was stamped with Basic Black Archival ink on Bermuda Bay. It was die cut with the banner die from the Large Numbers Framelits Dies. The sentiment banner was adhered to the card front using Dimensionals to complete the card.

I'm pleased with how it turned out though I regret not sponging the heart frame. Oh well, I don't think Raine will notice!


Close up showing the sparkly sequin shaker mix

I hope you enjoyed reading about my process for this card. I'm off to create more Valentines!


Friday, January 29, 2016

Teal Toned Atypical Valentine

In my blog post Rustic Wooden Valentine I shared a technique I had learned for creating your own Woodgrain. I had so much fun making the first woodgrain that I made a few in other colors! Today I made use of these ones:

Panels created using the Woodgrain Technique and Weathered Wood, Peacock Feathers, Evergreen Bough and Black Soot Distress Inks.

Be sure to check Rustic Wooden Valentine if you didn't already read about the Woodgrain Technique. These colors are my favorites so I couldn't go too long without using them! I had another idea for a Valentine card that used both the larger panel for a background and the smaller panel for die cutting.

I started with a Bermuda Bay card base and adhered the background panel to it with Dimensionals. Using the Hearts Collection Framelits, I die cut three hearts from the smaller panel. I used a sponge dauber to add Black Soot Distress Ink around the die cuts.

I cut a piece of vellum to lay over the Woodgrain panel but still show the ends. I used a sentiment from the now retired Happy Watercolor Stamp Set to stamp with Versamark and then heat embossed with Silver Stampin' Emboss Powder.

I laid out my hearts on top to establish their positions and then cut some thick Bermuda Bay Twine to fasten between them. I used glue dots to attach the twine to the hearts. I applied Dimensionals to the back of each heart and then adhered them to the vellum. I then adhered the vellum to the Woodgrain panel by applying glue dots to the vellum under the hearts so that the adhesive would not show.

I adhered a selection of sequins to the vellum using glue to provide interest and a little sparkle. Gotta have sparkle!

For inside the card I used a matte of Thick Whisper White (because I had a piece the right size handy, otherwise I would have used the regular Whisper White) and used the heart from the Bloomin' Love Stamp Set to stamp with Versamark and heat emboss again with silver. I also stamped the little hearts from the Perpetual Calendar Stamp Set in Bermuda Bay. I inked the edges of the matte with more Bermuda Bay and then adhered the matte with Fast Fuse Adhesive to complete the card.


Sorry about the color here . . . it looks like Island Indigo but it really is Bermuda Bay like above!

I think that the teal tones of the Distress Inks work really well with Bermuda Bay to provide an atypical Valentine!


I am entering this in the Stamp Ink Paper Challenge #32 and I played the diagonal from the bottom left to the top right.

SIP Tic Tac Toe 32


Wednesday, January 27, 2016

Rustic Wooden Valentine

So, have you tried the latest paper crafting trend–creating your own wood grain? A lady in my Stamping Enablers Facebook group posted a tutorial for creating your own wood grain panels using Distress inks and glue and several people have been trying the technique.

Basically, you score a piece of watercolor paper to look like planks, flip the sheet over and rub distress inks over it. You can add water to help the colors blend but that's it! I hadn't given my new mini distress inks a good work out yet so this was a good project for them!

I knew before starting that I would be using one of my panels to make a Valentine so for my first effort, I assembled a number of red inks as well as some of my neutrals. I used a strip of watercolor paper to swatch out my inks as a reference before beginning.

I wanted to use the rough side of the watercolor paper for my wood so I scored on the opposite side. I decided to use a score of every half inch.

I then started dragging my lightest red down the panel. I then alternated between my other reds, adding strips of color around the panel until I was totally satisfied. During the process, I also sprayed water a few times and blotted with a paper towel and then added more ink. I also added in some of my neutrals. In the end, I used all of these: Candied Apple, Barn Door, Fired Brick, Aged Mahogany, Hickory Smoke, Ground Espresso, and Black Soot.

This is what my first attempt looked like:

First attempt at wood tutorial

My first try and I was hooked on this technique! I decided to try a few other color combinations while I had the inks at hand. You'll probably see these used in other projects sometime soon!

Here are some more that I did:

Second attempt with additional, smaller scale, scored panel
Third attempt. I'm definitely hooked!
Eventually, I turned back to my first red panel and die cut three hearts from it, angling my hearts so that the planks ran at an angle. For the smaller hearts, it would have been better if I had had a smaller scale of wood panel because you can't see much more than one or two planks in the die cuts. I learned from this so I created a smaller scale panel for the teal color that I wanted to work with on a future project.

Die cuts from panel.
After die cutting the hearts, I inked the edges with Aged Mahogany and then used my Distress Glaze to seal the colors so that they wouldn't come off on anything else as I worked with them.

I cut a matte from Coastal Cabana and embossed it using the Happy Heart Embossing Folder. I inked the edges using Early Espresso.

On a piece of Thick Whisper White I stamped the sentiment, using my MISTI; I used Early Espresso and then Versamark, heat embossing it with Clear Stampin' Emboss Powder. To give the tag a little interest, I used the Curvy Corner Trio Punch on the corners. I then inked the edges using both Aged Mahogany and Candied Apple.

I adhered both the tag and the heart die cut to the embossed matte using Dimensionals. I tied a length of Thick Coastal Cabana Twine around the matte and then adhered it to a Early Espresso card base using Dimensionals.

For the inside, I sponged the edges of a Whisper White matte using Coastal Cabana and then adhered the two smaller hearts using Fast Fuse Adhesive and Glue Dots.


To complete the card, I added a variety of sequins to the heart and a single red heart sequin to the tag.


My card will be entered in the following challenges:


Love Theme Challenge 179 for the Paper Craft Crew.


I encourage you to try the woodgrain tutorial and then link me to your results. It's so much fun!


Tuesday, January 26, 2016

Valentine For Global Design Project

I am off work until Saturday so I am looking forward to some creative time in my craft room!

With Valentine's Day just around the corner, hearts seem to be front and centre on cards!

My card today is a 5 x 7" card designed for the Global Design Project #20.

The assignment this week is to CASE the Designer. While CASE generally means Copy And Share Everything, for the Global Design Project it translates as Copy And Selectively Edit. This enables the participants to be inspired by various things–colors, pattern or even the theme of the card–and truly make a design of their own.

I actually have a couple of ideas in mind for this challenge which I hope to work on this week but today's card has me focusing on the large heart, little hearts, and the twine from Connie's card design.

I cut a 5 x 7" card base from Crumb Cake card stock as well as a matte of 4.25 x 6.25". I cut 4.5 x 6.5" and 3.75 x 4" mattes from Very Vanilla. I also cut a small piece of Blushing Bride to go behind the smaller Very Vanilla matte.

Using a heart from the Hearts Collection Framelits Dies I die cut the smaller Very Vanilla matte. I then die cut five of the smallest heart die and punched several hearts using a punch from the Itty Bitty Accents Punch Pack. In addition, I used the Confetti Hearts Border Punch to punch some tiny hearts from Blushing Bride card stock.

I used one of my Tsukineko Fastastix Brushes to ink the edges of all the small hearts and used a Stampin' Sponge to ink the edges of both Very Vanilla mattes with Blushing Bride ink. Glue dots were used to adhere the Very Vanilla hearts around the cut out heart on the matte and then I used my Fine Tip Glue Pen to adhere the tiniest Blushing Bride hearts. I added some Wink of Stella to each Blushing Bride heart for a hint of glimmer.

Dimensionals were used to adhere the heart-encrusted matte to the Blushing Bride matte. The smaller Crumb Cake matte was adhered to the larger Very Vanilla matte using Fast Fuse Adhesive.

Linen thread was wrapped around the two mattes and secured with tape. Two Blushing Bride card stock hearts were punched and another die cut. They had their edges inked and a coat of Wink of Stella was applied to each. Once dry, the hearts were adhered on top of the linen thread using Dimensionals and glue dots. The mattes were then adhered tot he card front using Fast Fuse Adhesive.

Using my MISTI, the sentiment was stamped with Crumb Cake and Versamark on Very Vanilla and heat embossed with Clear Stampin' Emboss Powder. The sentiment was die cut using the banner die from the Large Numbers Framelits Dies. The sentiment was adhered to the bottom of the card front using Dimensionals.

A matte of Very Vanilla was cut for inside the card. A border stamp and Crumb Cake ink was used at the bottom and was heat embossed with Clear Stampin' Emboss Powder. The edges were inked with Blushing Bride and then the matte was adhered with Fast Fuse Adhesive.


I love the color scheme of this card but I'm not sure if I really like the card. I am somewhat troubled by the large Blushing Bride area inside the heart cut out but not sure what else to do with it.

Sometimes it is difficult to decide when a card is "finished!" Does this ever happen to you? Do you think this card is finished or do you have a suggestion for how I could improve it? Leave me a comment below!


Wednesday, January 20, 2016

Sunburst Valentine

Can you believe that it is already the middle of January? I'm still putting away Christmas decorations but I don't feel too bad because we were a little late in getting them up this year!

Besides un-decorating, I've been enjoying a little down time and catching up with some Netflix tv series. I'm watching Prison Break and it is quite exciting!

Today, after delivering my latest workshop orders, I had the chance to play. As sometimes is the case, I started making one card but it morphed into another! The card today was to be a Valentine card but the background that I created didn't work with my concept so I will save it for another card.

Today's card is 5 x 7" and uses a Melon Mambo card base. I started by creating my heart embellishment. I chose one of the Heart Framelits Collection dies and laid it over top of my Sunburst die to see if my idea would work. It did!

I used the Sunburst die to cut out a section of Dazzling Diamonds Glimmer paper that would fit the heart die. I glued the die cut to some Melon Mambo card stock and then used the heart die to cut out the heart. I then used two heart dies, with Melon Mambo card stock, to cut out a frame for the die cut.

The frame was embossed with the retired Swiss Dots embossing folder and then I used a sponge dauber with Blackberry Bliss to ink the inside of the frame.

I used the smallest Hearts die to cut two hearts from Dazzling Diamonds Glimmer paper and then punched four hearts from Melon Mambo card stock using the heart from the Itty Bitty Accents Punch Pack.
I sandwiched a piece of Silver Metallic Thread between the two glimmer hearts as well as the card stock ones and adhered them together with Fast Fuse Adhesive. I used a sponge dauber with Blackberry Bliss to ink the edges of each complete heart.

The three heart strings were sandwiched between the heart and its frame, and the frame was adhered using Fast Fuse Adhesive.

I cut five, one inch strips of a paper from the Have A Cuppa DSP pack and adhered them to the front of the card base using Fast Fuse Adhesive.

Using the heart from the Occasions Paper Piercing Pack along with my Stampin' Pierce Mat and Paper Piercing Tool, I pierced holes around the framed heart. I then used my 1/8" Circle Punch to punch larger holes. I sewed around the heart using the 1/8" Bermuda Bay Stitched Ribbon, finishing with a bow at the top.

The sentiment from the Bloomin' Love Stamp Set was stamped with Melon Mambo on Whisper White and then die cut using the arrow die from the retired On Film Framelits Dies. A sponge dauber and Bermuda Bay was used to ink the edges.

The completed heart embellishment was adhered to the card front using Dimensionals, leaving the hearts to dangle as they may. The arrow was adhered using triple Dimensionals on one side and a single Dimensional on the heart side.


I'm entering this card in The Paper Players Challenge:


Now that it is complete, I'm quite liking this card even though it is not the card I set out to create! Have you started working on Valentine's Day cards yet? Drop me a link below and let me know!


Saturday, February 14, 2015

Valentine Round Up

Happy Valentine's Day!

I've got a lengthy post for you today, with lots of photos, but hopefully it will offer you some inspiration for planning your Valentine projects for next year! I will list the supplies for each item underneath each project rather than at the very end of the post so you can quickly locate what items you will need in order to case a technique.


Steffan's Card

Linda Vich Creates: Valentine Round Up. Watercolor washed background topped with gorgeous grunge and red glimmer hearts. Alphabet rotary stamp used for sentiment.

First up is the card I created for Steffan, my daughter's boyfriend. He's definitely a one-of-a-kind guy so I wanted his card to reflect that and not be too lovey-dovey. He loves the color black but also likes red so that's what I went with for his card.

I created a simple watercolor wash using my Aqua Pen and Smoky Slate, followed by a little Basic Gray. I added some droplets of black by flicking some Basic Black and created some larger droplets by squeezing some drops from the Aqua Pen.

I liked the effect but wanted a bit more grunge so I added a stamp from Gorgeous Grunge using Tuxedo Black Memento ink.

I used the Hearts Collection Framelits as well as the Itty Bitty Accents Punch Pack to die cut three hearts from Red Glimmer paper. I inked the edges of each with Tuxedo Black Memento ink.

I cut the watercolor matte to size and then inked the edges with Real Red. I used the Alphabet Rotary stamp to stamp the sentiment at the top using Real Red. My only regret is that the stamp does not include the # symbol so I had to go with @ instead. Otherwise, the rotary stamp is great for words or short phrases (up to 13 characters) and includes uppercase letters, numbers, and some punctuation.

I adhered the watercolor to a Basic Black matte and then wrapped the bottom with Basic Black Baker's Twine. I adhered the largest heart over the twine, using Dimensionals. The two smaller hearts were adhered to the top right using Fuse Fast adhesive.

The matte was then adhered to a Real Red card base using Dimensionals.

Using the Envelope Punch Board, I created an envelope from Basic Black and die cut two hearts. I embossed the hearts using the Tim Holtz Alterations Bubble Wrap embossing folder and adhered them to the envelope.

Linda Vich Creates: Valentine Round Up. Watercolor washed background topped with gorgeous grunge and red glimmer hearts. Alphabet rotary stamp used for sentiment.

Linda Vich Creates: Valentine Round Up. Watercolor washed background topped with gorgeous grunge and red glimmer hearts. Alphabet rotary stamp used for sentiment.


Linda Vich Creates: Valentine Round Up. Watercolor washed background topped with gorgeous grunge and red glimmer hearts. Alphabet rotary stamp used for sentiment.

Linda Vich Creates: Valentine Round Up. Watercolor washed background topped with gorgeous grunge and red glimmer hearts. Alphabet rotary stamp used for sentiment.


Built for Free Using: My StampinBlog


Courtney's Treat Bag


Llinda Vich Creates: Expanded Mini Treat Bag embellished with Painted Petals Designer Paper, fringed trim and punched Bow.


Next up is the treat bag I created for Courtney, using the Mini Treat Bag Framelits Die. What a wonderful set of dies! Not only do you get the two pieces for creating the treat bag itself, but you get 10 other pieces to use for decorating it, including two sentiment dies. These dies will prove useful in many projects throughout the year!

I altered the use of this treat bag die and actually created an enlarged treat bag by cutting two pieces of Rose Red card stock with the larger die for the treat bag and not using the smaller one. Each piece had the smaller section of the pinked edge cut off and each was scored on the smaller side at 1/2 and 1 1/4." I also cut a piece for the bottom of the bag, measuring 1 1/2 x 4 5/8", scoring it 1/2" from each end. This idea was not my own but I modified the process of creating the larger bag after viewing several different tutorials from the web.

As well as folding on the original score lines provided by the die, I did mountain and valley folds for the score lines I added. The pieces were then adhered together using Fuse Fast and the bottom piece added to finish the bag itself.

I cut a piece of the paper from the Painted Blooms Designer Pack to adhere to the front of the bag and then used the Banners Framelits to cut a banner from Blackberry Bliss and embossed it using the Happy Hearts embossing folder. I adhered the banner to the top front of the bag.

I cut a strip of Rose Red and used the Fringe Scissors on it. It was adhered over the banner at the top of the bag. A strip of Silver Glimmer paper was die cut with another of the dies from the Mini Treat Bag Framelits and adhered on top of the fringed strip.

Using the Bow Builder Punch (another new favorite of mine!) I created a bow from the matching designer paper and embellished it with a rhinestone.

I used Rose Red to stamp one of the Groovy Kind of Love hearts on Whisper White and then punched it with the Sweetheart Punch. I inked it up with Versamark ink and then heat embossed it with Clear Embossing Powder to make it glossy.

I cut another heart from Silver Glimmer paper. Both hearts were adhered to the banner using Dimensionals.

"For You" was die cut using one of the sentiments from the Mini Treat Bag Framelits. I actually cut it three times and glued the pieces together to give it added thickness. I then applied Crystal Effects to it to make it really glossy. It was also adhered to the bag with Dimensionals.

After filling the bag I attached a Blackberry Bliss clothespin from the 2014-2016 In Color Printed Clothespins.


Built for Free Using: My StampinBlog


Courtney's Card


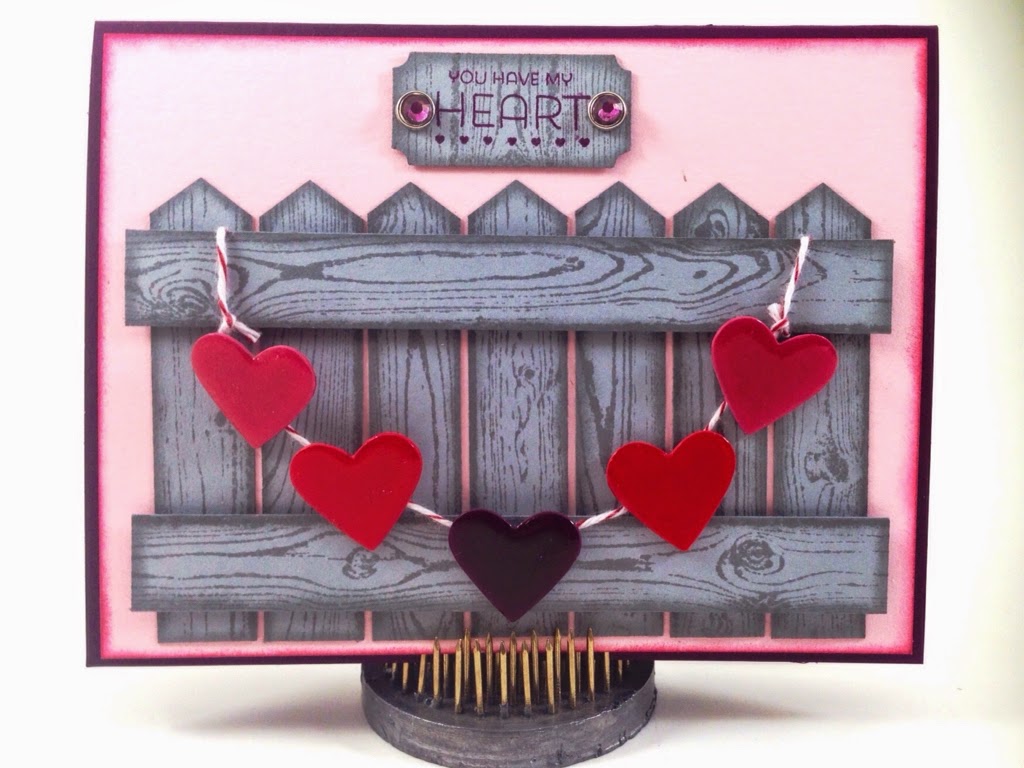
Courtney's card was a fun one to create! I used the Hardwood background stamp to stamp Smoky Slate ink onto Smoky Slate card stock. I did two separate stampings and then cut the boards apart.

The Chevron Punch was used to give a point to each board and then I cut them to size. Each board was inked with Smoky Slate ink using a sponge dauber.

I adhered the boards to a Pink Pirouette matte. To be sure I got them spaced correctly, I affixed the middle board using repositionable adhesive and then placed boards on either side, adhering them with Fuse Fast. I then removed the centre board and re-adhered it with Fuse Fast.

Two other boards were trimmed to size, inked, and then adhered with Dimensionals as cross pieces on the fence.

The sentiment from the January 2015 Paper Pumpkin kit (Filled With Love) was stamped with Blackberry Bliss ink on another piece of stamped board and then punched using the Ticket Duo Builder Punch.

I used one of the Piercing Templates from the Essentials Paper Piercing Pack to help me evenly pierce two holes, with my Piercing Tool, on either side of the sentiment and through the pink matte. I used two Candy Dots Brad Bases to attach the sentiment to the Pink Pirouette matte.

Rich Razzleberry Blendabilities were used to color two rhinestones and then I added them to the Candy Dots Brad Bases.

I die cut five small hearts, two Rose Red, two Real Red, and one Blackberry Bliss, using the Hearts Collection Framelits. I applied a coat of Crystal Effects to each to make them glossy.

To create a banner, I tied a piece of Cherry Cobbler Baker's Twine to the top horizontal board and then used Glue Dots to adhere the hearts to the twine and ultimately to the boards themselves.

The Pink Pirouette matte was inked with Rose Red and adhered to a Blackberry Bliss card base.

A matching Pink Pirouette envelope was created using the Envelope Punch Board. The flap was embossed using the Happy Hearts embossing folder. A tiny doily and Rose Red lace trim were added as further embellishment.

Linda Vich Creates: Valentine Round Up. The Hardwood Stamp helps to create a realistic fence, topped with a banner of glossy hearts. A matching wooden sign shares the card's Valentine sentiment.

Linda Vich Creates: Valentine Round Up. The Hardwood Stamp helps to create a realistic fence, topped with a banner of glossy hearts. A matching wooden sign shares the card's Valentine sentiment.

Linda Vich Creates: Valentine Round Up. The Hardwood Stamp helps to create a realistic fence, topped with a banner of glossy hearts. A matching wooden sign shares the card's Valentine sentiment.

Linda Vich Creates: Valentine Round Up.Valentine card and Mini Treat Bag.


Built for Free Using: My Stampin Blog


Raine's Card


Linda Vich Creates: Valentine Round Up: Punch art Elmo card.


My granddaughter, Raine, is currently besotted with Elmo from Sesame Street! She has a large, talking Elmo which she received for Christmas, as well as a small Elmo which came with a book. I knew that an Elmo card would be a hit with her so I scoured Pinterest for some punch art inspiration.

I first created a square card base from Real Red and used the largest scalloped circle from the Circles Collection Framelits to create the shaped card. I cut a single scalloped circle to adhere to the card front, hiding the fold of the original card base.

More circles were cut from Basic Black,Whisper White and Pumpkin Pie using either the Circles Collection or the 3/4" Circle Punch.

All pieces were adhered to the card front with Fuse Fast or Tombow adhesive and the nose was adhered using a Dimensional.

Inside the card, I used Tuxedo Black Memento ink to stamp little hearts from the Perpetual Calendar stamp set as well as a sentiment from the January 2015 Paper Pumpkin kit (Filled With Love). I used the Alphabet Rotary stamp to add her name.

To complete the inside of the card, I die cut a heart from Dazzling Diamonds Glimmer paper and adhered it with Dimensionals.


Linda Vich Creates: Valentine Round Up: Punch art Elmo card.


Linda Vich Creates: Valentine Round Up: Punch art Elmo card.


Built for Free Using: My StampinBlog


Raine's Treat Bag


Linda Vich Creates: Valentine Round Up. Dazzling Diamond Mini Treat Bag dazzles with red glimmer tag and red taffeta ribbon.


Of course, it wouldn't be Valentine's Day or a little girl without some treats so I made a simple treat bag with Dazzling Diamonds Glimmer paper using the Mini Treat Bag Framelits Dies.

I used the heart die from the same set of framelits to cut a heart shape in the front of the bag. A square of Window Sheet was adhered over this opening on the inside of the bag.

Using the Note Tag Punch I cut a tag from Red Glimmer Paper and punched a 1/4" hole for some Real Red Taffeta Ribbon. The sentiment, For You, was die cut from Dazzling Diamonds Glimmer paper and adhered to the tag.

Another piece of Real Red Taffeta Ribbon was tied in a bow at the top of the bag. Some Red Foil cellophane can be glimpsed through the heart opening and peeks out the top of the filled bag.

Linda Vich Creates: Valentine Round Up. Dazzling Diamond Mini Treat Bag dazzles with red glimmer tag and red taffeta ribbon.


Linda Vich Creates: Valentine Round Up. Punch art Elmo card accompanied by Dazzling Diamonds Mini Treat Bag.


Built for Free Using: My StampinBlog


Bob's Card


Linda Vich Creates: Valentine Round Up. A sequin-studded, jewel-toned watercolor bokeh background is embellished with a valentine heart strung on silver cords.


 The last card that I completed was for my husband, Bob. The design for his card had been "gelling" in my mind ever since I created the watercolor Bokeh background for it, back in January.You can read about the Bokeh Technique that I used in my blog post, Bokeh Technique and Sneak Peek From 2015 Occasions Catalog.

This is the result I got after creating the watercolor portion of the background, complete with the colors of Ink Refills I used:

Linda Vich Creates: Valentine Round Up. A sequin-studded, jewel-toned watercolor bokeh background is embellished with a valentine heart strung on silver cords.


This is what it looked like after I added the bokeh:

Linda Vich Creates: Valentine Round Up. A sequin-studded, jewel-toned watercolor bokeh background is embellished with a valentine heart strung on silver cords.
  

I must say that this is my most favorite Bokeh background to date! I love the swirl of dark, jewel tones topped with the three dimensional circles of white.

The Bokeh background was trimmed to size and then I used a sponge dauber to ink the edges with Tuxedo Black Memento ink.I adhered it to a matte of Silver Glimmer paper.

I punched a heart from Blackberry Bliss using the Sweetheart Punch. I added Crystal Effects to create a very glossy heart. (In retrospect, this step was unnecessary but I didn't know this at the time!)

The heart was covered with a heart punched from Window Sheet which had been stamped with White Stazon ink to add the sentiment from the Groovy Kind of Love stamp set. I used Versamark, Heat & Stick Powder and finally Silver Glitter around the edge of the heart. This was done to hide the adhesive from the 2-Way Glue Pen.

Silver cord from my personal stash was wrapped around the panel and the heart adhered with Dimensionals on top of it.

The finished matte was adhered to a Blackberry Bliss card base. Both Frosted Finishes sequins and some Sparkling Clear sequins from Pretty Pink Posh completed the front of the card.

For the inside, I adhered a Whisper White matte with sides inked in Blackberry Bliss ink. It was stamped with Versamark, using Love from the Seasonally Scattered stamp set, and heat embossed with Silver Embossing Powder.

Strips of Silver Glimmer Paper were die cut with a die from the Mini Treat Bag Thinlits Dies and were adhered at the top and bottom of the matte.

Linda Vich Creates: Valentine Round Up. A sequin-studded, jewel-toned watercolor bokeh background is embellished with a valentine heart strung on silver cords.

Linda Vich Creates: Valentine Round Up. A sequin-studded, jewel-toned watercolor bokeh background is embellished with a valentine heart strung on silver cords.

Linda Vich Creates: Valentine Round Up. A sequin-studded, jewel-toned watercolor bokeh background is embellished with a valentine heart strung on silver cords.


Built for Free Using: My StampinBlog

Well, if you have made it this far you are doing well! Thanks for hanging in there to see my collection of Valentine projects! I had a ball creating them and hopefully they have provided you with some inspiration of your own!