Showing posts with label layering ovals. Show all posts

Wednesday, July 4, 2018

Hand Delivered Card and Welcome Kit

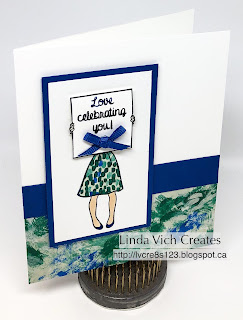
Linda Vich Creates: Hand Delivered Card and Welcome Kit. Cute little card using the Garden Impressions DSP with the Hand Delivered stamp set.
Stampin' Up really hit it out of the park with the Hand Delivered stamp set that you may order with your hostess rewards when you place a qualifying order!

This stamp set is so valuable because it can be used for a multitude of occasions: birthdays, thank you's, graduations, weddings . . . what's really great is the set includes a poster stamp that you can use for your sentiment, allowing you to choose the occasion! Talk about value for your money!

Anyway, my card was designed to welcome my new recruit! She is so excited to get started!

My inspiration for this card came from a card by Brandy Cox.

I cut a standard card base from Thick Whisper White and then cut a strip of patterned paper for the bottom of the card front using the absolutely delightful Garden Impressions DSP. If you haven't bought this DSP yet, don't hesitate! It is a gorgeous collection of bright patterns and floral images. I added a thinner strip of Blueberry Bushel card stock to act as a border between the DSP and the Whisper White background.

A small piece of the Thick Whisper White was cut, along with a Blueberry Bushel matte for it. I then stamped the girl's bottom half, skirt and legs, onto the white piece using Memento ink. I also stamped the skirt part of the image onto a small piece of DSP. This was then fussy cut and glued on top of the stamped image.

On another white piece, the poster was stamped and then the sentiment. This time, the sentiment was made up of two colors by using both my Basic Black and Blueberry Bushel Stampin' Write markers to color the stamp. After a quick "huff" onto the stamp to reinvigorate the ink, it was stamped onto the poster. The poster was then fussy cut and then the edges were touched up using the Basic Black marker.

The girl's shoes were colored with Blueberry Bushel and then her hands and legs were colored using the Ivory Blend marker.

After matting the stamped image, it was adhered to the card front using Dimensionals. The poster sentiment was also adhered using Dimensionals.

To complete the card, a small bow was made using the new Blueberry Bushel 1/8" Grosgrain Ribbon and it was attached with a glue dot.

Linda Vich Creates: Hand Delivered Card and Welcome Kit. Cute little card using the Garden Impressions DSP with the Hand Delivered stamp set.

Linda Vich Creates: Hand Delivered Card and Welcome Kit. Cute little card using the Garden Impressions DSP with the Hand Delivered stamp set.


Product List


Linda Vich Creates: Hand Delivered Card and Welcome Kit. A delightful box of goodies to welcome a new recruit, showcased in a stamp case decorated with Naturally Eclectic DSP and adorned with the Statement Of My Heart stamp.
I also created a special "kit" for my new recruit, using one of our Full Stamp Cases. For more ideas on how you can use our stamp cases, check out my post, Birthday Bouquet Card Set.

I cut a 11.25 x 7" piece of the now retired Naturally Eclectic DSP. (Making kits like this for your new recruits is a wonderful way to use up DSP and it really showcases the beauty of our Stampin' Up papers!)

Using the Statement Of My Heart stamp with Night of Navy, I stamped the sentiment on Lemon Lime Twist and then die cut it using the #4 oval in the Stitched Shapes Framelits. I matted it using a Night of Navy scalloped oval (#7 scalloped oval from the Layering Ovals Framelits).

After adhering the sentiment to the front of the DSP, I slipped it into the outer opening of the stamp case. Love the way it looks! After creating the kit, I had fun filling the case with an assortment of goodies: Dimensionals, Rhinestones, Bone Folder, Embossing Buddy, Wink of Stella Pen, Snail Adhesive and a stack of Sticky Notes.


Linda Vich Creates: Hand Delivered Card and Welcome Kit. A delightful box of goodies to welcome a new recruit, showcased in a stamp case decorated with Naturally Eclectic DSP and adorned with the Statement Of My Heart stamp.


Product List


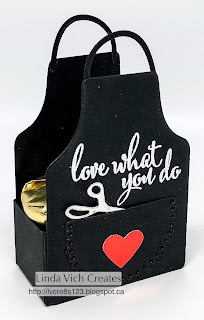
As one more treat for my recruit, I CASEd Michelle Last's apron treat boxes. So cute and so easy to make!

Simply die cut two aprons, a pocket and two neck strings. Stamp the sentiment on one of the aprons and heat emboss with White Stampin' Emboss Powder. Glue on the pocket.

From a 4 x 3" piece of Basic Black, score each side at 1" fold on all score lines. Cut "flaps" at each end and then glue flaps to form box. Adhere the box between the two aprons to finish the treat box.

Die cut the scissors from Silver Foil and add to the pocket, adhering with a glue dot.

So cute! I added a small heart, punched from the now retired Red Foil.

Linda Vich Creates: Hand Delivered Card and Welcome Kit. a cute little treat box created with the Apron Builder Framelits.

Linda Vich Creates: Hand Delivered Card and Welcome Kit. a cute little treat box created with the Apron Builder Framelits.

Linda Vich Creates: Hand Delivered Card and Welcome Kit. a cute little treat box created with the Apron Builder Framelits.


Product List

My recruit loved her card and welcome gifts! I'm looking forward to getting to know her better and to share in her Stampin' Up journey!

Tuesday, November 15, 2016

Beautiful Butterfly Birthday

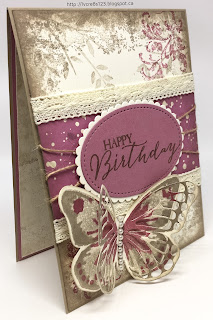
Linda Vich Creates: Beautiful Butterfly Birthday. Timeless Textures combines with beautiful butterflies to produce a elegant vintage-style card.
On Sunday it was my mother's 91st birthday. Quite a milestone! I wanted to create a very special card for her. I looked through Pinterest for ideas and decided to CASE one by Areli Johnson.

I started by cutting a 4.25 x 5.5" vertical card base from Crumb Cake. I also cut a Very Vanilla matte on which to stamp.

A stamp from the Number of Years stamp set was used to stamp a random leafy pattern all over the card stock using Sahara Sand. I then used an edge stamp from one of my all time favorite sets, Timeless Textures. I stamped this all around the edges of the card stock, again using Sahara Sand.

Choosing another stamp from the same set, I switched to Sweet Sugarplum and stamped in the top right and bottom left corners.

I cut a piece of the Playful Palette DSP and adhered it to the centre of the matte and then added some lace trim (it's a retired one from a Stampin' Up kit but it was unmarked so not sure which one) to the top and bottom of the DSP. Linen Thread was wrapped around the centre of the DSP and adhered to the back with Fast Fuse.

The sentiment, from the Butterfly Basics stamp set, was stamped with Crumb Cake on Sweet Sugarplum card stock and then die cut using an oval die from the Stitched Shapes Framelits. A scalloped oval from the Layering Ovals Framelits was die cut from Very Vanilla and adhered to the stamped oval. The finished piece was adhered over the linen thread using Dimensionals.

Next, I used my MISTI to stamp two butterflies using the Watercolor Wings stamp set. I used Sahara Sand and Sweet Sugarplum and stamped two of the same butterflies and then die cut one using the Bold Butterfly Framelits and one using the Butterflies Thinlits. The two were adhered together and then adhered to the card front using Glue Dots. A strip of pearls was added to the body.

For inside the card, I stamped a Very Vanilla matte using the same two stamps from Timeless Textures but stamped each in Sahara Sand after first stamping off. I also stamped the smaller butterfly, from the Butterfly Basics stamp set, two times using Sweet Sugarplum. One was die cut using the Bold Butterfly Framelits, and one using the Butterflies Thinlits. This was adhered near the top of the matte (not the best place as I discovered!) to complete the card.

I also decided to stamp the envelope and used my Envelopes Liners Framelits to line the envelope with matching paper.

Linda Vich Creates: Beautiful Butterfly Birthday. Timeless Textures combines with beautiful butterflies to produce a elegant vintage-style card.

Linda Vich Creates: Beautiful Butterfly Birthday. Timeless Textures combines with beautiful butterflies to produce a elegant vintage-style card.

Linda Vich Creates: Beautiful Butterfly Birthday. Timeless Textures combines with beautiful butterflies to produce a elegant vintage-style card.

I'm pretty pleased with how the card turned out! Who wouldn't love a combination of Timeless Textures and butterflies?

Here's a picture of my Mom carefully studying the card I gave her.


And here is a picture of her holding one of the nighties I gave her!


All in all I think my mom had a happy day!