Showing posts with label snowflake card thinlits dies. Show all posts

Tuesday, December 9, 2014

Time To Catch Up

Wow! It's long time since I've been here! So busy this time of year with work, shopping, and prepping items for my Stamping Group which met last Friday for our last time before Christmas. I couldn't show you any of these items beforehand because it would have ruined the surprise but now I can!

I made some Tea Light Holders for each of my ladies, using both the Silver and Gold Fancy Foil Designer Vellum and the Curvy Keepsakes die. I made a different type of tea light holder in Candle, Candle, Burning Bright.

Linda Vich Creates: Time To Catch Up

Linda Vich Creates: Time To Catch Up

I also prepared Christmas cards for each of my ladies using the Festival of Trees stamps and punch bundle. That set is getting quite a work out this season! You can view another card using the bundle in Trimming The Trees.

Linda Vich Creates: Time To Catch Up

Linda Vich Creates: Time To Catch Up

Next are the two cards which we made at our stamping group on Friday night.

This first card was cased in entirety from Justin Krieger's wonderful creation. Justin's card was lovely and I just didn't want to change anything–colors, design, etc.

One thing I did do, though, was to use the digital version of the Designer Paper he chose from the Motley Monsters pack. When I read his list of materials, I was quite surprised that the Bermuda Bay star paper came from that package. Because I knew I would not use the other papers, I opted to purchase the digital version and printed it off on Whisper White card stock, a much cheaper alternative at $5.50 instead of $13.50.

Card Designed by Justin Krieger http://jkcardsonline.com/2014/11/paper-craft-crew-117/

The second card was cased from Stampin' Up! demonstrator Jan McQueen. I loved her card and as I had never made a shaker card before, I decided that this would be the one to try! Instead of using the muted colors of the All Is Calm paper pack, I opted for traditional Christmas colors of red and green. I had to add a few non Stampin' Up! sequins into the shaker because there were none available in the two greens or the red that I chose. The other sequins came from the Frosted Sequins pack. (My shaker card below does not have any red sequins because I didn't have any at the time I made my sample card.)

Linda Vich Creates: Time To Catch Up

My ladies definitely had fun working on these two cards:

Linda Vich Creates: Time To Catch Up

Linda Vich Creates: Time To Catch Up

After completing their cards, it was time for our annual Christmas Tag Exchange! Each lady designed one tag and reproduced it for each member of the group. We lay out all our tags so they can be viewed and then we take turns describing how our tags were made and what materials (doesn't have to be from Stampin' Up!) we used to create it. This is my favorite part of our Christmas meeting!

Linda Vich Creates: Time To Catch Up

Here are some closeups of the tags. Mine are the shaker cards after the snowflakes.

Linda Vich Creates: Time To Catch UpLinda Vich Creates: Time To Catch Up

Linda Vich Creates: Time To Catch UpLinda Vich Creates: Time To Catch Up

Linda Vich Creates: Time To Catch UpLinda Vich Creates: Time To Catch Up

Of course, the evening would not be complete without some Christmas goodies:

Linda Vich Creates: Time To Catch Up

And a group shot:

Linda Vich Creates: Time To Catch Up

A fun evening was had by all!


Tea Light Holders Supplies

Built for Free Using: My Stampin Blog


Christmas Card Supplies

Built for Free Using: My Stampin Blog


Tag Supplies

Built for Free Using: My Stampin Blog


Card #1 Supplies

Built for Free Using: My Stampin Blog


Card #2 Supplies
Built for Free Using: My Stampin Blog

Tuesday, November 11, 2014

It's All About The Sparkle

Mojo Monday definitely is living up to its name for me! Did a quick review of the various Monday challenges and fell in love with this sketch.


I knew just what I wanted to do with it, other than picking the designer paper and deciding which card stock to use for the base and which for the matte. I also tried several different ribbon choices until I felt I had the best one. The card came together quickly after these decisions.


Linda Vich Creates: It's All About The Sparkle

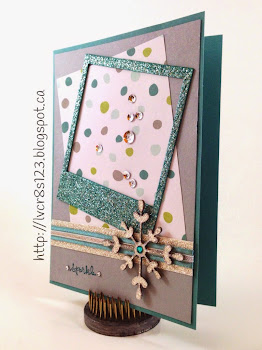
I started with a Lost Lagoon card base of 5 x 7." I cut a matte from Smoky Slate and a piece of All Is Calm Designer paper (love that stuff!).

I used the On Film framelits to cut a polaroid frame from Silver Glimmer paper. I also cut a 3/4" strip and a snowflake from the Glimmer paper. The snowflake is from the Snowflake Card Thinlits Dies, a beautiful set of framelits.

Because I found the frame and snowflake to be so flimsy, I also cut two snowflakes and two frames from Kraft card stock. I glued the two duplicate Kraft die cuts together and then glued the Glimmer paper die cuts on top. In retrospect, I should have cut the duplicates from Smoky Slate card stock instead of Kraft; because you could see some of the edge of the Kraft, I had to color it using a Smoky Slate Blendabilities marker.

I colored the frame using the darkest Coastal Cabana Blendabilities. I love how you can easily change the color of the Glimmer paper by using the Blendabilities and you still get that great glittery effect!

Look at that wonderful sparkle!

Linda Vich Creates: It's All About The Sparkle

I adhered the both Designer paper and the frame to the Smoky Gray matte. I then added the strip of Glimmer paper layered with first Lost Lagoon Ribbon and finally by Silver 1/8" Ribbon. I then adhered the matte to the card front.

I dropped a smattering of All Is Calm silver sequins within the polaroid frame, being sure I had an odd number. I find that dropping sequins from a height above the paper surface gives me a good random pattern, better than what I could come up with myself! I snapped a picture with my camera just to be on the safe side, and then adhered the sequins with a bit of Crystal Effects.

I adhered the snowflake and then added a rhinestone which I had colored with the Coastal Cabana Blendabilities marker.

Linda Vich Creates: It's All About The Sparkle

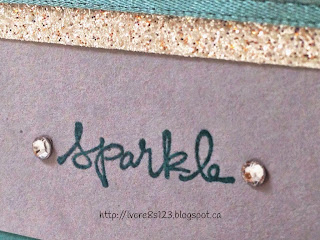
I chose the sentiment from the Good Greetings Hostess stamp set. I inked it first with Versamark and then Bermuda Bay before stamping it on the bottom left of the matte. I heat embossed it with clear embossing powder. I find that the new stamp pads dry too quickly to emboss well so I use a layer of Versamark and then the regular ink so that the stamped image catches more of the embossing powder.

The final touch was to add two small rhinestones on either side of the sentiment.

Linda Vich Creates: It's All About The Sparkle


I just love all the sparkles on this card–the frame, the snowflake, the sequins, the ribbon and the rhinestones bracketing the sentiment! Hope you like it too!

Linda Vich Creates: It's All About The Sparkle


Built for Free Using: My Stampin Blog

Thursday, November 6, 2014

Autumn Thank You

The past few days it seems that I've been alternating between a parka and a fall-weight coat. Accordingly, I have been creating both Christmas and fall cards!

Today I created a card which allows me to enter it into two different card challenges.

Over at the Paper Craft Crew blog, they posted a sketch challenge today; at Stampin Up Only Challenges, the #109 challenge was a theme: "Thanks" or "Thanksgiving."

Paper Craft Crew Card Sketch 117

Because I wanted to use a particular color scheme, I focused on finding that first. I had pinned this color combo about a week ago:

Color combo I love

I love the contrast between these colors!

Once I knew my colors, it was simply a matter of deciding which color would go where. In the end, I stayed pretty true to the sketch and color scheme I had selected, with the exception of some Mossy Meadow on the pumpkins and the addition of Whisper White and the neutral tone of the Burlap Ribbon.

I used Tangelo Twist for the card base with a matte of Blackberry Bliss which I embossed with the now retired Vine Street Embossing Folder.

I mounted a piece of Back To Black Designer Paper on Basic Black card stock and adhered it to the embossed matte. Over that I ran a piece of Burlap Ribbon topped by the skinny Basic Black ribbon, complete with a bow.

The pumpkins were stamped with Tangelo Twist and the stems colored in with a Mossy Meadow Stampin Write Marker. I used the framelits to cut out the pumpkins and then popped them up with Dimensionals.

I used two different banner framelits–one from the Banners Framelits themselves and one from the Snowflake Card Thinlits Dies–for the sentiment. The sentiment was from the Lots Of Thanks stamp set, stamped in Blackberry Bliss.

To complete the card, I added three Candy Dots. Though they were Pumpkin Pie in color, they blended nicely with the Tangelo Twist.


What blogs host your favorite card challenges? Let me know in the Comments below!

Built for Free Using: My Stampin Blog

Thursday, October 30, 2014

Homespun Christmas

Hey there! How have you been? It's been a couple of busy days for me at work but I found a little time today to create.

In my last blog post, I had entered a card challenge over at Pals Paper Arts. I found it to be a very motivating and creativity-stirring activity. Though my card was not chosen for one of the three card picks, I'm not lamenting. I was thoroughly delighted with the card I created and I received some lovely comments on it.

Today, I'm trying another challenge from Mojo Monday. This challenge presented a tall and skinny card sketch.

Linda Vich Creates: Homespun Christmas

I have always been drawn to non-standard sized cards but this one had me envisioning it flipped on its side. That's the beauty of a sketch . . . you can play with it, rotate it, flip it, move things around, substitute things . . .

My thoughts for this card turned to that of an old, country Christmas, one that included plenty of simple, home made decorations.

I chose a card size of 6 x 3 1/2" and created my card base using Kraft card stock. I trimmed the bottom of the card front by 3/4" so that I could display a colorful strip of paper adhered to the inside. I used a piece of paper from the Trim The Tree Designer Pack that reminded me of a cozy quilt.

I cut a Kraft matte for the front, equal in size to the trimmed card front. To this I adhered another piece of that designer paper, this one trimmed so that 3/8" of Kraft was still showing.

Keeping with the country theme, I attached a strip of the Burlap Ribbon and on top of that I ran a strip of the now retired Cherry Cobbler Core'dinations card stock. I embossed it with the Perfect Polka Dots Embossing Folder and then sanded the dots.

I created three, 3D trees to place on this strip. To do this I used the tree framelit from the Snowflake Card Thinlits Dies. Keeping to the country theme, for each 3D tree, I cut four trees from a gingham paper. I trimmed the trunk from all the trees and then vertically scored three of the four trees in each tree set.

I put Tombow glue on one half of a tree and adhered another tree half to it. This was repeated until only the non-scored tree remained. It was glued to the two remaining halves to serve as the tree base. A glue dot was used to adhere a gold foil star to the tree top. The stars were cut with a punch from the now retired Merry Minis Punch Pack. The trees were popped up with Dimensionals on the strip.

I used three burlap fibers to tie in a bow around the entire matte. I got the fibers by cutting off the bound edge of a length of the ribbon and then extracted some burlap strands. The matte was then mounted on the card front.

To complete the card, Christmas Wishes from the Ornamental Pine stamp set was stamped in Cherry Cobbler on the Kraft strip not covered by designer paper.

Linda Vich Creates: Homespun Christmas


Linda Vich Creates: Homespun Christmas


What do you think? Does this remind you of a country Christmas? Leave me a comment below!

Built for Free Using: My Stampin Blog