Showing posts with label thoughtful branches. Show all posts

Monday, January 30, 2017

So Detailed With Stamped Embossing

Linda Vich Creates: So Detailed With Stamped Embossing. Tempting Turquoise and Whisper White provide a fresh color scheme for this card that pairs stamped embossing with the So Detailed Thinlits.
Today's card uses a technique called Stamped Embossing which I used on the cards on the blog post, Catalog Party Prep Part 5.

Because I wanted a fresh and clean color scheme, I chose to use Tempting Turquoise and Whisper White. I started bu cutting the following:

  • Tempting Turquoise card base, 4.25 x 5.5"
  • two, 4 x 5.25" mattes, one Whisper White, one Thick Whisper White
Choosing the Thick Whisper White matte, I embossed it using the Petal Burst Embossing Folder. Then, using a stamp from the now retired First Sight stamp set, I lightly stamped repeatedly over the embossed paper, continuing until it was necessary to ink up again and then stamping some more until I was pleased with the resulting pattern I achieved.

I then die cut a piece of Tempting Turquoise with a die from the So Detailed Thinlits. I used some Removable adhesive to hold the die cut in place over the matte and then used my Simply Scored tool to score on either side of the matte so that I could fold the die cut edges neatly and adhere them at the back of the matte. The matte was adhered to the card front using Dimensionals.

Using my MISTI, I stamped the sentiment, from the now retired Thoughtful Branches, on Thick Whisper White using Tempting Turquoise and then Versamark, finishing by heat embossing with Clear Stampin' Emboss Powder. The sentiment was the die cut using a circle from the Stitched Shapes Framelits. The sentiment was adhered with Dimensionals over the So Detailed die cut.

For the inside of the card, the Whisper White matte was stamped using stamps from the Touches of Texture stamp set. Unfortunately, I got some extra ink on the edge of the flower stamp and it stamped onto the matte. :(

Linda Vich Creates: So Detailed With Stamped Embossing. Tempting Turquoise and Whisper White provide a fresh color scheme for this card that pairs stamped embossing with the So Detailed Thinlits.
Photo shows ink smudge above flowers

I really didn't want to stamp the matte again so I used my trusty Mono Sand Eraser to lightly erase the ink smudge.

Linda Vich Creates: So Detailed With Stamped Embossing. Tempting Turquoise and Whisper White provide a fresh color scheme for this card that pairs stamped embossing with the So Detailed Thinlits.
Ink smudge removed thanks to the Mono Sand Eraser

After adhering the finished matte inside the card, I added a few sequins to the card front to complete the card.

Linda Vich Creates: So Detailed With Stamped Embossing. Tempting Turquoise and Whisper White provide a fresh color scheme for this card that pairs stamped embossing with the So Detailed Thinlits.

Linda Vich Creates: So Detailed With Stamped Embossing. Tempting Turquoise and Whisper White provide a fresh color scheme for this card that pairs stamped embossing with the So Detailed Thinlits.

Linda Vich Creates: So Detailed With Stamped Embossing. Tempting Turquoise and Whisper White provide a fresh color scheme for this card that pairs stamped embossing with the So Detailed Thinlits.


Friday, December 30, 2016

My 12 Favorite Projects From 2016

As we reach the end of the year, it is both a time for reflection and goal setting. I'd like to take this opportunity to look back at the projects I've created this year. Be sure to click on each image to be taken to the pertinent blog post for all the details.

January

My favorite for January is actually a tie for two images! I absolutely fell in love with the Sky Is The Limit stamp set and knew that I would use it often–it was perfect for masculine cards!


In creating a Valentine for a man, it is sometimes difficult to create a card not full of flowers and frilly hearts! For this card, I felt that the combination of Kraft card stock and black worked well for a masculine Valentine. You can see that I managed to squeeze in a few flowers but they are "masculine" flowers! I also think that the the various textural elements work well for a masculine card.


February

My favorite for February is one that earned me the Top Picks award for the Stampin' Royalty challenge #316.


March

Anyone that knows me well knows that I am partial to unusual combinations, whether that be food, colors, textures, etc. For the Global Design Project #025, I was required to use a color combo that I wouldn't have picked for myself. In working with it, I chose to use the Brick Wall embossing folder as an actual wall as a backdrop for a window that showcased a very simple stamp set–Vivid Vases. I was very pleased with my completed card!


April

My favorite for April also uses the Brick Wall embossing folder but the card it is used on is totally different. This particular card enabled me to take part in an International Blog Hop organized by Kylie Bertucci! I also enjoyed trying a new technique–painting with alcohol in my Aqua Pen and reinkers.


May

My favorite for this month was the project I designed for the International Blog Hop that I mentioned  previously. I utilized my all time favorite color, Blackberry Bliss, and added a lot of textural and glitzy elements to put this gate fold card over the top!


June

My favorite for this month actually comes from a set of cards I created as a prize for my Catalog Launch Party! The technique that I used was new to me but it was oh such fun! The technique involves using an embossing folder with a large surface, in this case butterflies, and then stamping very lightly several times over the entire embossed image using a a flourish stamp. The stamping is repeated until the ink is totally used up on the stamp and then it is re-inked and stamped again. This technique provides a lot of dimension.


July

July's favorite card also uses the Brick Wall embossing folder and makes uses of several textural elements to create a truly dimensional card.


August

My favorite for this month combines both colors and textures and uses a bundle, Thoughtful Branches, that I was very disappointed was available for only a short time.


September

September's favorite also uses the Thoughtful Branches Bundle as well as a a dots stamp from the Swirly Birds stamp set. It is a fun technique that produces a lot of texture and color.


October

My favorite for October uses a combination of Kraft card stock and black in a non-traditional sort of Christmas card. I think this card would work well for a masculine card but I know that I would love to receive a card like this one as well!


November

My November favorite is a card I taught at one of my stamp groups. It uses a lot of textural elements–embossing, die cuts, ribbon–to produce a pleasing Christmas card!


December

Though my cards for December were few and far between, I do have a favorite. The card was my first use of a new stamp set from the Occasions Catalog, Beautiful You, and also my first play with the new Watercolor Pencils. In addition, I also got to use the Stitched Shapes Framelits which I absolutely love!


I hope that you've enjoyed my review of my favorite stamping projects throughout 2016! I said at the beginning of this post that the end of the year was a time for both reflection and goal setting. The review of my favorite projects takes care of reflection.

I am hoping that you, my blog readers, will help me with goal setting. I would like to know what sorts of techniques and projects you would like to see and read about in the 2017. This will help me to formulate my goals for the coming year! I would appreciate you leavng me a comment below.

I wish each and every one of you a Happy New Year and all the best for 2017!

Sunday, November 13, 2016

Stamp Club November Projects

Linda Vich Creates: Stamp Club November Projects. Santa's Sleigh Z fold card in dramatic tones of Whisper White and Night of Navy with accents of silver foil and both silver and dazzling diamonds glimmer paper.
I kept my stamp club ladies were very busy on Friday night assembling their card projects! Due to the complexity of one of the cards, I die cut all but the sentiment pieces for both cards–my Big Shot was smoking!

Our first card was CASEd from Olga Cavanaugh and the idea of using acetate for the z fold strip was CASEd from Chlo's Craft Closet. A Night of Navy card base was cut at 4.25 x 11" and scored at 2.75" and 5.5". A 1 x 11" strip of Whisper White was also cut and scored in the same way. (Note that the example photos here show an acetate strip in use but a Whisper White strip was used in class so it was easier with which to work.)

Using the MISTI, the sentiment from the Christmas Pines stamp set was stamped with Night of Navy on Thick Whisper White. The stamp was then cleaned and the sentiment re-stamped using Versamark. It was heat embossed using the now retired Iridescent Embossing Powder. The sentiment was then die cut using one of the ovals from the new Stitched Shapes Framelits.

I absolutely LOVE these new stitched framelits! The stitching is so crisp looking and I even saw that in one post on Pinterest, a demo had actually stitched with thread using one of these dies–totally amazing! If you haven't yet bought them, contact me to order yours today–you won't regret it!

This Z Fold card required four Whisper White mattes in total–two, 4 x 5.25" and two, 2.5 x 4". On one of the smaller ones, the clump of birch trees from the Thoughtful Branches stamp set were stamped. On one of the larger panels, the two-step stamping of five pine trees from the Thoughtful Branches stamp set was done. The last large matte, which is used for the back of the card to give the sender a place to write, was stamped also with the pine trees, but this time there were only two, offset to the bottom right of the matte. All stamping was done with Night of Navy. All four mattes were then adhered to the card base. The die cut sentiment was adhered to the panel with the five pines using Dimensionals.

The sleigh from the Santa's Sleigh Framelits was die cut from Night of Navy and the ornate sleigh overlay was cut from Silver Foil paper. The dryer sheet method was employed and worked beautifully to successfully cut and remove these fragile die cuts from the dies.

To adhere the foil overlay to the sleigh die cut, Connie Stewart's "Sponge in Tupperware Gluing System" (this is what I am calling it until I find a better name!) worked great! No mess, no fuss, and easily adhered! If you haven't yet tried this technique, you need to because it is fantastic!

Next, six deer were die cut from Dazzling Diamonds Glimmer paper and then six wreaths to clothe the necks of the deer were die cut from Night of Navy. The wreaths were slipped over the necks of the deer, eased past the nose, and adhered with a glue dot.

Two, 1 x 1" presents were cut from both Night of Navy and Silver Glimmer Paper. Matching bows were die cut and then adhered to the presents using glue dots. The present stack was designed and adhered together and then adhered to the sleigh.

The 1 x 11" strip of Whisper White–or in the card shown here acetate–was laid across the closed card. The 5.5" scored section was adhered only to the small front panel section of the card. The other end of the strip was then adhered to the back panel of the card.

The sleigh was adhered to the strip on the front panel and two deer followed it, all adhered with glue dots. The remaining deer were adhered to the middle and end sections of the strip.

To complete the card, a retired Winter Wonderland embellishment was adhered to the front of the card to act as a star.

Linda Vich Creates: Stamp Club November Projects. Santa's Sleigh Z fold card in dramatic tones of Whisper White and Night of Navy with accents of silver foil and both silver and dazzling diamonds glimmer paper.

Linda Vich Creates: Stamp Club November Projects. Santa's Sleigh Z fold card in dramatic tones of Whisper White and Night of Navy with accents of silver foil and both silver and dazzling diamonds glimmer paper.

Linda Vich Creates: Stamp Club November Projects. Santa's Sleigh Z fold card in dramatic tones of Whisper White and Night of Navy with accents of silver foil and both silver and dazzling diamonds glimmer paper.

Linda Vich Creates: Stamp Club November Projects. Santa's Sleigh Z fold card in dramatic tones of Whisper White and Night of Navy with accents of silver foil and both silver and dazzling diamonds glimmer paper.

I was pleased with how the card turned out and each stamp club member seemed delighted with their own constructed version!


Our second card was CASEd from Katina Martinez. This card is a one layer standard sized card with the card base cut from Thick Whisper White.

Using the MISTI, the sentiment, from the Tin of Tags stamp set, was stamped on Basic Black using Versamark and then heat embossed using White Stampin' Emboss Powder. The Embossing Buddy was used before stamping to ensure a "clean" emboss. The sentiment was then die cut using the 2nd largest oval from the Stitched Shapes Framelits. A second oval, using the largest stitched oval die, was die cut from Thick Whisper White. The two ovals were adhered together using liquid adhesive.

A small die from the Pyramid Pals Framelits was used to die cut seven Basic Black "light bulbs". In addition, seven more bulbs were die cut from Real Red, Melon Mambo, Pumpkin Pie, Crushed Curry, Cucumber Crush, Tempting Turquoise and Rich Razzleberry.

On each of the colored bulbs, the bottom section was snipped off with scissors and then the colored bulbs were adhered to the black bases using liquid adhesive. Matching ink was used to ink the edges of each light bulb using sponge daubers to create a glow effect. Each light bulb was given a coat of Clear Wink of Stella and then a Dimensional was applied to its back.

The die cut sentiment was adhered to the card front and then the positioning of the bulbs around the sentiment was pre-planned. A glue dot was used to anchor one end of gold twine (from the Baker's Twine Trio Pack) under the edge of the oval die cut and then the twine was twisted to form a loop. A glue dot was affixed to the card front and the twine adhered and a bulb adhered on top to hide the glue dot. This process was repeated around the sentiment until all the bulbs had been used. Another glue dot secured the end of the twine under the die cut sentiment.

Using a small paint brush, Crystal Effects was brushed liberally onto each light bulb by first tracing the edges of the bulb and then filling in the middle. The card was then set aside to dry thoroughly.

A matching envelope was made by drawing a curling "wire" along the edge of the envelope using a Gold Wink of Stella and then stamping the tiny "bulb" stamp from Tin of Tags along the wire, using the ink colors used previously on the card.

Linda Vich Creates: Stamp Club November Projects. Whimsical Christmas card featuring Christmas lights created from a Pyramid Pals die.

Linda Vich Creates: Stamp Club November Projects. Whimsical Christmas card featuring Christmas lights created from a Pyramid Pals die.

Isn't this a fun little holiday card? So easy and fun to create but so festive and colorful in all its sparkly goodness!

Have you started making Christmas cards yet? Maybe this year I'll get mine all done before Christmas!


Friday, October 14, 2016

Thoughtful Branches Sunflower

Linda Vich Creates: Thoughtful Branches Sunflower. A cheerful sunflower created with the Thoughtful Branches stamp set rests upon a cable knit matte in this cheerful birthday card.
Today's card share is a birthday card for a friend of mine who really likes sunflowers.

I cut a card base from Garden Green card stock for a 5.5 x 5.5" card. I cut a Soft Suede matte and embossed it with the Cable Knit Embossing Folder. After inking the edges with Soft Suede, I adhered it to the card front with Fast Fuse Adhesive.

Next, I stamped the leaves from the Thoughtful Branches stamp set—22 times—using Delightful Dijon. I had meant to stamp on Delightful Dijon card stock but pulled out some Hello Honey by mistake!

I die cut the leaves with the coordinating dies. I also used the dies to die cut the stem and leaves from Garden Green.

I punched a circle from Soft Suede card stock using the 2" Circle Punch. Using Soft Suede, I stamped the leaf canopy from the Thoughtful Branches stamp set on Soft Suede card stock and then die cut it. I then punched a 2" circle from the die cut and then glued it to the punched circle using liquid adhesive.

Unless you click on the pictures for a closeup look, you won't be able to see the Gold Wink of Stella that was "flicked" over both the embossed matte and the sunflower centre to add a bit of sparkle.

I adhered the stem to the card front using Glue Dots. The circle was turned upside down and then I glued the petals around the circle in two concentric circles. I adhered the flower to the card front over the stem using Dimensionals.

The Banner Triple Punch was used to flag one end of a strip of Garden Green. The sentiment from the Endless Birthday Wishes stamp set and the bee from the Garden in Bloom stamp set were stamped in Versamark and then heat embossed with Gold Stampin' Emboss Powder. The sentiment was adhered to the centre of the sunflower using a Dimensional.

A Very Vanilla matte was cut for the inside of the card. Two leaves were stamped in Garden Green in the bottom right corner of the matte. A third leaf was stamped on a scrap of Very Vanilla and die cut. It was adhered over the two stamped leaves using Dimensionals. The matte was adhered inside the card using Fast Fuse.

Linda Vich Creates: Thoughtful Branches Sunflower. A cheerful sunflower created with the Thoughtful Branches stamp set rests upon a cable knit matte in this cheerful birthday card.

Linda Vich Creates: Thoughtful Branches Sunflower. A cheerful sunflower created with the Thoughtful Branches stamp set rests upon a cable knit matte in this cheerful birthday card.


Wednesday, September 21, 2016

Thoughtful Branches in Copper

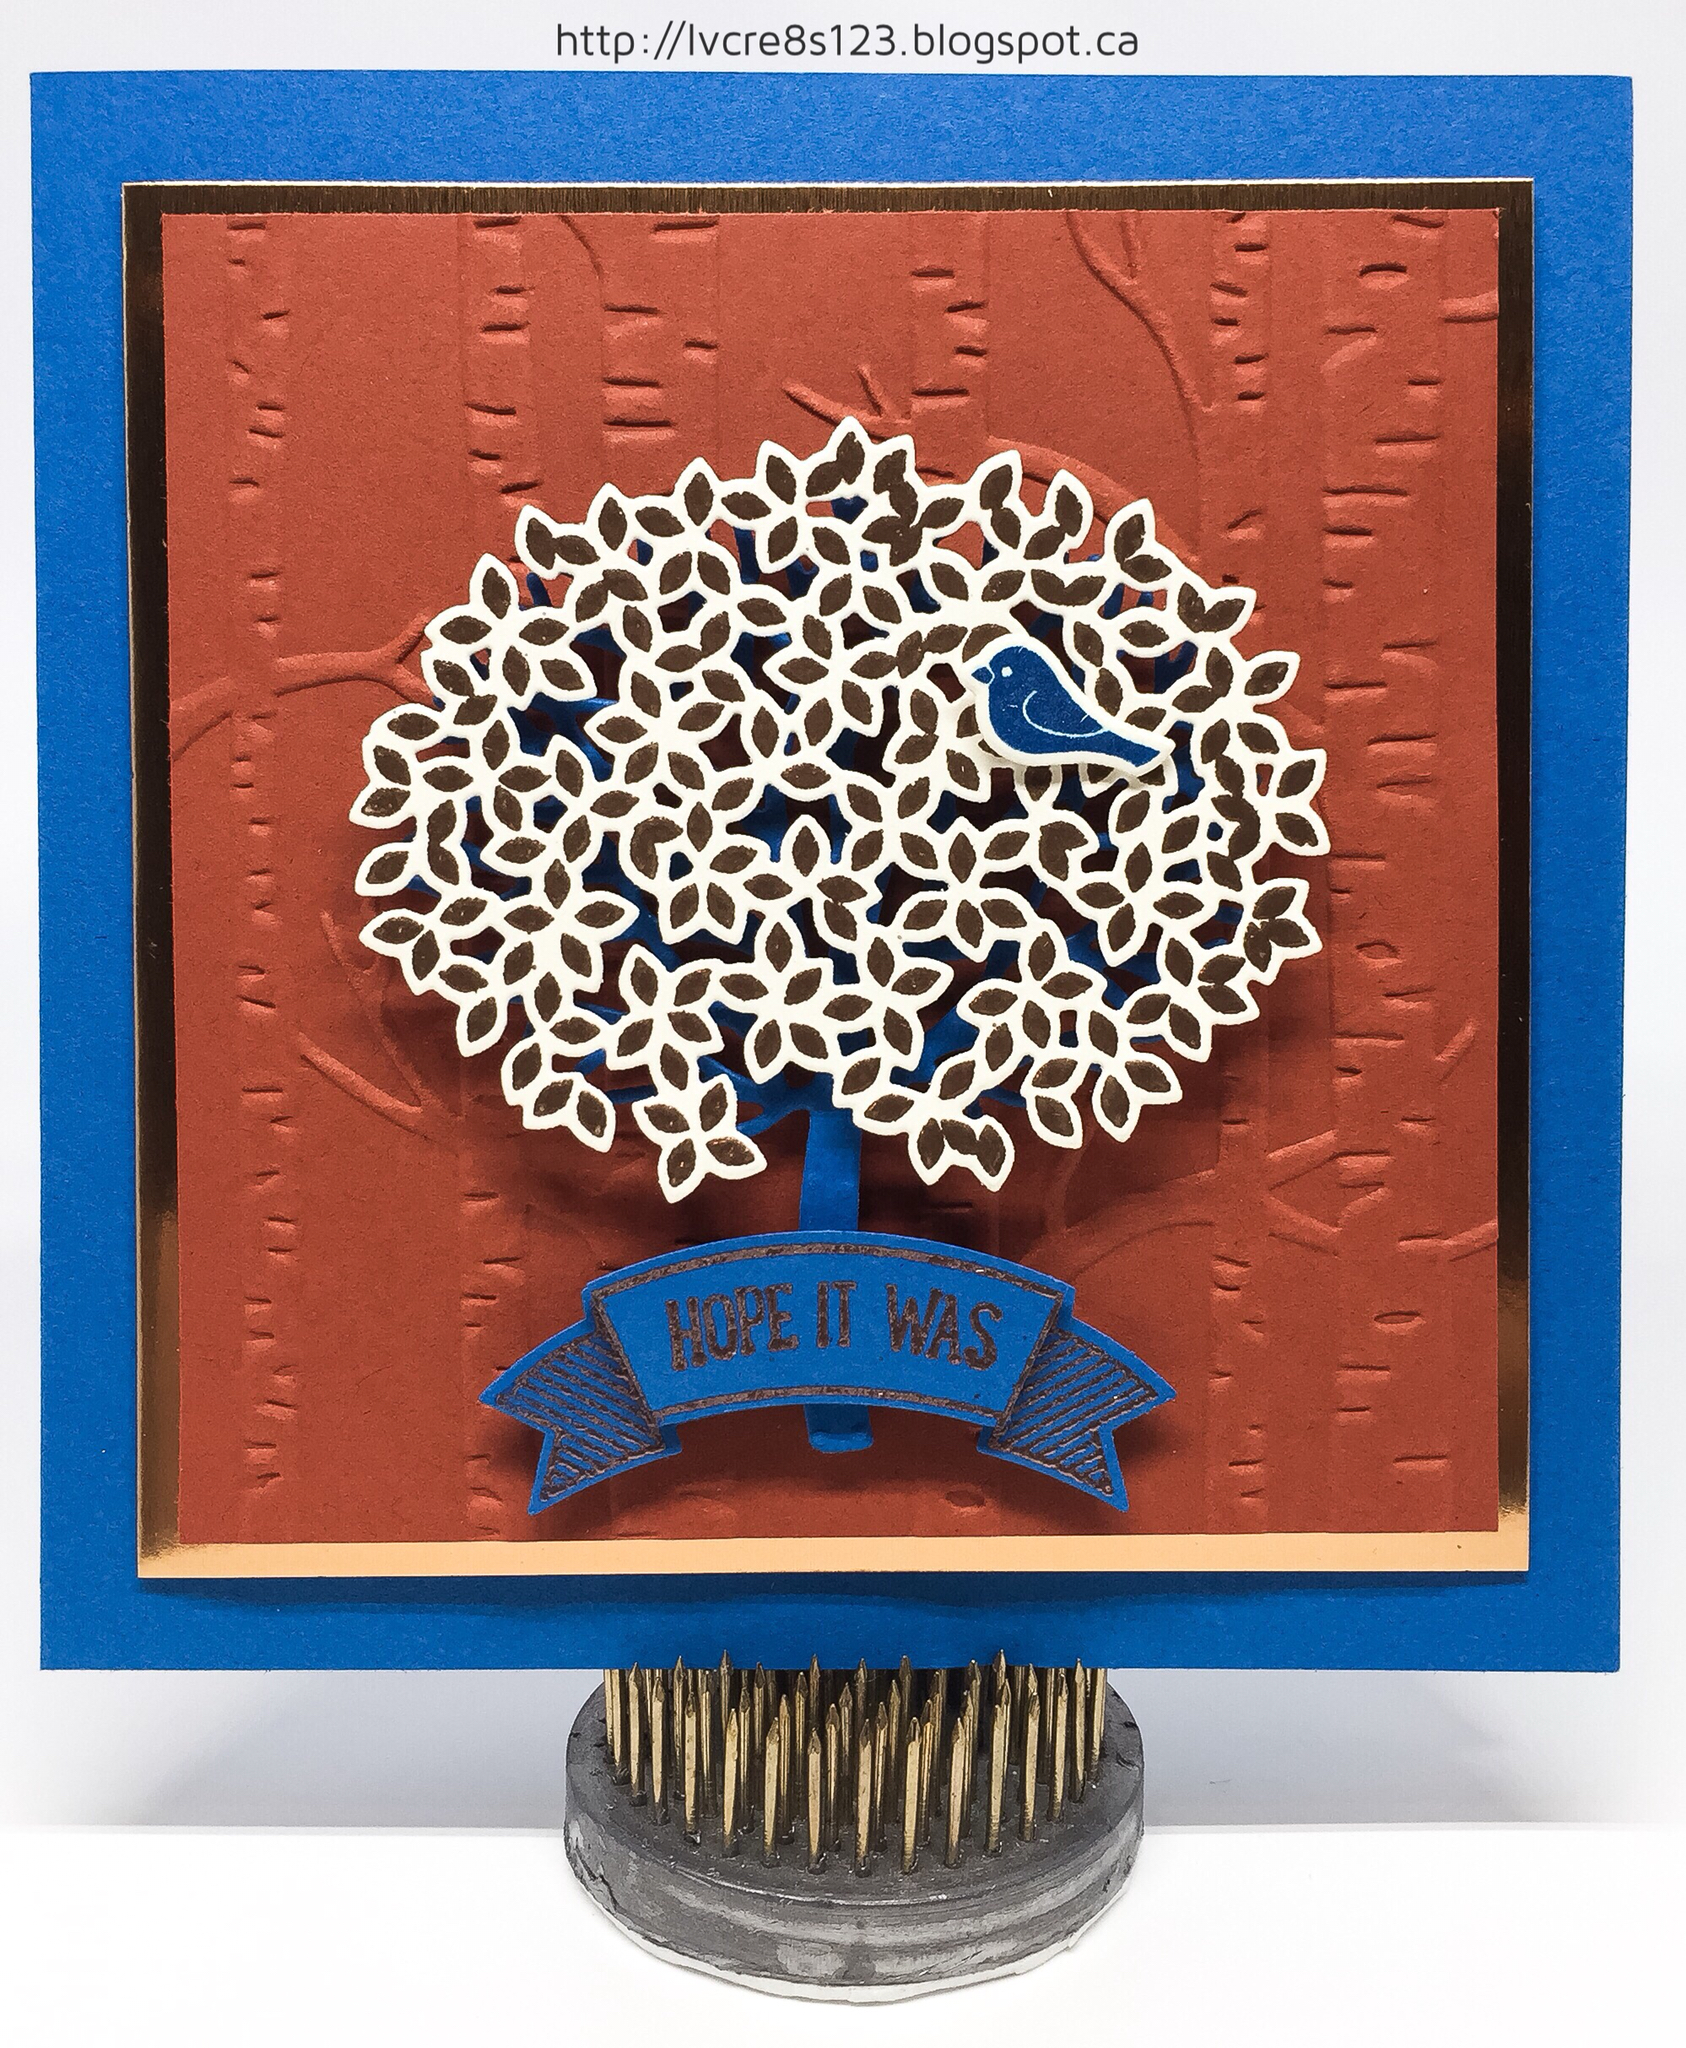
Linda Vich Creates: Thoughtful Branches in Copper. Masculine birthday card using Thoughtful Branches with copper foil and copper embossing.
I needed a masculine birthday card for my brother's birthday this week and decided that I could use the Thoughtful Branches set again but with a more masculine color scheme.

A card base was cut from Pacific Point card stock for a 5.5 x 5.5" card. On this I adhered a copper foil matte with Dimensionals and cut another matte from Cajun Craze. I dry embossed the Cajun Craze matte using the Woodland Embossing Folder and adhered it to the foil matte using Dimensionals.

I used Versamark to stamp the leaf canopy from the Thoughtful Branches stamp set on Very Vanilla and then heat embossed them with Copper Embossing Powder. I die cut the leaves using the coordinating die. I also die cut the tree trunk from Pacific Point.

Pieces of Adhesive Strips were used to adhere the tree to the Cajun Craze matte and then adhered the leaf canopy over it, using more Adhesive Strips.

I stamped two banners from the Thoughtful Banners stamp set on Pacific Point and heat embossed with copper, and stamped the sentiment from the Sweet Cupcake stamp set on one, heat embossing also with copper.

The Duet Banner Punch was used to punch the two banners and then I trimmed the one with the sentiment and layered it on top of the other with Dimensionals. The complete banner was then adhered with Dimensionals over the base of the tree.

Using Pacific Point, I stamped the bird on Very Vanilla and die cut it with the matching die. It was adhered to the tree using rolled up glue dots. Clear Wink of Stella gave the bird a little shimmer.
I used Versamark to stamp three of the leaves from the Thoughtful Branches on Very Vanilla and heat embossed them with copper. They were die cut with the matching die.

A Very Vanilla matte was cut for inside of the card and the edges inked with Cajun Craze. The sentiment was stamped in Basic Black and then the leaves adhered to the matte using both liquid adhesive and Dimensionals.

Linda Vich Creates: Thoughtful Branches in Copper. Masculine birthday card using Thoughtful Branches with copper foil and copper embossing.

Linda Vich Creates: Thoughtful Branches in Copper. Masculine birthday card using Thoughtful Branches with copper foil and copper embossing.

I really like the Pacific Point blue with the Cajun Craze and the copper! I think that the card has a definite masculine feel to it though I believe this card would also appeal also to females! What do you think? Leave me a comment below!


Monday, August 22, 2016

Thoughtful Branches with Layering Squares

Linda Vich Creates: Thoughtful Branches with Layering Squares. Layering Squares Framelits are paired with Thoughtful Branches in a delightful technique that gives dimension to a flat card.
In my email today I found a delightful card technique that used both the Thoughtful Branches stamp set and the Layering Squares Framelits. Kelly Acheson provided an informative video tutorial for this technique in her blog post.

In choosing my color scheme for my card, I consulted my 2016-17 Stampin' Up! Color Coordinator. You can download and print your own Color Coordinator and Nicole Watt has a wonderful video tutorial that details the ways in which you can use the Color Coordinator to select colors.

I began with a Very Vanilla matte and stamped the flowers/tree canopy stamp from Thoughtful Branches using Blushing Bride full strength. I then stamped it several times around the image to produce a lighter halo effect. I cleaned my stamp and stamped again, positioning the stamp a little off centre, using Sweet Sugarplum. Lastly, I used Watermelon Wonder.

I stamped the stems with Wild Wasabi and then stamped the sentiment using my MISTI, which allowed me to double-stamp. I then finished by stamping two leaves.

Two of the Layering Squares Framelits were used to cut out a "frame" and a smaller square from the stamped flower section. The stamped matte was then adhered to a Watermelon Wonder matte, using my Marsupial Tool, leaving a hole where the card stock showed through.

I replaced the "frame" and then inset the smaller square piece, being sure that both stamped die cuts were lined up the way they had been originally. I then removed the square, applied Fast Fuse and replaced it after once again checking that I had the correct alignment. (Am I anal? Yes! However, when applying adhesive, I have a habit of turning the piece around so I needed to verify that it was positioned correctly!) I then removed the "frame" die cut.

I cut a standard card base from Very Vanilla and then used the Marsupial again to adhere the mattes.

I used the Foam Adhesive Strips to apply to the "frame" die cut and then inserted it carefully back into the space from which it came. I added a small bow, made by folding the now retired Wild Wasabi Seam Binding in half, adhered with Glue Dots. Inside the card, I simply stamped two leaves in the bottom right corner to complete the card.
Linda Vich Creates: Thoughtful Branches with Layering Squares. Layering Squares Framelits are paired with Thoughtful Branches in a delightful technique that gives dimension to a flat card.

Linda Vich Creates: Thoughtful Branches with Layering Squares. Layering Squares Framelits are paired with Thoughtful Branches in a delightful technique that gives dimension to a flat card.


What a fun little technique! This could be used in a number of ways and gives a nice little "pop" to a relatively flat card.

I selected the following colors for my color scheme. Feel free to save them for your own projects!

Linda Vich Creates: Thoughtful Branches with Layering Squares. Layering Squares Framelits are paired with Thoughtful Branches in a delightful technique that gives dimension to a flat card.


Thursday, August 4, 2016

Thoughtful Branches Thank You

Linda Vich Creates: Thoughtful Branches Thank You. A lovely hydrangea blossom from Thoughtful Branches, in shades of Bermuda Bay and Island Indigo, rests against a grungy, Peekaboo Peach brick background.
When I sat down to design this card, I knew that I was going to use Bermuda Bay and Island Indigo, because they were favorites of the recipient, and I also added Cucumber Crush because the three colors produced a lovely analogous color scheme. However, I chose a complementary color, Peekaboo Peach, to really add some punch.

I started by stamping the blossoms, from the Thoughtful Branches stamp set, in both Bermuda Bay and Island Indigo on Thick Whisper White. They were die cut with the matching Thinlits. A set of leaves were also die cut from Cucumber Crush.

A matte was cut from Thick Whisper White and embossed with the Brick Wall Embossing Folder. I really love using the Thick Whisper White because it embosses so nicely! The Watercolor Wash stamp was used to stamp over the bricks using Peekaboo Peach to give them a nice grungy look. I also added in a few ink splatters by flicking the long end of a Tangerine Tango Stampin' Write Marker against its cap.

A 4.75 x 6" card base was cut from Peekaboo Peach as well as mattes from both Cucumber Crush and Bermuda Bay. I used a sponge dauber to ink the edges of all three mattes to provide separation of the colors and then Iadhered the embossed matte to the Cucumber Crush one with Fast Fuse. Dimensionals were used to adhere this combined matte to the Bermuda Bay one.

I chose the woodgrain stamp from Timeless Textures to add Tangerine Tango around the edges of the card base, echoing the splatters on the embossed matte. The mattes were then adhered with Dimensionals.

Using cut up Dimensionals, the two flower die cuts were adhered to one another, the Island Indigo one inverted under the Bermuda Bay one. The blossoms and the leaves were then adhered to the card front using Glue Dots.

The sentiment, from the Bunch of Blossoms stamp set, was masked so that I could stamp each part in different colors onto Thick Whisper White. The sentiment and a matte from Island Indigo was then die cut using the Tags & Labels Framelits. They were adhered to the card front and a small bow from Peekaboo Peach Ruched Ribbon was added to finish the card front.

A Whisper White matte was cut for the inside of the card. Stems were stamped in Cucumber Crush and the blossoms stamped three times in Island Indigo to provide some dimension.

Linda Vich Creates: Thoughtful Branches Thank You. A lovely hydrangea blossom from Thoughtful Branches, in shades of Bermuda Bay and Island Indigo, rests against a grungy, Peekaboo Peach brick background.

Linda Vich Creates: Thoughtful Branches Thank You. A lovely hydrangea blossom from Thoughtful Branches, in shades of Bermuda Bay and Island Indigo, rests against a grungy, Peekaboo Peach brick background.

Though I would not have immediately chosen this five color combo for a card, I believe that these colors work well together to provide a stand-out card! Feel free to save this color combo for your own creations.

Linda Vich Creates: Color Combo from Thoughtful Branches Thank You card.


Wednesday, August 3, 2016

Birthday In Blue With Thoughtful Branches

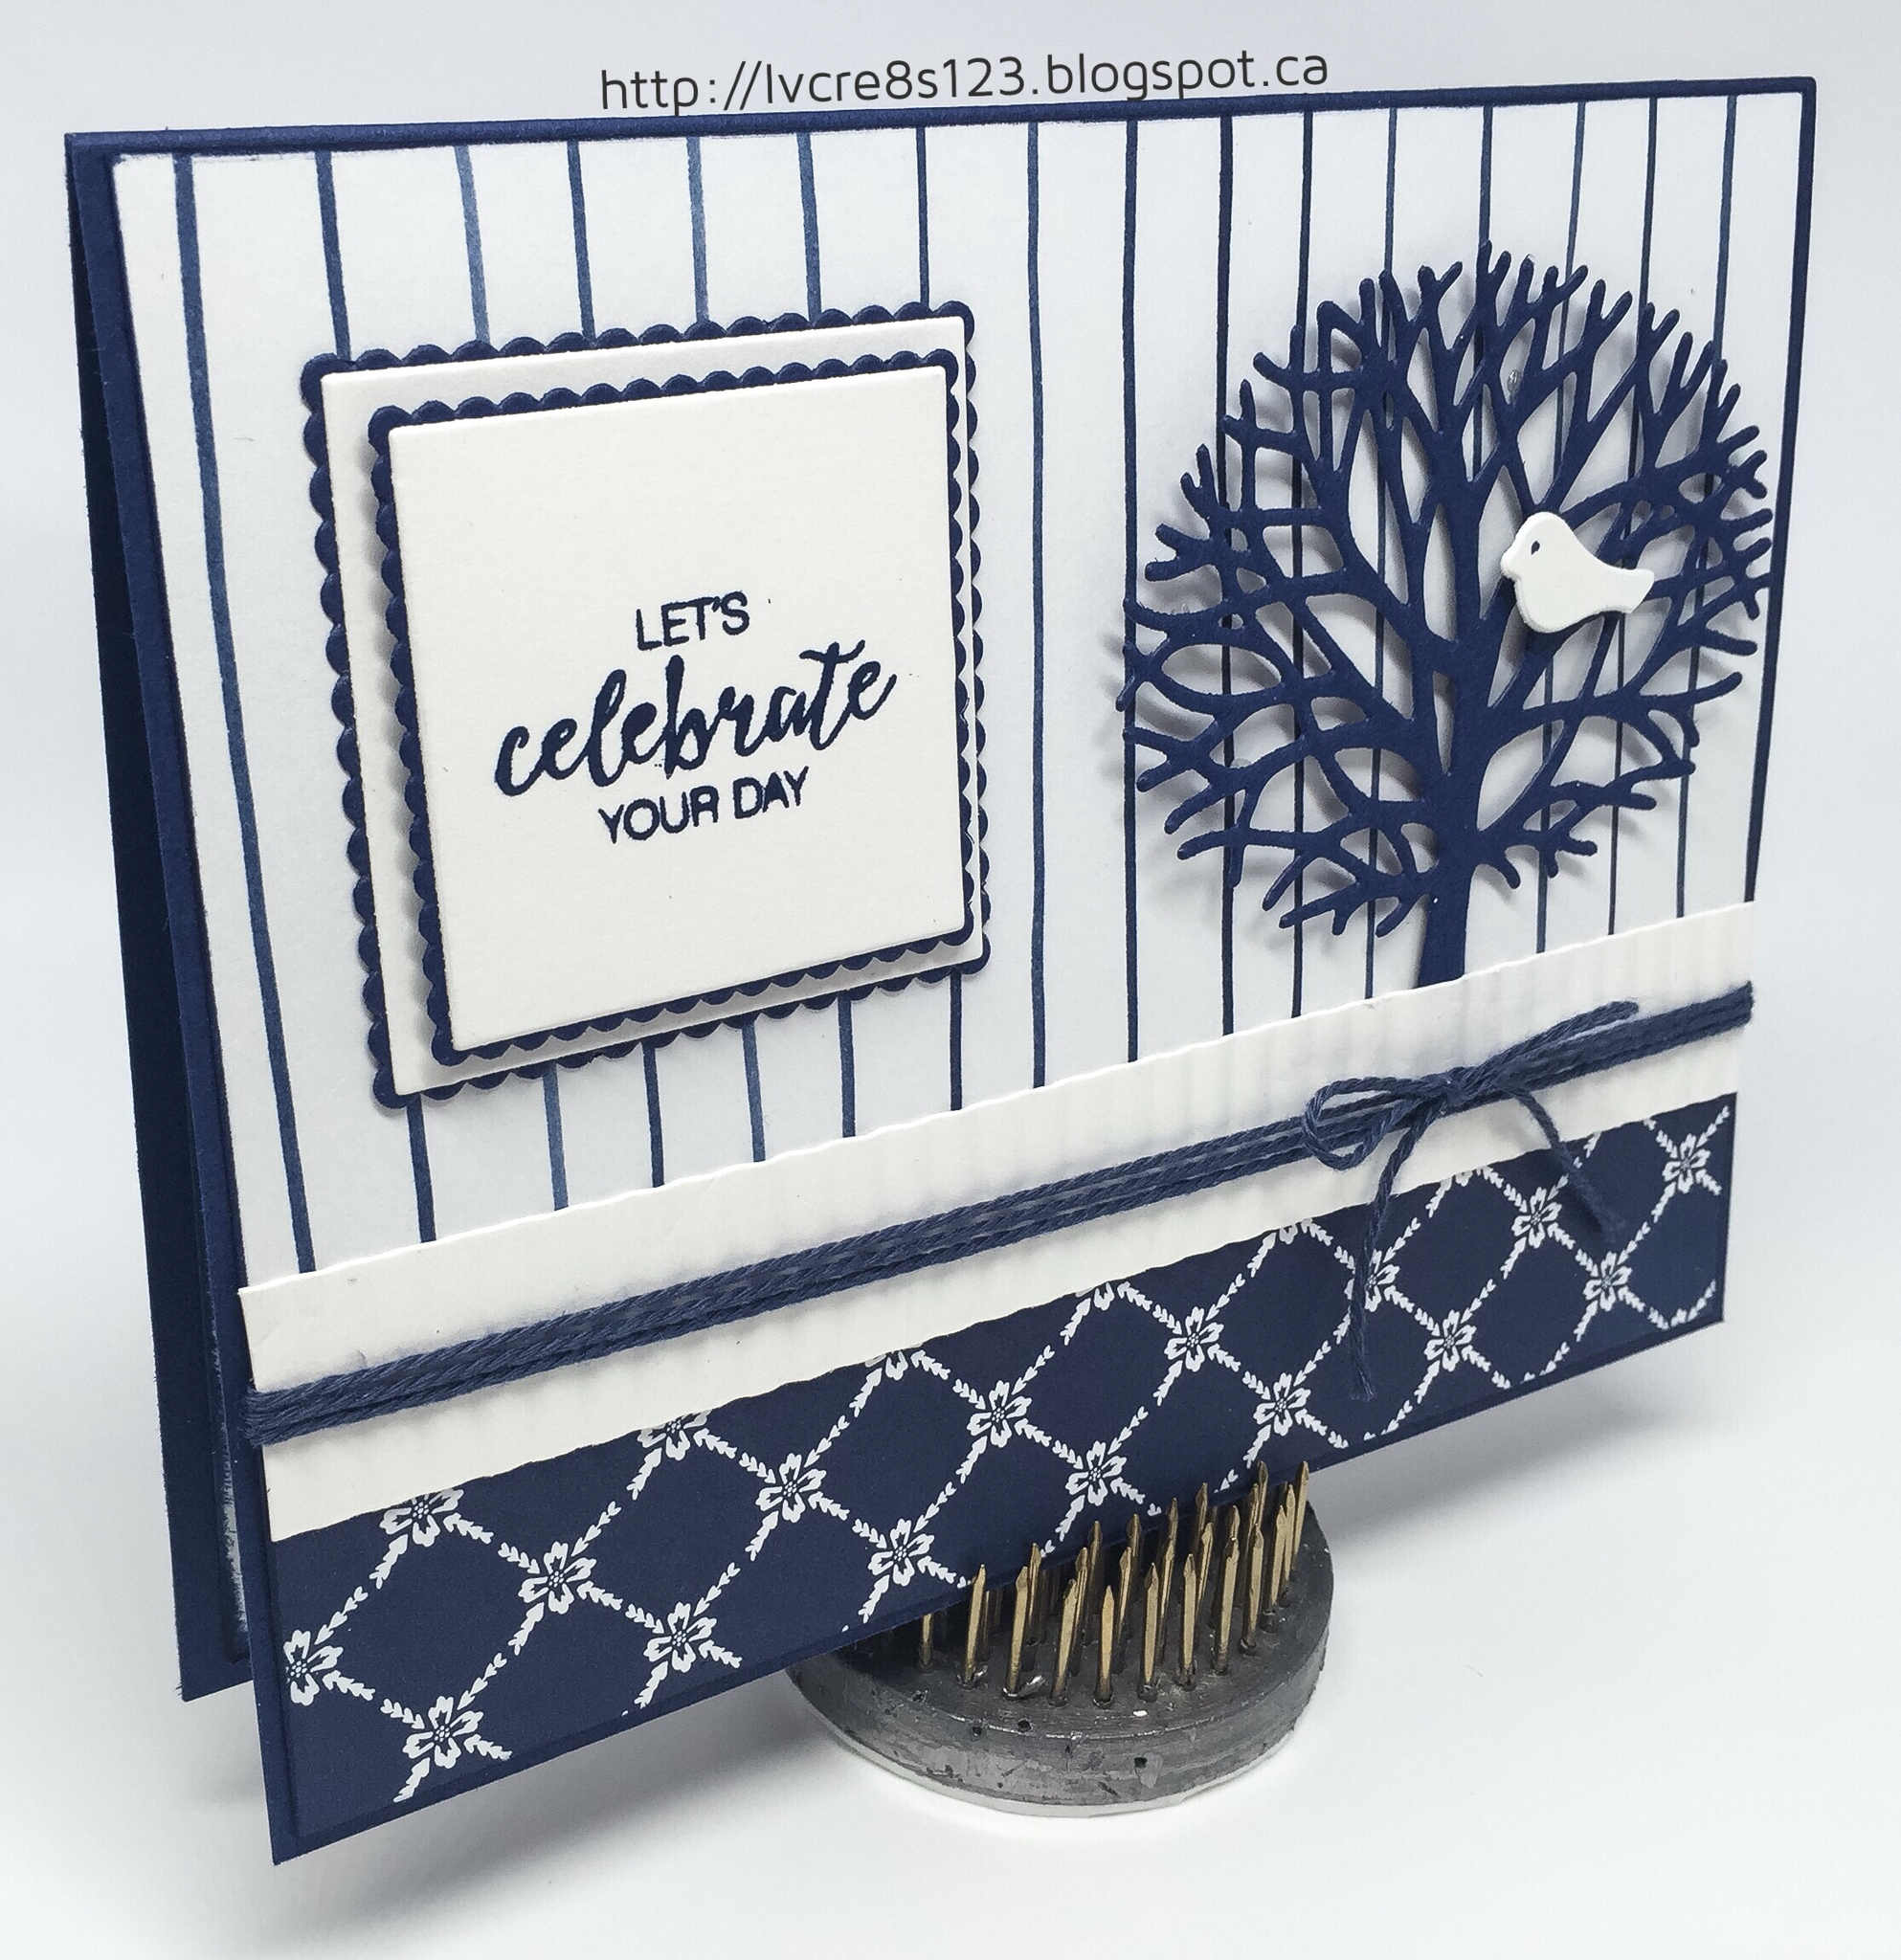
Linda Vich Creates: Birthday In Blue With Thoughtful Branches. Whisper White and Night of Navy combine in this card that showcases both the Floral Boutique DSP and the Thoughtful Branches Bundle.
My mother-in-law's birthday follows swift on the heels of that of my sister-in-law, so it was off to my craft room to create another card. I was drawn again to use the Thoughtful Branches bundle pairing it this time with the Floral Boutique DSP.

I started by cutting a 4.75 x 6" card base from Night of Navy. I cut a matte from a pin-striped paper from the Floral Boutique DSP and a smaller strip from a mostly navy design paper. These were adhered together using Fast Fuse.

Using the Beautiful Branches Thinlits, I die cut the tree from Night of Navy. I cut the bird from Thick Whisper White as well as a strip of paper which I ran through my paper crimper. It is hard to see in the pictures but it does add a nice bit of dimension to the card.

The tree was adhered to the matte using rolled up Glue Dots and then the crimped strip was adhered to the DSP matte and a length of Night of Navy Baker's Twine was tied around it. The matte was then adhered to the card front. I used a Night of Navy Stampin' Write Marker to give the bird a tree and then it was adhered to the tree using Glue Dots.

The sentiment from the Bunches of Blossoms stamp set was stamped in Night of Navy on Thick Whisper White. The Layering Squares Framelits were used to die cut the sentiment and other mattes from both Thick Whisper White and Night of Navy card stock. Each square and scalloped square were adhered using liquid adhesive and then adhered together using Dimensionals. They were adhered to the card front using Fast Fuse.

For the inside of the card, a leaf was stamped on Whisper White card stock and then a leaf die cut from Night of Navy was adhered beside it using Glue Dots. A sponge dauber was used to ink the edges before adhering the matte using Fast Fuse.

Linda Vich Creates: Birthday In Blue With Thoughtful Branches. Whisper White and Night of Navy combine in this card that showcases both the Floral Boutique DSP and the Thoughtful Branches Bundle.

Linda Vich Creates: Birthday In Blue With Thoughtful Branches. Whisper White and Night of Navy combine in this card that showcases both the Floral Boutique DSP and the Thoughtful Branches Bundle.

Linda Vich Creates: Birthday In Blue With Thoughtful Branches. Whisper White and Night of Navy combine in this card that showcases both the Floral Boutique DSP and the Thoughtful Branches Bundle.

Don't you just love the crisp quality of the card created by using white and navy together? I think that using the tree in navy really looks neat but I want to try a card that uses a white tree in the near future!

Be sure to place your order with me for the Thoughtful Branches Bundle! This limited edition bundle is available NOW until August 31 or while supplies last.


For further inspiration, check out my post from yesterday where I used the Thoughtful Branches Bundle on a pop-up card.


Tuesday, August 2, 2016

Thoughtful Branches Birthday

Linda Vich Creates: Thoughtful Branches Birthday. Pop-up card created with the Limited Edition Thoughtful Branches Bundle.
I know it's been awhile since I posted but with the hot weather we have been having, our house is HOT! The fan I have in my craft room is not enough to keep it cool in there so I have not been crafting. I am anxious to get back into it though so grabbed a little (sweaty) time to craft a birthday card for my sister-in-law.

This is pretty much a complete CASE of the card by Kelly Kent. It uses the Limited Edition Thoughtful Branches stamp set and matching Thinlits which is now available to order until August 31 while supplies last.

You won't want to pass up this stunning bundle! The stamp set itself is perfect for all year stamping with its selection of trees, trunks, and leaves and the included sentiments are simply BEAUTIFUL! They have used a lovely combination of script and sans serif fonts that can dress up almost any card whether it be casual or formal, and the sentiments can be used alone or you can pair up outside and inside sentiments.


Don't miss out on this extremely versatile set! If you received coupons for ordering in July, you can use them for your purchase of this set. Contact me to order it today!

I adapted the directions from Kelly to put them into inches and then proceeded with my card by cutting a 11 x 4.25" card base from Wild Wasabi. I scored it at 1, 2.5, 3.75, 5.5, 7.25, 8.25 and 10 inches. I also cut a strip that was 1 x 5 inches in length.

I folded the card on the score lines and then set the card base aside. Using the stamps, I stamped the tree trunk on Soft Suede, using matching ink and I stamped two sets of tree leaves on Sweet Sugarplum, one with Sweet Sugarplum and one with Rose Red.

I stamped the bird with Pacific Point on Marina Mist. Two leaves were stamped on Wild Wasabi, one with Wild Wasabi and the other with Garden Green. Three flowers, from the Best Birds stamp set, were stamped on Sweet Sugarplum using Rose Red. The sentiment was stamped with Soft Suede on Sweet Sugarplum.

All stamped images were die cut using the Beautiful Branches Thinlits, Birds & Blooms Thinlits, and the Layering Ovals Framelits. An extra tree trunk was also die cut. A scalloped oval matte was also die cut from Rose Red card stock.

I found the centre scored line of the card base and used my 1/8" Circle Punch to punch holes .5" in from each side. I then used my Stampin' Trimmer to cut on each side of the holes between them, leaving a slit between them. It is important not to make the slit too wide or the pop-up part of the card will not stay in place.

Using the 1 x 5" strip and the card base, I attached one end of the strip to the side of the card base (see photo above number 5 here for clarification) and then poked the other end through the slit that was cut in the card base. I used Fast Fuse to glue both folded ends together, sealing the end of the strip between them while creating the pop-up structure for the card.

I used the tree trunks and tree leaves die cuts to determine how long I needed the piece to be and how much to trim it so it would fit between the two tree trunks. When doing this step, it is important to determine the correct placement so that the flattened card will fit in your chosen envelope–mine fit into a standard envelope for a 4.25 x 5.5" card.

After using scissors to trim it both in length to taper the sides, I used liquid adhesive to glue the two tree trunks to it. The leaves were then also glued in place onto the trunk. Wink of Stella was added to the leaves and the bird was adhered.

With the pop-up set up, the leaves and flowers were added using Dimensionals. Wink of Stella was also added to the flowers. The sentiment was matted and also adhered to finish the card.

Linda Vich Creates: Thoughtful Branches Birthday. Pop-up card created with the Limited Edition Thoughtful Branches Bundle.

Linda Vich Creates: Thoughtful Branches Birthday. Pop-up card created with the Limited Edition Thoughtful Branches Bundle.
Side view showing how the pop-up is formed.

Linda Vich Creates: Thoughtful Branches Birthday. Pop-up card created with the Limited Edition Thoughtful Branches Bundle.

I'm delighted with how this card turned out and my sister-in-law loved it! I can see myself using this pop-up design for many more card designs in the future.

For further inspiration using the Thoughtful Branches Bundle, you will want to check out the Stamp Review Crew–Thoughtful Branches and the Thoughtful Branches Artisan Blog Hop.