Showing posts with label mcgill paper blossom tool kit. Show all posts

Monday, March 13, 2017

So Succulent Gift Set With Video Tutorial

Linda Vich Creates: So Succulent Gift Set With Video Tutorial. Pot of trendy, colorful succulents with coordinating gift card that uses Dragonfly Dreams.
Friday night, my stamping ladies did a little gardening, though a green thumb was not required!

Succulents and dragonflies were the focus of my class as we created a darling pot of succulents with a matching gift card.

The Succulent Framelits are so much fun to use to create a vast array of colorful succulents. All six framelits required for the largest succulent can be fit onto a 4.25 x 5.5" piece of card stock and run through the big shot at the same time so this means that you save paper AND time!

In designing the succulents for this pot, I did a Google search to get some ideas for how to color the plants. Little did I know that succulents come in all the colors of the rainbow! Such fun!

I did a little experimenting with different colors of card stock and ink before deciding on my final choices. I save small strips of card stock just for the purpose of testing my ideas for colors. It is amazing what you can discover by sponging various ink colors onto different colors of card stock. For example, by sponging Wisteria Wonder with Pool Party, I was able to create a kind of Periwinkle Blue color.

In the end, I designed three types and sizes of succulents because I knew it was important to mix sizes and colors to produce a balanced design.

You can view the following video explaining how the succulents were created and assembled. This particular video shows a slightly different method to those portrayed in the photographs in this blog post. The succulents created in my class were fuller looking and more realistic as detailed in the notes below.


In addition, the second video shows the assembly of the pot and uses two types of moss to add further texture to the finished project.


Large succulent:
Wisteria Wonder card stock was cut with all six framelits; Pool Party ink was sponged on the petals of each piece and then Melon Mambo was sponged on the tips; double Dimensionals were used to adhere the two largest bottom layers as well as the next layer; liquid glue was used to adhere the remaining pieces.

Medium succulents:
Mint Macaron card stock was cut twice with five of the framelits to produce two separate succulents; Pool Party ink was sponged on the petals of each piece and then Old Olive was sponged on the ends of each petal; double Dimensionals were used on the two largest layers and liquid glue for the remaining pieces.

Small succulents:
Sweet Sugarplum card stock was cut three times with the three smallest framelits to produce three separate succulents; Old Olive was sponged lightly over the petals and then the tips were sponged with Melon Mambo; the layers were adhered using liquid glue.

After sponging the pieces for each of the succulents, a large-ball stylus from either the Heartfelt Creations Deluxe Flower Shaping Kit or one from the McGill Paper Blossom Tool Kit was used to shape each piece. The piece was placed in the palm of the hand and the stylus was circled over the middle until the piece "cupped."

To add further dimension to each piece, a bone folder was used to curl each petal downward. Double Dimensionals were also used to create separation between the largest layers and to produce a fuller looking succulent.

Once all the succulents were assembled, it was time to prepare the pot.

A sheet of newspaper from a community paper was crumpled tightly into a ball and then carefully undone. It was re-crumpled but this time ensuring a smooth, top section to the ball. A glue gun was used to apply glue to the bottom and sides of the metal pot and the newspaper ball was pushed inside to adhere it. Some tutorials for succulent pots found on Pinterest use half a styrofoam ball to form this part of the pot but that adds to the cost. I much prefer using the easily attained newspaper!

Pieces of moss, in both natural and green were then hot-glued to the top of the newspaper. Some tendrils of moss were allowed to fall outside of the pot for added interest. After gluing enough moss to cover the newspaper, the pot was turned upside down and tapped to remove any loose moss.

The front of the pot was determined and the arrangement of the succulents was chosen. Each succulent was glued in place using the glue gun. A glue eraser was used to rid the pot of any clinging glue gun trails.

A glue dot was adhered to the middle back of the pot rim; two more were adhered to each side of the pot's rim. A length of the 5/8" Burlap Ribbon was adhered to the glue dots and tied in a bow at the front of the pot.

Finally, a dragonfly was die cut from Gold Glimmer paper, shaped slightly, and adhered to one of the succulents in the pot with Glue Dots.

Linda Vich Creates: So Succulent Gift Set With Video Tutorial. Pot of trendy, colorful succulents created using the Succulent Framelits.

Linda Vich Creates: So Succulent Gift Set With Video Tutorial. Pot of trendy, colorful succulents created using the Succulent Framelits.

Linda Vich Creates: So Succulent Gift Set With Video Tutorial. Pot of trendy, colorful succulents created using the Succulent Framelits.


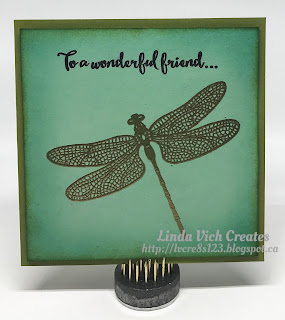
To create the accompanying card, a 4 x 4" card base was cut from Old Olive. Mattes of 3.75 x 3.75" were cut both from Mint Macaron and Whisper White.

On the Mint Macaron matte, the sentiment was stamped in Basic Black. The dragonfly, from the Dragonfly Dreams stamp set was stamped in Versamark and heat embossed with Gold Stampin' Emboss Powder.

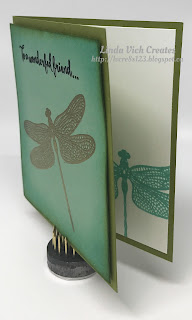
The edges of the matte were sponged generously with Pool Party and then, less generously with Old Olive. The matte was adhered to the card front using Dimensionals.

A dragonfly was stamped offset on the Whisper White matte using Pool Party and then adhered inside the card.

Using the Envelope Punch Board, a matching envelope in Mint Macaron was created. The flap of the envelope was stamped with another dragonfly using Pool Party.

Linda Vich Creates: So Succulent Gift Set With Video Tutorial. Gift card that uses Dragonfly Dreams and coordinates with a pot of the trendy succulents.

Linda Vich Creates: So Succulent Gift Set With Video Tutorial. Gift card that uses Dragonfly Dreams and coordinates with a pot of the trendy succulents.

Linda Vich Creates: So Succulent Gift Set With Video Tutorial. Gift card that uses Dragonfly Dreams and coordinates with a pot of the trendy succulents.


I hope you have enjoyed reading about my projects and viewing the video tutorials! If you have yet to order the Succulent Framelits or the Dragonfly Bundle, you can purchase them in my online store! Just think what you can create with these products!


Wednesday, August 31, 2016

Vintage Leaves Card Set Giveaway

Linda Vich Creates: Vintage Leaves Card Set Giveaway. Rich Autumn hues ta1ke center stage in this card set using Vintage Leaves and a gate fold technique introduced by Jennifer McGuire. Be sure to enter the draw to win this set!
Jennifer McGuire posted a tutorial the other day for a gate fold technique that used border dies. I really liked the result and kept mulling it over in my mind as to how I could make it my own. With Autumn just around the corner, I decided to create a card set using Autumn hues and employ Jennifer's technique.

For my colors, I chose Cherry Cobbler, Cajun Craze, Delightful Dijon, and Garden Green. I cut a piece of each color at 11 x 4.25", modifying Jennifer's size to be more in line with that of a standard size card. Each piece was scored on the long side at 4" from one end and 2" from the other end. After folding on the score lines, the card front overlapped slightly.

I placed the single edge die from the Detailed Floral Thinlits along the edge of the longest flap and ran it through the Big Shot. It easily cut through the top and partially through the next layer. I had to open the card, reposition the die and run it through again to finish cutting the second flap. There was a resulting indent from the die on the inside of the card but that would be hidden by a matte.

I chose a leaf stamp, from the Vintage Leaves stamp set, for each of the four colors and then stamped the front of the card using matching ink except for the Cherry Cobbler card. When using my Cherry Cobbler on the matching card stock, the color appeared "greenish" so I chose to use Real Red as an alternative.

After stamping the card fronts, I cut white mattes for the inside of the cards and stamped a leaf on each of those to match each card. In addition, I used my Envelope Punch Board to create envelopes for each card and stamped leaves on the fronts of those as well before assembling the envelopes, using Post It notes to mask off the non-inked sides of the envelopes.

Next, I stamped sentiments from the Watercolor Wishes Card Set, in Versamark on the four colors of card stock and heat embossed them with Gold Stampin' Emboss Powder. These were then die cut with the matching Leaflets Framelits. Each die cut had its edges inked with the corresponding ink.
It was then that I got the idea to heat emboss the edges of the die cut gate fold edges themselves! To do this, I used a Versamark Pen to ink each edge, repeating the process to really get a nice embossed gold effect.

Another idea struck and I decided to add flecks of ink onto the cards to provide a bit more texture to my design. I used both my Stampin' Write Markers, flicking the marker off the edge of the cap, and my Tim Holtz Distress Splatter Brush with reinkers, which produced larger splatters.

To finish each card, I added a thread nest, using Gold Metallic Thread secured with a glue dot, and adhered a leaf over it using Dimensionals.

Linda Vich Creates: Vintage Leaves Card Set Giveaway. Rich Autumn hues ta1ke center stage in this card set using Vintage Leaves and a gate fold technique introduced by Jennifer McGuire. Be sure to enter the draw to win this set!

Linda Vich Creates: Vintage Leaves Card Set Giveaway. Rich Autumn hues ta1ke center stage in this card set using Vintage Leaves and a gate fold technique introduced by Jennifer McGuire. Be sure to enter the draw to win this set!

Linda Vich Creates: Vintage Leaves Card Set Giveaway. Rich Autumn hues ta1ke center stage in this card set using Vintage Leaves and a gate fold technique introduced by Jennifer McGuire. Be sure to enter the draw to win this set!

Linda Vich Creates: Vintage Leaves Card Set Giveaway. Rich Autumn hues ta1ke center stage in this card set using Vintage Leaves and a gate fold technique introduced by Jennifer McGuire. Be sure to enter the draw to win this set!

Linda Vich Creates: Vintage Leaves Card Set Giveaway. Rich Autumn hues ta1ke center stage in this card set using Vintage Leaves and a gate fold technique introduced by Jennifer McGuire. Be sure to enter the draw to win this set!

Linda Vich Creates: Vintage Leaves Card Set Giveaway. Rich Autumn hues ta1ke center stage in this card set using Vintage Leaves and a gate fold technique introduced by Jennifer McGuire. Be sure to enter the draw to win this set!

Linda Vich Creates: Vintage Leaves Card Set Giveaway. Rich Autumn hues ta1ke center stage in this card set using Vintage Leaves and a gate fold technique introduced by Jennifer McGuire. Be sure to enter the draw to win this set!

Linda Vich Creates: Vintage Leaves Card Set Giveaway. Rich Autumn hues ta1ke center stage in this card set using Vintage Leaves and a gate fold technique introduced by Jennifer McGuire. Be sure to enter the draw to win this set!

Linda Vich Creates: Vintage Leaves Card Set Giveaway. Rich Autumn hues ta1ke center stage in this card set using Vintage Leaves and a gate fold technique introduced by Jennifer McGuire. Be sure to enter the draw to win this set!

Linda Vich Creates: Vintage Leaves Card Set Giveaway. Rich Autumn hues ta1ke center stage in this card set using Vintage Leaves and a gate fold technique introduced by Jennifer McGuire. Be sure to enter the draw to win this set!

After completing the cards and envelopes, I needed a container to put them in so I consulted this tutorial by Catherine Pooler on how to create a box. Once I had figured out what size I needed for my card box and lid, I cut the two pieces from Kraft card stock.

I scored, cut and glued the piece for the box bottom and then used my stamps to create my own paper for the box top. After stamping the leaves, I again used my Tim Holtz Distress Splatter Brush to add flecks of Crumb Cake reinker. After it was dry, I scored, cut and glued the lid together.

A belly band was created for my card box using a strip of Garden Green card stock topped with the now retired Cherry Cobbler Sheer Linen Ribbon. I stamped two oak leaves in Delightful Dijon on the matching card stock and die cut them with the framelits. The edges of the leaves were inked with matching ink and then I used my McGill Paper Blossom Tool Kit to give some dimension to the leaves. I used Glue Dots to adhere them to the top of the belly band to complete the box.

Linda Vich Creates: Vintage Leaves Card Set Giveaway. Rich Autumn hues ta1ke center stage in this card set using Vintage Leaves and a gate fold technique introduced by Jennifer McGuire. Be sure to enter the draw to win this set!

Linda Vich Creates: Vintage Leaves Card Set Giveaway. Rich Autumn hues ta1ke center stage in this card set using Vintage Leaves and a gate fold technique introduced by Jennifer McGuire. Be sure to enter the draw to win this set!

Linda Vich Creates: Vintage Leaves Card Set Giveaway. Rich Autumn hues ta1ke center stage in this card set using Vintage Leaves and a gate fold technique introduced by Jennifer McGuire. Be sure to enter the draw to win this set!

I am really loving the rich hues of this color combo! Feel free to copy this image if you'd like to use it!

Linda Vich Creates: Vintage Leaves Card Set Giveaway. Rich Autumn hues ta1ke center stage in this card set using Vintage Leaves and a gate fold technique introduced by Jennifer McGuire. Be sure to enter the draw to win this set!

I'm very pleased with how this card set turned out! And now the fun part–I'm going to give it away!

If you live in either Canada or the United States, here is what you need to do to be entered into a draw to win this card set:

  1. Leave a comment either below or on my Facebook post (or both!).
  2. Pin any image from this blog post to Pinterest.
  3. Share my Facebook post about this card set.
On Sunday, September 4, at 7:00 pm CDT, I will draw to see who wins the card set! Be sure to check back here for the announcement of the winner. I will need the winner to contact me so that I may get a mailing address for where to send the card set.

The lucky winner could be YOU!


Saturday, July 16, 2016

Sitting Here Retirement Card

Linda Vich Creates: Sitting Here Retirement Card. The hanging swing from Sitting Here is the focal image of this lively and bright color schemed retirement card.
With my brother and sister-in-law visiting from Calgary, I haven't had much time to craft this week. Today, we had a retirement party to go to for our neighbors so I had to get a card made for them this morning!

I chose to use the Sitting Here stamp set for my focal image. I stamped the wooden swing on Whisper White card stock using Basic Black Archival ink. I then used the leaves from the Sheltering Tree stamp set to stamp with both Cucumber Crush and then Wild Wasabi (turning the stamp upside down). The image was then die cut using the now retired Circles Collection Framelits.

I used two more circles to cut both a Cucumber Crush and a Pacific Point frame. The edges were inked with Basic Black and then they were layered over the stamped image, adhering them with liquid adhesive.

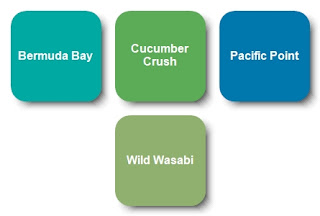
The pillows were stamped with Basic Black and then colored using Stampin' Write Markers in Pacific Point, Wild Wasabi, Cucumber Crush, and Bermuda Bay. A Basic Black marker was used to ink the edges of the fussy cut pillows. I then used a stylus from my McGill Paper Blossom Tool Kit to "puff up" the pillows like I did for the card in my Just Sitting Here post.

I cut a card base of 5.5 x 11" and then scored it at 2.75" from each end to create a gate fold card. I cut mattes from a piece of Cucumber Crush paper from the 2015-2017 In Color DSP Stack and adhered them to the front panels of the card after first inking the edges with Basic Black.

A Pacific Point 3/8" Stitched Ribbon was adhered to the back of the card and tied in a bow at the left side. Dimensionals were applied to the matted image but the adhesive was only removed from the side opposite the bow. This was done so that the card could be opened and also support the image on both sides.

The sentiment was cobbled together from two stamp sets–Wild About Flowers and Sweet Cupcake. It was stamped on Thick Whisper White using Basic Black. The sentiment was then die cut using a die from the Cupcake Cutout Framelits. A Pacific Point die cut was also made.

The Pacific Point die cut was cut in half, lengthwise, and then offset and glued to each side of the Whisper White die cut. It was adhered to the bottom of the stamped image on the card front.
The pillows were adhered to the stamped swing using doubled up Dimensionals.

For inside the card, a matte was cut from Thick Whisper White. The sentiment was stamped using Pacific Point and the tree was stamped using Soft Suede, Wild Wasabi and Cucumber Crush. The edges of the matte were inked with Wild Wasabi and then it was adhered with Fast Fuse Adhesive to complete the card.

A sheet of In Colors Envelope Paper was also used to create an envelope for the card, using the Envelope Punch Board. The envelope was not photographed.

Linda Vich Creates: Sitting Here Retirement Card. The hanging swing from Sitting Here is the focal image of this lively and bright color schemed retirement card.

Linda Vich Creates: Sitting Here Retirement Card. The hanging swing from Sitting Here is the focal image of this lively and bright color schemed retirement card.

I love the way this card came together and the color scheme really appeals to me! You can save it if you would like to use it for yourself!

Linda Vich Creates: Sitting Here Retirement Card. The hanging swing from Sitting Here is the focal image of this lively and bright color schemed retirement card.


Wednesday, July 6, 2016

Best Birds Thank You

Linda Vich Creates: Best Birds Thank You. Learn how the bird was created to look 3D on this delightful thank you card.
Every once in awhile, the stars align and a crafting session goes as smoothly as spreading peanut butter on a slice of bread. Today was one of those days. :)

As I sat reviewing my new stamp sets, I chose the Best Birds to create a card.

I had a blue bird in mind and chose a scrap of watercolor paper to try out my hunch that Marina Mist and Dapper Denim was the combination I was seeking. I used my Kuretake Fude Water Brush Pen and reinker to paint a few strokes. The blues were perfect together!

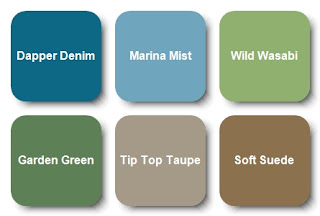
Then, since I was also going to be stamping a branch, I tried out Wild Wasabi and Garden Green for the leaves and Tip Top Taupe and Soft Suede for the branch. These combinations also worked well.

I then consulted a downloadable PDF from Patty Bennett that I had saved to Evernote. The PDF is a wonderful resource that provides a sample of all the DSP in the new 2016-2017 catalog. I was looking for a paper that would look good with the bird I was going to paint. One of the new Moroccan papers fit the bill!

I began by stamping, with Basic Black Archival ink, the bird and the branch onto watercolor paper using my MISTI. I zapped the images with my heat tool just to make sure the ink was set and then began watercoloring them using the reinkers I had selected previously. When complete, I heat set the images and then die cut them using the Birds & Blooms Thinlits.

Using the Hello You Thinlits, I die cut three "thanks" from Wild Wasabi and adhered them together using liquid adhesive. I chose green for this sentiment to pick up the green from the leaves and to provide a little relief from all the blue. I inked the stacked die cut with Versamark and then heat embossed with Clear Stampin' Emboss Powder three times to make the sentiment good and shiny.

To create the rest of the sentiment, I stamped with the Labeler Alphabet stamp set onto Thick Whisper White using Dapper Denim ink. To use these letters, you really need to stamp one letter at a time to be able to get them close enough to each other. Once complete, I cut the sentiment up into individual words.

Now that I had the sentiment, the bird and the branch, I took some time to plan out my layout for the card. I tried several different configurations, including both vertical and horizontal. I finally decided on a horizontal orientation.

It was necessary to create a 5 x 7" card to hold my layout. I first chose to matte the DSP with Dapper Denim card stock, after inking the edges of the DSP with Soft Suede. I then cut a Soft Suede card base to pick up the color of the branch. The matted DSP was adhered to the card front using Dimensionals.

In my post, Just Sitting Here, I used a technique learned from Lydia over at Understand Blue. The technique involves using a stylus, or in my case I used my McGill Paper Blossom Tool Kit, to push out the back of a die cut to give it a realistic 3D look. I wanted to apply this technique to my bird so it would not look so flat. I also used this technique on the branch to a lesser degree.

After puffing up my bird and branch, I attached double Dimensionals to the bird to maintain the "puffiness" and adhered both die cuts to the card front. This then allowed me to lay out and then adhere both parts of my sentiment. I attached the "thanks" with liquid glue. Before adhering the individual words, I used a sponge dauber to ink the edges of each word with Soft Suede. The words were then adhered to the card front using rolled up Glue Dots to provide a little height.

For the inside of the card, a matte was cut from watercolor paper. Leaves from the Birthday Blossoms stamp set were stamped in two corners using Basic Black Archival ink. Once dry, I used Wild Wasabi and Garden Green to watercolor the leaves. The matte was adhered with Fast Fuse to complete the card.

Linda Vich Creates: Best Birds Thank You. Learn how the bird was created to look 3D on this delightful thank you card.

Linda Vich Creates: Best Birds Thank You. Learn how the bird was created to look 3D on this delightful thank you card.

Here are a couple of shots showing the dimension on the card. It looks even better in real life!

Linda Vich Creates: Best Birds Thank You. Learn how the bird was created to look 3D on this delightful thank you card.

Linda Vich Creates: Best Birds Thank You. Learn how the bird was created to look 3D on this delightful thank you card.

I had a lot of fun creating this card! I really like the color scheme–feel free to save it!

Linda Vich Creates: Best Birds Thank You. Learn how the bird was created to look 3D on this delightful thank you card.


What was really nice was having the ability to create my own sentiment using alphabet stamps. Sometimes the sentiments in a stamp set just don't say what you need them to say so you have to get creative!

I hope you've enjoyed my card today!


Sunday, July 3, 2016

Hearth & Home With Flourish Thinlits

Linda Vich Creates: Hearth & Home With Flourish Thinlits. Brick wall backdrop for this window scene, complete with curtains and window box.
Today I am revisiting the brick wall that I created in my Pop of Paradise For My Daughter post from the other day.

If you remember, the first brick background I created for my card was in the wrong orientation! Today I make use of that background for a horizontal oriented card.
I chose to add a window to my brick wall background to create a somewhat realistic scene for my card.

The Hearth & Home Thinlits were used to die cut three windows from Basic Black and three window boxes from Melon Mambo card stock. I used liquid glue to stack these, one upon the other, for added strength. For the window box, I scored a line at the top before gluing on the last die cut to give the box a bit of dimension.

Because I really wanted the window box to "pop", I inked it up with Versamark and heat embossed it with Clear Stampin' Emboss Powder twice to give it a really glassy finish.

To create the drapes for the window, I cut two lengths of the now retired White Jute Ribbon and glued them to the back of the window frame. I added curtain pulls with some of the now retired Melon Mambo 1/8" ribbon.

A small piece of Smoky Slate card stock was cut to act as the inside of the house. It was glued into place on the brick matte and then the window frame was adhered over it using Foam Adhesive Strips. At this point the card front was adhered to a Basic Black card base using Dimensionals.

I used the retired Bird Builder Punch to punch some leaves from Basic Gray card stock. Flowers were punched from Smoky Slate, Whisper White and Melon Mambo using punches from both the Itty Bitty Accents and Itty Bitty Shapes punch packs, unfortunately both retired! The flowers were shaped using my McGill Paper Blossom Tool Kit. Some rhinestones were colored with a Sharpie and then they were inserted into the flowers.

Leaves were adhered onto the bottom of the window frame using liquid glue and then the window box was adhered into place using triple Dimensionals to achieve the proper height to fit over the window frame. The flowers were adhered using the Fine Tip Glue Pen.

The sentiment from the Picture Perfect stamp set was stamped on Melon Mambo with Basic Black Archival Ink and then the sentiment was punched with the now retired Washi Label Punch. The strip was adhered to the card front using Dimensionals.

Smoky Slate and Basic Gray leaves were die cut with the Flourish Thinlits and then adhered to the card front with liquid glue.

A Whisper White matte was stamped with the spray of flowers from the Flourishing Phrases stamp set using Melon Mambo and then the matte was adhered with Fast Fuse Adhesive to complete the card.

Linda Vich Creates: Hearth & Home With Flourish Thinlits. Brick wall backdrop for this window scene, complete with curtains and window box.

Linda Vich Creates: Hearth & Home With Flourish Thinlits. Brick wall backdrop for this window scene, complete with curtains and window box.

I am delighted with how this card turned out! What is really pleasing is that I was able to use both of the brick backgrounds I originally created but in two very different ways!

Have you tried creating an inked and embossed brick background yet? It is really fun and you can use any inks you need to match your project!


Saturday, July 2, 2016

It's A Good Day

Linda Vich Creates: It's A Good Day. The crisp colors of white and navy come together in this stunning card that uses the Floral Boutique DSP.
Last night I was clicking through my Evernote app looking at various card techniques when I spotted the Double Pleated Card technique from Iced Images. Instantly I knew what I was going to do with this technique.

I started by selecting one of the papers from the Floral Boutique DSP and trimming it to 5 x 10". I scored it, on the long side, at 1" and then 1.5" and repeated this pattern of one inch and then a half inch across the sheet.

Turning the sheet over, I marked both at 2 and 3" on each short end and then lined up my sheet at an angle in my Stampin' Trimmer with the 2" mark and the scored mark closest to it on either side of the centre fold in the sheet. Then I lined up at the 3" mark and the scored mark closest to it on the other side of the paper. I repeated this by switching to the other end of the paper. This gave me a diamond-shaped piece of paper.

Turning over to the side of the DSP I wanted to display, I alternated mountain and valley folds until I reached the middle scored section. I then switched to the other end of the paper and repeated this process until my entire sheet was pleated and met in the centre. I used Fast Fuse Adhesive to secure the pleats.

The length of this pleated piece measured 5" and the width was 4" so I cut a matte from Thick Whisper White card stock in this size. Using the Petal Burst Embossing Folder, I dry embossed the matte and then used Fast Fuse to adhere the pleated piece to it. A length of the now retired Night of Navy Seam Binding was adhered across the middle of the pleated piece. This panel was then adhered to a Night of Navy matte using Dimensionals. A Thick Whisper White card base with a finished size of 4.75 x 6" was then used.

I used the Botanical Builders Framelits to die cut a flower from the Thick Whisper White and stamens from Night of Navy card stock. These were shaped with my Mcgill Paper Blossom Tool Kit. The stamens were adhered with liquid glue and the flower adhered to the card front with a Dimensional. A pearl was added to the centre of the flower.

A piece of white Baker's twine tied together a length of pearl trim from the now retired Love Blossoms Embellishment Kit. These were adhered with glue dots. The sentiment from the Best Birds stamp set was stamped on Night of Navy using Versamark and heat embossed with White Stampin' Emboss Powder.

The Layering Circles Framelits were used to die cut the sentiment and then the now retired 1 1/4" Scalloped Circle Punch was used to cut a Thick Whisper White matte. These were adhered to the card front using Dimensionals.

Inside the card I adhered a strip of the same DSP and also stamped some flowers from the Touches of Texture stamp set to complete the card.

Linda Vich Creates: It's A Good Day. The crisp colors of white and navy come together in this stunning card that uses the Floral Boutique DSP.

Linda Vich Creates: It's A Good Day. The crisp colors of white and navy come together in this stunning card that uses the Floral Boutique DSP.

Don't you just love the crisp look of Night of Navy and Whisper White? It makes me think of wash day when clean white sheets could be seen billowing on a clothesline!

Have you used the Floral Boutique DSP yet? These papers are part of the Floral Boutique Suite found in the catalog on pages 76-77. I'm sure you will want to pair them with the matching Washi Tape, Solid Night of Navy Baker's Twine, Detailed Floral Thinlits Dies and Floral Phrases stamp set. I think this is one of the nicest suites in the catalog! Place your order with me today so you can enjoy creating with this wonderful suite!


Tuesday, June 7, 2016

Just Sitting Here

Linda Vich Creates: Just Sitting Here. Puffy pillows on a porch swing with a dog at your feet–what could be better than Stampin' Up's Sitting There stamp set paired with Playful Palette DSP?
Just sitting here thinking about what card to make for a person who needs cheering up when of course I thought of the Sitting Here stamp set!

I stamped the porch swing with Versamark at the side of an Emerald Envy matte and then heat embossed with White Stampin' Emboss. After planning for how I would make my card I decided to go in another direction so ended up trimming this matte down so that it would fit on a 4.75 x 6" card front.

Two sheets from the Playful Palette DSP Stack were trimmed to fit on a Thick Whisper White card front, adhered to each other and then a length of Emerald Envy Ruched Ribbon was knotted around the matte where the two patterned papers joined. The porch stamped matte was then adhered on top.

Using Basic Black Archival ink, I stamped the three pillows, the dog and the dog's bed on Whisper White card stock. I used Stampin' Write Markers to color all five items and then fussy cut them.

For each of the pillows, I used my McGill Paper Blossom Tool Kit to shape the back of each one to make "puffy" pillows. These were adhered to the card front using Dimensionals. The dog's bed was adhered with Fast Fuse to the card front and then the dog was popped up on it with Dimensionals.

The sentiment was stamped onto a strip of Very Vanilla and then the Banner Triple Punch was used to flag one end. The strip was then adhered to the card front with Fast Fuse. A black Sharpie was used to color three White Perfect Accents and then they were affixed to the sentiment banner.

The only embellishment for the inside of the card was to stamp the pot of flowers and to color them with Stampin' Write Markers.

Linda Vich Creates: Just Sitting Here. Puffy pillows on a porch swing with a dog at your feet–what could be better than Stampin' Up's Sitting There stamp set paired with Playful Palette DSP?

Linda Vich Creates: Just Sitting Here. Puffy pillows on a porch swing with a dog at your feet–what could be better than Stampin' Up's Sitting There stamp set paired with Playful Palette DSP?

I'm hoping this card will provide cheer for the recipient!


Monday, June 6, 2016

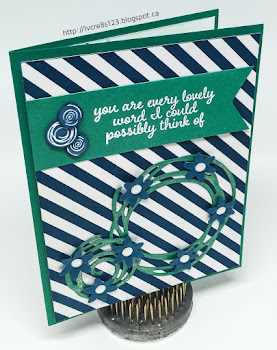
Swirly Bird Meets Love & Affection

Linda Vich Creates: Swirly Bird Meets Love & Affection. Swirly Bird stamps and matching dies are combined with angled stripes in this Emerald Envy and Dapper Denim color-schemed card.
So nice to actually get my hands on Swirly Bird and the coordinating Swirly Scribbles dies! Cards using these products are all over Pinterest.

I started my card by cutting a standard card base from Emerald Envy card stock. I also cut a matte from the retired Irresistibly Yours Specialty DSP.

Using my brayer, now retired, I inked up the matte using Dapper Denim and then carefully wiped off the excess using a paper towel.

Using the dies, I cut two of the swirls from Emerald Envy and coated them with Clear Wink of Stella. While they were drying, I punched the small flowers from Dapper Denim using the Blossom Bunch Punch. I used my McGill Paper Blossom Tool Kit to shape the flowers a bit.

Using my new Marsupial Layering Tool, I adhered my matte to the card base using Dimensionals. I used dots of glue on the back of the swirls to glue them to the bottom of the card front.

Glue dots were used to adhere the tiny flowers to the swirls and then I added White Perfect Accents to the centres.

The sentiment from the Love & Affection was stamped on a strip of Emerald Envy using Versamark and then heat embossed with White Stampin' Emboss Powder. I then used the Triple Banner Punch to flag the end. Fast Fuse adhered the strip to the top of the card front.

On a scrap of Whisper White I stamped three little swirls from the Swirly Bird stamp set, using Dapper Denim. I fussy cut these and then edged them with the Dapper Denim marker so that no white was evident. These were attached to the sentiment strip using glue dots.

On a Whisper White matte on the inside of the card, I used the "dots" stamp from the Swirly Bird set to stamp using Dapper Denim, both full-strength and stamped-off. I then stamped two sizes of the tiniest swirls stamps in Emerald Envy on top of the dots to complete the card.

Linda Vich Creates: Swirly Bird Meets Love & Affection. Swirly Bird stamps and matching dies are combined with angled stripes in this Emerald Envy and Dapper Denim color-schemed card.

Linda Vich Creates: Swirly Bird Meets Love & Affection. Swirly Bird stamps and matching dies are combined with angled stripes in this Emerald Envy and Dapper Denim color-schemed card.

Have you had the chance to play with Swirly Bird yet? If not, place an order with me!


Tuesday, May 10, 2016

Beloved Blackberry Bliss for International Stampin' Up! Blog Hop


Welcome to our International Blog Hop highlighting some of our favorite products that are retiring.We are sure you will find some incredible inspiration from the products you are about to see! I was in Kylie Bertucci's International Blog Highlight and I was selected to be in this hop today.

You may be starting the blog hop here at my blog–Linda Vich Creates–or may have come from the person previous to me in the list. If you get off track at any time, the full lineup below will help you move along from blog to blog so you see all the projects. At the moment you are visiting Linda Vich. I live in Canada. If you live in Canada and were wanting to purchase some Stampin' Up!® products, I am happy to help you!

As soon as I found out that this blog hop would focus on Retiring Products, I knew I would have to create a project featuring my all time favorite color, Blackberry Bliss! Oh how I will miss this color! Because it is so dear to me, you may still see me use it on a project from time to time!

I chose to create a gate-fold card so cut a card base for a 5 x 7" card but scored the Blackberry Bliss card stock at 2.5" and 7.5." I cut mattes from Very Vanilla and Blackberry Bliss and then used the Stylish Stripes Embossing Folder to emboss the Blackberry Bliss mattes. Because the mattes were longer than the embossing folder, I had to emboss part of the matte and then turn the matte around and reinsert it, carefully lining up with the previously embossed parts, and emboss again. The mattes were then adhered to the card front.

Using all but the largest Floral Frames Collection Framelits, I cut two from Very Vanilla and two from Blackberry Bliss card stock. I used the ornate flourish stamp from the First Sight stamp set to stamp all over the Very Vanilla die cuts using Blackberry Bliss ink. This stamp works very well for creating a stamped background and overlapping the pattern does not seem to give any weird looking shapes or designs.

I also die cut the stamens, using the Botanical Builder Framelits, from Very Vanilla card stock. I used my McGill Paper Blossom Tool Kit to shape these. It was a simple matter then to use Dimensionals and stack up the die cuts. I added a gold sequin and a rhinestone to the centre of the stamens and then added additional sequins and rhinestones to the petals of the larger Blackberry Bliss die cut.

Next, to add a bit more pizazz to the front of the card, I used glue dots to adhere Gold Sequin Trim around each embossed Blackberry Bliss matte. I adhered the completed flower to the top of the card using Dimensionals. For using the Dimensionals on this gate fold card, I placed them in strategic spots on the back of the die cut but only adhered the ones on the right side of the card front; the left ones were included to give the proper support and balance to the die cut.

To keep the card closed and to add a little more elegance to the card, I adhered a length of the Very Vanilla 5/8" Satin Ribbon to the back of the card using Fast Fuse and then tied it in a bow at the front.
The inside of the card is simple yet elegant. I stamped a Very Vanilla matte with the same ornate flourish stamp and also stamped the sentiment to complete the card.

Linda Vich Creates: Beloved Blackberry Bliss for International Stampin' Up! Blog Hop. A glitzy yet elegant card created in Blackberry Bliss and Very Vanilla using the Floral Frames Collection Framelits and First Sight stamp set.

Linda Vich Creates: Beloved Blackberry Bliss for International Stampin' Up! Blog Hop. A glitzy yet elegant card created in Blackberry Bliss and Very Vanilla using the Floral Frames Collection Framelits and First Sight stamp set.

Linda Vich Creates: Beloved Blackberry Bliss for International Stampin' Up! Blog Hop. A glitzy yet elegant card created in Blackberry Bliss and Very Vanilla using the Floral Frames Collection Framelits and First Sight stamp set.

Linda Vich Creates: Beloved Blackberry Bliss for International Stampin' Up! Blog Hop. A glitzy yet elegant card created in Blackberry Bliss and Very Vanilla using the Floral Frames Collection Framelits and First Sight stamp set.

Linda Vich Creates: Beloved Blackberry Bliss for International Stampin' Up! Blog Hop. A glitzy yet elegant card created in Blackberry Bliss and Very Vanilla using the Floral Frames Collection Framelits and First Sight stamp set.

I am so pleased with how this turned out! It has great contrast by using the Blackberry Bliss and Very Vanilla color combo and it is also very classy and elegant!

I used the following Retiring Products in the making of this card:
  • Blackberry Bliss 8.5 x 11" card stock #133675
  • Blackberry Bliss Classic Stampin' Pad #133642
  • Stylish Stripes Textured Impressions Embossing Folder #132174
  • Floral Frames Collection Framelits #127012
  • Very Vanilla 5/8" Satin Ribbon #134550
Be sure to place your order before these products are gone!

Thank you for taking part in our blog hop! There are so many amazing ideas and inspiration you don't want to miss. Remember that currently you are at my blog–Linda Vich–so check the blog hop line up to see who is next in the list.