Showing posts with label happy watercolor. Show all posts

Friday, February 24, 2017

Marblelized Thank You Cards

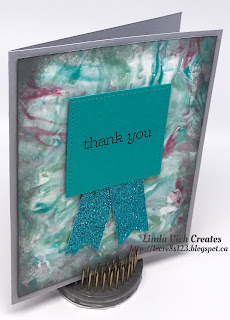
Linda Vich Creates: Shaving Cream Thank You Cards. Simple thank you cards that sport marblelized backgrounds topped with stitched sentiments with glimmer paper banners.
Today's cards use a technique that has been on my to do list for some time but which I just hadn't got around to trying. I had several cards to make so I thought that using shaving cream to produce a marblelized effect would be appropriate since several similar yet different backgrounds can be made at one time. An excellent tutorial can be found here.

The cards also use the 6 x 6" Glimmer Paper Assortment Pack, one of the new FREE Sale-A-Bration items that can be earned by placing a $60 order!

I started by cutting 4 x 5.25" mattes from Whisper White. I then sprayed shaving cream onto a foam plate (one that was larger than my matte) and smoothed the surface of the cream with a piece of cardboard saved from some packaging.

Next, I placed drops of reinker–Mint Macaron, Bermuda Bay, and Sweet Sugarplum–randomly on the shaving cream. I used a wooden dowel to drag through the drops both vertically and horizontally (and sometimes circularly). There is no right way of doing this–feel free to experiment!

I placed one of my mattes face down into the shaving cream and then removed it, checking to be sure I had color in all areas of the matte. If not, I re-dipped the matte.

I let the matte sit for a minute or two and then scraped off the shaving cream, leaving behind a marbled ink pattern. The matte was then set aside to dry while I repeated the process with other mattes.

Because the ink pattern tends to lose its crispness after producing a few mattes, I rinsed off the plate and began again. It was fun to try different "patterns" created with the wooden dowel. Sometimes I would only apply drops of Mint Macaron and Bermuda Bay, stir it with the dowel, and then add a few drops of the Sweet Sugarplum and stir it briefly with the dowel. It is important when working with colors that are complements on the color wheel, (red and green; blue and orange, purple and yellow) not to stir them together too much because the color will quickly turn to mud.

After my mattes were dry, I sponged the edges with Basic Gray ink and then adhered the mattes to standard card fronts cut from Smoky Slate.

The sentiment, from the now retired Happy Watercolor stamp set was stamped on either Sweet Sugarplum, Mint Macaron or Bermuda Bay card stock and then die cut using a square from the Stitched Shapes Framelits.

The Triple Banner Punch was used to flag the ends of Glimmer paper that matched the card stock used for the sentiment and these strips were adhered behind the sentiment. The sentiment piece was adhered to the card front using Dimensionals to complete each card.

Linda Vich Creates: Shaving Cream Thank You Cards. Simple thank you cards that sport marblelized backgrounds topped with stitched sentiments with glimmer paper banners.

Linda Vich Creates: Shaving Cream Thank You Cards. Simple thank you cards that sport marblelized backgrounds topped with stitched sentiments with glimmer paper banners.

I hope you will give this technique a try! Between colors and patterns, the possibilities are endless! What colors will you use and what patterns will you produce?



Wednesday, October 5, 2016

Cable Knit Thank You

Linda Vich Creates: Cable Knit Thank You. Gold embossed Vintage Leaves adorn a cable knit backround on this thank you card.
Though Autumn is not my favorite season–I much prefer Spring–I do love leaves! The Vintage Leaves stamp set is one of my most treasured because I think it is very realistic and it can be used in so many ways and the coordinating Framelits are nice too!

For my thank you card today, I started with a standard card base cut from Cajun Craze. I cut a matte from the now retired Naturals Ivory card stock and embossed it with the Cable Knit Embossing Folder. I find myself reaching for this folder over and over again!

Though the color and texture of the Naturals Ivory was what I wanted, the paper did not react well to being spritzed with water and then being embossed. The dried paper was very warped and I resorted to placing a sheet over it and ironing it to get any sort of flat matte from it! It was finally adhered to the card front using Fast Fuse.

Next, I stamped both the maple and oak leaves, on Cherry Cobbler and Delightful Dijon respectively, with Versamark and heat embossed using Gold Stampin' Emboss Powder. Each leaf was then die cut using the coordinating Leaflets Framelits.

The leaves were adhered to the card front using Dimensionals and then one of the now retired Gold Basic Metal Buttons was threaded with Linen Thread and adhered to the leaf stems.

The sentiment, from the now retired Happy Watercolor stamp set, was stamped with Basic Black on on a strip of Cajun Craze and then the Triple Banner Punch used to flag the end. It was adhered just under the leaves.

A matte of the Naturals Ivory card stock was stamped with both the oak and maple leaves using Cherry Cobbler and Delightful Dijon and then adhered inside the card.

Linda Vich Creates: Cable Knit Thank You. Gold embossed Vintage Leaves adorn a cable knit backround on this thank you card.

Linda Vich Creates: Cable Knit Thank You. Gold embossed Vintage Leaves adorn a cable knit backround on this thank you card.

I love all the texture achieved by combining both the embossing folder and the embossed leaves!


Friday, January 29, 2016

Teal Toned Atypical Valentine

In my blog post Rustic Wooden Valentine I shared a technique I had learned for creating your own Woodgrain. I had so much fun making the first woodgrain that I made a few in other colors! Today I made use of these ones:

Panels created using the Woodgrain Technique and Weathered Wood, Peacock Feathers, Evergreen Bough and Black Soot Distress Inks.

Be sure to check Rustic Wooden Valentine if you didn't already read about the Woodgrain Technique. These colors are my favorites so I couldn't go too long without using them! I had another idea for a Valentine card that used both the larger panel for a background and the smaller panel for die cutting.

I started with a Bermuda Bay card base and adhered the background panel to it with Dimensionals. Using the Hearts Collection Framelits, I die cut three hearts from the smaller panel. I used a sponge dauber to add Black Soot Distress Ink around the die cuts.

I cut a piece of vellum to lay over the Woodgrain panel but still show the ends. I used a sentiment from the now retired Happy Watercolor Stamp Set to stamp with Versamark and then heat embossed with Silver Stampin' Emboss Powder.

I laid out my hearts on top to establish their positions and then cut some thick Bermuda Bay Twine to fasten between them. I used glue dots to attach the twine to the hearts. I applied Dimensionals to the back of each heart and then adhered them to the vellum. I then adhered the vellum to the Woodgrain panel by applying glue dots to the vellum under the hearts so that the adhesive would not show.

I adhered a selection of sequins to the vellum using glue to provide interest and a little sparkle. Gotta have sparkle!

For inside the card I used a matte of Thick Whisper White (because I had a piece the right size handy, otherwise I would have used the regular Whisper White) and used the heart from the Bloomin' Love Stamp Set to stamp with Versamark and heat emboss again with silver. I also stamped the little hearts from the Perpetual Calendar Stamp Set in Bermuda Bay. I inked the edges of the matte with more Bermuda Bay and then adhered the matte with Fast Fuse Adhesive to complete the card.


Sorry about the color here . . . it looks like Island Indigo but it really is Bermuda Bay like above!

I think that the teal tones of the Distress Inks work really well with Bermuda Bay to provide an atypical Valentine!


I am entering this in the Stamp Ink Paper Challenge #32 and I played the diagonal from the bottom left to the top right.

SIP Tic Tac Toe 32