Showing posts with label butterflies thinlits. Show all posts

Monday, April 3, 2017

Stamping Mistake? Learn How I Fixed Rather Than Trashed This Card!

Linda Vich Creates: Stamping Mistake? Learn How I Fixed Rather Than Trashed This Card! Textural card created with Butterflies Thinlits.
It was with great pleasure that I sat down to create this thank you card for a friend. She had told me the type of sentiment she wanted and I chose the Floral Phrases stamp set. After she decided on the colors and style, I showed her a couple of cards in the style she wanted and we had a plan!

I started by cutting a standard card base from Crumb Cake and two mattes from Very Vanilla. Next, using Sahara Sand, I stamped the leafy image from the Number of Years stamp set all over one of the mattes.

One of the edge stamps from the Timeless Textures stamp set was stamped around the edge of the matte. Finally, I stamped the distressed leafy image in Cherry Cobbler in two opposing corners of the matte.

A piece of the Regals Designer Paper Stack was adhered to the middle of the matte. Two lengths of the Sale-A-Bration gold metallic ribbon were adhered to hide the seam of the DSP. Linen thread was then wrapped around the matte and secured at the back using Fast Fuse. The matte was then adhered to the card front using Dimensionals.

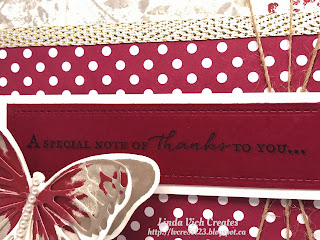
Using my MISTI, the sentiment from the Floral Phrases stamp set was stamped three times on a strip of Cherry Cobbler using Crumb Cake. I had wanted to use a stitched die for the sentiment but it was too long to fit  a Stampin Up die, even if I extended one of the stitched squares into a rectangle. As a work-around I used Lawn Cuts Stitched Borders to create my own stitched rectangle. I then matted this strip onto a strip of Very Vanilla. This was then adhered to the card front using Dimensionals.

On a piece of Very Vanilla, I stamped two identical butterflies using the Watercolor Wings stamp set and Sahara Sand, Crumb Cake and Cherry Cobbler inks. The two butterflies were die cut, one with Bold Butterfly Framelits and one with the Butterflies Thinlits dies. The two butterflies were adhered together using Glue Dots. A strip of pearls was adhered to the body of the top butterfly. After shaping the wings a bit, the butterfly was adhered to the card front using Foam Adhesive Strips.

Linda Vich Creates: Stamping Mistake? Learn How I Fixed Rather Than Trashed This Card! Textural card created with Butterflies Thinlits.

Linda Vich Creates: Stamping Mistake? Learn How I Fixed Rather Than Trashed This Card! Textural card created with Butterflies Thinlits.

For the remaining matte, it was prepared in the same way as the one for the card front with the exception that the stamp was stamped off each time as well as stamping the corner stamps in Sahara Sand as well. The sentiment was stamped using Crumb Cake.

The smaller butterfly was stamped on Very Vanilla using Sahara Sand, Crumb Cake and Cherry Cobbler. The Bold Butterfly Framelits and one with the Butterflies Thinlits dies were used to die cut the butterflies. They were adhered together and to the matte using Glue Dots.

Linda Vich Creates: Stamping Mistake? Learn How I Fixed Rather Than Trashed This Card! Textural card created with Butterflies Thinlits.

Linda Vich Creates: Stamping Mistake? Learn How I Fixed Rather Than Trashed This Card! Textural card created with Butterflies Thinlits.

Lastly, I used the Envelope Punch Board to create a matching envelope from Crumb Cake. It was stamped on the front using Crumb Cake and the leafy stamp from the Number of Years stamp set. The envelope was lined with a matching piece of Regals Designer Paper Stack. Mary Fish has a great tutorial for an envelope liner.

Linda Vich Creates: Stamping Mistake? Learn How I Fixed Rather Than Trashed This Card! Textural card created with Butterflies Thinlits.

Linda Vich Creates: Stamping Mistake? Learn How I Fixed Rather Than Trashed This Card! Textural card created with Butterflies Thinlits.

After finishing the card, I noticed that the sentiment on the front of the card was not totally distinct after having dried completely. How exasperating!

I knew that I would have to use a darker ink to correct the look of the sentiment. With hopes that I didn't have to remake the sentiment strip, I used some of my trusty Un-Du to remove the butterfly and sentiment strip. The card front and strip were completely saturated with the Un-Du solution so I used my heat tool to dry them.

Next, I used my MISTI to stamp the sentiment on the clear matte from my Stamp-a-ma-jig using a bright color of ink. I then placed my sentiment strip under the matte and played with it until I thought that both sentiments were in total alignment. I then carefully removed the plastic matte and secured the sentiment strip with magnets. I then inked up the sentiment with Early Espresso and re-stamped the sentiment.

Upon careful examination, I discovered that the restamp was not in exactly the same spot as the original. However, by happy accident, the stamping looked like it had been planned "shadow" stamping because the lighter, originally stamped sentiment acted as a shadow for the newer, crisply stamped sentiment! BONUS! It actually now had a kind of 3D quality to it!

Linda Vich Creates: Stamping Mistake? Learn How I Fixed Rather Than Trashed This Card! Textural card created with Butterflies Thinlits.
Original sentiment stamped in Crumb Cake.

Linda Vich Creates: Stamping Mistake? Learn How I Fixed Rather Than Trashed This Card! Textural card created with Butterflies Thinlits.
Sentiment Restamped in Early Espresso. Click on the
image to view a larger size to see the 3D shadowed detail.
So, the moral of this story is . . . if you make a stamping mistake, think about it and attempt a fix before having to trash your card completely. You might be pleasantly surprised!


>

Tuesday, November 15, 2016

Beautiful Butterfly Birthday

Linda Vich Creates: Beautiful Butterfly Birthday. Timeless Textures combines with beautiful butterflies to produce a elegant vintage-style card.
On Sunday it was my mother's 91st birthday. Quite a milestone! I wanted to create a very special card for her. I looked through Pinterest for ideas and decided to CASE one by Areli Johnson.

I started by cutting a 4.25 x 5.5" vertical card base from Crumb Cake. I also cut a Very Vanilla matte on which to stamp.

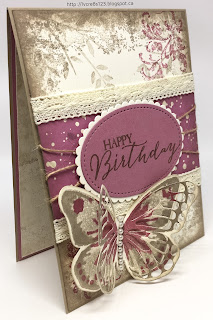
A stamp from the Number of Years stamp set was used to stamp a random leafy pattern all over the card stock using Sahara Sand. I then used an edge stamp from one of my all time favorite sets, Timeless Textures. I stamped this all around the edges of the card stock, again using Sahara Sand.

Choosing another stamp from the same set, I switched to Sweet Sugarplum and stamped in the top right and bottom left corners.

I cut a piece of the Playful Palette DSP and adhered it to the centre of the matte and then added some lace trim (it's a retired one from a Stampin' Up kit but it was unmarked so not sure which one) to the top and bottom of the DSP. Linen Thread was wrapped around the centre of the DSP and adhered to the back with Fast Fuse.

The sentiment, from the Butterfly Basics stamp set, was stamped with Crumb Cake on Sweet Sugarplum card stock and then die cut using an oval die from the Stitched Shapes Framelits. A scalloped oval from the Layering Ovals Framelits was die cut from Very Vanilla and adhered to the stamped oval. The finished piece was adhered over the linen thread using Dimensionals.

Next, I used my MISTI to stamp two butterflies using the Watercolor Wings stamp set. I used Sahara Sand and Sweet Sugarplum and stamped two of the same butterflies and then die cut one using the Bold Butterfly Framelits and one using the Butterflies Thinlits. The two were adhered together and then adhered to the card front using Glue Dots. A strip of pearls was added to the body.

For inside the card, I stamped a Very Vanilla matte using the same two stamps from Timeless Textures but stamped each in Sahara Sand after first stamping off. I also stamped the smaller butterfly, from the Butterfly Basics stamp set, two times using Sweet Sugarplum. One was die cut using the Bold Butterfly Framelits, and one using the Butterflies Thinlits. This was adhered near the top of the matte (not the best place as I discovered!) to complete the card.

I also decided to stamp the envelope and used my Envelopes Liners Framelits to line the envelope with matching paper.

Linda Vich Creates: Beautiful Butterfly Birthday. Timeless Textures combines with beautiful butterflies to produce a elegant vintage-style card.

Linda Vich Creates: Beautiful Butterfly Birthday. Timeless Textures combines with beautiful butterflies to produce a elegant vintage-style card.

Linda Vich Creates: Beautiful Butterfly Birthday. Timeless Textures combines with beautiful butterflies to produce a elegant vintage-style card.

I'm pretty pleased with how the card turned out! Who wouldn't love a combination of Timeless Textures and butterflies?

Here's a picture of my Mom carefully studying the card I gave her.


And here is a picture of her holding one of the nighties I gave her!


All in all I think my mom had a happy day!


Friday, June 3, 2016

Catalog Party Prep Part 4

Linda Vich Creates: Catalog Party Prep Part 4. Timeless Textures provide the distressed foundation for a butterfly in this set of cards.
Today brings us to Part 4 in my 5-part series. If you missed them, here are Part 1, Part 2 and Part 3.

The card set today was CASEd from Stamper's Blog.

A standard card base was cut from Crumb Cake card stock for all five cards. Mattes were cut from each of the five new In Color card stocks and a smaller Whisper White matte was also cut for each card.

Both the Bold Butterfly Framelits and the Butterflies Thinlits were used to die cut both intricate and solid butterflies for each card.
The In Colors were paired together as follows:

Peekaboo Peach and Flirty Flamingo
Dapper Denim and Peekaboo Peach
Flirty Flamingo and Sweet Sugarplum
Dapper Denim and Emerald Envy
Flirty Flamingo and Emerald Envy

Multi Medium Matte was used to adhere the ornate butterflies on top of the solid ones. A swirl of Linen Thread and a pearl was attached to the centre of each butterfly using glue dots.

Four different stamps from the Timeless Textures stamp set were used on each Whisper White matte using Crumb Cake as well as the two inks that matched the butterflies.

The grid stamp was first used to create an L-shape on the bottom left of the matte. Over that was stamped the wood grain stamp in Crumb Cake. The ornate stamp was stamped at the intersection of the L and along each axis. The dots were sprinkled around the first three stamps. The sentiment from the Butterfly Basics stamp set was stamped in one of the matching ink colors at the top of the card.

The stamped matte was adhered to the colored matte with Fast Fuse and then adhered to the card front using Dimensionals. The butterfly was adhered using a Dimensional to complete the card.

Linda Vich Creates: Catalog Party Prep Part 4. Timeless Textures provide the distressed foundation for a butterfly in this set of cards.

Linda Vich Creates: Catalog Party Prep Part 4. Timeless Textures provide the distressed foundation for a butterfly in this set of cards.

Linda Vich Creates: Catalog Party Prep Part 4. Timeless Textures provide the distressed foundation for a butterfly in this set of cards.

Linda Vich Creates: Catalog Party Prep Part 4. Timeless Textures provide the distressed foundation for a butterfly in this set of cards.

Linda Vich Creates: Catalog Party Prep Part 4. Timeless Textures provide the distressed foundation for a butterfly in this set of cards.

 I just love the juxtaposition of the distressed textures with the ornate butterflies!


Thursday, June 2, 2016

Catalog Party Prep Part 3

Linda Vich Creates: Catalog Party Prep Part 3. Ornately embossed vellum and card stock butterflies rest on the Softly Falling snow white background of these lovely In Color cards.
Today I bring you Part 3 in my 5-part series. You can view Part 1 and Part 2 if you missed them.

My card set today was CASEd from a card designed by demonstrator Annette Stewart but I can't link to it because it is displayed on the demonstrators' forum :(

I started with a standard card base cut from Thick Whisper White. I used the Softly Falling Embossing Folder to emboss the card front.

Using the Bold Butterfly Framelits, I die cut large, solid butterflies from each of the five In Colors and also five from vellum. I also used the Butterflies Thinlits to die cut small, intricate butterflies from the five In Colors and five from vellum.

On each of the vellum butterflies, I used my Embossing Buddy and then used the ornate stamp from the First Sight stamp set to stamp with Versamark. I then heat embossed using White Stampin' Emboss Powder. Because vellum is much more fragile than card stock, care must be taken to warm up the heat gun for a few seconds before attempting to heat emboss the vellum so as not to warp it.

Each vellum butterfly was attached to a matching card stock butterfly with glue dots. The smaller butterfly units were then attached to the larger ones also using glue dots. A large pearl was added to hide the glue dots. The wings were bent slightly to provide movement as well as to reveal both the ornate vellum wings and the colorful card stock below.

The sentiment from the Lovely Amazing You stamp set was used to stamp with ink that matched the card stock of the butterflies. Round punches were used to punch both Whisper White and In Color card stock circles. The circles were adhered together with Fast Fuse and then attached to the card fronts using Dimensionals. The completed butterfly for each card was also attached with Dimensionals to complete the cards.

Linda Vich Creates: Catalog Party Prep Part 3. Ornately embossed vellum and card stock butterflies rest on the Softly Falling snow white background of these lovely In Color cards.

Linda Vich Creates: Catalog Party Prep Part 3. Ornately embossed vellum and card stock butterflies rest on the Softly Falling snow white background of these lovely In Color cards.

Linda Vich Creates: Catalog Party Prep Part 3. Ornately embossed vellum and card stock butterflies rest on the Softly Falling snow white background of these lovely In Color cards.

Linda Vich Creates: Catalog Party Prep Part 3. Ornately embossed vellum and card stock butterflies rest on the Softly Falling snow white background of these lovely In Color cards.

Linda Vich Creates: Catalog Party Prep Part 3. Ornately embossed vellum and card stock butterflies rest on the Softly Falling snow white background of these lovely In Color cards.

Don't these butterflies look lovely in all five new colors? It is hard for me to pick a favorite! I think the embossing from the Softly Falling Embossing Folder also adds a lovely bit of subtle texture.


Wednesday, June 1, 2016

Catalog Party Prep Part 2


The 2016-2017 Stampin' Up! Catalog is LIVE! You are all set to view it here and place your orders! It is a wonderful catalog, all 204 pages for you to explore!

Plus, for the month of June, when your order totals $400 before taxes and shipping, you will receive $40 more in Stampin' Rewards! Start making your list!

host-promo-header-NA


Today's post is Part 2 in my 5-part series. You can read Part 1 here. This lovely card set was CASEd from Stamper's Blog.

Linda Vich Creates: Catalog Party Prep Part 2. This set of In Color cards is all about lines, from the die cut border to the intricate lines of the inset butterflies.

A standard card base was cut from Thick Whisper White and then mattes in each of the five In Colors was cut 4.25 x 5.5". The now retired Adorning Accents Edgelits were used to trim a curved bottom into each matte.

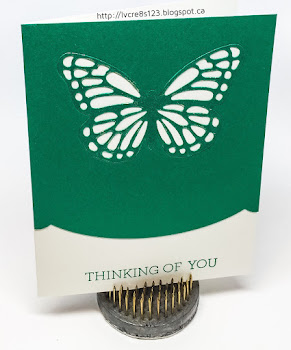
The Butterflies Thinlits were used to cut a butterfly from the top of each matte and then the mattes were adhered to the front of each card base using Fast Fuse Adhesive. Each butterfly was coated with Wink of Stella and then Multi Medium Matte was used to glue each butterfly back into the opening in each matte.

The sentiment from the Crazy About You stamp set was stamped at the bottom of each card base in ink matching the matte to complete the cards.

Linda Vich Creates: Catalog Party Prep Part 2. This set of In Color cards is all about lines, from the die cut border to the intricate lines of the inset butterflies.

Linda Vich Creates: Catalog Party Prep Part 2. This set of In Color cards is all about lines, from the die cut border to the intricate lines of the inset butterflies.

Linda Vich Creates: Catalog Party Prep Part 2. This set of In Color cards is all about lines, from the die cut border to the intricate lines of the inset butterflies.

Linda Vich Creates: Catalog Party Prep Part 2. This set of In Color cards is all about lines, from the die cut border to the intricate lines of the inset butterflies.

Linda Vich Creates: Catalog Party Prep Part 2. This set of In Color cards is all about lines, from the die cut border to the intricate lines of the inset butterflies.

These cards are simple yet effective because they use only two colors that give good contrast and because the focus is only on lines!


Friday, May 6, 2016

Birthday Bouquet Card Set

Did you know that Stampin' Up stamp cases can be used for more than just stamps? I love all the stamp cases and use them to store a variety of Stampin' Up items.

I use the Clear-Mount Stamp Cases #119105 to store my Stampin' Write Markers in color sets, the Full Wide Stamp Cases #127551 to store my sponges by color set, and I will soon have my reinkers organized into the Half Wide Stamp Cases #127552.

If you visit Kelly Kent's Blog, you can download and print her pretty inserts for your markers and reinkers.

Some people also store a variety of embellishments in the stamp cases. Bev Adams has some useful resources for this type of organization.

In addition to actual storage, the stamp cases can be used for creating lovely cases for treats or card sets. Jan Farring has a tutorial for a lovely case with a handle.

I created a card set with a matching case as a thank you gift for a friend. I chose to use the lovely Birthday Bouquet DSP. I cut a piece measuring 11 1/4 x 7" and slipped it into the front of the case where the stamp label usually goes.

Next, I created the cards for the set. I decided to make eight cards in total—four thank you cards and four sympathy cards. I cut standard card bases and mattes from Pool Party and Blushing Bride card stock  Two mattes of each color were embossed on the top 2/3 with the retiring Decorative Dots Embossing Folder and two with the Elegant Dots Embossing Folder. Matching ink was sponged over each to bring out the embossed texture. The edges were also inked.

Two different papers from the Birthday Bouquet DSP were cut and adhered to the bottom 1/3 of each matte and then a strip of coordinating ribbon, either Pool Party Glitter Ribbon or Blushing Bride Satin Ribbon from the Love Blossoms Embellishment Kit was adhered across the join of the DSP and the matte.

The mattes were then adhered to the matching card bases using Dimensionals. The Bold Butterfly Framelits were used to cut butterflies from both vellum and Dazzling Diamonds Glimmer Paper. These were adhered with either a glue dot or a Dimensional. The vellum butterflies also received a coating of Wink of Stella.

The sentiments, from the Rose Wonderstamp set were stamped on Thick Whisper White using Basic Black Archival and then the ends flagged using the Banner Triple Punch. These were adhered with Dimensionals. Using the retiring Envelope Liner Framelits, liners from matching DSP were die cut and adhered inside envelopes.

Linda Vich Creates: Birthday Bouquet Card Set. Lovely 8 card set contained in a Birthday Bouquet decorated full wide stamp case.

Linda Vich Creates: Birthday Bouquet Card Set. Lovely 8 card set contained in a Birthday Bouquet decorated full wide stamp case.

Linda Vich Creates: Birthday Bouquet Card Set. Lovely 8 card set contained in a Birthday Bouquet decorated full wide stamp case.

Linda Vich Creates: Birthday Bouquet Card Set. Lovely 8 card set contained in a Birthday Bouquet decorated full wide stamp case.

Using Fast Fuse Adhesive, two strips of the Blushing Bride Satin Ribbon were adhered inside each side of the stamp case. The finished cards and envelopes were stacked on either side and the ribbons tied in bows to hold them in place.

For the front of the finished card set case, a large butterfly was die cut from Watermelon Wonder card stock with the Butterflies Thinlits Dies. The smaller butterfly was stamped with the Butterfly Basics stamp set using Blushing Bride and die cut using the Butterfly Thinlits Dies and then the edges were inked with Watermelon Wonder.

Both butterflies were inked with Versamark and heat embossed with Clear Stampin' Emboss Powder two times to make them super glossy. Their wings were bent up a bit and they were then adhered to the case using Glue Dots.

Linda Vich Creates: Birthday Bouquet Card Set. Lovely 8 card set contained in a Birthday Bouquet decorated full wide stamp case.
Card case without cards and envelopes.
Linda Vich Creates: Birthday Bouquet Card Set. Lovely 8 card set contained in a Birthday Bouquet decorated full wide stamp case.
Open card case with cards and envelopes.
Linda Vich Creates: Birthday Bouquet Card Set. Lovely 8 card set contained in a Birthday Bouquet decorated full wide stamp case.
 
I'm quite pleased with how this set of cards turned out! Making a set of cards in a decorated stamp case makes a lovely gift!


Sunday, March 27, 2016

Spring Butterfly

I absolutely adore the papers in the Birthday Bouquet DSP! Such lovely colors and patterns to play with–what's not to like? These papers were the inspiration for my card today.

Die cutting a butterfly from the Birthday Bouquet DSP using the large die in the Bold Butterfly Framelits was my first step, as it was to be my focal point. I used the small die to cut a butterfly from Watermelon Wonder card stock.

Next, I used my Fun Flower Punch to punch one flower from Watermelon Wonder and another from Blushing Bride. I used the Blossom Bunch Punch as well as a punch from the now retired Itty Bitty Shapes Punch Pack to punch flower centres and one smaller flower using Pool Party, Mint Macaron and Watermelon Wonder card stock. The Bird Builder Punch was used to punch two leaves, one Old Olive and one Mossy Meadow.

My card base was cut from Watermelon Wonder in my new favorite 4.75 x 6" size and a matte was cut from the Perfectly Artistic DSP. Using stamps from the Timeless Textures, I stamped using Pool Party and then taped a piece of Pool Party Glitter Ribbon around the bottom of the matte. It was then adhered to the card front using Fast Fuse Adhesive.

Using a Tea Lace Paper Doily as a base, I designed my flower arrangement and snapped a photo. I then inked the edges of all the flowers parts, leaves and smallest butterfly with matching inks and brushed each piece with Wink of Stella. I also inked the the large butterfly with Soft Suede. Once the pieces were dry, I shaped them using both my Bone Folder and my McGill Paper Blossom Tool Kit. The flowers and butterfly were then adhered together using Multi Medium Matte.

The doily , leaves and large butterfly were adhered with a couple of drops of Multi Medium Matte and then the flowers were adhered with Dimensionals. I added pearls to both the flowers and butterfly.
The sentiment from the Rose Garden stamp set was stamped in Watermelon Wonder on Thick Whisper White and die cut with a die from the Rose Garden Thinlits. It was popped up over the flowers with Dimensionals.

For the inside matte, I used some of the now retired Naturals White card stock. I stamped a flower from the Beautiful Bunch in Blushing Bride and inked the edges using Pool Party. I die cut a butterfly from a piece of the Birthday Bouquet DSP using the smallest butterfly from the Butterflies Thinlits Dies and inked its edges in Soft Suede. It was adhered with Multi Medium Matte. It and the solid part of the flower stamp were coated with Wink of Stella and the matte was adhered with Fast Fuse to complete the card.


I am loving the color combination on this card–it is so airy and Spring-like! Feel free to copy it if you are inspired by these colors.


If you use these colors in a card, drop me a link below. I'd love to take a look!


Thursday, June 25, 2015

Watercolor Wings: A Study In Neutrals

Linda Vich Creates: Watercolor Wings: A Study In Neutrals. A stunning combo of neutral card stocks combined with glitzy butterflies and stamped flowers from Indescribable Gift and you have a recipe for a successful card!It's always such a delight when a card you've envisioned comes together!

Last night I started playing with a card that had been rolling around in my mind for about a day.

I got my mattes all cut and my stamping and die cutting pretty much done. Usually I finish a project, even if it is late but I was still recovering from a late night from the previous project so I headed to bed!

This morning, I was able to finish my card and I am more than pleased with how it turned out!

I started by stamping the large butterfly in the Watercolor Wings set on Very Vanilla card stock.

I used Sahara Sand to stamp the first stamp, Crumb Cake for the second and Tip Top Taupe for the third. I die cut it with the Bold Butterfly Framelits.

I then used the Butterflies Thinlits Dies to cut a detailed butterfly from Gold Glimmer paper. I also cut a small detailed butterfly from Gold Foil paper using the Bold Butterfly Framelits.

I stamped the inked butterfly with Versamark and then heat embossed it with Clear Stampin' Emboss Powder. I repeated the process to produce a smooth as glass shiny butterfly!

I attached the Gold Glimmer butterfly to the stamped butterfly using Crystal Effects and then attached the smaller Gold Foil butterfly on top. I liked the beautiful contrast of the clear embossed butterfly through the openings in the Gold Glimmer butterfly!

Next, I used my MISTI to stamp the flowers from Indescribable Gift in Tip Top Taupe on a 4 3/8" square Crumb Cake matte. I also stamped the sentiment from the Watercolor Wings stamp set.
I adhered the stamped matte to a Very Vanilla 4 5/8" matte using Fuse Fast.

Using Sticky Strip, I adhered a strip of Vanilla 5/8" Satin Ribbon across the bottom of the matte and then added a strip of Gold Sequin Trim.

I adhered a 5 1/4" matte of Tip Top Taupe to the 5 1/2" Very Vanilla card base using Fuse Fast. I then adhered the top matte to the card base using Dimensionals.

The butterfly was attached in the bottom right corner using both Crystal Effects and a couple of Dimensionals.

A 5 1/4" Crumb Cake matte was stamped with a section of the same flower stamp, using Tip Top Taupe, and then the matte was adhered to the inside of the card.

Linda Vich Creates: Watercolor Wings: A Study In Neutrals. A stunning combo of neutral card stocks combined with glitzy butterflies and stamped flowers from Indescribable Gift and you have a recipe for a successful card!


Linda Vich Creates: Watercolor Wings: A Study In Neutrals. A stunning combo of neutral card stocks combined with glitzy butterflies and stamped flowers from Indescribable Gift and you have a recipe for a successful card!
Close-up detail of butterfly

I just love the look of the gold and the neutral colors together. The Tip Top Taupe works especially well with the Crumb Cake.

What will you or have you created with the Watercolor Wings stamp set? Let me know in the comments below!

Built for Free Using: My Stampin Blog