Showing posts with label cups & kettles framelits. Show all posts

Monday, June 27, 2016

Cups & Kettles and Summer Flip Flops!

Linda Vich Creates: June Stamping Wind Up. Detailed Corner Fold card with the Cupas & Kettles Framelits.
Why does time speed by so quickly for things that I enjoy yet seems to drag its feet for things I dislike?

Friday night was the June Wind Up for our stamping group. It seems like only yesterday it was September and we were just starting our 2015-2016 stamping season!

We had a lovely gathering of 13 ladies and we had a time to socialize and eat goodies before our stamping began for the night. I was surprised with a lovely gift card to a local spa, courtesy of my lovely stampers!


In addition to this, were finally able to give Yvonne the Door Prize that she had won at the Catalog Launch Party back in May. She had left early so never got to receive it!


Because I had long ago prepared for this class, we utilized the now retired A Nice Cuppa stamp set and coordinating Framelits to make Decorative Corner Fold cards. I have hopes that Stampin' Up will resurrect this set for the Christmas Occasions catalog as a number of demonstrators have been actively petitioning Stampin' Up to bring the set back.

To make this card, we used a 8.5 x 5.5" piece of Thick Whisper White card stock, scored at 2 1/8", 4 1/4", and 63/8”. It was folded on the score lines in preparation for assembly.

Card stock mattes, 5.25x 1 7/8” in either Melon Mambo or Bermuda Bay were used to matte 5 x 1 5/8” strips of the now retired Have A Cuppa DSP and one Whisper White strip of the same size. These were then adhered to the card panels, with the white matte on one of the ends. The white matte would serve as the place to

A 1 x5.5” Whisper White strip was scored vertically in half and then folded. It was adhered, using liquid glue, to the two ends of the matted card panel, with the fold to the outside. This formed a complete box.

The cup was die cut from either a Melon Mambo or Bermuda Bay "solid" pattern, from the same DSP stack, using the Cups & Kettles Framelits. A strip of the now retired Glitter Tape was applied to the top of the cup and the excess trimmed. The sentiment was stamped with Basic Black Archival on the cup. One of the Have A Cuppa Embellishments was threaded onto a length of silver cording and attached to the handle of the cup.

Using the largest plain and scalloped squares from the Layering Squares Framelits, a Whisper White and either a Melon Mambo or Bermuda Bay piece of card stock was die cut. These were adhered together and then the cup was adhered using Dimensionals.

The card was folded flat, with the white matte to the back. Two 1" circles were punched from Whisper White using the 1" Circle Punch. They were scored down the middle and folded in half. Liquid glue was placed on one half of each and they were glued to the upper portion of the card front, folded side in towards the score line of the card. These would form the pivoting hinge for the focal image.

Glue was applied to the remaining two sides of the circles and then the matted square was placed on top. Once the card was stood up, the focal image was free to pivot at the front of the card.


Linda Vich Creates: June Stamping Wind Up. Detailed Corner Fold card with the Cupas & Kettles Framelits.

Linda Vich Creates: June Stamping Wind Up. Detailed Corner Fold card with the Cupas & Kettles Framelits.

Linda Vich Creates: June Stamping Wind Up. Detailed Corner Fold card with the Cupas & Kettles Framelits.

Linda Vich Creates: June Stamping Wind Up. Detailed Corner Fold card with the Cupas & Kettles Framelits.

Linda Vich Creates: June Stamping Wind Up. Detailed Corner Fold card with the Cupas & Kettles Framelits.

Our second card of the evening was a CASE of the card created by Sarah Lancaster. I thought that flip flops were definitely a sign of summer so would be the perfect send off for our group!

We started by cutting out the template that Sarah provided and then traced two of the top template onto Whisper White. One was fussy cut, the other was stamped on using stamps from the Love & Affection stamp set. This allowed images to be offset from the template. The stamped image was then cut out.

The template for the flip flop bottom was used to cut a bottom from Emerald Envy. The top strap for the flip flop was also cut from Emerald Envy.

Holes were poked through the strap by using a Piercing Tool. A brad was placed at the top through the stamped part and then double Dimensionals were added. The remaining two holes were pierced through the strap and the stamped piece. Once the brads were in place, the stamped piece was adhered to the Emerald Envy piece using liquid adhesive. The plain Whisper White piece was adhered to the back for written sentiments.

The Botanical Builder Framelits were used to cut a flower and stamens from Flirty Flamingo and Peekaboo Peach card stock. These were shaped and the stamens adhered to the flower with a glue dot. The flower was adhered to the strap of the flip flop using a Dimensional.

The sentiment was stamped with Versamark on Emerald Envy and heat embossed using White Stampin' Emboss Powder. It was then die cut with the now retired Washi Label Punch. It was adhered to the flip flop with Dimensionals.

A rhinestone for the centre of the flower was the finishing touch!

Linda Vich Creates: June Stamping Wind Up. Flip Flop card featuring Love & Affection stamp set.

Linda Vich Creates: June Stamping Wind Up. Flip Flop card featuring Love & Affection stamp set.


I hope you've enjoyed seeing our stamping projects!


Thursday, January 28, 2016

Have A Cuppa Valentine

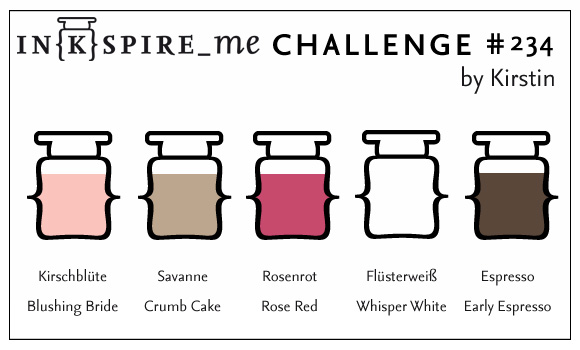
This morning I drew inspiration from the colors in the Inkspire_Me Challenge. The colors were lovely and coincided nicely with the Love Blossoms Designer Series Paper Stack. Of course they were also awesome colors for a valentine!


For this challenge, I knew I wanted to use the Cups & Kettle Framelits to create a card that represented a couple. To do this I wanted to use two cups facing each other with the steam wafting up to a heart above the cups.

The biggest challenge in creating this card was deciding on the patterned papers! Of course, all the papers in the Love Blossoms Designer Series Paper Stack coordinated but designing with patterns can be tricky. You have to choose colors and patterns wisely so that they don't overpower each other or look too busy. I finally decided on a Crumb Cake pattern for a strip at the bottom of the card and two Rose Red patterns for the cups.

I planned to divide the bottom and top by using a Blushing Bride ribbon from the Love Blossoms Embellishment Kit. This kit has all kinds of goodness in it! Satin ribbon, pearl trim, metallic doilies, sequins, glittered enamel dots as well as beautiful Rose Red bow clips!

For the upper part of the card, I needed to stamp on it so I would have chosen Whisper White but somehow all that bare whiteness was too much! That's when I got the idea to do a color wash on the background using Blushing Bride. This would give a lovely rest from the patterned paper while still providing some lovely texture.

I initially tried using the Watercolor Wash background stamp but it wasn't quite right. In the end, I decided to do a freehand wash so that I could control the amount of color I put onto the watercolor paper.

Using a flat paintbrush, I stroked on plain water to wet the watercolor paper. I then mixed clean water with some Blushing Bride reinker to create a very soft color and brushed it onto the paper. I used my heat tool to dry it and reshape it to its former flat state.

I used my heat tool to thoroughly dry the paper and then adhered a strip of Crumb Cake patterned paper to the bottom of it. I adhered a length of the ribbon over the top part of the patterned paper–it was starting to look really nice!

I used a cup die from the Cups & Kettle Framelits to die cut two cups, flipping one so that I had two cups that faced each other. I then also die cut some self-adhesive fun foam and adhered this to the back of each cup because I wanted added thickness for the cups. I used a sponge dauber and Early Espresso to ink all the edges to provide dimension and cover the white edges.

Using a Crumb Cake Stampin' Write Marker, I colored the modern heart from the A Nice Cuppa Stamp Set and stamped it at the top of the watercolor panel. I used the marker rather than the stamp pad because I wanted a looser looking, imperfect heart–one that could have been formed from steam perhaps?

At this point, I used foam tape to adhere the panel to a Crumb Cake card base. I chose the foam tape because I feel it works better with painted watercolor paper to keep it flat but popped up.

I cut a length of Metallic Gold Baker's Twine and unravelled it to get the gold thread. I placed a few glue dots on the spots that would be covered by the cups and then cut little pieces of the thread and stuck them down. Using Dimensionals, I adhered the cups and then played with the threads until they sort of stuck up like steam.

Using the banner die from the Large Numbers Framelits I cut a piece of watercolor paper. I gave it a Blushing Bride wash and dried it thoroughly. I then used Rose Red ink to stamp the sentiment. Because the sentiment stamp also contained a heart, I masked that with tape before inking and then removed it to stamp the sentiment itself. I inked the edges of the banner with Early Espresso and then adhered it across the two cups using Dimensionals.

I used the Confetti Hearts Border Punch to punch out hearts from both Crumb Cake and Rose Red card stock. I used glue to adhere them to the watercolor paper. My final task was to add little glimmer to the hearts by using my Clear Wink of Stella Glitter Brush.


I'm pleased with how this card turned out and it gave me a chance to use up a lot of patterned paper!