Showing posts with label daisy delight. Show all posts

Monday, June 12, 2017

Gold Dipped Daisies

Linda Vich Creates: Gold Dipped Daisies. Dramatic mix of black and gold on this card that features the Daisy Punch.
On the weekend, I had some free moments at my job to brainstorm card ideas. I came up with a couple for using with the Daisy and couldn't wait to try them today! My first idea didn't work quite the way I wanted so I went on to the second idea.

I started by stamping a 4.25 x 5.5" Basic Black matte using the Diagonal Stripe stamp and Versamark and then heat embossed it with Gold Stampin' Emboss Powder. I really liked that effect!

Using the Daisy Punch, I punched six daisies from Basic Black. I also punched out six of the medium size blossom on the now retired Blossom Bunch Punch. I used a sponge dauber to dab Versamark on the ends of each daisy petal and embossed with gold. After using my Heartfelt Creations Deluxe Flower Shaping Kit to shape the small blossom punches, I stamped them with Versamark and embossed the whole blossom, one half at a time, with gold. AMAZING!

I adhered two daisies together and then two of the gold blossoms. A Dimensional adhered the gold blossom to the daisy. This was repeated to create two more flowers. I then colored a Clear Faceted Gem with a black Sharpie and adhered it in the centres of each daisy. Wow!

Next, I cut a strip of Gold Foil and stamped the sentiment with Jet Black Stazon using my MISTI to ensure a clean stamp on a slippery surface. I then used the Scalloped Tag Topper Punch to punch each end. A gold Sharpie was used to ink the edges so that the lighter core of the paper wouldn't show.

I threaded four strands of Basic Black Solid Baker's Twine through the openings in the tag and applied Mini Dimensionals to the back of it. I also taped the twine on the back to prevent the tag from sliding around. The tag was placed at the bottom of the striped embossed matte and the ends of the twine were taped to the back. The matte was then adhered to a 4.75 x 6" Basic Black card front.

The daisies were adhered to the card front using Dimensionals.

For inside the card, a Very Vanilla matte was stamped with the smaller daisy and stem and embossed with gold to complete the card.

Linda Vich Creates: Gold Dipped Daisies. Dramatic mix of black and gold on this card that features the Daisy Punch.

Linda Vich Creates: Gold Dipped Daisies. Dramatic mix of black and gold on this card that features the Daisy Punch.

Linda Vich Creates: Gold Dipped Daisies. Dramatic mix of black and gold on this card that features the Daisy Punch.

I must say that I am LOVING this card! It turned out even better than I imagined that it would! Unfortunately, the photos do not do this card justice. It is so difficult to get good pictures when you use foil on your cards!

Hope you liked my card anyway!


Tuesday, June 6, 2017

2017 Catalog Launch Prep Part 3: First Prize

Linda Vich Creates: 2017 Catalog Launch Prep Part 3: First Prize. Delightful Daisy DSP teams up with the Daisy Punch for this lovely card set and portfolio.
Today brings us to the third and final part of my Catalog Launch Prep series. If you missed the two earlier parts, you can reach them here: 2017 Catalog Launch Prep Part 2: Second Prize and 2017 Catalog Launch Prep Part 1: Third Prize. You can also read about the actual 2017 Catalog Launch Party.

Today I feature the card set that was the First Prize at my Catalog Launch.

I started by creating the cards for the card set. I chose a 4.75 x 6" card base and cut it from Thick Whisper White. I cut a matte from Daffodil Delight and embossed it using the Hexagons Dynamic Embossing Folder and adhered it to the card front using Dimensionals.

I next cut a panel of the Delightful Daisy DSP and
matted it with some Night of Navy. I used half of a Delicate White Doily and adhered it under the Daisy panel which was adhered to the left side of the card front.

Using Night of Navy, the sentiment was stamped on a strip of Thick Whisper White and then it was punched with the Banner Triple Punch. It was adhered to the Daisy Panel with Fast Fuse and to the embossed matte using a Dimensional.

The Daisy Punch was used to punch two Night of Navy Daisies which were curled slightly using a bone folder and then adhered together using liquid adhesive. The 1/2" Circle Punch was used to punch a Daffolil Delight Circle which was adhered to the centre with a Clear Faceted Gem, colored with a sharpie, adhered over top of it. The daisy was adhered to the card front using a Dimensional.

The Envelope Punch Board was used with Daffodil Delight card stock was used to create matching envelopes for the cards.

Linda Vich Creates: 2017 Catalog Launch Prep Part 3: First Prize. Delightful Daisy DSP teams up with the Daisy Punch for this lovely card set and portfolio.


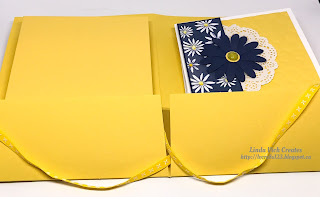
For the card portfolio, I used a 12 x 12" sheet of Daffodil Delight card stock trimmed to 11 x 9.5". I scored the long side at 2.5" from the bottom and at 5.5" on the short side and used a bone folder to really burnish the folds. Inside, I cut on the centre score line for the 2.5" piece and then cut slivers from each side to reduce the bulk when folding the portfolio.

For the front, I matted two pieces of the Delightful Daisy DSP with Night of Navy. Before adhering the mattes to the front and back covers of the portfolio, I used Tear & Tape to adhere a length of Daffodil Delight 1/4" Double Stitched Ribbon across the middle of the back and front. I then adhered the mattes using liquid adhesive.

Three additional daisies were punched, curled, and assembled as for the cards and then adhered to the front cover of the portfolio. The cards and envelopes were added inside and the portfolio tied up with the ribbon.

Linda Vich Creates: 2017 Catalog Launch Prep Part 3: First Prize. Delightful Daisy DSP teams up with the Daisy Punch for this lovely card set and portfolio.

Linda Vich Creates: 2017 Catalog Launch Prep Part 3: First Prize. Delightful Daisy DSP teams up with the Daisy Punch for this lovely card set and portfolio.

I really had a lot of fun preparing these prizes for my Catalog Launch and it was even more fun to share them with the ladies who won them!

I hope you've enjoyed reading about my preparations for the 2017 Catalog Launch. If you have visited, drop me a line below to let me know you stopped by–I'd love to hear from you!


Tuesday, May 9, 2017

Tri-fold Daisy for Mother's Day With 2017 Catalog Sneak Peeks

Linda Vich Creates: Tri-fold Daisy for Mother's Day With 2017 Catalog Sneak Peeks. Delightful daisies and Wood Textures team up to produce this distinctly feminine tri-fold Mother's Day card.
As soon as I laid eyes on the Delightful Daisy DSP in the 2017-2018 Annual Catalog, I knew I would be using it for my Mother's Day card! There are such lovely colors and patterns in this DSP and they speak to me . . . this is one pack that I definitely will be cutting up to use and I'll probably purchase some more!

My patterned paper was chosen and of course I wanted to use the new Daisy Punch but I still needed to decide on a technique for the card I would make for my mother. After reviewing my pins on Pinterest, I decided to try BJ Peters' Tri-fold Card.

I tried a sample using scrap paper and determined that I wanted a larger format so instead of the standard 4.25 x 5.5" card size, I revamped BJ's design to use my favorite 4.75 x 6" format. This gave me more room to display the lovely daisy DSP and the flower punch seemed to work better with that size of canvas.

Because I love the look of flowers against wood (like in those gorgeous photos of old buildings with wildflowers growing around them) I picked the Wood Textures DSP to complement the flowers.

I started by cutting a piece of Night of Navy card stock to 6 x 11" and then scored on the long side at 2 1/2" and 7 1/4." Mattes for the two front flaps and the inside panel were cut from Calypso Coral as well as a piece of the Wood Textures and a piece of the Daisy Delight DSP for each of the two front flaps. These were adhered using Fast Fuse. A white matte was also cut for the inner panel.

Next, I punched three daisies from Watercolor Paper and sponged them all over with Calypso Coral and then the centre parts with Watermelon Wonder. I tweaked the ends of the petals with my fingers and then bent the petals up a bit. The three were adhered together, offset, using liquid adhesive. I used the 1/2" Circle Punch for the small Night of Navy centre and then used a Navy Sharpie to color one of the new Faceted Gems before adhering it to complete the flower.

The Stitched Shapes Framelits and the Layering Circle Framelits were used to cut a series of circles (refer to my photos showing my Numbered Die Sets):

  • #3 Stitched Circle in Night of Navy
  • #2 Stitched Circle using the Wood Textures DSP
  • #1 Stitched Circle using the Wood Textures DSP
  • #2 Stitched Circle in Night of Navy
  • Scalloped Circles #2 and #6 in Calypso Coral
I used my MISTI to stamp the sentiment, from the retiring Circle of Spring stamp set, on the smaller Wood Textures circle using Night of Navy and then Versamark. It was heat embossed with Clear Stampin' Emboss Powder and then it was layered with the smaller Calypso Coral Scalloped Circle and the smaller Night of Navy stitched circle using liquid adhesive.

The remaining Wood Textures stitched circle was adhered to the Scalloped Circle using liquid adhesive. Glue dots were then adhered in the middle of the Night of Navy stitched circle and Gold Metallic Thread was adhered to make a thread nest. The two other circles were then adhered to it using Dimensionals. The flower was adhered using liquid adhesive.

The position for the flower and the sentiment was determined and they were adhered with both liquid adhesive and Dimensionals to the card front.

The small daisy was stamped on the Whisper White matte using Calypso Coral and Old Olive and then a strip of the Daisy Delight DSP was adhered along the bottom of the matte and then it was adhered inside the card to complete it.


I made an envelope from Calypso Coral using the Envelope Punch Board and used the now retired Petite Petals Punch to punch a detail in the envelope flap. To draw attention to the punched detail, I softly sponged Calypso Coral over the area surrounding the punch.

Linda Vich Creates: Tri-fold Daisy for Mother's Day With 2017 Catalog Sneak Peeks. Delightful daisies and Wood Textures team up to produce this distinctly feminine tri-fold Mother's Day card.

Linda Vich Creates: Tri-fold Daisy for Mother's Day With 2017 Catalog Sneak Peeks. Delightful daisies and Wood Textures team up to produce this distinctly feminine tri-fold Mother's Day card.

Linda Vich Creates: Tri-fold Daisy for Mother's Day With 2017 Catalog Sneak Peeks. Delightful daisies and Wood Textures team up to produce this distinctly feminine tri-fold Mother's Day card.

Linda Vich Creates: Tri-fold Daisy for Mother's Day With 2017 Catalog Sneak Peeks. Delightful daisies and Wood Textures team up to produce this distinctly feminine tri-fold Mother's Day card.
Close up details

Linda Vich Creates: Tri-fold Daisy for Mother's Day With 2017 Catalog Sneak Peeks. Delightful daisies and Wood Textures team up to produce this distinctly feminine tri-fold Mother's Day card.
Closer yet–check out that dazzling faceted gem!

Linda Vich Creates: Tri-fold Daisy for Mother's Day With 2017 Catalog Sneak Peeks. Delightful daisies and Wood Textures team up to produce this distinctly feminine tri-fold Mother's Day card.
One last look


I'm so pleased with how this card turned out! I love the flowers against the wood grain and the glint of the gold thread and the sparkle from the flower's centre makes this a distinctly feminine card that I'm sure my mother will love!

I hope you will give the Tri-fold Card a try . . . it has a lot of design potential!