Showing posts with label hello you thinlits. Show all posts

Sunday, January 15, 2017

Stitched Thank You Cards

Linda Vich Creates: Stitched Thank You Cards. This simple thank you card makes use of gold embossed layered die cuts and a die cut sentiment thinlit.
I am so in love with the Stitched Shapes Framelits that I use them every chance I get! Of course, after you purchase them, you will want to get the three Layering Framelits sets–circles, ovals, and squares–because they layer so nicely together!

Today's cards use the smallest squares with a retired alpha–Sophisticated Serifs.

To begin, I cut a card base 8.5 x 4.5" from Bermuda Bay. I chose a piece of the Brights Designer Series Paper Stack for a matte.

Using Versamark, I stamped the letters on Bermuda Bay and heat embossed them with Gold Stampin' Emboss Powder. Each letter was die cut using a square from the Stitched Shapes Framelits. These were then layered onto a scalloped square die cut from Gold Foil.

The letters were adhered to the card front using Dimensionals. The "you" was cut from Gold Foil using the now retired Hello You Thinlits. It was adhered with liquid adhesive.

Versamark was used to ink the edges of a Whisper White matte and then they were heat embossed using Gold Stampin' Emboss Powder.

Linda Vich Creates: Stitched Thank You Cards. This simple thank you card makes use of gold embossed layered die cuts and a die cut sentiment thinlit.


Linda Vich Creates: Stitched Thank You Cards. This simple thank you card makes use of gold embossed layered die cuts and a die cut sentiment thinlit.

The second card was created using Elegant Eggplant.

Linda Vich Creates: Stitched Thank You Cards. This simple thank you card makes use of gold embossed layered die cuts and a die cut sentiment thinlit.


I can't part with my alpha stamps because I like to use a variety of styles and know that as soon as I get rid of one, I'll need it! Do you still use your retired alpha stamp sets?


Wednesday, July 6, 2016

Best Birds Thank You

Linda Vich Creates: Best Birds Thank You. Learn how the bird was created to look 3D on this delightful thank you card.
Every once in awhile, the stars align and a crafting session goes as smoothly as spreading peanut butter on a slice of bread. Today was one of those days. :)

As I sat reviewing my new stamp sets, I chose the Best Birds to create a card.

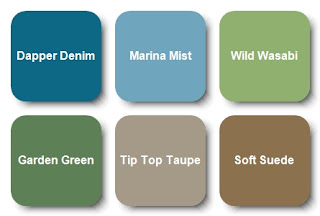
I had a blue bird in mind and chose a scrap of watercolor paper to try out my hunch that Marina Mist and Dapper Denim was the combination I was seeking. I used my Kuretake Fude Water Brush Pen and reinker to paint a few strokes. The blues were perfect together!

Then, since I was also going to be stamping a branch, I tried out Wild Wasabi and Garden Green for the leaves and Tip Top Taupe and Soft Suede for the branch. These combinations also worked well.

I then consulted a downloadable PDF from Patty Bennett that I had saved to Evernote. The PDF is a wonderful resource that provides a sample of all the DSP in the new 2016-2017 catalog. I was looking for a paper that would look good with the bird I was going to paint. One of the new Moroccan papers fit the bill!

I began by stamping, with Basic Black Archival ink, the bird and the branch onto watercolor paper using my MISTI. I zapped the images with my heat tool just to make sure the ink was set and then began watercoloring them using the reinkers I had selected previously. When complete, I heat set the images and then die cut them using the Birds & Blooms Thinlits.

Using the Hello You Thinlits, I die cut three "thanks" from Wild Wasabi and adhered them together using liquid adhesive. I chose green for this sentiment to pick up the green from the leaves and to provide a little relief from all the blue. I inked the stacked die cut with Versamark and then heat embossed with Clear Stampin' Emboss Powder three times to make the sentiment good and shiny.

To create the rest of the sentiment, I stamped with the Labeler Alphabet stamp set onto Thick Whisper White using Dapper Denim ink. To use these letters, you really need to stamp one letter at a time to be able to get them close enough to each other. Once complete, I cut the sentiment up into individual words.

Now that I had the sentiment, the bird and the branch, I took some time to plan out my layout for the card. I tried several different configurations, including both vertical and horizontal. I finally decided on a horizontal orientation.

It was necessary to create a 5 x 7" card to hold my layout. I first chose to matte the DSP with Dapper Denim card stock, after inking the edges of the DSP with Soft Suede. I then cut a Soft Suede card base to pick up the color of the branch. The matted DSP was adhered to the card front using Dimensionals.

In my post, Just Sitting Here, I used a technique learned from Lydia over at Understand Blue. The technique involves using a stylus, or in my case I used my McGill Paper Blossom Tool Kit, to push out the back of a die cut to give it a realistic 3D look. I wanted to apply this technique to my bird so it would not look so flat. I also used this technique on the branch to a lesser degree.

After puffing up my bird and branch, I attached double Dimensionals to the bird to maintain the "puffiness" and adhered both die cuts to the card front. This then allowed me to lay out and then adhere both parts of my sentiment. I attached the "thanks" with liquid glue. Before adhering the individual words, I used a sponge dauber to ink the edges of each word with Soft Suede. The words were then adhered to the card front using rolled up Glue Dots to provide a little height.

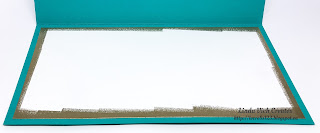
For the inside of the card, a matte was cut from watercolor paper. Leaves from the Birthday Blossoms stamp set were stamped in two corners using Basic Black Archival ink. Once dry, I used Wild Wasabi and Garden Green to watercolor the leaves. The matte was adhered with Fast Fuse to complete the card.

Linda Vich Creates: Best Birds Thank You. Learn how the bird was created to look 3D on this delightful thank you card.

Linda Vich Creates: Best Birds Thank You. Learn how the bird was created to look 3D on this delightful thank you card.

Here are a couple of shots showing the dimension on the card. It looks even better in real life!

Linda Vich Creates: Best Birds Thank You. Learn how the bird was created to look 3D on this delightful thank you card.

Linda Vich Creates: Best Birds Thank You. Learn how the bird was created to look 3D on this delightful thank you card.

I had a lot of fun creating this card! I really like the color scheme–feel free to save it!

Linda Vich Creates: Best Birds Thank You. Learn how the bird was created to look 3D on this delightful thank you card.


What was really nice was having the ability to create my own sentiment using alphabet stamps. Sometimes the sentiments in a stamp set just don't say what you need them to say so you have to get creative!

I hope you've enjoyed my card today!


Friday, September 25, 2015

Autumn Leaf Shaker and Four Fuse Tool Tips

Linda Vich Creates: Autumn Leaf Shaker and Four Fuse Tool Tips. Sequins add sparkle to a leafy fall shaker card.With Autumn in the air, I decided that my next shaker card made using the Fuse tool would have to have a leaf (or two) in it!

I chose a leaf patterned paper from the now retired Color Me Autumn DSP and adhered it to a piece of Crushed Curry card stock to give it strength.

I then used the Leaflet Framelits Dies to cut a maple leaf in the bottom left. I used the same die to create my shaker from a piece of a page protector. I filled it with an assortment of sequins, including some from Pretty Pink Posh.

As I created the shaker for this card, I realized that there was a bit of a learning curve for the Fuse tool.While my first shaker with the Fuse had been a straight-sided window, a leaf shape was much more complicated!

As I tried to trace the outside of the leaf die, I found it very tricky to fuse all the little angles of the die. It was then that I decided that my first piece of advice for the Fuse Tool was:

1. Don't choose complicated shapes. With that said, there is a caveat to this piece of advice; though a die shape maybe somewhat complicated, your fusing doesn't have to be ie. because the fused edge of the shaker will be generally hidden from view, you can fudge the fuse line a bit so that it is not so complicated to create.

I also had to create the leaf shaker a second time because the first time I was actually trying to fuse the INSIDE of the leaf die! I found it somewhat difficult to wrap my mind around where the die would cut the shape and where I would fuse it. This brings me to my second tip:

2. Die cut the inside of the die; fuse the outside of the die. The fused area of the shaker has to be OUTSIDE of the area where the opening is die cut, providing you with an area to adhere to the surrounding card and allowing you to keep the actual fused line hidden.

As I played more and more with creating the leaf shaker, my Fuse was still plugged in but sitting idle. when I used it to fuse again I actually ended up melting my plastic instead of fusing it! :( So my third tip becomes:

3. Unplug the Fuse when you are not planning to use it for awhile. On my iPhone, I have Siri set a timer for 15 minutes when I first plug in the Fuse so that I get it heated to its optimum heat setting. When I unplug it, I use the stopwatch function on my phone until I am once again ready to work with the Fuse tool. I then set a timer for the elapsed time on the stopwatch (or 15 minutes if it has been longer than 30 minutes) to reheat the Fuse.

4. While the Fuse is plugged in, use a heat safe container in which to hold it. I found that the little stand included with the tool to be somewhat useless. Because of the cord is so short, trying to rest the Fuse on its stand seems to be a very wobbly accident waiting to happen! Instead, I use a squat little canning jar to rest the Fuse in when I'm not holding it. Makes me feel a whole lot safer!

After my shaker was created, I taped it in place on the back of the card stock and then adhered the matte using mounting tape to a Crushed Curry card base. I used a Project Life journaling pen to create a stitched line around the leaf shaker.

The sentiment was die cut from Cajun Craze card stock using the Hello You thinlits and glued in place using the Fine Tip Glue Pen (my newest favorite adhesive!).

Linda Vich Creates: Autumn Leaf Shaker and Four Fuse Tool Tips. Sequins add sparkle to a leafy fall shaker card.

I'm going to keep playing with my Fuse to learn more about how it works best. Hopefully you will find the tips I have shared today useful in your fusing endeavours!

Built for Free Using: My Stampin Blog


Saturday, May 2, 2015

Revving Up For Retirement

I had a slight mishap on Thursday that kept me home from work but luckily I was feeling much better on Friday so that I could continue as planned with my stamping group. To find out what happened, check out my Facebook post here.

My stamping ladies were busy last night, creating cards using products that are on the retiring list. It was good to work with these favorite products before they disappear!

Linda Vich Creates: Revving Up For RetirementLinda Vich Creates: Revving Up For Retirement

Our first card was a departure from my usual colors and style but I wanted to create something that had a vintage feel to it.

Linda Vich Creates: Revving Up For Retirement. Vintage look is achieved with the use of neutral inks and embellishments in this Petal Potpourri card.


To begin with, we distressed a Whisper White matte and a smaller piece of the same using a sponge and the retiring Baked Brown Sugar ink.

Next, MISTI came into play when we used the retiring Dictionary background stamp with Soft Suede ink. It was stamped off once and then gave a nice hint of text to the distressed matte. To further distress it, the Distressing tool was used and then the edges were inked with Soft Suede.

We used the retiring On Film Framelits to cut a frame from Watercolor paper and then sponged it with Early Espresso. We used the frame to determine where to stamp the two flowers from the Petal Potpourri stamp set.

Two flowers were stamped on the matte using Baked Brown Sugar and one was stamped on the smaller distressed piece, using Soft Suede. The centre of that flower was colored with Hello Honey using a sponge dauber and the flower was punched with the Flower Medallion punch. Its edges were then inked with Soft Suede.

A strip of Sahara Sand Lace and the previously retired Soft Suede Taffeta ribbon were adhered to the bottom of the matte and then it was adhered to a Soft Suede card base using Dimensionals.
The frame was adhered to the matte with glue dots and then the punched flower was adhered inside but overlapping the frame using doubled-up Dimensionals.

The Hello You thinlits were used to die cut the word "you" and the banner punch was used to cut two banners from Dazzling Diamonds Glimmer paper. These were each sponged with Baked Brown Sugar and the banners were edged with Soft Suede.

"You" was adhered with glue to the top of the card. The banners were angled and adhered to the bottom right of the frame. A dragonfly bead was painted with Tim Holtz Tarnished Brass Distress Paint and then adhered on top of the banners using Crystal Effects.

The sentiment, Amaze Me, from the Crazy About You stamp set, was stamped with Early Espresso at the bottom of the card base.

To complete the card, an inside matte was created from a piece of the retiring Naturals White card stock. A flower was stamped in the bottom right corner using Soft Suede and then the edges were inked with Baked Brown Sugar.

Linda Vich Creates: Revving Up For Retirement. Vintage look is achieved with the use of neutral inks and embellishments in this Petal Potpourri card.

Linda Vich Creates: Revving Up For Retirement. Vintage look is achieved with the use of neutral inks and embellishments in this Petal Potpourri card.


Built for Free Using: My Stampin Blog


Inspiration for a Mother's Day card came from a creation by the Stampin' Stud.

We used a card base of Calypso Coral. A matte of the retiring Strawberry Slush was embossed with the Spring Flowers Embossing Folder and the edges inked with Calypso Coral. It was adhered to the card base with Dimensionals.

Linda Vich Creates: Revving Up For Retirement. A Mother's Day card is embellished with sponged vellum flowers and adorned with Gold Glimmer leaves.

A strip of Irresistably Yours was sponged with gold ink, heat set, and then the white leaves brought back by rubbing with paper towel.

The 1 3/4" and the 1 1/4" Scallop Circle Punches were used to punch circles from Gold Glimmer and Calypso Coral papers. The smaller circle's edges were inked with Strawberry Slush. The circles were then layered onto a 1/4 of a Tea Doily and adhered under the strip of leafy resist paper.

A square of vellum was sponged with a combination of Hello Honey, Pumpkin Pie, Strawberry Slush, and Blackberry Bliss. The Fun Flower punch was used twice, the Pansy Punch once and the Petite Petal Punch was used once.

The punched flowers were crumpled gently to give them some dimension and then a piercing tool was used to poke a hole in the centre of each. They were then attached together with a Candy Base Brad. A rhinestone which had been colored with a R24 Copic marker was added to the brad.

Glue dots were used to secure a length of Gold Baker's Twine in a pleasing circular arrangement and then the completed flower was adhered with Dimensionals on the left side of the leafy strip. The retired Secret Garden Framelits were used to die cut some leaves from Gold Glimmer paper and they were tucked under the flower and adhered with glue.

For the inside of the card, a matte of the retiring Naturals Ivory had its edges inked with gold and then the flowers and sentiment from the Mother's Love stamp set were stamped using Strawberry Slush and Crisp Cantaloupe, respectively.

Linda Vich Creates: Revving Up For Retirement. A Mother's Day card is embellished with sponged vellum flowers and adorned with Gold Glimmer leaves.

Linda Vich Creates: Revving Up For Retirement. A Mother's Day card is embellished with sponged vellum flowers and adorned with Gold Glimmer leaves.


Built for Free Using: My Stampin Blog


Lots of inky hands at the end of the night but some lovely cards were produced and a good time was had by all! Though it will be sad to see the products we used retire, the space they leave behind will be filled with more great products with which to create!

What products will you be sad to see retire? Leave me a comment below!

Monday, February 9, 2015

Painted Blooms Valentine

It was a strangely quiet day at Walmart today, as our Credit/Debit machines went down about 1:30! They still weren't working properly when we closed at 6:00. Apparently this was a Canada-wide problem and some other stores in the area were also having intermittent problems. Pretty hard for a lot of people when most people don't carry cash anymore!

A quick little card for you tonight!

I cut a square card base from Wild Wasabi and used Fuse Fast to adhere a matte of one of the papers from the Painted Blooms Designer Paper—a lovely pack of paper!

I adhered a strip of the White Jute Ribbon and topped it with a strip of Mossy Meadow Satin Ribbon. I trimmed the ribbon at each card edge.

I cut a smaller square matte from Pacific Point card stock and embossed it using the Happy Hearts embossing folder. The edges were inked with Mossy Meadow. I adhered it to the card front using Dimensionals.

Using Pacific Point, I stamped the sentiment from Crazy About You on Whisper White and then die cut it using a shape from the Word Bubbles Framelits. I inked the edges in both Wild Wasabi and Mossy Meadow and adhere it to the top right of the matte using Dimensionals.

I utilized the Hearts Collection Framelits to cut one heart from the Painted Blooms paper and three from Pacific Point. I glued these together with the designer paper on top.

I used Versamark, Heat & Stick Powder and Dazzling Diamonds to create a glittery heart. I wound Wild Wasabi Twine around one side of the heart and tied a bow. Dimensionals were used to adhere the heart to the card front.

I die cut the word, "you" from Pacific Point card stock two times, using the Hello You Thinlits. I glued these together and then heat embossed the word with clear embossing powder a few times to get it really glossy.

Finally, I adhered the word to the heart using Glossy Accents.

Linda Vich Creates: Painted Blooms Valentine.  Painted Blooms paper from Stampin' Up! provides the background for a delightful, twine-wrapped Valentine heart complete with Word Bubble sentiment and die cut from Hello You Thinlits.

Linda Vich Creates: Painted Blooms Valentine.  Painted Blooms paper from Stampin' Up! provides the background for a delightful, twine-wrapped Valentine heart complete with Word Bubble sentiment and die cut from Hello You Thinlits.

Linda Vich Creates: Painted Blooms Valentine.  Painted Blooms paper from Stampin' Up! provides the background for a delightful, twine-wrapped Valentine heart complete with Word Bubble sentiment and die cut from Hello You Thinlits.


I'm pretty happy with the way the card turned out even if it is a blue Valentine!


Built for Free Using: My Stampin Blog