Saturday, August 25, 2018

Petal Promenade Wedding Wallet

Linda Vich Creates: Petal Promenade Wedding Wallet. Petal Promenade DSP takes centre stage on this gorgeous, belly band-encircled wedding wallet.
My project today gave me great pleasure to make.

Over the years I have watched my niece, Nicole, grow into a beautiful young woman and today she takes the next step in her life to marry the man of her dreams!

I knew that I wanted something very special for Nicole and Brad and along came Trayce Bauer with a stunning wedding wallet and video tutorial!

Though I had wanted to do something in Turquoise and/or Rose Gold (their wedding colors), I settled instead for using some of the gorgeous Petal Promenade DSP. If you haven't yet bought this, run to my online store now and pick some up! It is stunning paper and will be essential for all your summer projects and weddings!

I won't recreate Trayce's great tutorial here . . . better for you to watch her video. Suffice to say that I created the initial wallet piece using Thick Whisper White card stock and then added Petal Promenade mattes that were cut 1/8" smaller than the sections in which they were adhered.

Other card details:

  • For the flap of the wallet card, the corners were rounded using the Detailed Trio Punch. The DSP matte also had the corners rounded.
  • For the inside piece where the sentiment was stamped, a piece of Gold Foil, 1/8" smaller than the section to which it was adhered, was topped with another piece of Thick Whisper White, the corners which had been punched with the Detailed Trio Punch to let the Gold Foil show through.
  • The stamp set for both the sentiment on the belly band and inside the card were from the now retired Falling For You stamp set but there are many other current stamp sets you could use.
  • The belly band measured 2 x 11" and was cut from Blackberry Bliss. Using the Tufted Embossing Folder gave it a touch of elegance. The band was spritzed with water and then embossed at one end. The band was removed and the other end placed inside, carefully lining up with the previous embossed pattern, and then embossed again. It was folded around the completed wallet and adhered using Tear & Tape, leaving a little "give" to allow the belly band to be easily removed and replaced.
  • The front sentiment was stamped with Blackberry Bliss on Thick Whisper White and then die cut using the #3 circle in the Stitched Shapes Thinlits. The #7 scalloped circle from the Layering Circles Framelits was used to die cut a matte from Gold Foil. The two were adhered using liquid adhesive. (See my Numbered Dies Sets.)
  • Fast Fuse was applied to the back of the sentiment circle and then a nest of Rose Metallic Thread was adhered. Also adhered to the back were Mossy Meadow die cut leaves (Petals & More Thinlits) and Gold Glimmer leaves (Leaf Punch). The circle was then adhered over top of the belly band, at the front of the wallet, using Dimensionals.

Linda Vich Creates: Petal Promenade Wedding Wallet. Petal Promenade DSP takes centre stage on this gorgeous, belly band-encircled wedding wallet.

Linda Vich Creates: Petal Promenade Wedding Wallet. Petal Promenade DSP takes centre stage on this gorgeous, belly band-encircled wedding wallet.
Please don't think I'm cheap—I only had some $20 bills on hand to photograph this card! :)

Linda Vich Creates: Petal Promenade Wedding Wallet. Petal Promenade DSP takes centre stage on this gorgeous, belly band-encircled wedding wallet.


The pictures of this card really don't do it justice! The DSP is just so rich and glamourous and the wallet is very sturdy and substantial. It will be a joy to present to Nicole and Brad!


Product List


Sunday, August 19, 2018

Masculine Metal and Leaves

Linda Vich Creates: Masculine Metal and Leaves. Galvanized metal and Rooted in Nature leaves combine to create a masculine thank you card that is brimming with texture!
Ever since I spotted the Galvanized Metallic Paper in the Holiday Catalog, I have been dying to make a masculine card with it!

I started by cutting a strip of the Galvanized paper and after spritzing it with water, ran it through the Big Shot in the new Corrugated Embossing Folder. Sweet! (However, I had the piece turned the wrong way in the embossing folder and had to do it again :( Oh well, I had a practice piece!)

After it dried, I used sponges to apply Balmy Blue, Blueberry Bushel and Cajun Craze to the corrugated piece to make it look like slightly discolored, rusty metal.

Next, I embossed a Cajun Craze matte with the Scattered Sequins Embossing Folder but turned it to the debossed side. It provided a surprisingly pleasing contrast to the embossed metal.

I adhered the metal strip to the matte with Dimensionals and then wound some of the Copper trim around the matte, securing it at the back with Fast Fuse. This matte was then adhered to a Blueberry Bushel card front using Dimensionals.

Next, from the Rooted in Nature Bundle I stamped eight small leaves on Blueberry Bushel using matching ink, and three larger leaves on Cajun Craze. These were die cut and then the edges were sponged with contrasting inks.

I used the 1" Circle Punch to create a base from Blueberry Bushel and then glued the small blue leaves to it. The Cajun Craze leaves were added under it and a Clear Faceted Gem was added to the centre. It was adhered to the card front with Dimensionals.

The sentiment, from the Abstract Impressions stamp set, was stamped with Versamark on Blueberry Bushel and then heat embossed 2X using Copper Stampin' Emboss Powder. The strip was trimmed and then adhered to the card front.

On a Thick Whisper White matte, three larger leaves were stamped in Cajun Craze and then two smaller leaves were stamped in Blueberry Bushel on matching card stock and die cut. These were glued in place over the stamped leaves with the excess trimmed off with scissors. The matte was adhered inside the card.

Linda Vich Creates: Masculine Metal and Leaves. Galvanized metal and Rooted in Nature leaves combine to create a masculine thank you card that is brimming with texture!

Linda Vich Creates: Masculine Metal and Leaves. Galvanized metal and Rooted in Nature leaves combine to create a masculine thank you card that is brimming with texture!

Linda Vich Creates: Masculine Metal and Leaves. Galvanized metal and Rooted in Nature leaves combine to create a masculine thank you card that is brimming with texture!


Product List


Sunday, August 12, 2018

Part Two: Edge Stamping With Blended Seasons

Linda Vich Creates: Part Two: Edge Stamping With Blended Seasons. Jennifer McGuire's Edge Stamping Technique is used with another card that uses the Blended Seasons Bundle in a dynamic way.
Today's card post is Part Two of using Jennifer McGuire's Edge Stamping Technique with the Blended Seasons Bundle. Here is Part One in case you missed it.

Though today's card uses a number of the same elements as the card from Part One, the feel of this card is punchier and more dynamic because the colors I have chosen are complementary colors ie. they are opposite each other on the color wheel. Part One's card used analogous colors or colors that are side-by-side on the color wheel. This leaves the viewer with a much mellower or comfortable feeling.

In Part One, I described how Jennifer's technique was used to stamp the leaf clusters. I colored those leaves using Watercolor Pencils and blended them with the Wink of Stella pen.

For today's card, I used the Poppy Parade Blends to color the leaves. I simply colored each leaf with the lighter color, then outlined the markings on the leaf with the darker marker. To blend everything together, I again used the lighter marker over the whole leaf. I repeated this process for each leaf. The colored leaves were then matted with a thin, Basic Black matte.

With the coloring finished, I set about to embellish my card. I embossed a piece of Granny Apple Green card stock using the Basket Weave Embossing Folder. I spritzed the card stock front and back with water first and then ran it through and back the Big Shot a couple of times to achieve a very deep embossing.

Next, I die cut the piece with the middle size of the stitched die from the Blended Seasons Bundle. I wasn't sure that the die cut would be successful because of the deep embossing of the Basket Weave embossing folder but I was absolutely amazed at the stitched detail, even on top of the embossing!
I adhered the shape to the colored leaves matte using Dimensionals.

I cut a length of the Gold Metallic Edge Ribbon and used my Dark Poppy Parade Blend to color it, both front and back. It took no time at all and dried almost instantly. I tied the ribbon around the middle of the matte and then adhered the matte to a 4.75 x 6" Granny Apple Green card front using Dimensionals.

The sentiment, from the Enjoy Life stamp set, was stamped on Basic Black with Versamark (I made sure to use my Embossing Buddy before stamping to avoid any stray embossing powder.) and then heat embossed with White Stampin' Emboss Powder. I trimmed it down with a pair of scissors and then it was adhered with Dimensionals.

As a final touch for the front of the card, I used a die from the Petals & More Thinlits to die cut some leaves from the now retired Dazzling Diamonds Glimmer paper. I used Glue Dots to attach this under the ribbon.

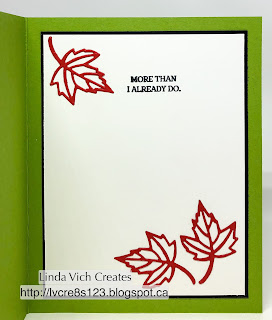
For the matte inside the card, I simply matted a piece of Thick Whisper White with Basic Black card stock and then used liquid adhesive to glue three leaves, die cut from Poppy Parade card stock, to the matte before adhering it inside the card.

Linda Vich Creates: Part Two: Edge Stamping With Blended Seasons. Jennifer McGuire's Edge Stamping Technique is used with another card that uses the Blended Seasons Bundle in a dynamic way.

Linda Vich Creates: Part Two: Edge Stamping With Blended Seasons. Jennifer McGuire's Edge Stamping Technique is used with another card that uses the Blended Seasons Bundle in a dynamic way.

Linda Vich Creates: Part Two: Edge Stamping With Blended Seasons. Jennifer McGuire's Edge Stamping Technique is used with another card that uses the Blended Seasons Bundle in a dynamic way.


I hope you'll try the Edge Stamping Technique for yourself! If you need to order a Stamparatus, you can do so in my online store. You will find many more uses for the Stamparatus and you will be amazed at how your stamping will improve and become more enjoyable!


Product List