Showing posts with label window box thinlits. Show all posts

Monday, February 27, 2017

Rose Garden Window Box

Linda Vich Creates: Rose Garden Window Box. The Window Box and Rose Garden Thinlits team up with the Sale-A-Bration Glimmer Paper in this darling gift box.
Have you purchased the Window Box Thinlits yet?

I had so much fun playing with them today to dress up my little gift box! They can be decorated in so many different ways using the dies that come in the set or by adhering patterned paper and embellishments, and they may be used both horizontally or vertically! Use them as gift boxes and/or tea candle holders.

I have only touched on a few ways to decorate these boxes but there are a host of ideas available for them if you do a search on Pinterest.

I have used the Window Box Thinlits for my Waterlily Gift Box and I created a double-sized gift box in my Valentine Collection blog post.

After playing with the Sale-A-Bration FREEBIE–6 x 6" Glimmer Paper Assortment Pack–the other day, I was anxious to use the glimmery goodness again on Basic Black. I started by cutting out the two necessary pieces to make my box and then assembled the box using liquid adhesive.

I used the Rose Garden Thinlits to die cut the smaller rose from the Sweet Sugarplum as well as six smaller flowers and then die cut both the larger and smaller leaves from the Mint Macaron, trimming them with scissors.

Placing glue dots strategically around the top edge of the box sides, I tied a length of the now retired Sweet Sugarplum Glitter Ribbon around the box, finishing with a bow at the front of the box.

I used Connie Stewart's method for adhering detailed die cuts to adhere the die cuts to the top and sides of my box. This is the BEST method I have found yet for adhering these types of die cuts.

To complete my little gift box, I added rhinestones to the centre of the flowers and on the lid of the box.

Linda Vich Creates: Rose Garden Window Box. The Window Box and Rose Garden Thinlits team up with the Sale-A-Bration Glimmer Paper in this darling gift box.

Linda Vich Creates: Rose Garden Window Box. The Window Box and Rose Garden Thinlits team up with the Sale-A-Bration Glimmer Paper in this darling gift box.


Isn't it pretty? It's too bad that the glitter ribbon isn't still available as it matches the Glimmer paper perfectly!

If you would like to make your own little boxes, you can purchase your own Window Box Thinlits in my online store. By purchasing either the Clear-Mount Bundle or the Wood-Mount Bundle, you qualify for a Sale-A-Bration FREEBIE! (You could get some of that luscious glimmery paper that I used by choosing #143831 for your free item!)


Wednesday, February 15, 2017

Valentine Collection

Linda Vich Creates: Valentine Collection. Several valentine projects that use a host of die sets to create lovely boxes and a card.
Valentine's Day this year marked the day 30 years ago when my husband Bob proposed to me! Such a special day that was! We celebrated by going for supper at Jonesy's Restaurant in Bird's Hill. This was the first time we had eaten at this restaurant and it definitely won't be our last! It is a very small restaurant, and did not have a fancy decor, but the food was wonderful and I highly recommend the place.

Today I have for you a collection of items that I created for my family for Valentine's Day this year.

First up is a simple tea light holder for my daughter who likes candles. I added no extra embellishments to this box so that the light of the candle could shine through all the tiny die cut holes.

I simply used the largest of the Window Box Dies to cut out two pieces of card stock and then used a smaller die with a heart pattern to cut openings in the small sides of the box. A larger die was used to cut the holes in the top of the box. Liquid adhesive was used to assemble the box.

Linda Vich Creates: Valentine Collection. Several valentine projects that use a host of die sets to create lovely boxes and a card.

Linda Vich Creates: Valentine Collection. Several valentine projects that use a host of die sets to create lovely boxes and a card.


Next, I created an enlarged Window Box by using a tutorial from Kirsteen Gill. I wanted a larger box that could hold more treats and this worked perfectly!

To create the box, you need to do some fancy cutting with your Big Shot. In order to make the box larger, you need to shift the top cutting plate so that it doesn't extend all the way across the Window Box Thinlits die. It is not a hard technique but I did need to refer to the tutorial in order to make it work for me!

Once the pieces were cut out, the box was assembled like the original version and I used liquid adhesive to adhere the card stock. I cut panels for the box using the Sending Love DSP and also used the Love Notes Framelits to cut tiny envelopes, hearts, arrows, and the banner for the top.

Using the Sealed With Love stamp set, I stamped the tiny notes within the envelopes. I used the Bloomin' Love stamp set for the sentiment on the banner which I embellished with rhinestones. I also used one of the Lace Doilies on the lid of the box. These doilies are really nice because they are Whisper White on one side and Very Vanilla on the other!


Linda Vich Creates: Valentine Collection. Several valentine projects that use a host of die sets to create lovely boxes and a card.

Linda Vich Creates: Valentine Collection. Several valentine projects that use a host of die sets to create lovely boxes and a card.

Linda Vich Creates: Valentine Collection. Several valentine projects that use a host of die sets to create lovely boxes and a card.


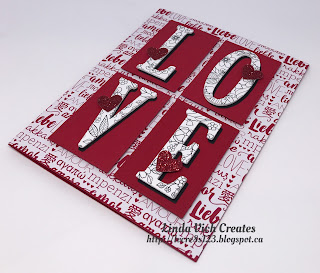
To create the card for my husband, I first die cut the four letters from the Sale-A-Bration Freebie, Inside The Lines DSP, using the Large Letters Framelits. I also cut three versions using Thick Whisper White and one from Basic Black for all four letters. These letters stacked and adhered using liquid adhesive, with the Basic Black layer being slightly offset to produce a shadow.

A 4.75 x 6" card base was cut from Real Red and then a sheet of the Sending Love DSP was cut and adhered to the front.

Next, I used one the squares from the Stitched Shapes Framelits to cut a rectangle on which to place each letter.

In order to cut a rectangle using a square die, the top cutting plate on the Big Shot must be placed so that the one edge of the die is not cut. The die is then moved, the platform rotated, and the cutting plate replaced so that the other side can be cut. To ensure that each of my rectangles was the same size, I cut one rectangle and then used the resulting "frame" as a template to place over each piece of card stock to be cut. The template ensured that the die could only be moved to the same place each time ensuring the same size of rectangle. For more information on this technique, check out the video tutorial by Dawn Griffith.


Linda Vich Creates: Valentine Collection. Several valentine projects that use a host of die sets to create lovely boxes and a card.
This shows the template on top with the square die
moved to create the second cut for the rectangle.

Linda Vich Creates: Valentine Collection. Several valentine projects that use a host of die sets to create lovely boxes and a card.
The top cutting plate is positioned so that the bottom
edge of the die does not cut through the card stock

Each letter was adhered to its stitched rectangle using liquid adhesive. The rectangles were adhered to the card front using Dimensionals. Small hearts were punched from Red Glimmer paper and adhered to the letters using Glue Dots.

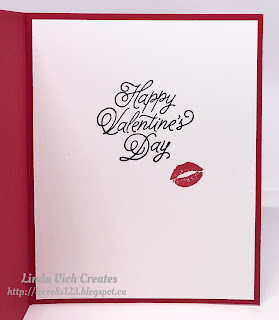
For inside the card, a white matte was stamped with a sentiment from the Sealed With Love stamp set using Basic Black and the lips were stamped with Real Red. The matte was adhered to complete the card.


Linda Vich Creates: Valentine Collection. Several valentine projects that use a host of die sets to create lovely boxes and a card.

Linda Vich Creates: Valentine Collection. Several valentine projects that use a host of die sets to create lovely boxes and a card.

Linda Vich Creates: Valentine Collection. Several valentine projects that use a host of die sets to create lovely boxes and a card.


Finally, I created a lidded box for my granddaughter using the Popcorn Box Thinlits. I referred to the tutorial by Intatwyne Designs.

I created my box using Real Red card stock and adhered panels cut from the Sending Love DSP. I decorated each panel by adhering layered hearts cut from Red and Dazzling Diamonds Glimmer paper using the Sweet & Sassy Framelits.

I stamped the sentiment from the Sealed With Love stamp set using Real Red and then Versamark inks and heat embossed it using the Real Red Glitter Embossing Powder. This was die cut using a square from the Stitched Shapes Framelits and adhered to the lid of the box.

A length of ribbon was adhered at the back of the box with a glue dot and then tied in a bow to complete the box.


Linda Vich Creates: Valentine Collection. Several valentine projects that use a host of die sets to create lovely boxes and a card.

Linda Vich Creates: Valentine Collection. Several valentine projects that use a host of die sets to create lovely boxes and a card.

Linda Vich Creates: Valentine Collection. Several valentine projects that use a host of die sets to create lovely boxes and a card.


This completes my Valentine projects for 2017. I hope you enjoyed a lovely Valentine's Day!


Wednesday, February 1, 2017

Waterlily Gift Box

Linda Vich Creates: Waterlily Gift Box. Succulent Framelits create a waterlily that tops a lovely gift box create with the Window Box Thinlits.
Instead of a card today, I have a gift box that was inspired by the photo of a waterlily that turned up in a Google search. I thought that the waterlily could be created by using the Succulent Framelits and the box could serve as the water and the lilypads could be represented by the die cut mattes added to the box.

After die cutting the two large sections for the box from Dapper Denim, I used Fast Fuse to assemble the box.

I got a tip on a Facebook group that one of the square Stitched Framelits perfectly fit as a matte for the Window Box so I die cut a matte from Cucumber Crush. A die from the Window Box Framelits was used to die cut little holes in the stitched matte.

On a scrap of Cucumber Crush, I tried sponging both Bermuda Bay and Emerald Envy to see which one would give me the look I was after; Bermuda Bay won! I sponged the matte and it looked great! I then die cut the remaining five mattes and sponged them as well.

Before adhering the mattes to the box, I decided to also sponge the edges of the box using Dapper Denim. The sponging gave the box some added depth. I then adhered the mattes using Glue Dots.

Next, I used the Succulent Framelits to cut two of the largest succulents, two of the middle size and one of the smallest size from Whisper White. I used Melon Mambo to sponge color on both sides of the die cuts and then used a bone folder to curl up the "petals" a bit. Liquid adhesive was used to adhere the die cuts to form the flower.

Clear Wink of Stella was used on the petals of the flower and then stamens were die cut from Crushed Curry using a die from the Botanical Builder Framelits. It was adhered and given a coat of Wink of Stella. A rhinestone was added to complete the flower.

When I put the flower on the top of the box, even though the blue of the box was designed to represent the water and I wanted it to show but, design-wise, I needed some greenery as well. I then die cut a hexagon using the largest Window Box die and further die cut it using the ornate hexagon die. I then trimmed the sides down as much as possible and adhered it to the top of the box before adhering the flower on top using Dimensionals.

Here is the Google photo that was my inspiration:

http://hubpages.com/living/Water-Lilies-The-Perfect-Addition-to-any-Garden

Here is my interpretation:

Linda Vich Creates: Waterlily Gift Box. Succulent Framelits create a waterlily that tops a lovely gift box create with the Window Box Thinlits.

I'm really pleased with how this little gift box turned out! It is so nice when a project you envision turns out so well!

If you would like to use my color scheme from this project, feel free to save it!


If you are ready to purchase the items to make this gift box, you can click on the items below to be taken directly to my store.