Showing posts with label acorn builder punch. Show all posts

Tuesday, November 24, 2015

Celebrate The Season With Acorns

As often happens with me, a card idea came to me just before I closed my eyes the other night. I immediately jotted it down into my Evernote app so I would not lose track of it.

The next day, I was able to create my card and I was able to utilize the leftover acorns I had created while previously making my Acorn Thank You cards.

I cut a card base from Basic Black card stock to give me a card measuring 8.5 x 4.5". I really like this card size! You can view another card I made in this size in my blog post, Love For The Lotus.

To add a bit of texture, I cut a matte from corrugated white paper and used a leaf from the soon to be retiring stamp set, Lighthearted Leaves, with Basic Black Archival ink to stamp all over the matte. I was very pleased with the result–I wanted a very airy look to the stamped panel and I think I achieved it because the Lighthearted Leaves were perfect for this effect!

I inked three sides of the matte using Real Red ink and then adhered it to the card base using Fast Fuse Adhesive.

Next, I used the Banners Framelits Dies to cut three banners from Real Red card stock and I inked all but the top edges on those, using the Basic Black Archival ink. These were also attached with Fast Fuse adhesive.

The acorns I had previously punched from Dazzling Diamonds Glimmer Paper and the soon to be retiring, Black Glimmer Paper. The top of the acorn was adhered using the Fine Tip Glue Pen. The acorns were adhered to each banner using Dimensionals.

Using my MISTI I stamped the sentiment from the soon to be retiring Happy Scenes stamp set, using Real Red on a 3/4" strip of Whisper White card stock. I then used the Triple Banner Punch to flag each end. I used the punch again on a 1" strip of Basic Black.

The sentiment pieces were adhered using Dimensionals and then adhered to the card front, also with Dimensionals.

For the inside of the card, I used a matte of the now retired Naturals White card stock. Using the same stamp from the Lighthearted Leaves, I stamped along the bottom of the matte using Real Red and then inked each edge as well.


I think that my card looks quite festive as well as being quite clean and crisp! You've just got to love red, white, and black!

I am so sad that the Lighthearted Leaves will be retiring! It is such a pretty set and can be used in so many different ways. If you like it as much as me, be sure to order it from me before it disappears! While you are at the store, be sure to grab some of the Black Glimmer Paper as well!

Built for Free Using: My Stampin Blog

Monday, November 23, 2015

Acorn Thank You

I absolutely love reading posts and watching Periscope broadcasts by Sandy Allnock! That girl has some serious art talent! Not only can she put a card together but her skill at coloring, drawing, and painting is second to none!

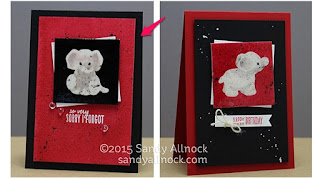
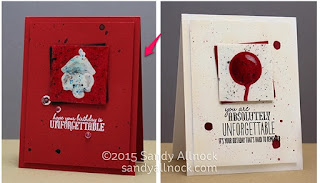
Sandy recently posted a couple of cards that she had CASEd and now I am posting a couple of cards that I CASEd from hers!

I am casing two of her four images:

Cards by Sandy Allnock.

Card by Sandy Allnock.

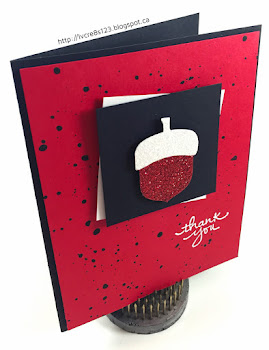
I started by punching my two different acorns from Dazzling Diamonds, Real Red, and Black Glimmer papers. Before gluing the tops on using the Fine Tip Glue Pen, I used a Real Red and a Basic Black Stampin' Write Marker to edge around each acorn to hide the white core of the Glimmer paper.

I then cut square mattes of 2.5" from Real Red, Basic Black and Whisper White card stock. I formed a stack with black and white and one with red and black. These were adhered together using Dimensionals.

Two card bases were cut, one from Basic Black and one from Real Red. Both cards used Real Red mattes which were adhered to the card bases using Dimensionals.

After adhering the mattes I realized that I hadn't yet created the paint fleck effect on the mattes so I went ahead and did it anyway, though I managed to get some paint on the card bases!

To create the fleck effect, I used Brusho powdered watercolor paint. I tapped out a little black paint and mixed it with water. After loading a brush with the paint, I tapped another brush against it to create the spatter.

Using MISTI, I stamped the sentiment from the Endless Thanks stamp set using Versamark and then heat embossed it using white embossing powder.

I adhered the square mattes to each card front and then the acorn on top of the mattes; both were adhered using Dimensionals.


I did not add mattes to the inside of these cards. Instead, I wrote in them using a white gel pen.

I really like both cards but I think the card with the Basic Black card base stands out more due to the high contrast between the two colors. However, I do love the red on red and the black and white acorn looks stunning on top! It uses the soon to be retiring Black Glimmer Paper.

Which card do you like best? Drop me a comment below!

Built for Free Using: My Stampin Blog

Saturday, September 26, 2015

Acorny Thank You

Linda Vich Creates: Acorny Thank You. This thank you card is brimming over with texture from the gold glimmer-capped acorns to the subtle leaf stamps on the corrugated Kraft matte, to the gold cording and stitched matte–all items make this card a winner!One of the first items that appealed to me in the Holiday Catalog was the Acorn Builder Punch as well as its coordinating stamp set, Acorny Thank You. It might have something to do with growing up in the country, surrounded by oak trees AND their acorns! Regardless, I thought it would be cute to be able to mix and match colors and papers to create all kinds of acorns for fall cards.

For this card, I started by stamping the acorn bottom twice on Whisper White card stock using Baked Brown Sugar. I used the coordinating punch to punch out the bottom as well as punching two tops from Gold Glimmer paper.

I knew that I wanted to use the Kraft Corrugated paper as a matte for a good dose of texture but thought it looked rather plain so I decided to stamp on it!

On a scrap of the corrugated paper, I tested Basic Brown Sugar, Soft Suede and finally Tip Top Taupe inks. I settled on the latter ink because I wanted the stamping to become a subtle background pattern.

After stamping oak leaves all over the corrugated matte, I inked the edges with Soft Suede using a sponge dauber.

I used the Stitched Circles Dies from Simon Says Stamps to die cut circles from a piece of the now retired Color Me Autumn DSP.

On Mossy Meadow card stock I stamped the sentiment in Versamark and heat embossed using Gold Tinsel Embossing Powder from Recollections. It was die cut using the Bitty Banner Framelits.
The corrugated matte was adhered to a Mossy Meadow card base using Dimensionals and the stitched circle matte was adhered to the matte in the same manner.

Using glue dots, I adhered an arrangement of Gold Cord on the stitched matte and then adhered two acorns at angles with Dimensionals over the cord. The sentiment was adhered at bottom of card front also using dimensionals.

For the inside matte, I stamped the oak leaf in Mossy Meadow on Naturals White card stock.

Linda Vich Creates: Acorny Thank You. This thank you card is brimming over with texture from the gold glimmer-capped acorns to the subtle leaf stamps on the corrugated Kraft matte, to the gold cording and stitched matte–all items make this card a winner!

Linda Vich Creates: Acorny Thank You. This thank you card is brimming over with texture from the gold glimmer-capped acorns to the subtle leaf stamps on the corrugated Kraft matte, to the gold cording and stitched matte–all items make this card a winner!

I really love all the texture on this card–to me it simply screams, "Fall!"

Built for Free Using: My Stampin Blog