Showing posts with label color bursts. Show all posts

Saturday, August 5, 2017

Dahlia Up Close

Linda Vich Creates: Dahlia Up Close. Rose Gold embossed dahlia is painted with shades of blue Color Burst watercolors on this lovely anniversary card.
How about something totally different?

Come on now, admit it. Even if you are a Stampin' Up! demonstrator, you have one or two other craft products lying around that you use from time to time! Let's face it–we are crafty individuals or we would never have got involved with Stampin' Up! in the first place!

I have soooooooooooooo many crafting tools and media that sometimes I have to take a break from crafting with Stampin' Up! to play with my other stuff! Or, I combine it with Stampin' Up! to get the best of BOTH worlds like I have done with this card!

Today's card is one I created for my brother and his wife for their anniversary. It is CASEd from a card by Jenny Lee Yamasaki.

I started by stamping the Dahlia Up Close stamp from The Ton on watercolor paper using Versamark using my MISTI after first using my Embossing Buddy. I then heat embossed it with Rose Gold Embossing Powder.

Next, I gathered together a few of my Color Burst colors in blue: Cerulean Blue, Ultramarine Blue, Indigo and Turquoise. I tapped a little of each powder in a watercolor palette I had and then wet a #4 watercolor brush and dipped into the Cerulean Powder and changed it to liquid watercolor.

I painted this over most of the flower and then, painting spots of each of the other colors, I added strategically to the image until I was pleased with the result. Sometimes, I used a paper towel to blot up some of the watercolor to make it paler. When I was finished, I heat set the image.

The next step is where I made a mistake but due to using my MISTI I was able to rectify it. After watercoloring and then drying my image, the watercolor paper was severely warped. I wanted to get it as flat as possible before adding it to my card front. To do this, I placed it face down on a piece of copy paper with another piece of copy paper on top and then an old pillowcase. I then proceeded to iron until the watercolor paper was flat.

I did end up with a flat paper, however, the ironing reheated my embossing and transferred it to the copy paper leaving behind a white outline where the embossing had been! Now this is actually a technique in itself and can be used to good effect but for this image I WANTED the Rose Gold embossing in place!

So, I went back to my MISTI and after using my Embossing Buddy, I re-inked the image with Versamark and heat embossed it AGAIN! Luckily, my stamp had remained in place in my MISTI and I was able to re-stamp the image. I was very careful to warm up the heat tool for awhile before doing the embossing to minimize warping.

Next, I cut a Pacific Point card front 4.75 x 6. I trimmed my painted matte to fit the card front but leave about a 3/4" strip of card front on the left side. I placed a strip of Burnished Rose Gold Foil Tape down the card front and then trimmed off the excess.

On a strip of vellum I stamped the sentiment from the Falling For You stamp set using Versamark and heat embossed it with the same Rose Gold embossing powder. I folded the strip around the edges of the painted matte and then taped the ends to the back. The matte was then adhered to the card front using Fast Fuse. To add a little more zing, several sequins were adhered to the card front using liquid adhesive.

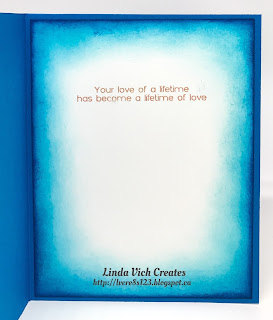
A watercolor matte was cut for inside the card and the matching sentiment was stamped and heat embossed on it. I then used sponges to ink the edges in both Tempting Turquoise and Pacific Point. The matte was then adhered with Fast Fuse to complete the card.

Linda Vich Creates: Dahlia Up Close. Rose Gold embossed dahlia is painted with shades of blue Color Burst watercolors on this lovely anniversary card.

Linda Vich Creates: Dahlia Up Close. Rose Gold embossed dahlia is painted with shades of blue Color Burst watercolors on this lovely anniversary card.

Linda Vich Creates: Dahlia Up Close. Rose Gold embossed dahlia is painted with shades of blue Color Burst watercolors on this lovely anniversary card.

Linda Vich Creates: Dahlia Up Close. Rose Gold embossed dahlia is painted with shades of blue Color Burst watercolors on this lovely anniversary card.


Delighted is how I feel about how this card turned out! I have never "painted" with the Color Bursts before so it was a learning experience but one that ended well for me! I can't wait to give this to my brother and his wife to see their reaction!

I hope you have enjoyed my deviation from projects made strictly with Stampin' Up! materials! I think that we can only become more creative by exploring all brands of media and by appreciating the resulting art forms.

Thank you for visiting today!


Saturday, November 26, 2016

ColorBurst and Stitched Shapes Thank You

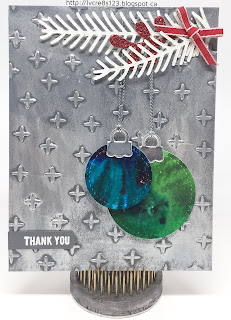
Linda Vich Creates: ColorBurst and Stitched Shapes Thank You. Stampin Up Pretty Pines and Stitched Shapes Framelits combine with Color Bursts and Inka Gold in this seasonal card.
Today's card share uses a mix of Stampin' Up and some of my mixed media supplies.

I started by cutting a standard card base from Thick Whisper White as well as a matte, to completely cover the card front, from Basic Gray.

Using the Sparkle Embossing Folder, I dry embossed the Basic Gray matte and then used my fingers to stroke on Silver Inka Gold. I was not overly particular about they way it went on because I wanted a kind of rustic finish to the matte. After the Inka Gold had been applied, I used a paper towel to buff it to bring out the shine. The matte was then adhered to the card front using Fast Fuse.

Next, I used my Ken Oliver Color Bursts on Watercolor paper. I tapped the colors that I wanted to use out on my paper and then I used a new to me product called Ink Potion #9 by Tsukineko to spray the ink powders. This spray is supposed to be good for blending inks and paint but also to help combat the warping of paper caused by spraying with water. It did seem to help quite a bit with keeping the paper flat. I continued spraying and adding more of the Color Bursts until I was satisfied with the color blending and then I allowed them to dry. I created two different color combos using Turquoise, Ultramarine Blue and Indigo for the blues and Lime Green, Terre Verte, and Pthalo Green for the greens.

Once these were completely dry, I used two sizes of Stitched Shapes Framelits to cut out circles. I then used the Delicate Ornaments Thinlits (which were in the first 24 Hour Sale for Online Extravaganza) to cut ornament toppers from Silver Foil. I used liquid adhesive to attach the toppers to the two stitched shapes to form Christmas ornaments.

I threaded a length of the now retired silver cording through each ornament topper. The ornaments were adhered to the card front using Dimensionals and the cording adhered using Glue Dots.

Sprigs of pine were die cut from Dazzling Diamonds Glimmer paper as well as little berries from Real Red Glimmer paper using the Pretty Pines Thinlits. These were adhered at the top of the card using more Glue Dots. A bow from the now retired 1/8" Real Red Ribbon was adhered on top.

The sentiment from the Thoughtful Banners stamp set was stamped on Basic Gray using Versamark and then heat embossed using White Stampin' Emboss Powder. It was punched with the Classic Label Punch and then adhered to the card front to complete this simple but cheery seasonal thank you card!

Linda Vich Creates: ColorBurst and Stitched Shapes Thank You. Stampin Up Pretty Pines and Stitched Shapes Framelits combine with Color Bursts and Inka Gold in this seasonal card.


Thursday, April 28, 2016

Rose Wonder Meets Color Burst

Linda Vich Creates: Rose Wonder Meets Color Burst. The lovely Rose Wonder stamp has been stamped in black and clear embossed to allow it to be painted with the lovely Color Burst watercolors.
I needed a quick birthday card the other day after discovering that one of my friends at Walmart was celebrating her birthday. I actually came up with the design and created the card before leaving for work—probably the fastest card I have ever made!

I started by using my MISTI to stamp the rose from the Rose Wonder stamp set on watercolor paper with Basic Black Archival ink. I then re-stamped it using Versamark and heat embossed it with Clear Stampin' Emboss Powder.

Using a small paintbrush, I wet the leaves and then sprinkled on green Color Burst. I loved the varying shades of green that resulted! I repeated this process with the rose, this time using reds. I used the paintbrush to draw some color into areas where the paper still showed. I set the painted matte aside to dry.

Next, I used Jet Black Stazon to stamp the sentiment on Thick Whisper White card stock. I used the Rose Garden Thinlits to die cut the sentiment.

I used my heat tool to dry the watercolor completely and then adhered a piece of craft foam to the back using Fast Fuse Adhesive. This was adhered to a Real Red card base. The sentiment was adhered using Dimensionals. To complete the card front, I adhered a handful of crystal sequins.

For the inside of the card I stamped some leaves in Cucumber Crush and inked the edges as well.
All in all, I pretty happy with how this card turned out!

Linda Vich Creates: Rose Wonder Meets Color Burst. The lovely Rose Wonder stamp has been stamped in black and clear embossed to allow it to be painted with the lovely Color Burst watercolors.

Linda Vich Creates: Rose Wonder Meets Color Burst. The lovely Rose Wonder stamp has been stamped in black and clear embossed to allow it to be painted with the lovely Color Burst watercolors.

Next time, I will have more time to work with the Color Bursts to give the rose more detail. I really want to give the Color Bursts a workout to see how many ways they can be used!

Have you had a chance to play with Color Bursts yet? Drop me a note below–I'd love to hear from you!


Thursday, December 31, 2015

My Most Popular Posts of 2015

We have come to the last day of 2015 and I look back fondly on my creative endeavors during the year! I wish you all a Happy New Year and look forward to having you visit my blog in 2016!

January–Bokeh Technique and Sneak Peek From 2015 Occasions Catalog

Linda Vich Creates: Bokeh Technique and Sneak Peak From 2015 Occasions Catalog


February–My Least Favorite Card To Create

Linda Vich Creates: My Least Favorite Card To Create. Painted Petals float on vellum above the coordinating Painted Blooms designer paper on this sympathy card.


March–Projects From Stamping Group

Linda Vich Creates: Projects From Stamping Group. A Lotus Blossom adorns a vibrant, card base created using a sun rays mask. Sea creatures abound in a 3D book card using stamps from By The Sea.


Linda Vich Creates: Projects From Stamping Group. A Lotus Blossom adorns a vibrant, card base created using a sun rays mask. Sea creatures abound in a 3D book card using stamps from By The Sea.


April–Remnants of Easter

Linda Vich Creates: Remnants of Easter

Linda Vich Creates: Remnants of Easter


May–Corner Garden Blues

Linda Vich Creates: Corner Garden Blues. Clean, crisp lines of the Corner Garden stamp contrast well with Sahara Sand. One flower colored with Blendabilities is popped up with Dimensionals to give the card a 3D quality; sequins add some extra zing.


June–2015 Catalog Launch

Linda Vich Creates: 2015 Catalog Launch

Linda Vich Creates: 2015 Catalog Launch


July–New Floor and Grateful For You

Linda Vich Creates: New Floor and Grateful For You. Dry and wet embossed card sports a banner punched with the Triple Banner Punch. A swirl of twine and a layered flower completes this simple but effective card.


August–Best Thoughts Joy Fold Card

Linda Vich Creates: Best Thoughts Joy Fold Card. Shimmering sequins surround blossoms colored with Zig Clean Color Real Brush Markers on a woodgrain embossed panel of this Joy fold card.


September–Pretty in Pink Poinsettia

Linda Vich Creates: Pretty In Pink Poinsettia. A pretty pink poinsettia adorns this Softly Falling embossed card. Silver Glimmer paper strips and a sequin-filled sentiment pocket complete this stunning Christmas card.


October

This was a busy month for me and I didn't get to post AT ALL :( Hopefully, 2016 will allow me to post every single month!


November–Color Burst Christmas and Wonderful Wonderland

Linda Vich Creates: Color Burst Christmas and Wonderful Wonderland. Stunning Color Burst background panel embellished with Festive Flower punched poinsettia.

Linda Vich Creates: Color Burst Christmas and Wonderful Wonderland. Brayered Wonderland card cased from LeeAnn Greff.


December–Tag Exchange and December Stamp Class

Linda Vich Creates: Tag Exchange and December Stamp Class. A whimsical snowman shaker tag created with the Snow Friends Framelits.

Linda Vich Creates: Tag Exchange and December Stamp Class. Christmas Light Treat Holder.

Linda Vich Creates: Tag Exchange and December Stamp Class. A dazzling aurora borealis sky serves as the backdrop to this Sleigh Ride Thinlits winter scene.

I hope you have enjoyed this review of my most popular posts from 2015. I look forward to your comments in 2016!


Wednesday, December 16, 2015

Festive Color Burst Ornaments


Such a busy time of the year! I've been working on Christmas cards lately but can't show you those quite yet! In the meantime, I got a chance to use my Color Bursts again!

Ever since seeing the Delicate Ornaments Dies, I have been dying to use them with my Color Bursts! Finally got the chance and this is the result!

I started by using my Color Bursts on three separate pieces of watercolor paper. I used Yellow Ochre and Orange, Pthalo Green and Ultramarine Blue, and finally, Alizarin Crimson and Violet.

I used the method where I wet the papers first and then applied the colors, adding more water and color until I was satisfied with the results. I set them aside to dry while working on another project but then returned to them and zapped them with the heat tool to ensure they were completely dry.

I used two of the ornaments from the Delicate Ornaments Thinlits Dies and one circle from the Circles Collection Framelits to cut from each of the papers. I also cut three ornament toppers from Gold Foil paper.

I then used the Leafy Vine Embossing Folder from Taylored Expressions to emboss each ornament. To make the embossing more apparent, I sponged on Black Soot Distress Ink across each ornament and then applied to the sides to give them a bit of shape. Once this was completed, I used Distress Glaze to seal the paints and ink.

I decided to make the ornaments even more vibrant so I brushed on a coat of Crystal Effects and left them to dry overnight and then attached the toppers using the Fine Tip Glue Pen.
On a Garden Green matte I stamped the Watercolor Wash background stamp using Versamark and heat set it.

I decided on my arrangement for the ornaments and then adhered them to the matte using Dimensionals. After die cutting the sentiment, from the Wonderful Wreath Framelits Dies, from Gold Foil, I attached it to the ornaments using the Fine Tip Glue Pen.

Using my MISTI and one of the ornaments from the Embellished Ornaments Stamp Set, I stamped on the bottom right corner of a piece of the now retired Naturals White card stock in Blackberry Bliss and then also inked the edges of the matte using a sponge dauber. Fast Fuse Adhesive was used to adhere it inside the card.


Lastly, I added a few gold sequins to the front of the card using the Fine Tip Glue Pen.


So, what are your thoughts on this card? Drop me a comment below!

Built for Free Using: My Stampin Blog

Monday, November 9, 2015

Color Burst Christmas and Wonderful Wonderland

Wow! We had a crazy, jam-packed stamping class on Friday night! Sixteen ladies in attendance and stamping–it got a little warm in the room with so many bodies present but we persevered to create some spectacular cards!

I had been wanting to give my group the chance to try working with the Color Bursts and I knew that our last class before Christmas would be busy with our tag exchange so I went ahead with my plan on Friday.

As this was their first chance to play with the Color Bursts, I decided to keep things simple.

I demonstrated how to achieve both smooth and more distressed looking effects using just two colors of Color Bursts. I had hoped that they would be able to experiment and make two background panels but because they were having so much fun playing, most only got to make one.


After their Color Burst background panel was completed and dry, they trimmed up the panels to make a 4 x 5.25" matte and inked the edges. It was then adhered to a Thick Whisper White card base.

They had previously chosen a color of card stock that would coordinate with the Color Bursts they were using. From this card stock they used the Festive Flower Punch to punch small petals (8), double petals (2) and the 3/4" Circle Punch to punch a circle to use for a poinsettia embellishment. They also punched three small petals and two centres from either gold or silver Glimmer Paper.

They folded each petal in half lengthwise to give it some dimension and then inked the edges of each using either Basic Black Archival or Early Espresso ink. They used glue guns to assemble the poinsettias and then adhered them to their Color Burst panels using Dimensionals.

They stamped a sentiment from the Happy Scenes stamp set on a strip of Whisper White and inked the edges with either Basic Black Archival or Early Espresso. One end was flagged and then the sentiment was adhered to the card front. A few sequins were added for some extra sparkle!

It's here that I would love to have posted pictures of the lovely cards they made but once again I forgot to take photos! If I get the ladies to send pictures of their cards, I will edit this post to include them and let you know!

The second card that we made was cased entirely from the lovely card designed by LeeAnn Greff. LeeAnn has a video tutorial on her blog that shows how to construct this card.

We started by brayering the lovely sky using both Island Indigo and Rich Razzleberry inks. We then used Basic Black Archival ink to stamp two clumps of trees using the Wonderland stamp set. A strip of Whisper White as stamped with the sentiment from the same stamp set. The strip was then ripped to simulate the edge of a snowbank and then adhered to the bottom of the inked background.

The completed panel was mounted on a Whisper White matte which in turn was mounted on a Rich Razzleberry card base using Dimensionals.

A white gel pen was used to create stars and add snow to the tree branches. Once dry, a Two-Way Glue Pen was used over these spots and Dazzling Diamonds added. The glue pen and Dazzling Diamonds were also added to the edge of the snowbank.

A Whisper White matte was stamped with the trees for the inside of the card.

Such a lovely result and fun techniques used to create the card. Thank you LeeAnn for designing this wonderful card!

I hope you will get a chance to try the Color Bursts, creating a Poinsettia and brayering to create the beautiful Wonderland card!


Built for Free Using: My Stampin Blog

Tuesday, November 3, 2015

Color Burst Projects

As you should be able to tell from the date of my last post, babysitting and working are taking the majority of my time these days. Don't get me wrong—I'm loving the time I get to spend with my granddaughter! However, by the time she gets picked up and we get supper done with, I'm about DONE for the evening!


However, I have had the odd moment to create but just haven't had the chance to blog about it. Today, I have two projects, both using Color Bursts.

My first card is a card that I designed for my friend, Charlene.


I started by using the Earth Tone set of Color Bursts on a piece of watercolor paper.

I sprinkled tiny bits of Merlot, Burnt Orange, and Yellow Ochre on the paper and then spritzed them with water. I tilted the paper to make the paint run in different directions, adding more powder and water until I was pleased with how it was taking shape. I then added in some Terre Verte (green) to increase the richness of the colors. Once I was totally pleased with the effect, I dried the piece with my heat tool.

I then mounted the oak leaf from the Vintage Leaves stamp set on an acrylic block and sprayed it with water. I pressed it down onto the colored watercolor panel and held it in place for about 30 seconds. When I removed the stamp, there was a little bit of pooled water which I absorbed with a paper towel. I then repeated this procedure on the rest of the panel.

I dried the panel again and then threw a few droplets of water onto the panel as well, letting them sit for a few seconds before blotting with a paper towel.

Because I was planning to use Embossing Paste on top of the watercolors and I wasn't sure if the paste would reactivate the watercolors, I decided to use Ranger Distress Micro Glaze to seal the surface. Just a little bit goes a long way with this stuff! You simply get a little bit on your finger and then rub it into the surface of your work. After it is completely covered, you take a paper towel and just buff the piece, removing any excess.

The next step was to lay my Garden Leafy Stems stencil, from Memory Box, across my watercolor piece and secure both it and my watercolor paper to my craft mat using some washi tape. I then applied Dreamweaver Gold Embossing paste with a palette knife. When complete, I simply lifted the stencil off of my work and set it aside to dry.

The next day, (it didn't take that long to dry but I didn't have time to get back to the card until then!) I inked the edges of the watercolor piece with Black Soot Distress Ink and then finished with a fine line of Ranger Archival Ink.

I stamped the sentiment using the same archival ink and the Endless Birthdays stamp set. I then knotted a piece of Cherry Cobbler Sheer Linen ribbon around the panel and also added a length of Gold Sequin Trim. I then mounted the panel, using Foam Tape, to a Cherry Cobbler card base.

Around the edges of a matte of Natural Ivory card stock I stamped the oak leaf, using Delightful Dijon. I then inked the edges of the matte using Cherry Cobbler ink.


I love the richness of the colors in this card, especially accompanied by the gold embossing paste!

My next Color Burst project was thank you cards for my stamping group. For these, I used Color Bursts on 9 x 11" sheets of watercolor paper and then cut them down to size as mattes.

For the blue set, I used Indigo and Terre Verte for the colors, finishing with some green, blue and crystal sequins. The color on these is very smooth in appearance as I let the colors dry naturally after moving the watercolor paper to get the paint to flow.


For this second set of cards, I used Merlot, Burnt Orange, Yellow Ochre and Terre Verte. The color in these cards is rougher in appearance, except for two, because I dried and then spritzed again with water, creating a droplet pattern. To these cards I added green, red, and gold sequins.


Both sets of watercolors were trimmed to matte size and edged with Ranger Archival Ink. The sentiment was also stamped with archival ink, using the now retired Four You stamp set. The blue set of cards were mounted on Night of Navy card bases and the fall color set were mounted on Kraft card bases, using Foam Tape.

Have you tried Color Bursts yet? I just love playing with them and next time I use them, I want to try using stencils with them. I'm looking forward to the results!


Built for Free Using: My Stampin Blog

Saturday, July 4, 2015

How Do I Spell Fun? C-O-L-O-R B-U-R-S-T-S!

There is nothing like working with a new product to get your creative juices fired up!

I recently purchased Ken Oliver's Color Bursts from Rubbernecker.com and was really pleased with the speed of their delivery! I got stung at another online store before buying at Rubbernecker and had to submit a claim with Paypal but they came through for me with flying colors and got my payment returned to me! If you want to learn more about Color Bursts you can visit Ken's Facebook page and there are a few YouTube videos worth watching as well!
Basically, the Color Bursts are powdered watercolors and they come in little squeeze containers. You basically squeeze them on your paper and then spritz with water or spritz with water and then squeeze them on. Pretty simple! But there is a whole lot more you can do with them if you use a paintbrush, stencils, etc.

They can be a bit messy, though, so you may want to use them in a spray booth of some sort (I use an old shoe box) because the powder can really get into a lot of places! Trying to wipe the powder up with a wet cloth will activate the watercolors and then you will get a bunch of colorful streaks to clean up! (Ask me how I know?!)

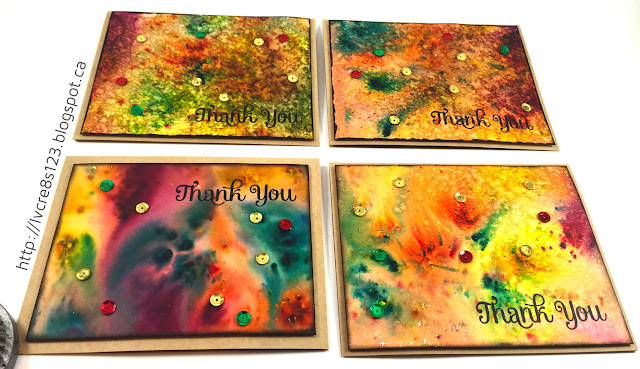
I set out to create some Thank You cards for my stamping group and the cards below are what I created.

Basically, I used Lawn Fawn Large Stitched Rectangle Stackables to cut out my watercolor mattes. I then used my MISTI to stamp the sentiment, from the Another Thank You stamp set, with Versamark and heat embossed with White Stampin' Emboss Powder.

Working with one matte at a time, I spritzed the matte with water and then squeezed on the inks of my choice. I would add more ink and spritz again as needed till I was satisfied with my creation. Sometimes I picked up the matte and allowed the inks to run; sometimes I wiped off too much ink. I used my heat tool to dry the matte and sometimes added more water/ink after doing so.

I adhered each watercolor piece to a Basic Black matte and then onto a Whisper White Thick card stock card base.

Linda Vich Creates: How Do I Spell Fun? C-O-L-O-R  B-U-R-S-T-S! Vibrant Thank You cards colored with Ken Oliver's Color Bursts.

Linda Vich Creates: How Do I Spell Fun? C-O-L-O-R  B-U-R-S-T-S! Vibrant Thank You cards colored with Ken Oliver's Color Bursts.

Linda Vich Creates: How Do I Spell Fun? C-O-L-O-R  B-U-R-S-T-S! Vibrant Thank You cards colored with Ken Oliver's Color Bursts.

Linda Vich Creates: How Do I Spell Fun? C-O-L-O-R  B-U-R-S-T-S! Vibrant Thank You cards colored with Ken Oliver's Color Bursts.

Linda Vich Creates: How Do I Spell Fun? C-O-L-O-R  B-U-R-S-T-S! Vibrant Thank You cards colored with Ken Oliver's Color Bursts.

Linda Vich Creates: How Do I Spell Fun? C-O-L-O-R  B-U-R-S-T-S! Vibrant Thank You cards colored with Ken Oliver's Color Bursts.

Linda Vich Creates: How Do I Spell Fun? C-O-L-O-R  B-U-R-S-T-S! Vibrant Thank You cards colored with Ken Oliver's Color Bursts.

Linda Vich Creates: How Do I Spell Fun? C-O-L-O-R  B-U-R-S-T-S! Vibrant Thank You cards colored with Ken Oliver's Color Bursts.

Linda Vich Creates: How Do I Spell Fun? C-O-L-O-R  B-U-R-S-T-S! Vibrant Thank You cards colored with Ken Oliver's Color Bursts.

Linda Vich Creates: How Do I Spell Fun? C-O-L-O-R  B-U-R-S-T-S! Vibrant Thank You cards colored with Ken Oliver's Color Bursts.


Have you tried working with Color Bursts yet? I'm sure you would enjoy them.


Built for Free Using: My Stampin Blog