Showing posts with label banners framelits. Show all posts

Monday, January 16, 2017

Beautiful You Trio

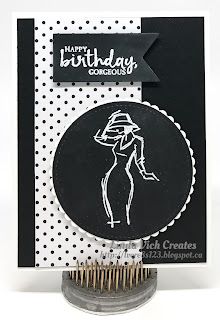
Linda Vich Creates Beautiful You Trio. Coordinated set of cards using Beautiful You.
I had a lovely breakfast out with my daughter this morning! It was great to catch up and hear about her nursing practicum placement from last week. She is doing really well and has had great comments from her supervisors.

Back at home this afternoon, I was able to play in my craft room for awhile. I was excited to finally get to create the cards I had been envisioning since I first saw the Beautiful You stamp set. With my love for contrast, I just knew I had to create some cards in black and white.

I started by stamping each image and sentiment in Versamark on Basic Black. Each was heat embossed with White Stampin' Emboss Powder.

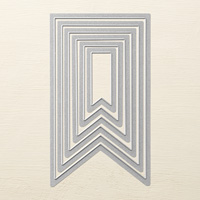
The images were die cut using the largest square, oval, and circle of the Stitched Shapes Framelits. Two of the sentiments were die cut with the Banners Framelits, and one with a smaller stitched square. Each image and the one sentiment were matted with a coordinating scalloped die from the Layering Squares, Circles and Ovals Framelits, cut from Thick Whisper White.

Three standard card bases were cut from Thick Whisper White and mattes from Basic Black. Strips of polka dot paper from the Pop of Pink DSP were layered over the black mattes and the mattes were adhered to the card fronts.

Dimensionals were used to adhere the images and sentiments to the card fronts.

Linda Vich Creates Beautiful You Trio. Coordinated set of cards using Beautiful You.

Linda Vich Creates Beautiful You Trio. Coordinated set of cards using Beautiful You.

Linda Vich Creates Beautiful You Trio. Coordinated set of cards using Beautiful You.


Have you purchased Beautiful You yet? If not, you can purchase the Clear-Mount Set here or Wood Mount here.


Tuesday, November 8, 2016

Irresistible Cupcake

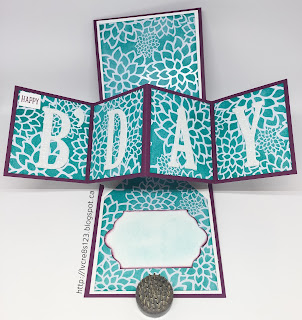
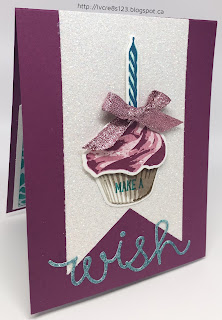
Linda Vich Creates: Irresistible Cupcake. A multi-step-stamped Sweet Cupcake graces the card front of this Pop Up Panel card while the inside flaunts a resist background brought to life by sponging with Bermuda Bay
It has been so hard waiting to blog about this card but I needed to wait until the recipient had received it! This is my very first Pop Up Panel card, AKA Pop and Twist card, AKA Twist and Pop card.

There are so many of these cards being displayed on the internet now and each one that I have seen has pushed me to try one of my own. Some of the cards are quite simply embellished and some are outright over-the-freakin'-top!

The tutorial that I chose to follow was one from Maymay Made It. I had previously looked at some other tutorials but found hers to be the easiest to follow.

There are three main pieces to this type of card: 1. card base 2. mechanism for the pop up and 3. the strip for the pop out panel.

I started by cutting a 4 1/4 x 11" card base from Rich Razzleberry. It was scored at 5 1/2". The mechanism for the pop up was cut from Whisper White at 8 1/2 x 10 3/4" and scored at 2 1/4", 4 1/4" and 6 1/4" on the short side and at 3 7/8", 5 3/8" and 6 6/8" on the long side. The strip for the pop out panel was cut at 3 x 11" from Rich Razzleberry. It was scored at 2 3/4", 5 1/2" and 8 1/4".

Four mattes for the pop out panel were cut from Irresistibly Floral DSP at 2 3/4 x 2 1/2". Two mattes, for the inside card panels were also cut at 3 3/4 x 5 1/2" before being trimmed to fit.

For each of the panels, I sponged them with Bermuda Bay ink to reveal the patterned resist. The two larger panels were trimmed to fit by tracing the mechanism for the pop up once it was created.

To create the pop up mechanism, after scoring, the four outer corners are cut away leaving a kind of T shape. The T has two wide pieces and two narrow pieces. Each of the narrow pieces had notches cut from each side to help get rid of some of the bulk from when the mechanism would be folded. Finally, using the score lines, the panels are folded to create an X at the centre. It is very hard to describe the actual construction of the pop out mechanism so you are best to view the video tutorial.

Once the pop out mechanism is created, the strip for the pop out panel is adhered to it. The four mattes were then adhered. Next, the two large panels for the inside of the card are trimmed by tracing the pointed shape of the pop out mechanism onto them. These mattes are then glued onto parts of the mechanism that actually form the white base matte inside the card. The mechanism was then glued to the inside of the Rich Razzleberry card base.

To finish embellishing the card, the large letters for the pop out panels were die cut from Dazzling Diamonds Glimmer paper using the Large Letter Framelits. "Happy" was stamped on a piece of Whisper White using Rich Razzleberry ink and a sentiment from the Sweet Cupcake stamp set.

Using the Lots of Labels Framelits, a tag was cut from Whisper White and edges inked with Rich Razzleberry. This was designed as a place to add greetings from the sender. Unfortunately, the Whisper White did not stay pristine! It picked up a smudge of Bermuda Bay so I compensated by lightly sponging more Bermuda Bay onto it!

For the front of the card, I cut a banner from Dazzling Diamonds Glimmer paper using the Banners Framelits. Using the Sweet Cupcake stamp set, I did multi-step stamping to create the cupcake, its wrapper and a candle. The cupcake used Sweet Sugarplum and Rich Razzleberry, the wrapper used Sahara Sand, Tip Top Taupe and Soft Suede, and the candle used Pool Party and Island Indigo. Each piece was die cut using the coordinating framelits.

"Make a" was stamped onto the cupcake wrapper and then the cupcake had a slit cut into it so the bottom of the candle could be inserted and taped to the back. The cupcake was popped up with Dimensionals onto the wrapper and adhered to the banner. Sweet Sugarplum Glitter Ribbon was tied in a bow and adhered to the base of the candle.

To complete the card, the "wish" sentiment was die cut from Dazzling Diamonds Glimmer paper using a die from the Cupcake Cutout Framelits. It was sponged with Bermuda Bay and adhered at the bottom of the banner.

Linda Vich Creates: Irresistible Cupcake. A multi-step-stamped Sweet Cupcake graces the card front of this Pop Up Panel card while the inside flaunts a resist background brought to life by sponging with Bermuda Bay

Linda Vich Creates: Irresistible Cupcake. A multi-step-stamped Sweet Cupcake graces the card front of this Pop Up Panel card while the inside flaunts a resist background brought to life by sponging with Bermuda Bay

This card was a joy to create, especially knowing that I would be sending it to my special online friend, Donna!




Thursday, November 6, 2014

Autumn Thank You

The past few days it seems that I've been alternating between a parka and a fall-weight coat. Accordingly, I have been creating both Christmas and fall cards!

Today I created a card which allows me to enter it into two different card challenges.

Over at the Paper Craft Crew blog, they posted a sketch challenge today; at Stampin Up Only Challenges, the #109 challenge was a theme: "Thanks" or "Thanksgiving."

Paper Craft Crew Card Sketch 117

Because I wanted to use a particular color scheme, I focused on finding that first. I had pinned this color combo about a week ago:

Color combo I love

I love the contrast between these colors!

Once I knew my colors, it was simply a matter of deciding which color would go where. In the end, I stayed pretty true to the sketch and color scheme I had selected, with the exception of some Mossy Meadow on the pumpkins and the addition of Whisper White and the neutral tone of the Burlap Ribbon.

I used Tangelo Twist for the card base with a matte of Blackberry Bliss which I embossed with the now retired Vine Street Embossing Folder.

I mounted a piece of Back To Black Designer Paper on Basic Black card stock and adhered it to the embossed matte. Over that I ran a piece of Burlap Ribbon topped by the skinny Basic Black ribbon, complete with a bow.

The pumpkins were stamped with Tangelo Twist and the stems colored in with a Mossy Meadow Stampin Write Marker. I used the framelits to cut out the pumpkins and then popped them up with Dimensionals.

I used two different banner framelits–one from the Banners Framelits themselves and one from the Snowflake Card Thinlits Dies–for the sentiment. The sentiment was from the Lots Of Thanks stamp set, stamped in Blackberry Bliss.

To complete the card, I added three Candy Dots. Though they were Pumpkin Pie in color, they blended nicely with the Tangelo Twist.


What blogs host your favorite card challenges? Let me know in the Comments below!

Built for Free Using: My Stampin Blog

Wednesday, September 24, 2014

Creative Gathering

Friday and Saturday, I was able to attend the Creative Gathering in Friedensfeld, Manitoba, organized by the Scrapbook Cottage. There was a wonderful group of ladies there—Scrapbooking, card making, experimenting with mixed media and generally just being creative!


Since the Friday night session ran until midnight, Charlene and I chose to stay at a wonderful Bed & Breakfast known as Calder House. Here we are on the front porch.


Lovely place to stay and what a wonderful breakfast we had–a fresh-made juice concoction and crepes with fresh berries, granola and Greek yogurt.


I was definitely pleased with what I accomplished. Though I may work slowly (I play a lot and try different variations with my card making before I decide on the final design) I felt that my finished cards were well worth the time it took to create them!

Here is one of the cards I created on the weekend.


This was a fun yet simple card to create. I knew I wanted to use a technique to create my own background. Here's what I used to create the effect on the Smoky Slate card stock matte.


That's right—a stamp pad and a crumpled piece of paper! I simply dabbed the crumpled paper on the stamp pad and then pounced it on the card stock to produce this effect:


I think the result is kind of funky and organic looking!

After creating this matte, I used Fuse Fast to adhere it to the Blackberry Bliss card base. I then used the Banners Framelits, along with my BigShot and Magnetic Platform, to cut out a banner. I used Versamark and a non Stampin' Up! silver embossing powder (to get a glittery silver effect) to heat emboss the edges of the banner. Because it was difficult to get the stamp pad into the "V" of the banner, I used a Versamark pen (now retired from Stampin' Up!) to ink that area. The pen was not as juicy as the stamp pad so I had to ink and emboss the area several times until it looked like the rest of the embossing.

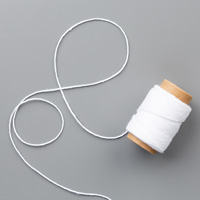
I did not have any gray twine so used my lightest Smoky Slate Blendabilities marker to recolor Whisper White twine. After it dried, I tied two lengths around the top of the banner.

I stamped the typewriter from the Tap, Tap, Tap stamp set with Blackberry Bliss onto Smoky Slate card stock and then fussy cut it. The sentiment was stamped with Rich Razzleberry and then the typewriter was adhered to the banner with Dimensionals. I also used Dimensionals to pop up the banner on the matte.

I really like the Tap, Tap, Tap stamp set and plan to use it again soon!