Showing posts with label edge stamping technique. Show all posts

Sunday, August 12, 2018

Part Two: Edge Stamping With Blended Seasons

Linda Vich Creates: Part Two: Edge Stamping With Blended Seasons. Jennifer McGuire's Edge Stamping Technique is used with another card that uses the Blended Seasons Bundle in a dynamic way.
Today's card post is Part Two of using Jennifer McGuire's Edge Stamping Technique with the Blended Seasons Bundle. Here is Part One in case you missed it.

Though today's card uses a number of the same elements as the card from Part One, the feel of this card is punchier and more dynamic because the colors I have chosen are complementary colors ie. they are opposite each other on the color wheel. Part One's card used analogous colors or colors that are side-by-side on the color wheel. This leaves the viewer with a much mellower or comfortable feeling.

In Part One, I described how Jennifer's technique was used to stamp the leaf clusters. I colored those leaves using Watercolor Pencils and blended them with the Wink of Stella pen.

For today's card, I used the Poppy Parade Blends to color the leaves. I simply colored each leaf with the lighter color, then outlined the markings on the leaf with the darker marker. To blend everything together, I again used the lighter marker over the whole leaf. I repeated this process for each leaf. The colored leaves were then matted with a thin, Basic Black matte.

With the coloring finished, I set about to embellish my card. I embossed a piece of Granny Apple Green card stock using the Basket Weave Embossing Folder. I spritzed the card stock front and back with water first and then ran it through and back the Big Shot a couple of times to achieve a very deep embossing.

Next, I die cut the piece with the middle size of the stitched die from the Blended Seasons Bundle. I wasn't sure that the die cut would be successful because of the deep embossing of the Basket Weave embossing folder but I was absolutely amazed at the stitched detail, even on top of the embossing!
I adhered the shape to the colored leaves matte using Dimensionals.

I cut a length of the Gold Metallic Edge Ribbon and used my Dark Poppy Parade Blend to color it, both front and back. It took no time at all and dried almost instantly. I tied the ribbon around the middle of the matte and then adhered the matte to a 4.75 x 6" Granny Apple Green card front using Dimensionals.

The sentiment, from the Enjoy Life stamp set, was stamped on Basic Black with Versamark (I made sure to use my Embossing Buddy before stamping to avoid any stray embossing powder.) and then heat embossed with White Stampin' Emboss Powder. I trimmed it down with a pair of scissors and then it was adhered with Dimensionals.

As a final touch for the front of the card, I used a die from the Petals & More Thinlits to die cut some leaves from the now retired Dazzling Diamonds Glimmer paper. I used Glue Dots to attach this under the ribbon.

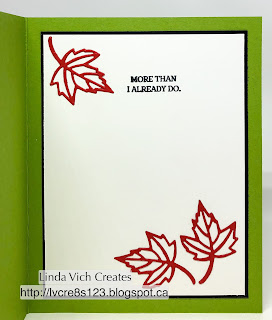
For the matte inside the card, I simply matted a piece of Thick Whisper White with Basic Black card stock and then used liquid adhesive to glue three leaves, die cut from Poppy Parade card stock, to the matte before adhering it inside the card.

Linda Vich Creates: Part Two: Edge Stamping With Blended Seasons. Jennifer McGuire's Edge Stamping Technique is used with another card that uses the Blended Seasons Bundle in a dynamic way.

Linda Vich Creates: Part Two: Edge Stamping With Blended Seasons. Jennifer McGuire's Edge Stamping Technique is used with another card that uses the Blended Seasons Bundle in a dynamic way.

Linda Vich Creates: Part Two: Edge Stamping With Blended Seasons. Jennifer McGuire's Edge Stamping Technique is used with another card that uses the Blended Seasons Bundle in a dynamic way.


I hope you'll try the Edge Stamping Technique for yourself! If you need to order a Stamparatus, you can do so in my online store. You will find many more uses for the Stamparatus and you will be amazed at how your stamping will improve and become more enjoyable!


Product List


Saturday, August 11, 2018

Part One: Edge Stamping With Blended Seasons

Linda Vich Creates: Part One: Edge Stamping With Blended Seasons. The Stamparatus is used for this Edge Stamping Technique which then uses Watercolor Pencils with the Blended Seasons Bundle to create this lovely card.
At times, I wrestle with my mojo but lately, idea after idea has been coming to me and all I need is time to craft those ideas into fruition!

Today's project is actually in two parts; I used Jennifer McGuire's wonderful Edge Stamping Trick to create two cards. One I will detail today, the other you will get to read about in tomorrow's post.

I had planned to snap photos of my use of the Stamparatus for this technique but realized, when I was coloring, that I hadn't! I plan to use this technique in the near future so I will try to remember to do it then.

Before trying this technique with the Stamparatus, you will need to watch Jennifer's video. She uses the MISTI for her stamp positioning tool and it is slightly larger than our Stamparatus.The technique is still possible though, due to the open sides of our Stamparatus, paper can easily extend out the side allowing for more flexibility when stamping.

To begin, I positioned two, 4 x 5.25" mattes of Thick Whisper White into the Stamparatus. I used the tool so that it opened toward the left. Both mattes were butted up against the hinge (left) side and against the bottom hinge. This left the top matte extending out the top slightly.

I added a magnet and then positioned my leaf cluster stamp so that it overlapped the corners of both mattes on the right side of the Stamparatus. Because the stamp would be offset, I used the piece of Stampin' Up Grid Paper that I had laminated, under the mattes so that I could easily clean up after stamping.

The stamp was inked with Stazon and then I stamped both mattes at the same time. I then removed the magnet, turned each matte around 180 degrees and replaced them in the Stamparatus and stamped again. This allowed me to stamp the two opposing corners of each matte.

I then removed the stamp, cleaned it, repositioned both my mattes and stamp to allow me to stamp the remaining two corners of each matte in the same manner.

When I was finished, I had two identical mattes, stamped in all four corners with leaf clusters. Though I only created two stamped mattes, this could easily be done for several cards at a time. Remember this when it comes time to create your Christmas cards!

I set one of the mattes aside for my second card. Once the ink was dry, I used Watercolor Pencils to add color to the leaves and used Wink of Stella to blend them. To do this I would take one pencil crayon and scribble (hard) in various areas of the leaf. This was repeated with all the colors I wanted to use. I then used the Wink of Stella to color over the colors, blending them together and giving them a wonderful sparkle! I so wish that you could see the lovely sparkle that Wink of Stella provides—it is magical!

After my leaves were colored, I stamped the sentiment on Merry Merlot and die cut it using the #3 oval in the Stitched Shapes Framelits. I used the #5 scalloped oval from the Layering Ovals to cut a matte from Copper Foil. (See my Numbered Die Sets.) While I was at it, I cut three copper leaves and a matte to go behind the colored leaves. The last die cut used the middle size of the stitched shapes from the Blended Seasons Bundle to cut a stitched shape from Merry Merlot.

Both liquid adhesive and Dimensionals were used to assemble the sentiment and mattes. Before adhering the colored leaves matte to the copper one, I used a Basic Black Stampin' Write Marker to run around the edge of the matte to mimic a very thin black matte. This made the matte "pop" more from the on top of the copper one. A length of the Copper Trim was added behind the matte before adhering to the card front.

Dimensionals were used to adhere the mattes to a 4.75 x 6" Merry Merlot card front and then the die cut leaves were adhered using a little bit of Glossy Accents.

For the matte inside the card, The Stamparatus was used in stamping the leaf cluster, repeatedly, on the Thick Whisper White matte. To do this, I inked up areas of the stamp with sponge daubers, and stamped, repeating the process to get the multicolored effect on the leaves. The edges of the matte were also sponged with inks before adhering inside the card.

Linda Vich Creates: Part One: Edge Stamping With Blended Seasons. The Stamparatus is used for this Edge Stamping Technique which then uses Watercolor Pencils with the Blended Seasons Bundle to create this lovely card.

Linda Vich Creates: Part One: Edge Stamping With Blended Seasons. The Stamparatus is used for this Edge Stamping Technique which then uses Watercolor Pencils with the Blended Seasons Bundle to create this lovely card.

Linda Vich Creates: Part One: Edge Stamping With Blended Seasons. The Stamparatus is used for this Edge Stamping Technique which then uses Watercolor Pencils with the Blended Seasons Bundle to create this lovely card.


I love how the Copper Foil pairs with the Merry Merlot!

Be sure to return tomorrow for Part Two to see the second card that I designed using the Edge Stamping Technique.


Product List