Showing posts with label butterfly basics. Show all posts

Monday, April 3, 2017

Stamping Mistake? Learn How I Fixed Rather Than Trashed This Card!

Linda Vich Creates: Stamping Mistake? Learn How I Fixed Rather Than Trashed This Card! Textural card created with Butterflies Thinlits.
It was with great pleasure that I sat down to create this thank you card for a friend. She had told me the type of sentiment she wanted and I chose the Floral Phrases stamp set. After she decided on the colors and style, I showed her a couple of cards in the style she wanted and we had a plan!

I started by cutting a standard card base from Crumb Cake and two mattes from Very Vanilla. Next, using Sahara Sand, I stamped the leafy image from the Number of Years stamp set all over one of the mattes.

One of the edge stamps from the Timeless Textures stamp set was stamped around the edge of the matte. Finally, I stamped the distressed leafy image in Cherry Cobbler in two opposing corners of the matte.

A piece of the Regals Designer Paper Stack was adhered to the middle of the matte. Two lengths of the Sale-A-Bration gold metallic ribbon were adhered to hide the seam of the DSP. Linen thread was then wrapped around the matte and secured at the back using Fast Fuse. The matte was then adhered to the card front using Dimensionals.

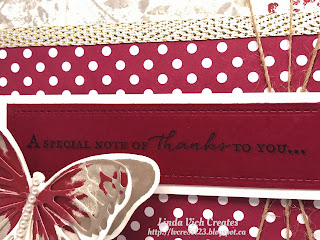
Using my MISTI, the sentiment from the Floral Phrases stamp set was stamped three times on a strip of Cherry Cobbler using Crumb Cake. I had wanted to use a stitched die for the sentiment but it was too long to fit  a Stampin Up die, even if I extended one of the stitched squares into a rectangle. As a work-around I used Lawn Cuts Stitched Borders to create my own stitched rectangle. I then matted this strip onto a strip of Very Vanilla. This was then adhered to the card front using Dimensionals.

On a piece of Very Vanilla, I stamped two identical butterflies using the Watercolor Wings stamp set and Sahara Sand, Crumb Cake and Cherry Cobbler inks. The two butterflies were die cut, one with Bold Butterfly Framelits and one with the Butterflies Thinlits dies. The two butterflies were adhered together using Glue Dots. A strip of pearls was adhered to the body of the top butterfly. After shaping the wings a bit, the butterfly was adhered to the card front using Foam Adhesive Strips.

Linda Vich Creates: Stamping Mistake? Learn How I Fixed Rather Than Trashed This Card! Textural card created with Butterflies Thinlits.

Linda Vich Creates: Stamping Mistake? Learn How I Fixed Rather Than Trashed This Card! Textural card created with Butterflies Thinlits.

For the remaining matte, it was prepared in the same way as the one for the card front with the exception that the stamp was stamped off each time as well as stamping the corner stamps in Sahara Sand as well. The sentiment was stamped using Crumb Cake.

The smaller butterfly was stamped on Very Vanilla using Sahara Sand, Crumb Cake and Cherry Cobbler. The Bold Butterfly Framelits and one with the Butterflies Thinlits dies were used to die cut the butterflies. They were adhered together and to the matte using Glue Dots.

Linda Vich Creates: Stamping Mistake? Learn How I Fixed Rather Than Trashed This Card! Textural card created with Butterflies Thinlits.

Linda Vich Creates: Stamping Mistake? Learn How I Fixed Rather Than Trashed This Card! Textural card created with Butterflies Thinlits.

Lastly, I used the Envelope Punch Board to create a matching envelope from Crumb Cake. It was stamped on the front using Crumb Cake and the leafy stamp from the Number of Years stamp set. The envelope was lined with a matching piece of Regals Designer Paper Stack. Mary Fish has a great tutorial for an envelope liner.

Linda Vich Creates: Stamping Mistake? Learn How I Fixed Rather Than Trashed This Card! Textural card created with Butterflies Thinlits.

Linda Vich Creates: Stamping Mistake? Learn How I Fixed Rather Than Trashed This Card! Textural card created with Butterflies Thinlits.

After finishing the card, I noticed that the sentiment on the front of the card was not totally distinct after having dried completely. How exasperating!

I knew that I would have to use a darker ink to correct the look of the sentiment. With hopes that I didn't have to remake the sentiment strip, I used some of my trusty Un-Du to remove the butterfly and sentiment strip. The card front and strip were completely saturated with the Un-Du solution so I used my heat tool to dry them.

Next, I used my MISTI to stamp the sentiment on the clear matte from my Stamp-a-ma-jig using a bright color of ink. I then placed my sentiment strip under the matte and played with it until I thought that both sentiments were in total alignment. I then carefully removed the plastic matte and secured the sentiment strip with magnets. I then inked up the sentiment with Early Espresso and re-stamped the sentiment.

Upon careful examination, I discovered that the restamp was not in exactly the same spot as the original. However, by happy accident, the stamping looked like it had been planned "shadow" stamping because the lighter, originally stamped sentiment acted as a shadow for the newer, crisply stamped sentiment! BONUS! It actually now had a kind of 3D quality to it!

Linda Vich Creates: Stamping Mistake? Learn How I Fixed Rather Than Trashed This Card! Textural card created with Butterflies Thinlits.
Original sentiment stamped in Crumb Cake.

Linda Vich Creates: Stamping Mistake? Learn How I Fixed Rather Than Trashed This Card! Textural card created with Butterflies Thinlits.
Sentiment Restamped in Early Espresso. Click on the
image to view a larger size to see the 3D shadowed detail.
So, the moral of this story is . . . if you make a stamping mistake, think about it and attempt a fix before having to trash your card completely. You might be pleasantly surprised!


>

Tuesday, November 15, 2016

Beautiful Butterfly Birthday

Linda Vich Creates: Beautiful Butterfly Birthday. Timeless Textures combines with beautiful butterflies to produce a elegant vintage-style card.
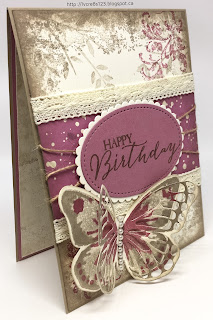
On Sunday it was my mother's 91st birthday. Quite a milestone! I wanted to create a very special card for her. I looked through Pinterest for ideas and decided to CASE one by Areli Johnson.

I started by cutting a 4.25 x 5.5" vertical card base from Crumb Cake. I also cut a Very Vanilla matte on which to stamp.

A stamp from the Number of Years stamp set was used to stamp a random leafy pattern all over the card stock using Sahara Sand. I then used an edge stamp from one of my all time favorite sets, Timeless Textures. I stamped this all around the edges of the card stock, again using Sahara Sand.

Choosing another stamp from the same set, I switched to Sweet Sugarplum and stamped in the top right and bottom left corners.

I cut a piece of the Playful Palette DSP and adhered it to the centre of the matte and then added some lace trim (it's a retired one from a Stampin' Up kit but it was unmarked so not sure which one) to the top and bottom of the DSP. Linen Thread was wrapped around the centre of the DSP and adhered to the back with Fast Fuse.

The sentiment, from the Butterfly Basics stamp set, was stamped with Crumb Cake on Sweet Sugarplum card stock and then die cut using an oval die from the Stitched Shapes Framelits. A scalloped oval from the Layering Ovals Framelits was die cut from Very Vanilla and adhered to the stamped oval. The finished piece was adhered over the linen thread using Dimensionals.

Next, I used my MISTI to stamp two butterflies using the Watercolor Wings stamp set. I used Sahara Sand and Sweet Sugarplum and stamped two of the same butterflies and then die cut one using the Bold Butterfly Framelits and one using the Butterflies Thinlits. The two were adhered together and then adhered to the card front using Glue Dots. A strip of pearls was added to the body.

For inside the card, I stamped a Very Vanilla matte using the same two stamps from Timeless Textures but stamped each in Sahara Sand after first stamping off. I also stamped the smaller butterfly, from the Butterfly Basics stamp set, two times using Sweet Sugarplum. One was die cut using the Bold Butterfly Framelits, and one using the Butterflies Thinlits. This was adhered near the top of the matte (not the best place as I discovered!) to complete the card.

I also decided to stamp the envelope and used my Envelopes Liners Framelits to line the envelope with matching paper.

Linda Vich Creates: Beautiful Butterfly Birthday. Timeless Textures combines with beautiful butterflies to produce a elegant vintage-style card.

Linda Vich Creates: Beautiful Butterfly Birthday. Timeless Textures combines with beautiful butterflies to produce a elegant vintage-style card.

Linda Vich Creates: Beautiful Butterfly Birthday. Timeless Textures combines with beautiful butterflies to produce a elegant vintage-style card.

I'm pretty pleased with how the card turned out! Who wouldn't love a combination of Timeless Textures and butterflies?

Here's a picture of my Mom carefully studying the card I gave her.


And here is a picture of her holding one of the nighties I gave her!


All in all I think my mom had a happy day!


Friday, June 3, 2016

Catalog Party Prep Part 4

Linda Vich Creates: Catalog Party Prep Part 4. Timeless Textures provide the distressed foundation for a butterfly in this set of cards.
Today brings us to Part 4 in my 5-part series. If you missed them, here are Part 1, Part 2 and Part 3.

The card set today was CASEd from Stamper's Blog.

A standard card base was cut from Crumb Cake card stock for all five cards. Mattes were cut from each of the five new In Color card stocks and a smaller Whisper White matte was also cut for each card.

Both the Bold Butterfly Framelits and the Butterflies Thinlits were used to die cut both intricate and solid butterflies for each card.
The In Colors were paired together as follows:

Peekaboo Peach and Flirty Flamingo
Dapper Denim and Peekaboo Peach
Flirty Flamingo and Sweet Sugarplum
Dapper Denim and Emerald Envy
Flirty Flamingo and Emerald Envy

Multi Medium Matte was used to adhere the ornate butterflies on top of the solid ones. A swirl of Linen Thread and a pearl was attached to the centre of each butterfly using glue dots.

Four different stamps from the Timeless Textures stamp set were used on each Whisper White matte using Crumb Cake as well as the two inks that matched the butterflies.

The grid stamp was first used to create an L-shape on the bottom left of the matte. Over that was stamped the wood grain stamp in Crumb Cake. The ornate stamp was stamped at the intersection of the L and along each axis. The dots were sprinkled around the first three stamps. The sentiment from the Butterfly Basics stamp set was stamped in one of the matching ink colors at the top of the card.

The stamped matte was adhered to the colored matte with Fast Fuse and then adhered to the card front using Dimensionals. The butterfly was adhered using a Dimensional to complete the card.

Linda Vich Creates: Catalog Party Prep Part 4. Timeless Textures provide the distressed foundation for a butterfly in this set of cards.

Linda Vich Creates: Catalog Party Prep Part 4. Timeless Textures provide the distressed foundation for a butterfly in this set of cards.

Linda Vich Creates: Catalog Party Prep Part 4. Timeless Textures provide the distressed foundation for a butterfly in this set of cards.

Linda Vich Creates: Catalog Party Prep Part 4. Timeless Textures provide the distressed foundation for a butterfly in this set of cards.

Linda Vich Creates: Catalog Party Prep Part 4. Timeless Textures provide the distressed foundation for a butterfly in this set of cards.

 I just love the juxtaposition of the distressed textures with the ornate butterflies!


Monday, July 27, 2015

Botanical Sketch Birthday Card

Linda Vich Creates: Botanical Sketch Birthday Card. The flowers and foliage of Tim Holtz's Botanical Sketch stamp are brought to life in this brightly watercolored card.Today I needed to create a birthday card for my sister-in-law's 65th birthday. I was in the mood for a little painting and I thought the Botanical Sketch from Tim Holtz would be wonderful for the front of her card.

I used my MISTI to stamp with Ranger Archival Ink onto watercolor paper. I heat set it and then proceeded to painstakingly paint it, using an Aqua Pen and several reinkers. It was truly a labor of love!

I stamped the sentiment from Butterfly Basics using the Archival ink. Because I wanted the colors to really pop, I chose to adhere it to a thin Basic Black matte using Fuse Fast Adhesive. I adhered the matted stamp to a Bermuda Bay card base using Dimensionals.

For the inside of the card I created a matte from the now retired Naturals White card stock. I used a fern stamp from Butterfly Basics to stamp with Old Olive around the edges of the matte. I stamped the sentiment using the Archival ink and then inked the edges of the matte in Old Olive and Mossy Meadow.

Linda Vich Creates: Botanical Sketch Birthday Card. The flowers and foliage of Tim Holtz's Botanical Sketch stamp are brought to life in this brightly watercolored card.

Linda Vich Creates: Botanical Sketch Birthday Card. The flowers and foliage of Tim Holtz's Botanical Sketch stamp are brought to life in this brightly watercolored card.

Linda Vich Creates: Botanical Sketch Birthday Card. The flowers and foliage of Tim Holtz's Botanical Sketch stamp are brought to life in this brightly watercolored card.


My only regret is that I somehow got a blob of ink where I shouldn't have but I think she will understand!
Built for Free Using: My Stampin Blog

Tuesday, July 14, 2015

Indescribable Gift Meets Butterfly Basics

Inspiration may come from several different sources–a technique, a product, a design or a color combination.

Because color is very important to me, I am constantly in search of new resources to inspire me in this area. I found a wonderful resource in the magazine, Color Made Easy from Better Homes and Gardens.

It was easy to translate the color swatches in the magazine to the Stampin' Up colors to come up with even more fresh color combos to use in card making!


For my card today, I was inspired by this page:


I translated the color combo from BHG to the Stampin' Up colors of Cucumber Crush, Melon Mambo and Whisper White.

I am really enjoying using the Stampin' Blender Pen with my reinkers to give a watercolor look to my stamped images! However, my card today caused me a bit of grief.

I actually colored my stamped image twice; the first time, I stamped the sentiment over the colored stamp only to find out it was not completely legible :(

The second time I colored it, I thought I would have to color it a third time because I got some ink on the white parts!

Luckily, I utilized a method from Jennifer McGuire to get rid of my mistake. I used a craft knife to scrape lightly over the errant ink area and then blended the paper fibres a bit using a white eraser. That method, paired with a vellum cover-up saved my bacon!

The card itself was pretty simple to create. Using my MISTI, I stamped the flowers from the Indescribable Gift stamp set using Tuxedo Black Stazon ink on Watercolor Paper. After a quick pass under my Heat Tool to set the ink, I used Melon Mambo, Cucumber Crush and Soft Suede reinkers with my Blender Pen to color in the stamp.

I used a die from the Circles Collection Framelits to cut out the colored stamp as well as a same sized circle from Vellum.

Using both the die cut and the original vellum piece, I placed both in my MISTI and stamped the sentiment from Butterfly Basics using the Stazon ink again. Using the original piece of vellum with the die cut allowed me to make sure the round die cut did not move while I was stamping it.
I used tiny amounts of Snail Adhesive on the colored sections of the stamped image to attach the vellum piece over top.

I used a non Stampin' Up embossing folder–Christmas Vine by Craft Concepts–to emboss the Cucumber Crush matte. I did this because I needed a larger embossing folder to emboss the matte. This matte was then adhered to a Whisper White matte.

I then angled strips of Melon Mambo stitched ribbon across the matte, securing on the back with Sticky Strip. This completed matte was then attached to a Melon Mambo matte that had been previously adhered to a Whisper White Thick card stock card base, using Fuse Fast Adhesive.

The circular stamped piece was adhered onto the card front using Dimensionals. A RV09 Copic Marker was used to color five rhinestones and they were adhered to the vellum matte.

The Bitty Butterfly Punch was used to cut a butterfly from Melon Mambo card stock and then I used my Wink of Stella pen to glimmer it up a bit! I also inked the edges of the butterfly using Rose Red and a Sponge Dauber.

Finally, the butterfly was adhered to the card front using a dab of Crystal Effects.

Linda Vich Creates: A bold color scheme of Cucumber Crush and Melon Mambo enlivens this watercolored rendition of Indescribable Gift.

Linda Vich Creates: A bold color scheme of Cucumber Crush and Melon Mambo enlivens this watercolored rendition of Indescribable Gift.

Linda Vich Creates: A bold color scheme of Cucumber Crush and Melon Mambo enlivens this watercolored rendition of Indescribable Gift.
Close-up showing the effect of the Wink of Stella pen.


What have you watercolored using the Blender Pen? Leave me a link in a comment below!


Built for Free Using: My Stampin Blog

Wednesday, February 4, 2015

Dazzling Diamonds Meets Wonderful Watercolor

Well, I couldn't help myself–I had to create another card using the Butterfly Basics and coordinating Thinlits! I wonder if there is a 12 step program yet for those of us obsessed with this set?!

I had actually planned to work on a Valentine project tonight but then I caught sight of one of the watercolor background pieces I had created some time ago and decided that I knew just what to do with it!

But before I get carried away, back in my blog post, Gold, Grunge, Glitz and Two Charlenes, I promised that I would show you the two Bokeh cards that my upline, Charlene had created. At long last, here they are:

Linda Vich Creates: Dazzling Diamonds Meets Wonderful Watercolor. Card created by Charlene Lee.

Linda Vich Creates: Dazzling Diamonds Meets Wonderful Watercolor. Card created by Charlene Lee.

 Didn't she do a wonderful job? Which one do you like the best? I'm leaning to the second one though the first one are more my colors.

Now, back to tonight's card.

As I mentioned, I chose to use a watercolor background I had created previously. I used the same technique as in this post: Bokeh Technique and Sneak Peek From Occasions 2015 Catalog though I did not add the bokeh to this one. This is what it looked like when I was finished:

Linda Vich Creates: Dazzling Diamonds Meets Wonderful Watercolor.


To help me keep track of what colors I used, I snapped a photo showing the Ink Refills.

Linda Vich Creates: Dazzling Diamonds Meets Wonderful Watercolor.

Tonight, I decided to use the same odd-sized card base as in my post, A Happy Thing. The card base measures 4 7/8 x 5 7/8" with the Whisper White matte being 4 1/4 x 5 1/4." For this card I inserted another matte between the white and the watercolor layer–the Cajun Craze matte was 4 1/8 x 5 1/8." I liked the proportions of the mattes, with the card base showing a larger amount than usual. All layers were adhered to each other using Fuse Fast adhesive.

Before adhering a piece of the new Whisper White Jute Ribbon around the watercolor layer using Fuse Fast adhesive, I inked the edges using both Cajun Craze and then Early Espresso inks.

I stamped the smaller butterfly from Butterfly Basics using Tangerine Tango. I die cut both it and the larger butterfly, with the larger one being cut from Melon Mambo.

For the smaller butterfly, I inked it with Versamark ink and then heat embossed it with Clear Embossing Powder. I did this twice to give it a good gloss.

For the larger butterfly, I inked it with Versamark and then applied Heat & Stick powder. I heated this until it melted and then quickly added Dazzling Diamonds glitter on top and heated it again to seal it. Dazzling Diamonds is my new love! Don't you just love the beautiful shimmer it produced?

Linda Vich Creates: Dazzling Diamonds Meets Wonderful Watercolor. A glittery diecut butterfly perches on Whisper White Jute Ribbon that is adhered to a dramatic watercolor background created using Stampin' Up! ink refills. A distressed tag, anchored by a lovely bit of bling, displays the sentiment.


For both butterflies, I embossed only half the body at a time to make it easier to emboss.

I bent the wings of both butterflies up a bit and then used Clear Effects adhesive to adhere first the larger butterfly to the Jute Ribbon and then the smaller butterfly on top of the larger. I chose Clear Effects because I knew it would hold both items securely.

I used the Note Tag punch to cut a tag from Whisper White. I used the honeycomb stamp from the set to stamp with Crushed Curry. I stamped several times without re-inking to produce a textured, slightly distressed look.

I inked the edges and lightly dusted the tag with a sponge dauber for each of Melon Mambo, Crushed Curry and Tangerine Tango inks.

I then filled my larger Aqua Painter with Rubbing Alcohol and several drops of Melon Mambo Ink Refill. I wanted to add some small ink droplets to the tag.

I practiced on scrap paper first to make sure I had the right color and technique. I found that I had to add more and more drops to the alcohol to get the right color. I probably still could have added more to give the tag more dimension but I didn't this time round!

To get the small droplets, I squeezed the Aqua Painter several times to load the brush with ink and then tapped the brush on my extended index finger. To get a few larger droplets, I squeezed again but this time held the Aqua Painter straight out in front of me and sort of jerked it toward the tag, stopping quickly and letting the drops keep going! I was quite pleased with the results I achieved!

I then used Black Stazon Ink to stamp the sentiment on the tag. I adhered the tag at the top with a glue dot and a Dimensional at the bottom to give it a little lift. I added one of the now retired Frosted Finishes ornaments for a little added bling and to anchor the tag to the card.

Linda Vich Creates: Dazzling Diamonds Meets Wonderful Watercolor. A glittery diecut butterfly perches on Whisper White Jute Ribbon that is adhered to a dramatic watercolor background created using Stampin' Up! ink refills. A distressed tag, anchored by a lovely bit of bling, displays the sentiment.

Lastly, I added some rhinestones to the smaller butterfly and called the card done!

Linda Vich Creates: Dazzling Diamonds Meets Wonderful Watercolor. A glittery diecut butterfly perches on Whisper White Jute Ribbon that is adhered to a dramatic watercolor background created using Stampin' Up! ink refills. A distressed tag, anchored by a lovely bit of bling, displays the sentiment.

Linda Vich Creates: Dazzling Diamonds Meets Wonderful Watercolor. A glittery diecut butterfly perches on Whisper White Jute Ribbon that is adhered to a dramatic watercolor background created using Stampin' Up! ink refills. A distressed tag, anchored by a lovely bit of bling, displays the sentiment.

Linda Vich Creates: Dazzling Diamonds Meets Wonderful Watercolor. A glittery diecut butterfly perches on Whisper White Jute Ribbon that is adhered to a dramatic watercolor background created using Stampin' Up! ink refills. A distressed tag, anchored by a lovely bit of bling, displays the sentiment.

I'm liking this one! What do you think? If you would like to read about other butterfly cards not mentioned in the above post, try these posts:


Cofor Free Using: My Stampin Blog

Friday, January 23, 2015

Gold, Grunge, Glitz and Two Charlenes

This is my week to craft with ladies named Charlene!

On Monday, I visited a newer friend–named Charlene–at her home and helped her try out an emboss resist technique, some sponging, and some die cutting with the Butterfly Thinlits.

Then today at my place, I enjoyed a lovely day stamping with my long time best friend–and Upline– Charlene. She wanted to learn about the Bokeh Technique that I used here and while she worked on creating her watercolor backgrounds for the bokeh, I finished up my thank you cards to go out with my recent Stampin' Up! order.

Charlene achieved some great results and modelled them after my card from here but then branched out and made good use of some acetate and ribbon for a unique look! I am waiting on some pictures from her so I'll try to post those tomorrow.

Finally, my cards were finished and I was able to create the card I had been envisioning for days!
I started with a 5 x 7 Basic Black card base. I stamped my sentiment (from the now retired, See Ya Later stamp set) in the top left corner with Versamark and heat embossed with Gold Embossing Powder.

I cut a black card stock panel and stamped the fern from Butterfly Basics in Versamark, heat embossing again with the Gold Embossing Powder.

I used Dimensionals and offset this panel on another panel of Gold Foil.

I cut two of the the mid-sized butterfly from the Butterfly Thinlits, one in Basic Black and one from Gold Glimmer paper. I used the wonderful dryer sheet technique from Deb Valder to make it easy to remove the butterflies from the dies. I heat embossed the black one using Clear Embossing Powder to make it glossy.

Next, after deciding where my offset panel would go, I used Versamark to stamp some grungy flecks from Gorgeous Grunge. I also embossed these with Gold Embossing Powder. (Notice a trend here??) I then added the offset panel using Dimensionals.

I attached the black butterfly at the bottom of the offset panel using Glue Dots. The Gold Glimmer butterfly was attached to the black one using Glue Dots and the wings were bent up slightly to simulate flight.

I punched a tiny butterfly from Vellum using my Bitty Butterfly Punch and inked the edge in Versamark and then (you guessed it, right?) heat embossed it using Gold Embossing Powder. I bent up the wings and attached it with a Glue Dot near the sentiment.

The final touch for the outside of the card was to add a few rhinestones to the body of the bitty butterfly.

Since the card was black, I needed to create an inner panel to make it easier on which to write.
I cut a panel from Naturals Ivory card stock. Using Tuxedo Black Memento ink, stamped off, I stamped a few ferns at the bottom of the panel, not re-inking between stamps to give some added dimension. I also added a few flecks using black ink with Gorgeous Grunge.

I felt compelled to ink the edges loosely with Versamark and heat emboss them with Gold Embossing Powder. To complete the theme, I stamped the little butterflies–from the Perpetual Birthday Calendar stamp set–in Versamark and heat embossed them with Gold Embossing Powder.

Here are a few shots . . . it's hard to get good shots of the gold and glitter.

Linda Vich Creates: Gold, Grunge, Glitz and Two Charlenes. A bold and dramatic card that utilizes the Butterfly Thinlits from Stampin' Up! to create this card with a little bit of glitz and a little bit of grunge.

Linda Vich Creates: Gold, Grunge, Glitz and Two Charlenes. A bold and dramatic card that utilizes the Butterfly Thinlits from Stampin' Up! to create this card with a little bit of glitz and a little bit of grunge.


Linda Vich Creates: Gold, Grunge, Glitz and Two Charlenes. A bold and dramatic card that utilizes the Butterfly Thinlits from Stampin' Up! to create this card with a little bit of glitz and a little bit of grunge.


Linda Vich Creates: Gold, Grunge, Glitz and Two Charlenes. A bold and dramatic card that utilizes the Butterfly Thinlits from Stampin' Up! to create this card with a little bit of glitz and a little bit of grunge.
Details of the inside.

Lots of gold, grunge and glitz. Gotta love it!

If you love butterfly cards, be sure to check out these posts:


What have you created with your Butterfly Basics and Butterfly Thinlits? Let me know in the comments below!

Built for Free Using: My Stampin Blog

Tuesday, January 13, 2015

Color Inspiration and Abundant Butterflies

Received a Pier 1 Imports flyer in the mail the other day. In leafing through it, I found nothing I wanted to buy but it did give me some inspiration for card making!

Linda Vich Creates: Color Inspiration and Abundant Butterflies

I thought the combination of colors was fresh, and Spring-like. Even though we are a long way from Spring right now, the frigid temperatures of late made this color combo very appealing!

First in my creative process, I knew that I wanted to use the Reverse Framelits Technique that I learned about on Deb Valder's Blog. Also, because I was going for the WOW factor, I decided to use the largest butterfly from the Butterfly Thinlits.

Be sure to check out Bokeh Technique and Sneak Peek From 2015 Stampin' Up! Occasions Catalog and Butterfly Obsession for more posts on using the Butterfly Thinlits. In particular, the Bokeh Technique and Sneak Peek From 2015 Stampin' Up! Occasions Catalog shares a technique for easily removing the little pieces from detailed Framelit dies in one easy maneuvre!

I cut my card base from Soft Suede, 11 x 5.5" and scored it on the long side, 2.75" from each end. I used my bone folder to create good creases for this Gate Fold card, making sure that the gates met well in the centre of the card.

I cut pieces of Very Vanilla to attach to the "gates" and embossed them using the Decorative Dots Embossing Folder. I adhered them using Fuse Fast.

I stamped my sentiment on Very Vanilla using Soft Suede and then used the Scalloped Oval Punch to cut it. I used the Extra Large Oval Punch to cut a matte for the sentiment from Soft Suede.

I stamped two butterflies in Soft Suede on Very Vanilla using stamps from the popular Papillon Potpourri stamp set. After using the Elegant Butterfly and the Bitty Butterfly Punches to punch these out, I edged them with more Soft Suede using a Sponge Dauber. I cut four more butterflies from Soft Suede using the Beautiful Wings Embosslits Die.

I decided on the placement of the large butterfly, the sentiment and the smaller butterflies on the card and then used the Reverse Framelits Technique to cut the large butterfly from the card gates.

This technique can be done using any Framelit die and is done by laying the entire card on a Cutting Pad on the Magnetic Platform and placing the Thinlit Die face up inside the card, centering it carefully, and then adding the top Cutting Pad before running it through the Big Shot.

With my butterfly shape now cut out of the gates of my card, I could cut out the actual butterfly for the card using Pear Pizzazz card stock. For this technique to work properly, it is most important to cut the shape keeping the thinlit die face up so that the cut shape will fit perfectly within the opening you have cut in your card.

I trimmed some Dimensional edges to fit on the body of the butterfly die cut and set the butterfly in place.

I felt that I needed a bit more green on the card but the sentiment didn't look right stamped in Pear Pizzazz so I tried some Old Olive Twine twisted behind the sentiment but the color did not pop enough. In the end I decided to use the Old Olive 1/8" ribbon instead, taping it to the back of the Soft suede oval matte. I added a Dimensional to the left side of the sentiment and adhered it in place.

I used glue dots to adhere the little butterflies to the card front. I liked what I had designed but I felt the card needed a little more pizzazz (but not necessarily of the Pear variety!).

For the final touch, I added both Basic Pearls and Basic Rhinestones (colored with an Old Olive Blendability Marker) to the little butterflies as well as the large die cut butterfly.
Now I was satisfied with the card!

As I set out to take the photos of it, I discovered one problem–when the card was opened, the tape I used to adhere the ribbon to the matte of the sentiment could be seen. Horrors!

I easily solved this by cutting another Soft Suede oval and adhering it to the back of the first, covering the tape, and then reattaching the sentiment to the card with a Dimensional.
My project was now a Fait Accompli!

Check out these photos:

Linda Vich Creates: This lovely gate fold card uses the Reverse Framelits Technique to showcase the elaborate Butterfly Thinlits die from Stampin' Up! artfully surrounded by a kaleidoscope of smaller butterflies.


Linda Vich Creates: This lovely gate fold card uses the Reverse Framelits Technique to showcase the elaborate Butterfly Thinlits die from Stampin' Up! artfully surrounded by a kaleidoscope of smaller butterflies.

Linda Vich Creates: This lovely gate fold card uses the Reverse Framelits Technique to showcase the elaborate Butterfly Thinlits die from Stampin' Up! artfully surrounded by a kaleidoscope of smaller butterflies.


And some close up details:

Linda Vich Creates: This lovely gate fold card uses the Reverse Framelits Technique to showcase the elaborate Butterfly Thinlits die from Stampin' Up! artfully surrounded by a kaleidoscope of smaller butterflies.


Linda Vich Creates: This lovely gate fold card uses the Reverse Framelits Technique to showcase the elaborate Butterfly Thinlits die from Stampin' Up! artfully surrounded by a kaleidoscope of smaller butterflies.


Linda Vich Creates: This lovely gate fold card uses the Reverse Framelits Technique to showcase the elaborate Butterfly Thinlits die from Stampin' Up! artfully surrounded by a kaleidoscope of smaller butterflies.


What do you think? Have you tried using the Butterfly Thinlits and the coordinating stamp set, Butterfly Basics? Have you encountered any problems? Do you need some solutions? Be sure to link me up to the cards you create using the Reverse Framelits Technique.

Leave me a comment below and I will be sure to reply!
Built for Free Using: My Stampin Blog