Showing posts with label large letters framelits. Show all posts

Tuesday, September 26, 2017

Painted Harvest Birthday Using Eclipse Technique

Linda Vich Creates: Painted Harvest Birthday Using Eclipse Technique. A bright and cheerful card using the Eclipse Technique and featuring the Painted Harvest stamp set.
How much fun are the cards using the Eclipse Technique (sometimes called the Floating Letters Technique)? There are so many variations to be seen and they can be designed to meet the needs of any occasion–birthday, season, Christmas, etc.

All you need for the Eclipse Technique is to choose a word, a card front that fits the word, and a stamp set or sets to use! A search on YouTube will turn up a number of tutorials for the technique but one that I like is by Gaynor Boyce.

Of course, you will also need to use the Large Letters Framelits. Though these are a very expensive set, you can get them for 50% off when you have a qualifying order. I have used my Framelits many times after purchasing them and the Eclipse Technique provides many opportunities to use them.

My first Eclipse card was designed for a birthday and I chose to use the lovely Painted Harvest stamp set. Because Simone's name was quite long, I designed my card to be 4 x 8.5" in size. After cutting my card base from Berry Burst, I cut two Basic Black and two Thick Whisper White mattes. I used liquid adhesive to adhere one Whisper White matte to a Basic Black matte and then adhered the second Basic Black matte to the card front.

To begin with, I laid out the letter's of Simone's name on a white matte to see where they would fall. This allowed me to plan out my stamping.

I started by stamping the sentiment, from the Tabs For Everything stamp set, with Basic Black. I then used Daffodil Delight, Tangerine Tango and Berry Burst to stamp the sunflowers. I also stamped one complete flower on a full-adhesive Post It Note and then fussy cut it. I used this as a mask on the flowers so that when stamping the leaves in Wild Wasabi, it would look like the leaves were behind the flowers.

With my stamping complete, I laid out the six letters and then drew a light pencil line to be sure that my alignment of the letters would be perfect. I used the Big Shot and my Magnetic Platform to die cut the letters. I also die cut a second set of the letters from another piece of Thick Whisper White.

Using liquid adhesive, I glued all the stamped letters to the second set of letters. In the case of the O, the two pieces of the stamped letter O was replaced into the die cut opening. The middle of the O was then adhered with liquid adhesive and then the outer part of the O was removed again. I then adhered the stamped matte to the Basic Black matte on the card front.

I applied Foam Adhesive Strips to all the letters and then placed each into its die cut opening on the card front.

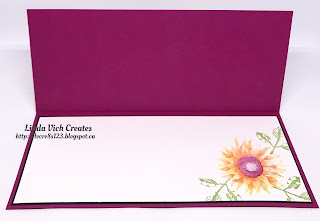
For the inside of the card, I simply stamped a single flower and some leaves in the bottom right corner of the remaining Whisper White matte and then adhered the matte inside the card.

Linda Vich Creates: Painted Harvest Birthday Using Eclipse Technique. A bright and cheerful card using the Eclipse Technique and featuring the Painted Harvest stamp set.

Linda Vich Creates: Painted Harvest Birthday Using Eclipse Technique. A bright and cheerful card using the Eclipse Technique and featuring the Painted Harvest stamp set.

Linda Vich Creates: Painted Harvest Birthday Using Eclipse Technique. A bright and cheerful card using the Eclipse Technique and featuring the Painted Harvest stamp set.

I am so pleased with how this card turned out! The colors are bright and cheerful and the stamping looks so cool on the raised letters!

I hope that you have enjoyed my card and that you will try this technique for yourself!


Sunday, June 11, 2017

Summer Daisy

Linda Vich Creates: Summer Daisy. Masking technique used to create two-toned letters on this Delightful Daisy summer card!
With the glorious weather lately, it's not hard to tell that summer is the topic on everyone's mind. Popular items through my till at Walmart include fans, air conditioners, pools, barbecues and patio furniture. Because of this, I thought it fitting then to create a summer card!

I started by selecting a piece of the Delightful Daisy DSP and then selected colors from within the pattern–Tranquil Tide and Calypso Coral–to use for a matte and card base. I also chose to use So Saffron and Calypso Coral for my letters. Though Daffodil Delight is supposed to be the yellow in the Delightful Daisy DSP, I found it to be too bright for the yellow of this particular pattern.

Next, I lined up the letter stamps from the Letters For You stamp set on my MISTI to spell SUMMER, leaving out the U and leaving a space for a second M.

I used washi tape to hold a piece of scrap paper across the letters as a mask so that I could ink up half of the letter at a time. I started with So Saffron and I inked up the letters first with Versamark and then the So Saffron so that it would ink up better. After carefully removing the mask, I stamped twice onto Watercolor Paper to get the color strength that I wanted. I then masked up the part of the letters I had stamped and then inked the remaining half of the letters with the Versamark and Calypso Coral and stamped two times.

And then, being the linear thinker that I am, I made my BIG mistake.

The MISTI is an amazing tool and is very useful for repeat stamping. What I should have done after stamping the So Saffron, was remove the piece of watercolor paper and replace it with another to stamp the second M. Then do the second masking, stamp, replace the watercolor paper and stamp again. This would have ensured that I had the division line between the So Saffron and the Calypso Coral in the exact same place on both M's.

But I didn't do that! :(

Instead, I took off the M letter stamp and put it in the spot where the second M would go and attempted to mask and stamp to get the colors in the right places.

NOT!

In the end, I measured carefully and was successful at stamping another M correctly and then I was able to die cut all the letters using the Large Letters Framelits. But it would have been so much easier just to replace the watercolor paper with another piece! Regardless, I got what I wanted in the end.

After die cutting the letters, I punched two daisies from Watercolor Paper using the Daisy Punch and then colored them using sponge daubers. I shaped them slightly with a bone folder and adhered them together using liquid adhesive. A Gold Faceted Gem was added to the centre but I decided it needed to be more yellow so I touched it up with a yellow Sharpie.

I cut the DSP and matted it onto Tranquil Tide. The letters were adhered using liquid adhesive and then the daisy with Dimensionals.

The entire matte was adhered to the Calypso Coral card front using Foam Adhesive Strips.

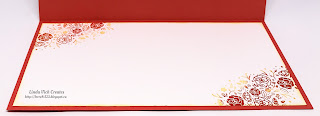
On a Whisper White matte, I used my MISTI to stamp the flowers from the Word Words stamp set onto a corner of the matte using So Saffron. This was repeated and then I selectively added Calypso Coral to some flowers on the stamp using a sponge dauber and stamped it again, twice. This procedure was repeated with the opposite corner of the matte. A sponge dauber was then used to ink all four edges of the matte with So Saffron before adhering the matte inside the card.

Linda Vich Creates: Summer Daisy. Masking technique used to create two-toned letters on this Delightful Daisy summer card!

Linda Vich Creates: Summer Daisy. Masking technique used to create two-toned letters on this Delightful Daisy summer card!

Linda Vich Creates: Summer Daisy. Masking technique used to create two-toned letters on this Delightful Daisy summer card!

Linda Vich Creates: Summer Daisy. Masking technique used to create two-toned letters on this Delightful Daisy summer card!


I love the combo of Tranquil Tide with the Calypso Coral and I really like this piece of the Delightful Daisy DSP and I hope to find a use for it again soon!


Thursday, March 16, 2017

Poppin' Box Birthday Card

Linda Vich Creates: Poppin' Box Birthday Card. Succulents decorate this box that holds a 3D surprise for the recipient
After seeing so many of these really neat box cards that when opened allow a box to spring out I decided that I wanted to tackle one for my neighbor, Debby, for her birthday. Jan B recently posted a tutorial for one so I gave it a try!

I will not try to describe how this card was created since Jan did such a good job and I think you really need the video to see how this is done.

I did CASE Jan's design but changed it up by adding some succulents to the card box decoration and the letters/numbers I added to the pop up cube were H, B, 2, and U. I also used some of the now retired Sweet Sugarplum Ribbon from the Glitter Combo Pack.

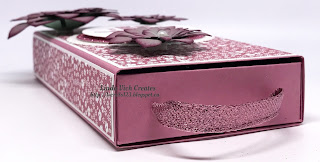
The box was decorated with DSP from the 2016-2018 In Color DSP Stack and Whisper White. The cube was created with Sweet Sugarplum card stock and decorated with both Sweet Sugarplum and Dazzling Diamonds Glimmer Paper. The Large Letters and the Large Numbers Framelits were used to cut the characters for on the cube.

For the succulents, I used Mint Macaron card stock and sponged the pieces with Sweet Sugarplum and the tips with Rich Razzleberry. To dress the succulents up, I added some of the metal rimmed pearls.

Here is a very short video to show hwat the card would look like when a recipient opened it.


Linda Vich Creates: Poppin' Box Birthday Card. Succulents decorate this box that holds a 3D surprise for the recipient

Linda Vich Creates: Poppin' Box Birthday Card. Succulents decorate this box that holds a 3D surprise for the recipient

Linda Vich Creates: Poppin' Box Birthday Card. Succulents decorate this box that holds a 3D surprise for the recipient

Linda Vich Creates: Poppin' Box Birthday Card. Succulents decorate this box that holds a 3D surprise for the recipient

Linda Vich Creates: Poppin' Box Birthday Card. Succulents decorate this box that holds a 3D surprise for the recipient

Linda Vich Creates: Poppin' Box Birthday Card. Succulents decorate this box that holds a 3D surprise for the recipient

I'm really pleased with how this project turned out! Have you tried one of these box cards yet? Give Jan's tutorial a try!


Wednesday, February 15, 2017

Valentine Collection

Linda Vich Creates: Valentine Collection. Several valentine projects that use a host of die sets to create lovely boxes and a card.
Valentine's Day this year marked the day 30 years ago when my husband Bob proposed to me! Such a special day that was! We celebrated by going for supper at Jonesy's Restaurant in Bird's Hill. This was the first time we had eaten at this restaurant and it definitely won't be our last! It is a very small restaurant, and did not have a fancy decor, but the food was wonderful and I highly recommend the place.

Today I have for you a collection of items that I created for my family for Valentine's Day this year.

First up is a simple tea light holder for my daughter who likes candles. I added no extra embellishments to this box so that the light of the candle could shine through all the tiny die cut holes.

I simply used the largest of the Window Box Dies to cut out two pieces of card stock and then used a smaller die with a heart pattern to cut openings in the small sides of the box. A larger die was used to cut the holes in the top of the box. Liquid adhesive was used to assemble the box.

Linda Vich Creates: Valentine Collection. Several valentine projects that use a host of die sets to create lovely boxes and a card.

Linda Vich Creates: Valentine Collection. Several valentine projects that use a host of die sets to create lovely boxes and a card.


Next, I created an enlarged Window Box by using a tutorial from Kirsteen Gill. I wanted a larger box that could hold more treats and this worked perfectly!

To create the box, you need to do some fancy cutting with your Big Shot. In order to make the box larger, you need to shift the top cutting plate so that it doesn't extend all the way across the Window Box Thinlits die. It is not a hard technique but I did need to refer to the tutorial in order to make it work for me!

Once the pieces were cut out, the box was assembled like the original version and I used liquid adhesive to adhere the card stock. I cut panels for the box using the Sending Love DSP and also used the Love Notes Framelits to cut tiny envelopes, hearts, arrows, and the banner for the top.

Using the Sealed With Love stamp set, I stamped the tiny notes within the envelopes. I used the Bloomin' Love stamp set for the sentiment on the banner which I embellished with rhinestones. I also used one of the Lace Doilies on the lid of the box. These doilies are really nice because they are Whisper White on one side and Very Vanilla on the other!


Linda Vich Creates: Valentine Collection. Several valentine projects that use a host of die sets to create lovely boxes and a card.

Linda Vich Creates: Valentine Collection. Several valentine projects that use a host of die sets to create lovely boxes and a card.

Linda Vich Creates: Valentine Collection. Several valentine projects that use a host of die sets to create lovely boxes and a card.


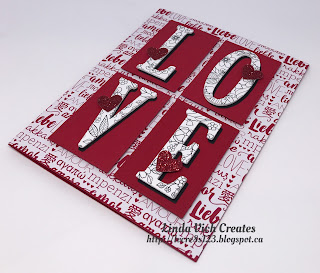
To create the card for my husband, I first die cut the four letters from the Sale-A-Bration Freebie, Inside The Lines DSP, using the Large Letters Framelits. I also cut three versions using Thick Whisper White and one from Basic Black for all four letters. These letters stacked and adhered using liquid adhesive, with the Basic Black layer being slightly offset to produce a shadow.

A 4.75 x 6" card base was cut from Real Red and then a sheet of the Sending Love DSP was cut and adhered to the front.

Next, I used one the squares from the Stitched Shapes Framelits to cut a rectangle on which to place each letter.

In order to cut a rectangle using a square die, the top cutting plate on the Big Shot must be placed so that the one edge of the die is not cut. The die is then moved, the platform rotated, and the cutting plate replaced so that the other side can be cut. To ensure that each of my rectangles was the same size, I cut one rectangle and then used the resulting "frame" as a template to place over each piece of card stock to be cut. The template ensured that the die could only be moved to the same place each time ensuring the same size of rectangle. For more information on this technique, check out the video tutorial by Dawn Griffith.


Linda Vich Creates: Valentine Collection. Several valentine projects that use a host of die sets to create lovely boxes and a card.
This shows the template on top with the square die
moved to create the second cut for the rectangle.

Linda Vich Creates: Valentine Collection. Several valentine projects that use a host of die sets to create lovely boxes and a card.
The top cutting plate is positioned so that the bottom
edge of the die does not cut through the card stock

Each letter was adhered to its stitched rectangle using liquid adhesive. The rectangles were adhered to the card front using Dimensionals. Small hearts were punched from Red Glimmer paper and adhered to the letters using Glue Dots.

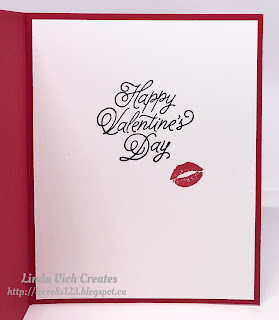
For inside the card, a white matte was stamped with a sentiment from the Sealed With Love stamp set using Basic Black and the lips were stamped with Real Red. The matte was adhered to complete the card.


Linda Vich Creates: Valentine Collection. Several valentine projects that use a host of die sets to create lovely boxes and a card.

Linda Vich Creates: Valentine Collection. Several valentine projects that use a host of die sets to create lovely boxes and a card.

Linda Vich Creates: Valentine Collection. Several valentine projects that use a host of die sets to create lovely boxes and a card.


Finally, I created a lidded box for my granddaughter using the Popcorn Box Thinlits. I referred to the tutorial by Intatwyne Designs.

I created my box using Real Red card stock and adhered panels cut from the Sending Love DSP. I decorated each panel by adhering layered hearts cut from Red and Dazzling Diamonds Glimmer paper using the Sweet & Sassy Framelits.

I stamped the sentiment from the Sealed With Love stamp set using Real Red and then Versamark inks and heat embossed it using the Real Red Glitter Embossing Powder. This was die cut using a square from the Stitched Shapes Framelits and adhered to the lid of the box.

A length of ribbon was adhered at the back of the box with a glue dot and then tied in a bow to complete the box.


Linda Vich Creates: Valentine Collection. Several valentine projects that use a host of die sets to create lovely boxes and a card.

Linda Vich Creates: Valentine Collection. Several valentine projects that use a host of die sets to create lovely boxes and a card.

Linda Vich Creates: Valentine Collection. Several valentine projects that use a host of die sets to create lovely boxes and a card.


This completes my Valentine projects for 2017. I hope you enjoyed a lovely Valentine's Day!


Tuesday, November 8, 2016

Irresistible Cupcake

Linda Vich Creates: Irresistible Cupcake. A multi-step-stamped Sweet Cupcake graces the card front of this Pop Up Panel card while the inside flaunts a resist background brought to life by sponging with Bermuda Bay
It has been so hard waiting to blog about this card but I needed to wait until the recipient had received it! This is my very first Pop Up Panel card, AKA Pop and Twist card, AKA Twist and Pop card.

There are so many of these cards being displayed on the internet now and each one that I have seen has pushed me to try one of my own. Some of the cards are quite simply embellished and some are outright over-the-freakin'-top!

The tutorial that I chose to follow was one from Maymay Made It. I had previously looked at some other tutorials but found hers to be the easiest to follow.

There are three main pieces to this type of card: 1. card base 2. mechanism for the pop up and 3. the strip for the pop out panel.

I started by cutting a 4 1/4 x 11" card base from Rich Razzleberry. It was scored at 5 1/2". The mechanism for the pop up was cut from Whisper White at 8 1/2 x 10 3/4" and scored at 2 1/4", 4 1/4" and 6 1/4" on the short side and at 3 7/8", 5 3/8" and 6 6/8" on the long side. The strip for the pop out panel was cut at 3 x 11" from Rich Razzleberry. It was scored at 2 3/4", 5 1/2" and 8 1/4".

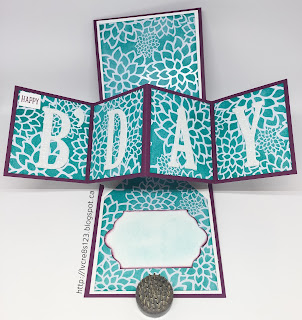
Four mattes for the pop out panel were cut from Irresistibly Floral DSP at 2 3/4 x 2 1/2". Two mattes, for the inside card panels were also cut at 3 3/4 x 5 1/2" before being trimmed to fit.

For each of the panels, I sponged them with Bermuda Bay ink to reveal the patterned resist. The two larger panels were trimmed to fit by tracing the mechanism for the pop up once it was created.

To create the pop up mechanism, after scoring, the four outer corners are cut away leaving a kind of T shape. The T has two wide pieces and two narrow pieces. Each of the narrow pieces had notches cut from each side to help get rid of some of the bulk from when the mechanism would be folded. Finally, using the score lines, the panels are folded to create an X at the centre. It is very hard to describe the actual construction of the pop out mechanism so you are best to view the video tutorial.

Once the pop out mechanism is created, the strip for the pop out panel is adhered to it. The four mattes were then adhered. Next, the two large panels for the inside of the card are trimmed by tracing the pointed shape of the pop out mechanism onto them. These mattes are then glued onto parts of the mechanism that actually form the white base matte inside the card. The mechanism was then glued to the inside of the Rich Razzleberry card base.

To finish embellishing the card, the large letters for the pop out panels were die cut from Dazzling Diamonds Glimmer paper using the Large Letter Framelits. "Happy" was stamped on a piece of Whisper White using Rich Razzleberry ink and a sentiment from the Sweet Cupcake stamp set.

Using the Lots of Labels Framelits, a tag was cut from Whisper White and edges inked with Rich Razzleberry. This was designed as a place to add greetings from the sender. Unfortunately, the Whisper White did not stay pristine! It picked up a smudge of Bermuda Bay so I compensated by lightly sponging more Bermuda Bay onto it!

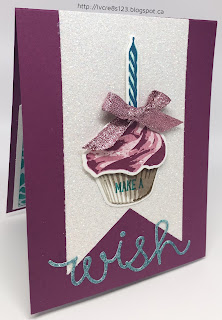
For the front of the card, I cut a banner from Dazzling Diamonds Glimmer paper using the Banners Framelits. Using the Sweet Cupcake stamp set, I did multi-step stamping to create the cupcake, its wrapper and a candle. The cupcake used Sweet Sugarplum and Rich Razzleberry, the wrapper used Sahara Sand, Tip Top Taupe and Soft Suede, and the candle used Pool Party and Island Indigo. Each piece was die cut using the coordinating framelits.

"Make a" was stamped onto the cupcake wrapper and then the cupcake had a slit cut into it so the bottom of the candle could be inserted and taped to the back. The cupcake was popped up with Dimensionals onto the wrapper and adhered to the banner. Sweet Sugarplum Glitter Ribbon was tied in a bow and adhered to the base of the candle.

To complete the card, the "wish" sentiment was die cut from Dazzling Diamonds Glimmer paper using a die from the Cupcake Cutout Framelits. It was sponged with Bermuda Bay and adhered at the bottom of the banner.

Linda Vich Creates: Irresistible Cupcake. A multi-step-stamped Sweet Cupcake graces the card front of this Pop Up Panel card while the inside flaunts a resist background brought to life by sponging with Bermuda Bay

Linda Vich Creates: Irresistible Cupcake. A multi-step-stamped Sweet Cupcake graces the card front of this Pop Up Panel card while the inside flaunts a resist background brought to life by sponging with Bermuda Bay

This card was a joy to create, especially knowing that I would be sending it to my special online friend, Donna!