Showing posts with label gift bag punch board. Show all posts

Monday, November 21, 2016

Online Extravaganza Continues–First 24 Hour Sale


You won't want to miss these products in the first 24 hour sale! These are available until 12:50 PM November 21 or while supplies last. Don't miss out–place your order NOW!


Look what you could make with some of these items!

With the Gift Bag Punch Board, you can make projects like this Glitzy Gift Bag.


Or perhaps you like themed gift bags like these ones for Halloween.

Linda Vich Creates: Halloween Round Up. Halloween gift bag created using the Gift Bag Punch Board and Spider Web Doilies.

Linda Vich Creates: Halloween Round Up. Halloween gift bag created using the Gift Bag Punch Board and Spider Web Doilies.

Linda Vich Creates: Halloween Round Up. Halloween gift bag created using the Gift Bag Punch Board and Spider Web Doilies.

Full details can be found for the Halloween bags in my Halloween Round Up.

Perhaps the Gift Box Punch Board interests you? You could make a project like these ones from my Remnants of Easter blog post.

Linda Vich Creates: Remnants of Easter. Treat boxes created with the Gift Box Punch Board.

At this time of year, the Embellished Ornaments would come in handy. The two projects below display the sentiments from the stamp set.

Linda Vich Creates: Rustic Poinsettias. Reminiscent of vintage enamel ware pots and pans, dappled poinsettias in vibrant hues embellish rustic, burlap trimmed cards.

Linda Vich Creates: Pretty In Pink Poinsettia. A pretty pink poinsettia adorns this Softly Falling embossed card. Silver Glimmer paper strips and a sequin-filled sentiment pocket complete this stunning Christmas card.

Full details for these two cards can be found at Rustic Poinsettias and Pretty in Pink Poinsettia.

I hope I have provided with you with a few ideas for using the products available for only 24 hours! Click directly on the products shown above to be taken to my online store where you can place your order!

Monday, December 21, 2015

Glitzy Gift Bag

The Christmas season is such a busy time that I usually don't get the opportunity to do exquisite gift wrapping or create numerous embellished gift bags to give to my friends and family.

This year, however, my work schedule at Walmart has been quite slack so I've had additional crafting time. This allowed me to create a gift bag for a good friend and crafting enabler.

Because I had already created Christmas cards for the ladies in my stamping group, I decided to match the bag to the particular card that I gave my friend.

I used my Gift Bag Punch Board to create a Medium bag (3.25" in width) by using a piece of Bermuda Bay card stock measuring a full 8.5 x 11". The 11" is necessary to make a Medium bag while the 8.5" determines the finished height of the bag, minus about 2" for the bottom bag closure.

Once the bag was punched, folded, and adhered, using Fast Fuse Adhesive, I sprayed all sides of the bag using my Heidi Swap Color Shine Spritz in Gold Lamé. I haven't quite mastered the spraying process yet! I tend to get too much spray on my projects or the drops are too big. Regardless, I think the addition of the spray really amps up the wattage on a project!

I used my heat tool to ensure that all sides were dry and then threaded a coordinating sheer ribbon through the holes I had punched in the top of the bag. I knotted the ends to form two separate handles.
Next, to match up with the Christmas card, I used sticky strip to adhere a piece of burlap ribbon completely around the bag, from one edge to the other. To cover the raw edges of the ribbon, I adhered two Metallic Foil Doilies, folded in half over the edges of the bag.

Since the card utilized snowflakes, I decided to use two of the Snowflake Elements on the bag. The top side of each snowflake was painted with Picket Fence Distress Ink and then I adhered Iced Rhinestones to the centres of each snowflake.

I adhered a folded strip of Bermuda Bay Sequin Trim behind each snowflake and then adhered the snowflakes with Dimensionals to each side of the bag where the doily met the top of the burlap ribbon.

With very few embellishments or time, I had a elegant gift bag to fill for my friend!

Though I did not take a picture of both the card and bag together, you can see below that they match quite well.


The Gift Bag Punch Board is ideal for creating unique bags for gifting. Have you used the Gift Bag Punch Board? Drop me a comment below with a link to your projects!

Built for Free Using: My Stampin Blog

Tuesday, November 3, 2015

Halloween Round Up

Halloween was a real whirlwind this year! It seemed that no sooner were the candy, costumes, and decorations on the shelves at Walmart when Halloween night had come and gone!

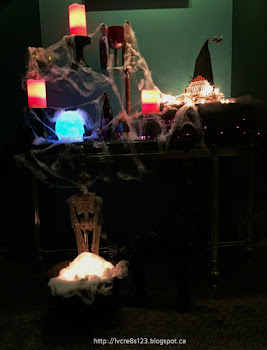
I had been looking forward to creating the Halloween Decor Project from Stampin Up and I was able to incorporate it into a spooky little scene in our hallway entrance that totally captivated my granddaughter, Raine!

For the first couple of times she was over, she would not walk past it at all, even if I held her! Gradually, she was able to go by if I was holding her and by Halloween night, she walked past it herself a couple of times!

Here's the hat by itself after I completed it:


And here it is in the Halloween display I created:


Luckily, I had a day off prior to Halloween in order to create some cards and gift bags.

For Steffan, I used my Zig Clean Color Real Brush Markers to color in a stamp from the Happy Witches stamp set by Hampton Art. I die cut the stamp as well as a Black Glimmer paper using the Lots Of Labels Framelits.

The sentiment from Halloween Expressions Mini from Inkadinkado was stamped with Archival ink on Cucumber Crush card stock. The edges were inked with the archival ink and then the matte was mounted on a Rich Razzleberry card base.

The die cuts were adhered to each other and then popped up on the matte using Dimensionals.


For Courtney, I cased this card. I used the wonderfully spooky stamp set, Witches' Night, to stamp the main image on Whisper White card stock using Basic Black Archival ink. I used Pumpkin Pie and Rich Razzleberry inks to sponge the image and then die cut it using the Lots of Labels Framelits, cutting a larger one from Black Glimmer paper. The colored image was also stamped with Versamark and then heat embossed with Clear Embossing Powder to make it shiny. The die cuts were adhered to each other.

On a strip of Rich Razzleberry I stamped the zig zag pattern stamp from the same stamp set and then adhered a strip of Black Glimmer paper over top. On a Pumpkin Pie matte, I stamped bats in each corner and then it was adhered to a Rich Razzleberry card base using Dimensionals.

The strips of Rich Razzleberry and Black Glimmer were adhered in the centre of the matte and then a black Spiderweb Doily was cut in half and adhered to the back of the die cut. The die cut was then adhered to the card front using Dimensionals.


 For Raine's gift bag, I used a piece of paper from the Happy Haunting DSP pack and the Gift Bag Punch Board to create her treat bag. To decorate it, I used a stamp from the Witches' Night stamp set to stamp on Pumpkin Pie card stock and then die cut it using the Lots of Labels Framelits. It was attached to the bag with a black spiderweb doily cut in half behind it.

I used both the Boo To You and the Seasonal Frame Thinlits Dies to die cut Boo! and Spooky from Pumpkin Pie card stock, three copies of each. The words were glued together using the Fine Tip Glue Pen. I used Versamark and Clear Embossing Powder to heat emboss the words to make them shiny.


Steffan's bag was made the same way but I used a different stamp on Real Red card stock and it was heat embossed to make it shiny. The stamp was die cut and adhered to Black Glimmer paper die cut and then adhered over a spiderweb showing the white side.

I used the Howl-o-ween Treat stamp set with StazOn ink to stamp the skull and bone on Dazzling Diamonds Glimmer paper. They were die cut using the Boo To You Framelits.


Finally, for Courtney's gift bag, I stamped the image from the Happy Witches stamp set on Rich Razzleberry card stock and die cut it. It was edged with Basic Black Archival ink. A larger die cut label in Pumpkin Pie was used behind it, with a black Spiderweb Doily sandwiched between.


Here's a picture of Raine in her costume taken by her daycare provider. They had a party that day and took their costumes to put on there. Prior to this, Raine had not been persuaded to try on her costume but when she saw all the other kids getting into their costumes, she figured it was ok to do the same!


Here's Raine after returning from walking door-to-door for over 1 1/2 hours! She had a ball and got a Walmart bag full of goodies!


Here she is, enjoying some of her candy stash!
 Hope you all had a good Halloween!

Built for Free Using: My Stampin Blog