Showing posts with label flourish thinlits. Show all posts

Tuesday, May 9, 2017

Ice Cream Sandwiches and Irresistibly Floral

Linda Vich Creates: Ice Cream Sandwiches and Irresistibly Floral. An ice cream sandwich treat box CASED from Barb Mullikin for my stamping group projects.
With thoughts of summer on the horizon, I had a great class with my monthly stamping group on Friday.

Our first summertime project was a direct CASE from Barb Mullikin. Her attention to detail in creating this sweet Ice Cream Sandwich Treat Box was second to none! To get a better idea of how this project is made, check out her video.

To make this project less confusing for my students, I had pre-cut all the necessary pieces, with the exception of the ice cream. This is what was needed:
  • 6 7/8 x 7 3/8" Thick Whisper White
  • two, 3 1/4 x 6" and 2 5/8 x 7" Chocolate Chip
  • 1 1/2 x 2" and two labels using dies #5 and #6 from Lots of Labels Framelits cut from Pool Party
  • one label using die #5 cut from Whisper White
  • 1 1/2 x 2" Watermelon Wonder
  • one 3/4 x 12" strip of striped Tasty Treats DSP
  • 2 5/8 x 5 9/16" piece of Tasty Treats DSP for inside lid
  • four, 1/x 3" pieces of Tasty Treats DSP for Hershey Nuggets
  • spoon die cut from Silver Foil using Frozen Treats Framelits
  • cherry die cut from Watermelon Wonder using Frozen Treats Framelits
  • one ice cream bowl die cut from Tasty Treats DSP using Frozen Treats Framelits
  • a piece of grid paper, 3 1/4 x 6", with holes pre-punched on every other vertical line, and on every other horizontal line, staggered by 1 line
We constructed this project as a group because I knew it might be confusing for some. I also supplied a "cheat sheet" with their supplies for the scoring directions in case they got lost during the class.
We started by constructing the "ice cream" box by scoring along the long side of the Thick Whisper White piece at 5/8", 3 3/8", 4" and 6 3/4." We then rotated the paper 90 degrees and scored at 5/8" from each end. All score lines were then folded and burnished well with a bone folder.

We located the "box" on either side of the middle score lines and cut up the score lines and snipped the tabs right off. Then, turning the paper so that the cut out pieces were on the left and right, we cut up each score line at the ends to meet the other score line. We cut a slight sliver off of each tab to create less bulk when forming the box. The paper was rotated 180 degrees and the ends were cut and slivered.

Next, glue was put on two of the end tabs and adhered to form the bottom of the box being sure to form 90 degree corners.

This process was repeated to form the lid of the box but before adhering the glued tabs, the box was closed. This ensured that the lid of the box would form a tight fit.

Next, the cookies were created. A stack with the grid paper and the two matching sized pieces of Chocolate Chip was formed. A piercing tool and a piercing pad was used to pierce holes in the the card stock. A corner rounder or the Envelope Punch Board was used then to round the corners of each piece. A bone folder was used to smooth down the raised edge of the pierced card stock pieces.

Glue was placed on the top of the box and then adhered to a face-down chocolate "cookie." This was repeated with the bottom of the box.

Next, the remaining piece of Chocolate Chip card stock was xored on the long end at 3/4", 1 1/4", and 1 3/4" from each end. It was then folded and burnished to form a tray liner for the box.

To prepare the Hershey Nuggets, a glue dot was applied to the bottom of the nugget and then the 1 x 3" piece of DSP was wrapped around it, securing with a second glue dot. All four nuggets were placed in the box and the box closed.

The 3/4 x 12" strip of DSP was wrapped around the box, being sure to crease each corner well. The smaller Pool Party label was centred on the box top and the strips adhered to it. The larger Pool Party label was then adhered over it. The Whisper White label was adhered on top.

The small pieces of Pool Party and Watermelon Wonder were stamped with the ice cream swirl, with matching inks and then die cut. Wink of Stella was used to highlight the inking and then the ice cream, spoon, bowl, and cherry were adhered to the white label.

A small Pool Party bow was created using the retired Sycamore Street ribbon and adhered to the bowl using a glue dot.

Linda Vich Creates: Ice Cream Sandwiches and Irresistibly Floral. An ice cream sandwich treat box CASED from Barb Mullikin for my stamping group projects.

Linda Vich Creates: Ice Cream Sandwiches and Irresistibly Floral. An ice cream sandwich treat box CASED from Barb Mullikin for my stamping group projects.

Linda Vich Creates: Ice Cream Sandwiches and Irresistibly Floral. An ice cream sandwich treat box CASED from Barb Mullikin for my stamping group projects.
Check out the cookie details!


Our second project of the evening was much simpler and completed independently.

A matte cut from the retiring Irresistibly Floral DSP was sponged in Pear Pizzazz, Pacific Point, and Bermuda Bay and then adhered to a Basic Black matte, aligned at the right and bottom edges. This matte was adhered to a Thick Whisper White card base, again aligned at the right and bottom edges.

The sentiment from the Floral Phrases stamp set was stamped in Versamark on a Basic Black oval die cut using the Stitched Shapes Framelits. It was heat embossed with White Stampin' Emboss Powder and then adhered to a Whisper White scalloped oval die cut with the Layering Ovals.

Two flowers were die cut from Basic Black using the Flourish Thinlits. These were layered above and below the sentiment using liquid adhesive. The sentiment was adhered with Dimensionals. Rhinestones were adhered to the flower centres to complete the card.

Linda Vich Creates: Ice Cream Sandwiches and Irresistibly Floral. A emboss resist card made with the Irresistibly Floral DSP for my stamping group projects.

Linda Vich Creates: Ice Cream Sandwiches and Irresistibly Floral. A emboss resist card made with the Irresistibly Floral DSP for my stamping group projects.

Linda Vich Creates: Ice Cream Sandwiches and Irresistibly Floral. A emboss resist card made with the Irresistibly Floral DSP for my stamping group projects.


I hope you've enjoyed reading about our projects from stamping class!

Thursday, April 6, 2017

Flourish Thinlits For Global Design Project #81

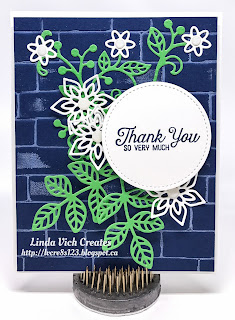
Linda Vich Creates: Flourish Thinlits For Global Design Project #81. Delicate Flourish Thinlits dress up a brick embossed background in this entry for #gdp081.
I often find that a color scheme can stir the mojo juices and inspire me to design a project. The Global Design Project #81 has a color challenge that did just that! The challenge was to combine Night of Navy, Whisper White, and any other color. Because Cucumber Crush will soon be retiring, I want to use it as much as I can before it is gone so I chose it for my additional color.

The one thing I knew was that I wanted to use the Brick Wall Embossing Folder for my background so I started by cutting a Night of Navy matte. Using my now retired brayer to ink up the top of the folder with Whisper White Craft Ink, I then placed my matte on the other side of the folder, closed it, and ran it through the Big Shot. This gave me some light "grout" lines on my brick-embossed card stock. After setting the ink with my heat tool, I adhered the matte to a Thick Whisper White card base using Foam Adhesive Strips.

I stamped the sentiment with Night of Navy on a scrap of Thick Whisper White and then die cut it using a circle from the Stitched Shapes Framelits. I used dies from the Flourish Thinlits to die cut leaves and flowers from Cucumber Crush and Thick Whisper White and then developed a pleasing design on my card front. After snapping a picture for reference, I took the design apart and then used liquid adhesive and Foam Adhesive Strips to adhere the die cuts and sentiment to the card front, adding White Perfect Accents for the flower centres.

Finally, to complete the card, I stamped the large flourish image on the inside of the card.

Linda Vich Creates: Flourish Thinlits For Global Design Project #81. Delicate Flourish Thinlits dress up a brick embossed background in this entry for #gdp081.

Linda Vich Creates: Flourish Thinlits For Global Design Project #81. Delicate Flourish Thinlits dress up a brick embossed background in this entry for #gdp081.

Linda Vich Creates: Flourish Thinlits For Global Design Project #81. Delicate Flourish Thinlits dress up a brick embossed background in this entry for #gdp081.

Do you like the color combo? You can pin the following image for future reference.

Linda Vich Creates: Flourish Thinlits For Global Design Project #81. Delicate Flourish Thinlits dress up a brick embossed background in this entry for #gdp081.

Don't forget to stock up on all things Cucumber Crush (and any of the other retiring In Colors) in my online store.

I will be entering this card in the Global Design Project #081. Won't you come and play too?


Monday, September 12, 2016

September Projects for Stamping Group

Friday night was the beginning of the 2016-17 stamping year for my stamp group. It was so good to see everyone and catch up with their news from the summer.

To welcome them back, I made them each a little box that held a container of Tic Tacs, CASEd from Linda Parker.

Linda Vich Creates: September Projects for Stamping Group. Tic Tacs treat hold box created using Night of Navy and Floral Boutique Designer Washi Tape.

Linda Vich Creates: September Projects for Stamping Group. Tic Tacs treat hold box created using Night of Navy and Floral Boutique Designer Washi Tape.

Linda Vich Creates: September Projects for Stamping Group. Tic Tacs treat hold box created using Night of Navy and Floral Boutique Designer Washi Tape.

For our evening's projects, we made two fall–themed cards.

The first card introduced the group to the versatility of the Cookie Cutter Punch by using it to create this card using the scarecrow stamp image. The image was stamped on Thick Whisper White using Basic Black Archival ink and then colored with Stampin' Write Markers. Glue Dots allowed "straw" (Linen Thread pieces) to be adhered to the scarecrow's hands and feet. Soft Suede and a sponge dauber was used to provide a little definition to the "straw."

Pumpkins, from the Spooky Fun stamp set were also stamped and then colored with markers. Clear Wink of Stella gave them some shimmer.

The sentiment, from the Butterfly Basics stamp set was stamped on a Marina Blue matte using Basic Black. The stamped matte was offset over a white one with a strip of burlap ribbon wrapped around.

A matte from the Halloween Night DSP was cut and inked with Early Espresso and then adhered to a Marina Mist card base. The offset mattes were adhered with Dimensionals. The scarecrow was attached to the burlap ribbon using Dimensionals and the pumpkins were adhered with a Dimensional and an adhesive strip to complete the card.

Linda Vich Creates: September Projects for Stamping Group. Cookie Cutter Halloween scarecrow graces the front of this fall-themed card.

Linda Vich Creates: September Projects for Stamping Group. Cookie Cutter Halloween scarecrow graces the front of this fall-themed card.

The second card had a tie in to fall by "canning" some of the Fruit Stand DSP within the Jar Framelits and mounting the jar on a belly band that secured a Pinwheel Fold card. This idea was CASEd from Leena Girsa.

Though my example shows flowers within the jar, the other papers in the DSP pack displayed a variety of fruits—pears, strawberries and peaches.

The largest jar from the Jar of Love stamp set was stamped on Thick Whisper White using Smoky Slate; the lid was stamped with Basic Gray. The jar and lid were die cut with the coordinating Framelits. As well, a jar was die cut from Window sheet and the fruit DSP was die cut with the die for the jar contents.

Next, liquid glue was used to adhere the DSP to the jar die cut with the "glass" (window sheet) and the lid adhered with Glue Dots.

The folded card was created by first measuring and marking all four sides of a two-sided piece of DSP at 3" and 5" and then the paper was scored by aligning at the 3" mark on one side of the paper with the 5" mark on the adjacent side. This was repeated with each of the three remaining side. (I demonstrated this method with the group since none of them had purchased the Diagonal Board for the Simply Scored tool. If you have this, you need not do any of the above measuring and marking. Simply place the paper on the Diagonal Board and score at 3" on each side. Done!)

The scoring produced four small triangles which were snipped out with a pair of scissors. The paper was then flipped over and scored at 1" on each side.

The paper was then folded and burnished on all the score lines, with the 1" flaps being folded back to expose the contrasting side of the DSP.

A coordinating fruit (or flower) was stamped on the bottom corner of a Whisper White matte. This was adhered to a matte of complementary card stock (matching the belly band strip) and then adhered inside the opened card using Fast Fuse.

The flaps of the card were then folded inward, following either a clockwise or counter-clockwise direction (which ever produced the final pinwheel formation, with the last flap being tucked in to "lock" the card.

To create the belly band, a strip of complementary card stock was wrapped around the card and adhered together with a piece of burlap ribbon wrapped around it. The jar was attached to the band using Glue Dots.

Here's a tip for creating a belly band that is easily removed. Place the card stock strip under the card and fold one side of the strip around the card and crease firmly. Slide the card over about 1/8" from the crease and then wrap the other side of the strip around the card and crease and then adhere the ends of the strip together. This gives a finished look to the belly band and it is just the right size to it to easily slip off the card.

The sentiment, stamped in Pear Pizzazz on Thick Whisper White had its end flagged with the Triple Banner Punch and then was adhered in place using Glue Dots.

Linda Vich Creates: September Projects for Stamping Group. Pinwheel Fold card created using the Jar of Love stamp set and coordinating dies with Fruit Stand DSP.

Linda Vich Creates: September Projects for Stamping Group. Pinwheel Fold card created using the Jar of Love stamp set and coordinating dies with Fruit Stand DSP.

Linda Vich Creates: September Projects for Stamping Group. Pinwheel Fold card created using the Jar of Love stamp set and coordinating dies with Fruit Stand DSP.

We're off to a great start for our stamping year with many more projects to come!

Tic Tac Box


Scarecrow Card


Pinwheel Fold Card


Saturday, July 9, 2016

Brayered Glue Technique For Mass Producing Cards With Detailed Die Cuts

Linda Vich Creates: Brayered Glue Technique For Mass Producing Cards With Detailed Die Cuts.
Have you ever wanted to mass produce a card design that used a detailed die cut? Did you stop short of doing so because of the work involved in adhering the die cuts to the card front? I believe I have found a workable solution!

I am loving the new Flourish Thinlits because they are so lacy looking! However, sometimes all that laciness is hard to work with because if you overlap one die cut with another, it looks a little odd.

To combat this odd look, you can adhere a die cut to a card stock backing and then overlap it with another die cut. Because I needed multiple cards that used the Flourish Thinlits adhered to a background, I tried a gluing technique that worked remarkably well.

I used the Flourish Thinlits to die cut flowers from Melon Mambo card stock and leaves from Cucumber Crush. The bottom two leaves were removed from each leaf die cut. A standard card base was cut from Thick Whisper White card stock, a 5 1/8 x 3 7/8" matte from Whisper White and a 5 1/4 x 4" matte from Basic Black.

I played with the layout of the flower and leaves on the white matte, being sure to leave room for the sentiment. Once I was satisfied with my design, it was time to adhere the Melon Mambo flowers to a Whisper White backing.

For my Brayered Glue Technique, I placed some liquid glue on one side of my craft mat and rolled my brayer through it to completely coat it. I made sure to roll the brayer back and forth a few times to even out the glue and get rid of any blobs.

Linda Vich Creates: Brayered Glue Technique For Mass Producing Cards With Detailed Die Cuts.

Linda Vich Creates: Brayered Glue Technique For Mass Producing Cards With Detailed Die Cuts.

On the opposite side of my craft mat I flipped two flowers upside down. I held them in place just until the brayer had rolled over the edge of them. Once the glue was applied, I carefully placed the flowers on the Whisper White card stock background and smoothed them down with my hand.

Linda Vich Creates: Brayered Glue Technique For Mass Producing Cards With Detailed Die Cuts.

Linda Vich Creates: Brayered Glue Technique For Mass Producing Cards With Detailed Die Cuts.

I repeated this gluing process until all the flowers were glued. Immediately after smoothing down the last flower, I rinsed my mat and my brayer thoroughly under the tap. Unfortunately, because some of the glue dried on the mat while I was gluing additional flowers, I ended up with some sticky residue that would not come totally come off the mat. (I may still be able to scrub the glue off my matte but just in case I can't remove it, I recommend that you use a sheet of wax paper as your working surface.)

While my flowers were drying, I prepared my white matte by adding black splatters to it. I did this by dipping an Aqua Pen, filled with rubbing alcohol, into Basic Black Archival reinker and flicking the pen with my finger. Alcohol was used instead of water so that the drops would dry quicker.

To produce the largest drops, I made sure to squeeze my Aqua Pen until I had a large drop forming at the end and then flicked it. The finest splatter marks were made by using the Tim Holtz Splatter Brush.

To ensure that my matte was dry, I zapped it with my Heat Tool. Choosing a sentiment from the now retired Love You Sew stamp set, I used pieces of washi tape to mask off all but the "thanks" in the sentiment. I inked up the stamp with Basic Black, removed the washi tape and stamped. This matte was then adhered to the black matte with Fast Fuse and then adhered to the card front using Dimensionals.

I fussy cut the flower and then used Dimensionals to attach it to the card front. I used liquid adhesive to adhere the leaves just under the edge of the flower to complete the card.

Linda Vich Creates: Brayered Glue Technique For Mass Producing Cards With Detailed Die Cuts.

I hope you have enjoyed reading about my Brayered Glue Technique! If you use this technique, please let me know how it works for you!


Sunday, July 3, 2016

Hearth & Home With Flourish Thinlits

Linda Vich Creates: Hearth & Home With Flourish Thinlits. Brick wall backdrop for this window scene, complete with curtains and window box.
Today I am revisiting the brick wall that I created in my Pop of Paradise For My Daughter post from the other day.

If you remember, the first brick background I created for my card was in the wrong orientation! Today I make use of that background for a horizontal oriented card.
I chose to add a window to my brick wall background to create a somewhat realistic scene for my card.

The Hearth & Home Thinlits were used to die cut three windows from Basic Black and three window boxes from Melon Mambo card stock. I used liquid glue to stack these, one upon the other, for added strength. For the window box, I scored a line at the top before gluing on the last die cut to give the box a bit of dimension.

Because I really wanted the window box to "pop", I inked it up with Versamark and heat embossed it with Clear Stampin' Emboss Powder twice to give it a really glassy finish.

To create the drapes for the window, I cut two lengths of the now retired White Jute Ribbon and glued them to the back of the window frame. I added curtain pulls with some of the now retired Melon Mambo 1/8" ribbon.

A small piece of Smoky Slate card stock was cut to act as the inside of the house. It was glued into place on the brick matte and then the window frame was adhered over it using Foam Adhesive Strips. At this point the card front was adhered to a Basic Black card base using Dimensionals.

I used the retired Bird Builder Punch to punch some leaves from Basic Gray card stock. Flowers were punched from Smoky Slate, Whisper White and Melon Mambo using punches from both the Itty Bitty Accents and Itty Bitty Shapes punch packs, unfortunately both retired! The flowers were shaped using my McGill Paper Blossom Tool Kit. Some rhinestones were colored with a Sharpie and then they were inserted into the flowers.

Leaves were adhered onto the bottom of the window frame using liquid glue and then the window box was adhered into place using triple Dimensionals to achieve the proper height to fit over the window frame. The flowers were adhered using the Fine Tip Glue Pen.

The sentiment from the Picture Perfect stamp set was stamped on Melon Mambo with Basic Black Archival Ink and then the sentiment was punched with the now retired Washi Label Punch. The strip was adhered to the card front using Dimensionals.

Smoky Slate and Basic Gray leaves were die cut with the Flourish Thinlits and then adhered to the card front with liquid glue.

A Whisper White matte was stamped with the spray of flowers from the Flourishing Phrases stamp set using Melon Mambo and then the matte was adhered with Fast Fuse Adhesive to complete the card.

Linda Vich Creates: Hearth & Home With Flourish Thinlits. Brick wall backdrop for this window scene, complete with curtains and window box.

Linda Vich Creates: Hearth & Home With Flourish Thinlits. Brick wall backdrop for this window scene, complete with curtains and window box.

I am delighted with how this card turned out! What is really pleasing is that I was able to use both of the brick backgrounds I originally created but in two very different ways!

Have you tried creating an inked and embossed brick background yet? It is really fun and you can use any inks you need to match your project!


Wednesday, June 29, 2016

Flourishing Thinlits Note

Linda Vich Creates: Flourishing Thinlits Note. Inked embossed brick background showcases the Flourishing Thinlits dies.
What starts out as one type of project sometimes ends up as another. This is what happened today.

Today I had been looking forward to trying Lyssa Griffin Zwolanek's Bamboo Tutorial. Unfortunately, my attempt at creating a bamboo look was not very successful (not any reflection on Lyssa's excellent tutorial). However, I did still like the background effect so decided to use it for a card anyway!

I started by embossing a Crumb Cake matte with the Brick Wall embossing folder. Then, as per the tutorial, I used stamping sponges to swipe on first Early Espresso ink (over the cracks between the bricks), Pear Pizzazz (below the Early Espresso ink) and finally Crushed Curry (above the Early Espresso).

Next, I used my Kuretake Fude Water Brush Pen, Medium to paint vertical strokes over the entire piece to blend the colors. Though I did like the blend of colors, I didn't have Lyssa's touch in creating a bamboo look!

In matching colors to the inked matte, I chose Pear Pizzazz and because the Early Espresso kind of looked purple to me, I tried and liked Elegant Eggplant as a contrasting color. I added a thin matte in Elegant Eggplant and then adhered the panel to a Pear Pizzazz card base using Dimensionals.

Using the Flourish Thinlits, I die cut the large flourish from Elegant Eggplant and three flowers from Crushed Curry. After snipping off the two blossoms on the flourish, I adhered it to the card front using Multipurpose Liquid Glue. The flowers were adhered on top and purple sequins were added to the flower centres.

The sentiment was stamped with Elegant Eggplant on Pear Pizzazz card stock and die cut using the Layering Ovals Framelits. An Elegant Eggplant matte was also cut. The sentiment was adhered with Dimensionals to the card.

A Very Vanilla matte was cut for inside the card. Pear Pizzazz leaves were stamped in the upper corner and then another one of the Thinlits were used to cut trim from Elegant Eggplant to add to the bottom and side.

Linda Vich Creates: Flourishing Thinlits Note. Inked embossed brick background showcases the Flourishing Thinlits dies.

Linda Vich Creates: Flourishing Thinlits Note. Inked embossed brick background showcases the Flourishing Thinlits dies.


Tuesday, June 14, 2016

Flourish Thinlits For Global Design Project

Linda Vich Creates: Flourish Thinlits For Global Design Project. Shabby chic style card using the Flourish Thinlits.
I'm in love!

I had my first play today with the Flourish Thinlits and the coordinating stamp set, Flourishing Phrases. I was a little leery about die cutting them with my Big Shot because Stampin' Up has recommended that both the Precision Plate and the new Big Shot Platform be used with these detailed dies.

I'm happy to say that by using a dryer sheet with my magnetic platform, I was easily able to cut my card stock with these dies! To be sure, I ran it through twice but I might have only needed the one run through because the dies cut like butter for me!

Now because every Big Shot is a little bit different, you may not get the same results as me; you might need what is recommended by Stampin' Up and/or you may need to use some shims to cut successfully.

Choosing Soft Suede for my flourish die cut I then coordinated my mattes around that choice. I used a Soft Suede card base to make a 4.75 x 6" card and cut a matte from a piece of Dapper Denim in the 2016-2018 In Color DSP Stack. I also cut two tall and narrow mattes, one from Crumb Cake and one from Very Vanilla.

Some texture was added to the Very Vanilla matte by using the flourish from Timeless Textures to stamp with Sahara Sand after first stamping off. I repeated this process with the Crumb Cake matte with full-strength inking.

Next, I used the now retired Distress Tool to roughen the edges of both mattes and then inked the Very Vanilla matte with Soft Suede and the Crumb Cake one with Dapper Denim.

I lightly sponged Soft Suede onto two lengths of Linen Thread and wrapped them around the top and bottom of the Very Vanilla matte, securing on the back with Fast Fuse Adhesive.

My Marsupial Layering Tool was used to adhere the Dapper Denim matte to the card front and then the Crumb Cake matte was adhered on top. The Very Vanilla matte was adhered using Dimensionals.
After die cutting the flourish from Soft Suede, I cut two of the blossoms again, this time from Dapper Denim. I also punched 10 circles using the 1/4" Circle Punch. The flowers and the circles were glued onto the die cut and then it was glued to the card front.

The sentiment from the Garden in Bloom stamp set was inked with Soft Suede and stamped onto a strip of Soft Suede. The strip was then distressed and inked with Soft Suede. Dimensionals were used at one end of the strip and it was tucked between the two mattes on the card front.

Sahara Sand ink was used on the flourish to stamp the edges of a Very Vanilla matte, stamping off first. Then the large flourish stamp from the Flourishing Phrases stamp set was inked with Dapper Denim and stamped in the bottom right corner. The matte was distressed with the Distressing Tool and then the edges were inked with both Soft Suede and Dapper Denim. The matte was adhered with Fast Fuse inside the card.

Linda Vich Creates: Flourish Thinlits For Global Design Project. Shabby chic style card using the Flourish Thinlits.

Linda Vich Creates: Flourish Thinlits For Global Design Project. Shabby chic style card using the Flourish Thinlits.

Linda Vich Creates: Flourish Thinlits For Global Design Project. Shabby chic style card using the Flourish Thinlits.

I'm really liking this card, especially all the distressing and the wonderful color combination. Feel free to save this color combo if you'd like to use it for your own cards!


I'm entering this card in the Global Design Project #040. Why not come out and play with us?


My one regret is that I wish I had used a baby wipe to dab away a little of the ink from my stamp when stamping the Dapper Denim flourish inside the card. I think that a more distressed version of the stamp would have looked better with the other distressing on the card.

Have you had a chance to play with the Flourish Thinlits yet? Let me know what you think of them by leaving me a comment below!