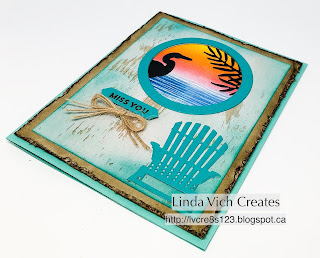
I really wanted a "beachy" feel to the card so this governed my choices for paper and embellishments for my card.
I started with a 4.75 x 6" card front cut from Coastal Cabana. I then cut two mattes . . . one from the Wood Textures DSP and one from Crumb Cake card stock.
Using the now retired Distressing Tool, I roughed up the edges of the Crumb Cake matte and then sponged the edges using Soft Suede. On the other matte, I sponged the edges and some inner sections using both Coastal Cabana and Bermuda Bay. The two mattes were then adhered together using liquid adhesive.
On a square of watercolor paper, I stamped the water image from Lilypad Lake using Versamark and heat embossed with Clear Stampin' Emboss Powder. This allowed me to sponge over the top using Balmy Blue and Blueberry Bushel to create the water. I then used Pineapple Punch, Grapefruit Grove and Lovely Lipstick to sponge the sunset.
The heron die was used to die cut the heron from black and a couple of branches were die cut using the Tropical Thinlits Dies.
Next, I determined that I would use the #6 and #8 circles from the Layering Circles Framelits. Using the two together, I cut through two layers of Bermuda Bay card stock to create the round frame. I did two layers at once so that I could make the frame thicker and so they fit together perfectly. These were glued together using liquid adhesive.
I then used the #6 circle die to cut the hole in the top section of my matte. After gluing the frame in place on the matte, I played with positioning the sponged image and die cuts behind the frame before gluing them into place. The matte was then adhered to the card front using Dimensionals.
The sentiment, from the now retired Sunshine Sayings stamp set, was stamped on Bermuda Bay with Soft Suede and then punched with the Classic Label Punch. After first punching it out, I then placed the right side back into the punch from the top to allow me to shorten up the sentiment strip. The sentiment was adhered using Mini Dimensionals.
The chair was die cut from Bermuda Bay using the Seasonal Layers Thinlits and then adhered using liquid adhesive. A bow was made from three lengths of Linen Thread and adhered under the sentiment using a Glue Dot.
I used the Envelope Punch Board to create my own envelope from Bermuda Bay and stamped the heron on the front using matching ink.
My friend loved the card! I'm glad that she will have a lovely summer to spend at her cottage but she will definitely be missed at work.
To check out the numbering system I use for my dies, please view my Numbered Dies Sets.
Product List


