Showing posts with label tin of tags. Show all posts

Sunday, November 13, 2016

Stamp Club November Projects

Linda Vich Creates: Stamp Club November Projects. Santa's Sleigh Z fold card in dramatic tones of Whisper White and Night of Navy with accents of silver foil and both silver and dazzling diamonds glimmer paper.
I kept my stamp club ladies were very busy on Friday night assembling their card projects! Due to the complexity of one of the cards, I die cut all but the sentiment pieces for both cards–my Big Shot was smoking!

Our first card was CASEd from Olga Cavanaugh and the idea of using acetate for the z fold strip was CASEd from Chlo's Craft Closet. A Night of Navy card base was cut at 4.25 x 11" and scored at 2.75" and 5.5". A 1 x 11" strip of Whisper White was also cut and scored in the same way. (Note that the example photos here show an acetate strip in use but a Whisper White strip was used in class so it was easier with which to work.)

Using the MISTI, the sentiment from the Christmas Pines stamp set was stamped with Night of Navy on Thick Whisper White. The stamp was then cleaned and the sentiment re-stamped using Versamark. It was heat embossed using the now retired Iridescent Embossing Powder. The sentiment was then die cut using one of the ovals from the new Stitched Shapes Framelits.

I absolutely LOVE these new stitched framelits! The stitching is so crisp looking and I even saw that in one post on Pinterest, a demo had actually stitched with thread using one of these dies–totally amazing! If you haven't yet bought them, contact me to order yours today–you won't regret it!

This Z Fold card required four Whisper White mattes in total–two, 4 x 5.25" and two, 2.5 x 4". On one of the smaller ones, the clump of birch trees from the Thoughtful Branches stamp set were stamped. On one of the larger panels, the two-step stamping of five pine trees from the Thoughtful Branches stamp set was done. The last large matte, which is used for the back of the card to give the sender a place to write, was stamped also with the pine trees, but this time there were only two, offset to the bottom right of the matte. All stamping was done with Night of Navy. All four mattes were then adhered to the card base. The die cut sentiment was adhered to the panel with the five pines using Dimensionals.

The sleigh from the Santa's Sleigh Framelits was die cut from Night of Navy and the ornate sleigh overlay was cut from Silver Foil paper. The dryer sheet method was employed and worked beautifully to successfully cut and remove these fragile die cuts from the dies.

To adhere the foil overlay to the sleigh die cut, Connie Stewart's "Sponge in Tupperware Gluing System" (this is what I am calling it until I find a better name!) worked great! No mess, no fuss, and easily adhered! If you haven't yet tried this technique, you need to because it is fantastic!

Next, six deer were die cut from Dazzling Diamonds Glimmer paper and then six wreaths to clothe the necks of the deer were die cut from Night of Navy. The wreaths were slipped over the necks of the deer, eased past the nose, and adhered with a glue dot.

Two, 1 x 1" presents were cut from both Night of Navy and Silver Glimmer Paper. Matching bows were die cut and then adhered to the presents using glue dots. The present stack was designed and adhered together and then adhered to the sleigh.

The 1 x 11" strip of Whisper White–or in the card shown here acetate–was laid across the closed card. The 5.5" scored section was adhered only to the small front panel section of the card. The other end of the strip was then adhered to the back panel of the card.

The sleigh was adhered to the strip on the front panel and two deer followed it, all adhered with glue dots. The remaining deer were adhered to the middle and end sections of the strip.

To complete the card, a retired Winter Wonderland embellishment was adhered to the front of the card to act as a star.

Linda Vich Creates: Stamp Club November Projects. Santa's Sleigh Z fold card in dramatic tones of Whisper White and Night of Navy with accents of silver foil and both silver and dazzling diamonds glimmer paper.

Linda Vich Creates: Stamp Club November Projects. Santa's Sleigh Z fold card in dramatic tones of Whisper White and Night of Navy with accents of silver foil and both silver and dazzling diamonds glimmer paper.

Linda Vich Creates: Stamp Club November Projects. Santa's Sleigh Z fold card in dramatic tones of Whisper White and Night of Navy with accents of silver foil and both silver and dazzling diamonds glimmer paper.

Linda Vich Creates: Stamp Club November Projects. Santa's Sleigh Z fold card in dramatic tones of Whisper White and Night of Navy with accents of silver foil and both silver and dazzling diamonds glimmer paper.

I was pleased with how the card turned out and each stamp club member seemed delighted with their own constructed version!


Our second card was CASEd from Katina Martinez. This card is a one layer standard sized card with the card base cut from Thick Whisper White.

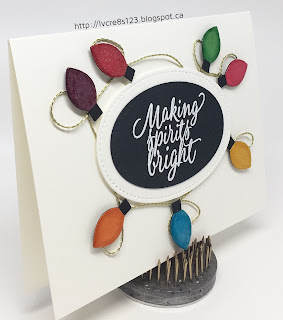
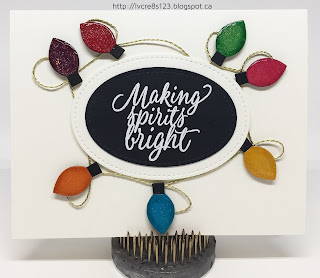
Using the MISTI, the sentiment, from the Tin of Tags stamp set, was stamped on Basic Black using Versamark and then heat embossed using White Stampin' Emboss Powder. The Embossing Buddy was used before stamping to ensure a "clean" emboss. The sentiment was then die cut using the 2nd largest oval from the Stitched Shapes Framelits. A second oval, using the largest stitched oval die, was die cut from Thick Whisper White. The two ovals were adhered together using liquid adhesive.

A small die from the Pyramid Pals Framelits was used to die cut seven Basic Black "light bulbs". In addition, seven more bulbs were die cut from Real Red, Melon Mambo, Pumpkin Pie, Crushed Curry, Cucumber Crush, Tempting Turquoise and Rich Razzleberry.

On each of the colored bulbs, the bottom section was snipped off with scissors and then the colored bulbs were adhered to the black bases using liquid adhesive. Matching ink was used to ink the edges of each light bulb using sponge daubers to create a glow effect. Each light bulb was given a coat of Clear Wink of Stella and then a Dimensional was applied to its back.

The die cut sentiment was adhered to the card front and then the positioning of the bulbs around the sentiment was pre-planned. A glue dot was used to anchor one end of gold twine (from the Baker's Twine Trio Pack) under the edge of the oval die cut and then the twine was twisted to form a loop. A glue dot was affixed to the card front and the twine adhered and a bulb adhered on top to hide the glue dot. This process was repeated around the sentiment until all the bulbs had been used. Another glue dot secured the end of the twine under the die cut sentiment.

Using a small paint brush, Crystal Effects was brushed liberally onto each light bulb by first tracing the edges of the bulb and then filling in the middle. The card was then set aside to dry thoroughly.

A matching envelope was made by drawing a curling "wire" along the edge of the envelope using a Gold Wink of Stella and then stamping the tiny "bulb" stamp from Tin of Tags along the wire, using the ink colors used previously on the card.

Linda Vich Creates: Stamp Club November Projects. Whimsical Christmas card featuring Christmas lights created from a Pyramid Pals die.

Linda Vich Creates: Stamp Club November Projects. Whimsical Christmas card featuring Christmas lights created from a Pyramid Pals die.

Isn't this a fun little holiday card? So easy and fun to create but so festive and colorful in all its sparkly goodness!

Have you started making Christmas cards yet? Maybe this year I'll get mine all done before Christmas!


Sunday, October 23, 2016

Pretty Pine Bough

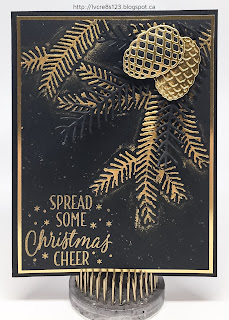
Linda Vich Creates: Pretty Pine Bough. Black and gold unite in this festive holiday card filled with stamped, embossed and die cut pine boughs.Gold is in the house!

The card I started the other day–but couldn't complete because I actually ran out of both Gold Foil and Gold Glimmer paper and had to order more–could now be completed!

I started by embossing a Basic Black matte with the Pine Bough Embossing Folder. I got to use my Viva Decor Inka Gold Old Gold! I used my finger to apply the metal gloss paint to the embossed pine bough. Though I tried initially to avoid smearing the paint on the matte itself, in the end I decided that I didn't mind the additional smears! After applying, I buffed the paint with a paper towel.

Next I stamped the sentiment from the Tin of Tags stamp set in Versamark and heat embossed it with Gold Stampin' Emboss Powder. To add even more gold to this matte, I "flicked" my Gold Wink of Stella pen to add several gold sparkles.

This matte was adhered to a Gold Foil matte with Fast Fuse and then adhered to a standard Basic Black card front using Dimensionals.

The Pretty Pines Thinlits were used to die cut pine pieces from Basic Black and pine cones from both Gold Foil and Basic Black. The pine pieces were adhered to the embossed matte using Glue Dots and the pine cones were adhered over top of them using Dimensionals.

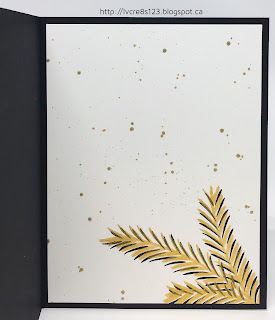
A Whisper White matte was cut for the inside of the card and two of the pine stamps from the Christmas Pines stamp set were used to stamp on the bottom of the matte using both Basic Black and Tsukineko Delicata Golden Glitz ink. Since Stampin' Up no longer carries gold or silver inks, the Delicata inks are the ones I love to use when I need metallic ink! Both the gold and silver are very rich and metallic! I flicked my Gold Wink of Stella over this matte as well before adhering it with Fast Fuse to complete the card.

Linda Vich Creates: Pretty Pine Bough. Black and gold unite in this festive holiday card filled with stamped, embossed and die cut pine boughs.

Linda Vich Creates: Pretty Pine Bough. Black and gold unite in this festive holiday card filled with stamped, embossed and die cut pine boughs.

Linda Vich Creates: Pretty Pine Bough. Black and gold unite in this festive holiday card filled with stamped, embossed and die cut pine boughs.


I love the drama of the black and gold in this card!


Sunday, October 16, 2016

Stamp Class #2 Projects

Linda Vich Creates: Stamp Class #2 Projects. Heat embossed background serves as a pretty backdrop for the Jar of Cheer candle embellishment in this cheery Christmas card.
When I was a kid, time seemed to pass soooooo slowly. It took forever just to get to the weekend. Christmas and summer vacation were eons away. And growing up, in general, seemed like it would never happen. Now, one week runs into the next, and the months gallup into years!

Though it seems like only a few days ago, I met with my second stamp group at the end of September. All but three were new to stamping but they did fabulously with the two projects I created for them.

The first card started with a standard card base cut from Thick Whisper White card stock. A matte of Real Red received a stamped background of Versamark using one of the stamps from the Timeless Textures stamp set. It was Heat embossed using Clear Stampin' Emboss Powder.

A length of the metallic gold twine from the Baker's Twine Trio Pack was wrapped around the matte and secured with tape. The matte was then adhered to the card front using Dimensionals.

On a square of Thick Whisper White, the candle from the Jar of Cheer stamp set was stamped using Basic Black Archival ink. The heat tool was used to set the ink before coloring with Stampin' Write Markers. The candle and flame also received some Gold Wink of Stella.

The candle and a piece of gold foil were die cut using the Layering Circles Framelits and then adhered together using liquid adhesive. The finished embellishment was then adhered over the twine using Dimensionals.

To complete the card, a sentiment from the Tin of Tags stamp set was stamped in Real Red on the inside of the card.

Linda Vich Creates: Stamp Class #2 Projects. Heat embossed background serves as a pretty backdrop for the Jar of Cheer candle embellishment in this cheery Christmas card.


Linda Vich Creates: Stamp Class #2 Projects. Heat embossed background serves as a pretty backdrop for the Jar of Cheer candle embellishment in this cheery Christmas card.


The second card was CASEd from here. The standard card base was cut from Crushed Curry and two mattes cut from Very Vanilla and Rich Razzleberry.

The Rich Razzleberry matte was spritzed lightly with water and then embossed using the Cable Knit Embossing Folder. It was adhered to the Very Vanilla matte with liquid adhesive and then to the card front.

Crumb Cake was used to stamp a leaf from Vintage Leaves on watercolor paper and then after die cutting, color was sponged onto the leaf using Crushed Curry, Pumpkin Pie, Rich Razzleberry and Old Olive. Two pieces of Linen Thread were tied around the leaf stem and then the leaf was adhered to the card front using Dimensionals.

The Triple Banner Punch was used to flag one end of a strip of Very Vanilla and then Rich Razzleberry was used to stamp the sentiment from Basket of Wishes Stamp set. The strip was adhered using Dimensionals.

Linda Vich Creates: Stamp Class #2 Projects. Rich Razzleberry Cable Knit background is paired with a colorful autumn leaf in this thinking of you card.

Linda Vich Creates: Stamp Class #2 Projects. Rich Razzleberry Cable Knit background is paired with a colorful autumn leaf in this thinking of you card.

The ladies had a lot of fun and the time flew by!