Friday, February 27, 2015

My Least Favorite Card To Create


Linda Vich Creates: My Least Favorite Card To Create. Painted Petals float on vellum above the coordinating Painted Blooms designer paper on this sympathy card.Though I am always excited to be creating a new card, I dislike having to make a sympathy card because it means that someone is hurting. This time, the father of the Head Customer Service Manager at Walmart passed away.

Because Michelle is such a special person who is always striving to be cheerful and encouraging, even under the most trying of circumstances, I wanted to create a special card to give to her.

I decided to use the Painted Petals stamp set along with the coordinating Designer Series Paper, Painted Blooms.

I cut a standard card base from Rich Razzleberry and a matte from Blackberry Bliss. I cut a piece of Vellum Card Stock and a piece of the DSP to 5 1/4 x 4."

I used my new MISTI (Most Incredible Stamping Tool Invented–more on this tool in the future!) to position my sentiment from the Love & Sympathy stamp set and stamped it using Jet Black Stazon ink. I next stamped the stems of the flowers in Wild Wasabi and the blooms in Rich Razzleberry.

Once the ink was dry, I used some Crystal Effects along the left edge to attach the vellum on top of the DSP. I knew the adhesive wouldn't be seen because I was going to attach a strip of card stock down the left side of the card front. I adhered the DSP to the Blackberry Bliss matte using Fuse Fast adhesive.

The Decorative Dots embossing folder was used to emboss a 1 1/2" strip of Rich Razzleberry card stock. I wrapped a piece of Mossy Meadow ribbon around it and adhered it on the back using Sticky Strip. I then tied a small piece of ribbon around the existing piece and knotted it. I secured the ribbon to the front of the embossed strip using a couple of glue dots.

I placed three Candy Dots down the top right side of the card front and added some Crystal Effects to the underside of the vellum, beneath the Candy Dots, to further secure the vellum to the card front.

I adhered a matte of Naturals White card stock to the inside of the card and to echo the front design, I stamped three tiny flowers.

Linda Vich Creates: My Least Favorite Card To Create. Painted Petals float on vellum above the coordinating Painted Blooms designer paper on this sympathy card.

Linda Vich Creates: My Least Favorite Card To Create. Painted Petals float on vellum above the coordinating Painted Blooms designer paper on this sympathy card.

Linda Vich Creates: My Least Favorite Card To Create. Painted Petals float on vellum above the coordinating Painted Blooms designer paper on this sympathy card.

Drop me a line below to let me know how you like the card! Also, please let me know how you like the scrolling list of products used compared to the large gallery display of products I was using previously. I thought that the scroll takes up a lot less space while still allowing you to view all the products used.


Built for Free Using: My Stampin Blog

Wednesday, February 25, 2015

Stampin' Up! Sale-a-Bration Surprise!

Just when you thought Sale-a-Bration couldn't get any better, Stampin' Up! goes and releases four new products for you to earn for FREE with a $60 order! (Click on the pictures for a closer look.)


And what a wonderful selection of products they have added!

There is a thank you stamp set that lends itself wonderfully to coloring with Blendabilities. Check out the wonderful card on the brochure that has been colored–isn't it gorgeous?

For the many fans of the 2014-2016 In Colors, there is an accessory set that contains both thick Baker's Twine and buttons in the In Colors. How nice will those be to embellish your projects?

A second stamp set contains a lovely selection of florals and another butterfly that coordinates with the Elegant Butterfly Punch!

Lastly, is a 6 x 6" pad of Designer Vellum. You get two pieces of each of the 12 designs–WOW! These will be wonderful to layer on card fronts. And did you know you can color the vellum with Blendabilities??

These FREE products will be available for you to add to your $60 order starting on March 1 but they will only last until the end of March when Sale-a-Bration ends.

Contact me TODAY to place your order!


Monday, February 23, 2015

Irresistible Petals, Bold and Bright!

Linda Vich Creates: Irresistible Petals, Bold and Bright! Irresistibly Yours paper coordinates with bright and bold stamped flowers from Petal Potpourri.

A bitterly cold, cold day today. If the wind hadn't been blowing so hard from the north, it would not have been so bad but if you were caught out in the open, it was UGLY!

A simple little card for you today, in a long and narrow format. The card base was cut from Whisper White to make a 8 1/2 x 3 1/2" card.

I cut a strip of the striped pattern from the Irresistibly Yours Papers, available for free with a $60 order during Sale-a-Bration.

I used Post-Its to mask off each stripe as I worked, using Sponge Daubers, to ink up the stripes in Melon Mambo, Crushed Curry and Bermuda Bay. I used Fuse Fast to attach the strip to the bottom of the card front.

Linda Vich Creates: Irresistible Petals, Bold and Bright! Irresistibly Yours paper coordinates with bright and bold stamped flowers from Petal Potpourri.


The Best Year Ever Accessory Pack supplied Crushed Curry ribbon that I adhered across the top of the striped paper strip.

To match the stripes, I stamped three flowers on Whisper White using the Petal Potpourri stamp set. I punched them out with the coordinating Flower Medallion Punch.

I used Blendabilities markers to color white buttons from the Neutrals Designer Buttons to act as centres for the flowers. They were adhered with a glue dot and the flowers were popped up with Dimensionals on the card front.

The sentiment was stamped on Whisper White using the Regarding Dahlias stamp set. It was punched out with the 1" Square Punch and then popped up with Dimensionals on a Basic Black punch from the Postage Stamp Punch.

To complete the card, the sentiment was adhered to the card front using a Dimensional.

Linda Vich Creates: Irresistible Petals, Bold and Bright! Irresistibly Yours paper coordinates with bright and bold stamped flowers from Petal Potpourri.

I used bright, happy colors to brighten my day and distract me from the cold outside. I hope this card brightens your day as well!

Built for Free Using: My Stampin Blog

Saturday, February 21, 2015

Watercolor Workout

Linda Vich Creates: Watercolor Workout. Bold and vibrant watercolor background provides the ideal setting for sparkly Floral Frenzy leaves and a few punched flowers, colored with Blendabilities.


Today was a day that made me happy because I got to play in my craft room all day! I put on my Creative Mozart music (supposed to be good for creativity) and set out to create some new watercolor backgrounds.

I decided to try out some watercolor brushes, rather than use my Aqua Pen because I wanted a larger brush. Obviously you get what you pay for . . . I picked up a pack of brushes at Walmart and as I painted, I kept losing bristles on the paper! I guess I'll have to invest in some better brushes if I want to keep creating these types of cards!

To aid me in my quest for watercolor mastery, I purchased an online course from Online Card Classes. The class I got is called Watercolor For Card Makers. I have taken a course from this site before and it is well worth the fee!

For my class, it is an independent study as the real time class has already run. However, for $25, I get 11 lessons with printable PDF's for each as well as 5-6 videos per lesson showing the techniques for each lesson. I also get access to the forum and gallery and have lifetime access to the course and videos! I can even download the videos or I can watch them on the web.

I'm definitely going to enjoy working through the lessons as they not only work with real watercolor paints but inks, distress inks, markers, and pencils. There are several different teachers as well so you get to experience a number of different styles of watercolor techniques.

Today, I played with getting my paper sufficiently wet to allow me to have a proper flow for the paint to move around and blend.

I used Melon Mambo, Bermuda Bay and Crushed Curry ink refills along with my new, albeit cheap, watercolor brushes! I had time to create three backgrounds. One, I probably will not use at all, the other I may use and the other I will share with you on the card I created!

After my watercolor background had been created and dried with my heat tool, I cut it down to 4 x 5" and to make the colors really pop, I cut a thin black matte 4 1/8 x 5 1/8."

I cut another matte, slightly larger at 4 3/8 x 5 3/8" and inked the edges with Melon Mambo, using a sponge dauber.

Using Jet Black Stazon ink, I stamped the sentiment from the Lovely Amazing You stamp set. I punched a tiny heart from Silver Glimmer Paper, using the now retired Small Heart Punch, and adhered it with a glue dot near the sentiment.

I cut a set of leaves out of Dazzling Diamonds Glimmer Paper using the Flower Frenzy Bigz L Die and adhered them to the left side of the watercolor using glue dots. The Pansy Punch and the Petite Petals Punch provided flowers from Silver Glimmer Paper which I colored using Blendabilities.

For the flower centres I used rhinestones and a Faceted Vintage Button; all were colored with Blendabilities. The larger flower was adhered with a Dimensional, the smaller flowers with glue dots.

I love the vibrant colors teamed with the sparkle from the leaves and flowers! I think that the glimmer paper reinforces the water droplet marks on the watercolor.

Linda Vich Creates: Watercolor Workout. Bold and vibrant watercolor background provides the ideal setting for sparkly Floral Frenzy leaves and a few punched flowers, colored with Blendabilities.


Linda Vich Creates: Watercolor Workout. Bold and vibrant watercolor background provides the ideal setting for sparkly Floral Frenzy leaves and a few punched flowers, colored with Blendabilities.


Some details:


Linda Vich Creates: Watercolor Workout. Bold and vibrant watercolor background provides the ideal setting for sparkly Floral Frenzy leaves and a few punched flowers, colored with Blendabilities.


Linda Vich Creates: Watercolor Workout. Bold and vibrant watercolor background provides the ideal setting for sparkly Floral Frenzy leaves and a few punched flowers, colored with Blendabilities.


What do you think? Leave me a comment below!

Built for Free Using: My Stampin Blog

Thursday, February 19, 2015

Indescribable Gift

Linda Vich Creates: Indescribable Gift. Blendabilities, ruffled ribbons, and complementary card stock combine to produce a Spring-like Easter card.

Got my Blendabilities out to color my card for today. I really wanted to color the apple blossoms (I think that's what they are?) from the Indescribable Gift stamp set.

After stamping the image on Whisper White with my Tuxedo Black Memento ink, I used my Pink Pirouette for the blossoms themselves and Wild Wasabi for the leaves. For the stem I used the two darkest markers in the Skin Tone assortment.

I chose to cut the completed image using the Window Frames Collection Framelits and cut a matte from Pear Pizzazz. (In retrospect, I should have cut the matte from from Wild Wasabi but in the end, I had three different yet complementary greens on the finished card!)

I chose a 5 1/2 x 5 1/2" card base of Soft Suede. I then faced a bit of a dilemma. I wanted to use Pink Pirouette paper behind the blossoms and I wanted to emboss it but the embossing folder would have been too small. Too compensate, I cut strips of Pink Pirouette from the Subtles Core'dinations collection and embossed the strips using the Decorative Dots embossing folder. I then used the now retired sanding block to reveal the white dots on the card stock.

Since the blossoms that I had colored looked closer in color to Crisp Cantaloupe than to Pink Pirouette, I chose to ink the edges of the embossed strips with Crisp Cantaloupe ink, using a Sponge Dauber.
I adhered the strips to the card base using Fuse Fast and trimmed the excess using my scissors. I then adhered both Calypso Coral and Lucky Limeade Ruffled Ribbons, now retired, in between the embossed strips.

I used Dimensionals to mount the Pear Pizzazz matte and the colored blossoms and then stamped the sentiment on Calypso Coral card stock using Versamark. I heat embossed it using White Stampin Emboss Powder and punched it using the Modern Label Punch. The edges were inked with Soft Suede.I adhered the sentiment using Dimensionals to complete the front of the card.

I cut a matte from Naturals White card stock for the inside of the card and used Soft Suede to stamp a portion of the blossoms in both the top left and bottom right corners, stamping off first. Edges were inked using Calypso Coral ink and the matte adhered using Fuse Fast.

I chose the colors of this card because they make me think of Spring. Hopefully, it isn't too far away!

Do you find that you are stamping in Spring colors to beat the winter blahs right now? Drop me a comment below to let me know!

Linda Vich Creates: Indescribable Gift. Blendabilities, ruffled ribbons, and complementary card stock combine to produce a Spring-like Easter card.

Linda Vich Creates: Indescribable Gift. Blendabilities, ruffled ribbons, and complementary card stock combine to produce a Spring-like Easter card.

Linda Vich Creates: Indescribable Gift. Blendabilities, ruffled ribbons, and complementary card stock combine to produce a Spring-like Easter card.


Built for Free Using: My Stampin Blog

Saturday, February 14, 2015

Valentine Round Up

Happy Valentine's Day!

I've got a lengthy post for you today, with lots of photos, but hopefully it will offer you some inspiration for planning your Valentine projects for next year! I will list the supplies for each item underneath each project rather than at the very end of the post so you can quickly locate what items you will need in order to case a technique.


Steffan's Card

Linda Vich Creates: Valentine Round Up. Watercolor washed background topped with gorgeous grunge and red glimmer hearts. Alphabet rotary stamp used for sentiment.

First up is the card I created for Steffan, my daughter's boyfriend. He's definitely a one-of-a-kind guy so I wanted his card to reflect that and not be too lovey-dovey. He loves the color black but also likes red so that's what I went with for his card.

I created a simple watercolor wash using my Aqua Pen and Smoky Slate, followed by a little Basic Gray. I added some droplets of black by flicking some Basic Black and created some larger droplets by squeezing some drops from the Aqua Pen.

I liked the effect but wanted a bit more grunge so I added a stamp from Gorgeous Grunge using Tuxedo Black Memento ink.

I used the Hearts Collection Framelits as well as the Itty Bitty Accents Punch Pack to die cut three hearts from Red Glimmer paper. I inked the edges of each with Tuxedo Black Memento ink.

I cut the watercolor matte to size and then inked the edges with Real Red. I used the Alphabet Rotary stamp to stamp the sentiment at the top using Real Red. My only regret is that the stamp does not include the # symbol so I had to go with @ instead. Otherwise, the rotary stamp is great for words or short phrases (up to 13 characters) and includes uppercase letters, numbers, and some punctuation.

I adhered the watercolor to a Basic Black matte and then wrapped the bottom with Basic Black Baker's Twine. I adhered the largest heart over the twine, using Dimensionals. The two smaller hearts were adhered to the top right using Fuse Fast adhesive.

The matte was then adhered to a Real Red card base using Dimensionals.

Using the Envelope Punch Board, I created an envelope from Basic Black and die cut two hearts. I embossed the hearts using the Tim Holtz Alterations Bubble Wrap embossing folder and adhered them to the envelope.

Linda Vich Creates: Valentine Round Up. Watercolor washed background topped with gorgeous grunge and red glimmer hearts. Alphabet rotary stamp used for sentiment.

Linda Vich Creates: Valentine Round Up. Watercolor washed background topped with gorgeous grunge and red glimmer hearts. Alphabet rotary stamp used for sentiment.


Linda Vich Creates: Valentine Round Up. Watercolor washed background topped with gorgeous grunge and red glimmer hearts. Alphabet rotary stamp used for sentiment.

Linda Vich Creates: Valentine Round Up. Watercolor washed background topped with gorgeous grunge and red glimmer hearts. Alphabet rotary stamp used for sentiment.


Built for Free Using: My StampinBlog


Courtney's Treat Bag


Llinda Vich Creates: Expanded Mini Treat Bag embellished with Painted Petals Designer Paper, fringed trim and punched Bow.


Next up is the treat bag I created for Courtney, using the Mini Treat Bag Framelits Die. What a wonderful set of dies! Not only do you get the two pieces for creating the treat bag itself, but you get 10 other pieces to use for decorating it, including two sentiment dies. These dies will prove useful in many projects throughout the year!

I altered the use of this treat bag die and actually created an enlarged treat bag by cutting two pieces of Rose Red card stock with the larger die for the treat bag and not using the smaller one. Each piece had the smaller section of the pinked edge cut off and each was scored on the smaller side at 1/2 and 1 1/4." I also cut a piece for the bottom of the bag, measuring 1 1/2 x 4 5/8", scoring it 1/2" from each end. This idea was not my own but I modified the process of creating the larger bag after viewing several different tutorials from the web.

As well as folding on the original score lines provided by the die, I did mountain and valley folds for the score lines I added. The pieces were then adhered together using Fuse Fast and the bottom piece added to finish the bag itself.

I cut a piece of the paper from the Painted Blooms Designer Pack to adhere to the front of the bag and then used the Banners Framelits to cut a banner from Blackberry Bliss and embossed it using the Happy Hearts embossing folder. I adhered the banner to the top front of the bag.

I cut a strip of Rose Red and used the Fringe Scissors on it. It was adhered over the banner at the top of the bag. A strip of Silver Glimmer paper was die cut with another of the dies from the Mini Treat Bag Framelits and adhered on top of the fringed strip.

Using the Bow Builder Punch (another new favorite of mine!) I created a bow from the matching designer paper and embellished it with a rhinestone.

I used Rose Red to stamp one of the Groovy Kind of Love hearts on Whisper White and then punched it with the Sweetheart Punch. I inked it up with Versamark ink and then heat embossed it with Clear Embossing Powder to make it glossy.

I cut another heart from Silver Glimmer paper. Both hearts were adhered to the banner using Dimensionals.

"For You" was die cut using one of the sentiments from the Mini Treat Bag Framelits. I actually cut it three times and glued the pieces together to give it added thickness. I then applied Crystal Effects to it to make it really glossy. It was also adhered to the bag with Dimensionals.

After filling the bag I attached a Blackberry Bliss clothespin from the 2014-2016 In Color Printed Clothespins.


Built for Free Using: My StampinBlog


Courtney's Card


Courtney's card was a fun one to create! I used the Hardwood background stamp to stamp Smoky Slate ink onto Smoky Slate card stock. I did two separate stampings and then cut the boards apart.

The Chevron Punch was used to give a point to each board and then I cut them to size. Each board was inked with Smoky Slate ink using a sponge dauber.

I adhered the boards to a Pink Pirouette matte. To be sure I got them spaced correctly, I affixed the middle board using repositionable adhesive and then placed boards on either side, adhering them with Fuse Fast. I then removed the centre board and re-adhered it with Fuse Fast.

Two other boards were trimmed to size, inked, and then adhered with Dimensionals as cross pieces on the fence.

The sentiment from the January 2015 Paper Pumpkin kit (Filled With Love) was stamped with Blackberry Bliss ink on another piece of stamped board and then punched using the Ticket Duo Builder Punch.

I used one of the Piercing Templates from the Essentials Paper Piercing Pack to help me evenly pierce two holes, with my Piercing Tool, on either side of the sentiment and through the pink matte. I used two Candy Dots Brad Bases to attach the sentiment to the Pink Pirouette matte.

Rich Razzleberry Blendabilities were used to color two rhinestones and then I added them to the Candy Dots Brad Bases.

I die cut five small hearts, two Rose Red, two Real Red, and one Blackberry Bliss, using the Hearts Collection Framelits. I applied a coat of Crystal Effects to each to make them glossy.

To create a banner, I tied a piece of Cherry Cobbler Baker's Twine to the top horizontal board and then used Glue Dots to adhere the hearts to the twine and ultimately to the boards themselves.

The Pink Pirouette matte was inked with Rose Red and adhered to a Blackberry Bliss card base.

A matching Pink Pirouette envelope was created using the Envelope Punch Board. The flap was embossed using the Happy Hearts embossing folder. A tiny doily and Rose Red lace trim were added as further embellishment.

Linda Vich Creates: Valentine Round Up. The Hardwood Stamp helps to create a realistic fence, topped with a banner of glossy hearts. A matching wooden sign shares the card's Valentine sentiment.

Linda Vich Creates: Valentine Round Up. The Hardwood Stamp helps to create a realistic fence, topped with a banner of glossy hearts. A matching wooden sign shares the card's Valentine sentiment.

Linda Vich Creates: Valentine Round Up. The Hardwood Stamp helps to create a realistic fence, topped with a banner of glossy hearts. A matching wooden sign shares the card's Valentine sentiment.

Linda Vich Creates: Valentine Round Up.Valentine card and Mini Treat Bag.


Built for Free Using: My Stampin Blog


Raine's Card


Linda Vich Creates: Valentine Round Up: Punch art Elmo card.


My granddaughter, Raine, is currently besotted with Elmo from Sesame Street! She has a large, talking Elmo which she received for Christmas, as well as a small Elmo which came with a book. I knew that an Elmo card would be a hit with her so I scoured Pinterest for some punch art inspiration.

I first created a square card base from Real Red and used the largest scalloped circle from the Circles Collection Framelits to create the shaped card. I cut a single scalloped circle to adhere to the card front, hiding the fold of the original card base.

More circles were cut from Basic Black,Whisper White and Pumpkin Pie using either the Circles Collection or the 3/4" Circle Punch.

All pieces were adhered to the card front with Fuse Fast or Tombow adhesive and the nose was adhered using a Dimensional.

Inside the card, I used Tuxedo Black Memento ink to stamp little hearts from the Perpetual Calendar stamp set as well as a sentiment from the January 2015 Paper Pumpkin kit (Filled With Love). I used the Alphabet Rotary stamp to add her name.

To complete the inside of the card, I die cut a heart from Dazzling Diamonds Glimmer paper and adhered it with Dimensionals.
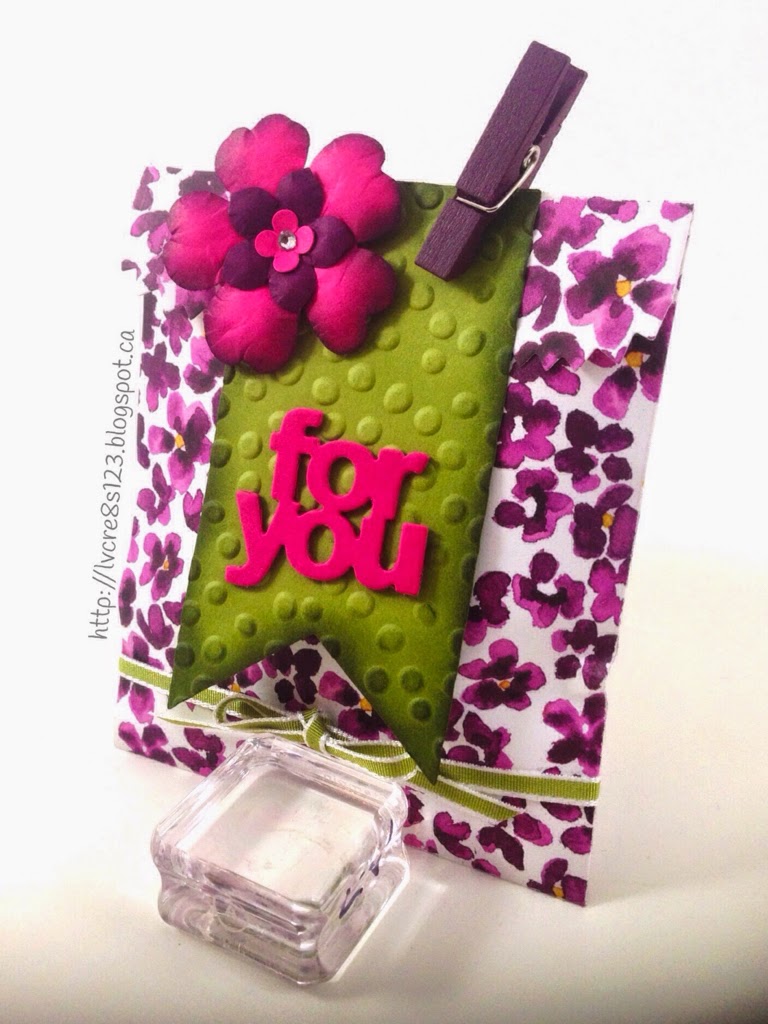

Linda Vich Creates: Valentine Round Up: Punch art Elmo card.


Linda Vich Creates: Valentine Round Up: Punch art Elmo card.


Built for Free Using: My StampinBlog


Raine's Treat Bag


Linda Vich Creates: Valentine Round Up. Dazzling Diamond Mini Treat Bag dazzles with red glimmer tag and red taffeta ribbon.


Of course, it wouldn't be Valentine's Day or a little girl without some treats so I made a simple treat bag with Dazzling Diamonds Glimmer paper using the Mini Treat Bag Framelits Dies.

I used the heart die from the same set of framelits to cut a heart shape in the front of the bag. A square of Window Sheet was adhered over this opening on the inside of the bag.

Using the Note Tag Punch I cut a tag from Red Glimmer Paper and punched a 1/4" hole for some Real Red Taffeta Ribbon. The sentiment, For You, was die cut from Dazzling Diamonds Glimmer paper and adhered to the tag.

Another piece of Real Red Taffeta Ribbon was tied in a bow at the top of the bag. Some Red Foil cellophane can be glimpsed through the heart opening and peeks out the top of the filled bag.
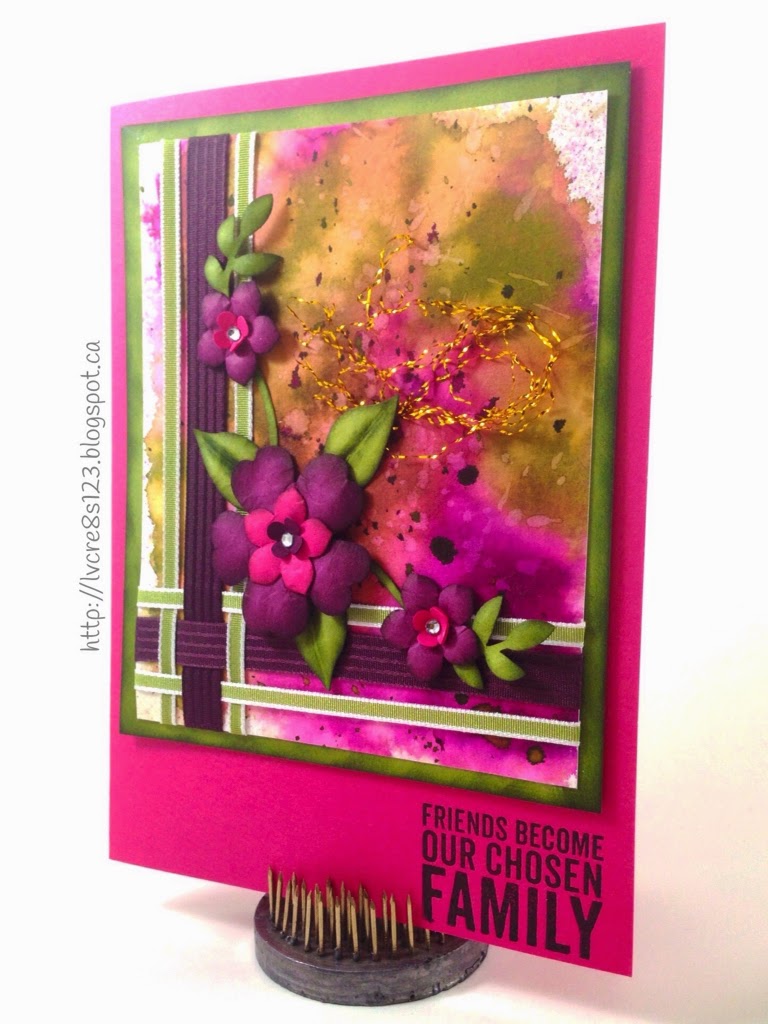
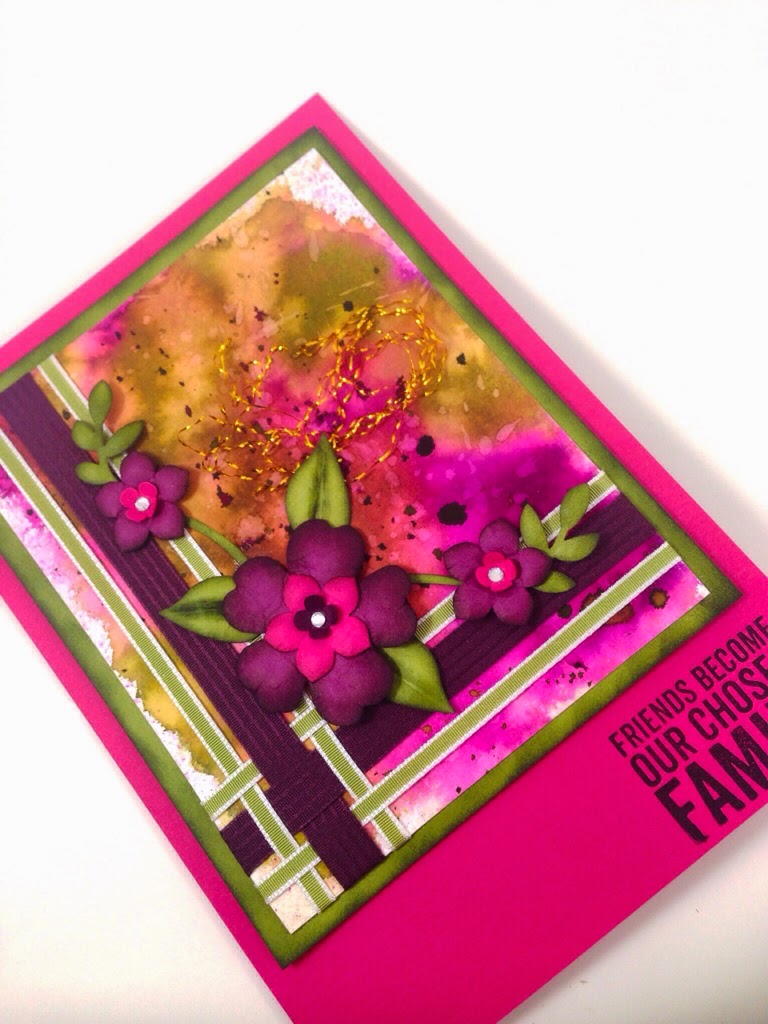
Linda Vich Creates: Valentine Round Up. Dazzling Diamond Mini Treat Bag dazzles with red glimmer tag and red taffeta ribbon.


Linda Vich Creates: Valentine Round Up. Punch art Elmo card accompanied by Dazzling Diamonds Mini Treat Bag.


Built for Free Using: My StampinBlog


Bob's Card


Linda Vich Creates: Valentine Round Up. A sequin-studded, jewel-toned watercolor bokeh background is embellished with a valentine heart strung on silver cords.


 The last card that I completed was for my husband, Bob. The design for his card had been "gelling" in my mind ever since I created the watercolor Bokeh background for it, back in January.You can read about the Bokeh Technique that I used in my blog post, Bokeh Technique and Sneak Peek From 2015 Occasions Catalog.

This is the result I got after creating the watercolor portion of the background, complete with the colors of Ink Refills I used:

Linda Vich Creates: Valentine Round Up. A sequin-studded, jewel-toned watercolor bokeh background is embellished with a valentine heart strung on silver cords.


This is what it looked like after I added the bokeh:

Linda Vich Creates: Valentine Round Up. A sequin-studded, jewel-toned watercolor bokeh background is embellished with a valentine heart strung on silver cords.
  

I must say that this is my most favorite Bokeh background to date! I love the swirl of dark, jewel tones topped with the three dimensional circles of white.

The Bokeh background was trimmed to size and then I used a sponge dauber to ink the edges with Tuxedo Black Memento ink.I adhered it to a matte of Silver Glimmer paper.

I punched a heart from Blackberry Bliss using the Sweetheart Punch. I added Crystal Effects to create a very glossy heart. (In retrospect, this step was unnecessary but I didn't know this at the time!)

The heart was covered with a heart punched from Window Sheet which had been stamped with White Stazon ink to add the sentiment from the Groovy Kind of Love stamp set. I used Versamark, Heat & Stick Powder and finally Silver Glitter around the edge of the heart. This was done to hide the adhesive from the 2-Way Glue Pen.

Silver cord from my personal stash was wrapped around the panel and the heart adhered with Dimensionals on top of it.

The finished matte was adhered to a Blackberry Bliss card base. Both Frosted Finishes sequins and some Sparkling Clear sequins from Pretty Pink Posh completed the front of the card.

For the inside, I adhered a Whisper White matte with sides inked in Blackberry Bliss ink. It was stamped with Versamark, using Love from the Seasonally Scattered stamp set, and heat embossed with Silver Embossing Powder.

Strips of Silver Glimmer Paper were die cut with a die from the Mini Treat Bag Thinlits Dies and were adhered at the top and bottom of the matte.

Linda Vich Creates: Valentine Round Up. A sequin-studded, jewel-toned watercolor bokeh background is embellished with a valentine heart strung on silver cords.

Linda Vich Creates: Valentine Round Up. A sequin-studded, jewel-toned watercolor bokeh background is embellished with a valentine heart strung on silver cords.

Linda Vich Creates: Valentine Round Up. A sequin-studded, jewel-toned watercolor bokeh background is embellished with a valentine heart strung on silver cords.


Built for Free Using: My StampinBlog

Well, if you have made it this far you are doing well! Thanks for hanging in there to see my collection of Valentine projects! I had a ball creating them and hopefully they have provided you with some inspiration of your own!

Monday, February 9, 2015

Painted Blooms Valentine

It was a strangely quiet day at Walmart today, as our Credit/Debit machines went down about 1:30! They still weren't working properly when we closed at 6:00. Apparently this was a Canada-wide problem and some other stores in the area were also having intermittent problems. Pretty hard for a lot of people when most people don't carry cash anymore!

A quick little card for you tonight!

I cut a square card base from Wild Wasabi and used Fuse Fast to adhere a matte of one of the papers from the Painted Blooms Designer Paper—a lovely pack of paper!

I adhered a strip of the White Jute Ribbon and topped it with a strip of Mossy Meadow Satin Ribbon. I trimmed the ribbon at each card edge.

I cut a smaller square matte from Pacific Point card stock and embossed it using the Happy Hearts embossing folder. The edges were inked with Mossy Meadow. I adhered it to the card front using Dimensionals.

Using Pacific Point, I stamped the sentiment from Crazy About You on Whisper White and then die cut it using a shape from the Word Bubbles Framelits. I inked the edges in both Wild Wasabi and Mossy Meadow and adhere it to the top right of the matte using Dimensionals.

I utilized the Hearts Collection Framelits to cut one heart from the Painted Blooms paper and three from Pacific Point. I glued these together with the designer paper on top.

I used Versamark, Heat & Stick Powder and Dazzling Diamonds to create a glittery heart. I wound Wild Wasabi Twine around one side of the heart and tied a bow. Dimensionals were used to adhere the heart to the card front.

I die cut the word, "you" from Pacific Point card stock two times, using the Hello You Thinlits. I glued these together and then heat embossed the word with clear embossing powder a few times to get it really glossy.

Finally, I adhered the word to the heart using Glossy Accents.

Linda Vich Creates: Painted Blooms Valentine.  Painted Blooms paper from Stampin' Up! provides the background for a delightful, twine-wrapped Valentine heart complete with Word Bubble sentiment and die cut from Hello You Thinlits.

Linda Vich Creates: Painted Blooms Valentine.  Painted Blooms paper from Stampin' Up! provides the background for a delightful, twine-wrapped Valentine heart complete with Word Bubble sentiment and die cut from Hello You Thinlits.

Linda Vich Creates: Painted Blooms Valentine.  Painted Blooms paper from Stampin' Up! provides the background for a delightful, twine-wrapped Valentine heart complete with Word Bubble sentiment and die cut from Hello You Thinlits.


I'm pretty happy with the way the card turned out even if it is a blue Valentine!


Built for Free Using: My Stampin Blog

Creative Blog Hop

Today I am excited to share with you because I was asked to take part in a Creative Blog Hop! Michelle Long, a Stampin' Up! Demonstrator from Oregon, invited me to participate. You will definitely want to check out her post for the hop as she designed a lovely group of items!

Saturday was my day off so I had all day to play and create for this post. I chose to work with watercolor again; I am really enjoying the many different techniques available to produce watercolor effects with ink.

I started by selecting a piece of watercolor paper. I used washi tape to tape it down on my craft mat so it would not curl up as it got wet.

I wet the paper with clean water using a large, flat brush. I then dipped my Aqua Painter in either Blackberry Bliss or Old Olive ink refills and dropped ink or painted portions of the paper.

As I went, I blotted or added more ink to areas, depending on how it looked to me. I also spritzed water on it using my Stampin Spritzer. It definitely did not look the way I had planned it! However, I grew to like it more and more as I continued the process.

Finally, I decided I had laid down enough color so I used my heat tool to dry it before continuing.
I wanted to add a few water spots so I picked up some clean water with my hand and flicked it onto the paper. I let it sink in for a bit and then blotted it with a paper towel. I repeated this a couple of times until I was pleased with the effect.

I then flicked some ink drops of both Blackberry Bliss and Old Olive onto the paper for added interest. I dried the paper using my heat tool and then trimmed it to 4 1/8 x 5 1/8", preserving some of the un-inked portions of the watercolor paper.

I cut pieces of Blackberry Bliss and Old Olive ribbons and adhered them with Sticky Strip to the back of the paper, both in a vertical and a horizontal format. I then wove the strips where they met and then adhered the remaining ribbon ends.

I used the Pansy Punch to cut a flower from Rich Razzleberry and inked the edges with Blackberry Bliss. I cut two additional flowers using the Petite Petals Punch, inking them as well. I also punched a flower from Mambo Melon and inked the edges with (you guessed it!) Blackberry Bliss. I used a punch from the now retired Itty Bitty Shapes Punch Pack to punch tiny flowers from Mambo Melon and Blackberry Bliss.

I used my Paper Blossom Tool Kit to shape each flower to make it more realistic. This set has been invaluable to me over the years and is always in my basic tool kit for card making. I adhered the parts of each flower using Crystal Effects.

I used the Bird Builder Punch to provide some greenery for the flowers, using the leaves and the bird wing to act as leaves. These were punched from Old Olive and inked with Mossy Meadow. They were also shaped with my Paper Blossom Tool Kit.

I attached the larger flower to the watercolor panel using a Dimensional and the smaller flowers were adhered with Crystal Effects. I also adhered the little leaves with Crystal Effects.

I added a rhinestone to the centre of each flower. To finish off the panel, I unravelled the gold thread from the Gold Bakers Twine and kind of shaped it into a pleasing shape. It was adhered in places with a little Crystal Effects.

The watercolor panel was adhered to an Old Olive 4 1/2 x 5 1/2" matte that had been inked loosely with Mossy Meadow.

I used Black Stazon Ink to ink the sentiment from Painted Petals on the 5 x 7" Mambo Melon card base and then adhered the rest of the card to it using Dimensionals.

Linda Vich Creates: Creative Blog Hop. A rich palette of Stampin' Up! colors dance on a watercolored background, with woven ribbon details and colorful flowers.

Linda Vich Creates: Creative Blog Hop. A rich palette of Stampin' Up! colors dance on a watercolored background, with woven ribbon details and colorful flowers.

Linda Vich Creates: Creative Blog Hop. A rich palette of Stampin' Up! colors dance on a watercolored background, with woven ribbon details and colorful flowers.

Linda Vich Creates: Creative Blog Hop. A rich palette of Stampin' Up! colors dance on a watercolored background, with woven ribbon details and colorful flowers. Details.

To coordinate with my card I created a treat bag from the Painted Petals Designer paper, cut with the Mini Treat Bag Thinlits Dies. I assembled the bag quickly using Fuse Fast adhesive.

I used the Banners Dies to cut a banner from Old Olive and embossed it using the Designer Dots embossing folder. I inked it with Mossy Meadow.

Using Mambo Melon card stock, I cut the For You using one of the pieces from the Mini Treat Bag Thinlits Dies. I cut it three times and adhered the layers together to make thick letters. I adhered these to the banner using Crystal Effects.

I created another flower, using Mambo Melon and Blackberry card stocks and adhered it to the banner using a Dimensional. I then attached the banner to the treat bag using a clothespin.

Linda Vich Creates: Creative Blog Hop. Painted Blooms paper was used to create this Mini Treat Bag using the Mini Treat Bag Thinlits Die and coordinates well with the watercolor card.

Linda Vich Creates: Creative Blog Hop. Painted Blooms paper was used to create this Mini Treat Bag using the Mini Treat Bag Thinlits Die and coordinates well with the watercolor card.


As part of this Creative Blog Hop, I need to answer a few questions.

1. What are you working on?

In the next few days, I will be designing some Valentine treats for my Granddaughter, Raine, as well as planning my projects for the March session of my stamping group.

2. How does your style differ from others in your genre?

I'm not sure that my style differs from others but I do tend to use bold, dramatic color combinations and I tend to favor texture in the form of embossing, burlap, ribbons, etc. I like to try a number of different styles in card making rather than sticking with one particular style. At the present time, I am enjoying experimenting with watercolor techniques.

3. Why do you create what you do?

I enjoy the creative process and love to share it with others! What could be more fun than playing with color and paper and ribbons and ink and glitter? :)

4. How does your creative process work?

My creative process can be sparked in various ways. Sometimes (quite often in fact!) I am inspired by a particular color scheme and I create a project based on it. Other times, I may be project driven in that I may have to create a particular type of card–birthday, thank you, sympathy, etc. Still other times I start with a particular technique I want to learn and combine that with a pleasing color scheme to design a specific project.

I nominate Carrie Rhoades who will be posting projects on her own blog on February 16. I found Carrie through Pinterest. She has some amazing projects on her blog! In particular, I love the flowers she has created using the Bouquet Bigz L Die to adorn some of her projects so be sure to browse back through her posts to see these!

Be sure to visit Carrie on February 16 to view her special projects!

Thanks for visiting today!

Built for Free Using: My Stampin Blog

Wednesday, February 4, 2015

Dazzling Diamonds Meets Wonderful Watercolor

Well, I couldn't help myself–I had to create another card using the Butterfly Basics and coordinating Thinlits! I wonder if there is a 12 step program yet for those of us obsessed with this set?!

I had actually planned to work on a Valentine project tonight but then I caught sight of one of the watercolor background pieces I had created some time ago and decided that I knew just what to do with it!

But before I get carried away, back in my blog post, Gold, Grunge, Glitz and Two Charlenes, I promised that I would show you the two Bokeh cards that my upline, Charlene had created. At long last, here they are:

Linda Vich Creates: Dazzling Diamonds Meets Wonderful Watercolor. Card created by Charlene Lee.

Linda Vich Creates: Dazzling Diamonds Meets Wonderful Watercolor. Card created by Charlene Lee.

 Didn't she do a wonderful job? Which one do you like the best? I'm leaning to the second one though the first one are more my colors.

Now, back to tonight's card.

As I mentioned, I chose to use a watercolor background I had created previously. I used the same technique as in this post: Bokeh Technique and Sneak Peek From Occasions 2015 Catalog though I did not add the bokeh to this one. This is what it looked like when I was finished:

Linda Vich Creates: Dazzling Diamonds Meets Wonderful Watercolor.


To help me keep track of what colors I used, I snapped a photo showing the Ink Refills.

Linda Vich Creates: Dazzling Diamonds Meets Wonderful Watercolor.

Tonight, I decided to use the same odd-sized card base as in my post, A Happy Thing. The card base measures 4 7/8 x 5 7/8" with the Whisper White matte being 4 1/4 x 5 1/4." For this card I inserted another matte between the white and the watercolor layer–the Cajun Craze matte was 4 1/8 x 5 1/8." I liked the proportions of the mattes, with the card base showing a larger amount than usual. All layers were adhered to each other using Fuse Fast adhesive.

Before adhering a piece of the new Whisper White Jute Ribbon around the watercolor layer using Fuse Fast adhesive, I inked the edges using both Cajun Craze and then Early Espresso inks.

I stamped the smaller butterfly from Butterfly Basics using Tangerine Tango. I die cut both it and the larger butterfly, with the larger one being cut from Melon Mambo.

For the smaller butterfly, I inked it with Versamark ink and then heat embossed it with Clear Embossing Powder. I did this twice to give it a good gloss.

For the larger butterfly, I inked it with Versamark and then applied Heat & Stick powder. I heated this until it melted and then quickly added Dazzling Diamonds glitter on top and heated it again to seal it. Dazzling Diamonds is my new love! Don't you just love the beautiful shimmer it produced?

Linda Vich Creates: Dazzling Diamonds Meets Wonderful Watercolor. A glittery diecut butterfly perches on Whisper White Jute Ribbon that is adhered to a dramatic watercolor background created using Stampin' Up! ink refills. A distressed tag, anchored by a lovely bit of bling, displays the sentiment.


For both butterflies, I embossed only half the body at a time to make it easier to emboss.

I bent the wings of both butterflies up a bit and then used Clear Effects adhesive to adhere first the larger butterfly to the Jute Ribbon and then the smaller butterfly on top of the larger. I chose Clear Effects because I knew it would hold both items securely.

I used the Note Tag punch to cut a tag from Whisper White. I used the honeycomb stamp from the set to stamp with Crushed Curry. I stamped several times without re-inking to produce a textured, slightly distressed look.

I inked the edges and lightly dusted the tag with a sponge dauber for each of Melon Mambo, Crushed Curry and Tangerine Tango inks.

I then filled my larger Aqua Painter with Rubbing Alcohol and several drops of Melon Mambo Ink Refill. I wanted to add some small ink droplets to the tag.

I practiced on scrap paper first to make sure I had the right color and technique. I found that I had to add more and more drops to the alcohol to get the right color. I probably still could have added more to give the tag more dimension but I didn't this time round!

To get the small droplets, I squeezed the Aqua Painter several times to load the brush with ink and then tapped the brush on my extended index finger. To get a few larger droplets, I squeezed again but this time held the Aqua Painter straight out in front of me and sort of jerked it toward the tag, stopping quickly and letting the drops keep going! I was quite pleased with the results I achieved!

I then used Black Stazon Ink to stamp the sentiment on the tag. I adhered the tag at the top with a glue dot and a Dimensional at the bottom to give it a little lift. I added one of the now retired Frosted Finishes ornaments for a little added bling and to anchor the tag to the card.

Linda Vich Creates: Dazzling Diamonds Meets Wonderful Watercolor. A glittery diecut butterfly perches on Whisper White Jute Ribbon that is adhered to a dramatic watercolor background created using Stampin' Up! ink refills. A distressed tag, anchored by a lovely bit of bling, displays the sentiment.

Lastly, I added some rhinestones to the smaller butterfly and called the card done!

Linda Vich Creates: Dazzling Diamonds Meets Wonderful Watercolor. A glittery diecut butterfly perches on Whisper White Jute Ribbon that is adhered to a dramatic watercolor background created using Stampin' Up! ink refills. A distressed tag, anchored by a lovely bit of bling, displays the sentiment.

Linda Vich Creates: Dazzling Diamonds Meets Wonderful Watercolor. A glittery diecut butterfly perches on Whisper White Jute Ribbon that is adhered to a dramatic watercolor background created using Stampin' Up! ink refills. A distressed tag, anchored by a lovely bit of bling, displays the sentiment.

Linda Vich Creates: Dazzling Diamonds Meets Wonderful Watercolor. A glittery diecut butterfly perches on Whisper White Jute Ribbon that is adhered to a dramatic watercolor background created using Stampin' Up! ink refills. A distressed tag, anchored by a lovely bit of bling, displays the sentiment.

I'm liking this one! What do you think? If you would like to read about other butterfly cards not mentioned in the above post, try these posts:


Cofor Free Using: My Stampin Blog