Showing posts with label watercolor wings. Show all posts

Thursday, June 1, 2017

2017 Catalog Launch Prep Part 2: Second Prize

Linda Vich Creates: 2017 Catalog Launch Prep Part 2: Second Prize. Peekaboo Pullback cards and handbag created with the Floral Boutique DSP and Watercolor Wings.
Navy and white always pack a punch! No wonder that I chose to create with these colors and the lovely Floral Boutique DSP for the Second Prize at my 2017 Catalog Launch! This blog post is part two in a three part series. Be sure to check out Part One.

I started by creating a handbag to contain my set of cards. I used a tutorial from Kirsteen Gill. Her tutorial creates a box in a bag which really means that you first create a shallow box for your cards and then add a bag to it.

I knew that I wanted my finished "box" to measure 1.5 x 6" so I used the handy calculator on Kirsteen's page to find out how large my starting piece of card stock should be. I ended up cutting my piece of Night of Navy to 8 x 3." I then scored each side at 1" (the depth of the box) and then cut up on the score lines at each end to create tabs. I applied liquid adhesive to these tabs and adhered them to the rest of the card stock to create the basic box.

Next, I cut two pieces of the Floral Boutique DSP at 6 x 12." I adhered these with Tear & Tape on the short side with an overlap of one inch and then trimmed the length to 15.5" according to Kirsteen's calculator. I put Tear & Tape all along the length of one side of the DSP  and up one of the short sides. I then carefully adhered the DSP around the box, ensuring that the DSP was flush with the bottom edge of the box and adhered the edges when I reached the end. This formed the "bag" part of the box.

I then cut two, 2 x 11" strips of Night of Navy and scored lengthwise at one inch. After folding on the score line, I used my fingers to curve the strip, breaking the fibers. Taking one strip, I fitted it around the top edge of my bag. I inserted the nozzle of my liquid glue at spots to glue it along the outside to keep it in place. I repeated with the second strip. It was necessary to trim the ends of the first strip slightly because where the strips overlapped, the strips didn't meet up precisely.

For the straps of the handbag, I cut two strips, 1 x 11" and scored each lengthwise, leaving 1 1/2" from each end not scored. I placed Tear & Tape on one edge and adhered the other to it.

Using my Piercing Tool, I held one end of a strap in place while I made a hole. I then removed the strap, added a little glue to the end and replaced it on the bag, fitting a retired brad into the hole. I repeated this with the three other straps to complete the handbag.

Linda Vich Creates: 2017 Catalog Launch Prep Part 2: Second Prize. Peekaboo Pullback cards and handbag created with the Floral Boutique DSP and Watercolor Wings.

It was then easy to create the Peekaboo Pullback cards to fill the handbag. My cards were a CASE of the cards by Lyssa Griffin Zwolanek.

To make these cards, I cut four standard card bases from Thick Whisper White card stock. I then cut four pieces of the Floral Boutique DSP, 4 x 5.5". On the long side of the DSP, I used my Stampin' Trimmer to make a cut that was 2" in length at the 2 3/4" mark.

For each DSP piece, I folded back the paper from the cut to form little triangles. Using a pencil, I marked the edges of the folded back part on all four card fronts so I would know where to stamp.

Using my MISTI, I stamped the sentiments from the now retired Endless Thanks stamp set on the card fronts using Night of Navy. I stamped two horizontally, and two vertically so that the cards would have two different orientations. After stamping, I erased the pencil marks.

I then adhered the DSP pieces to each card front and applied a Dimensional under each folded back triangle.

For the butterflies, I again used my MISTI and I used Night of Navy ink. For the largest overall stamp, I stamped off once before stamping the butterfly on Whisper White. I used the Night of Navy full strength for the three other stamps to create the butterfly. I then used the Fold Butterfly Framelits to die cut the butterflies. Each was attached to a card front using a Dimensional.

Linda Vich Creates: 2017 Catalog Launch Prep Part 2: Second Prize. Peekaboo Pullback cards and handbag created with the Floral Boutique DSP and Watercolor Wings.

Linda Vich Creates: 2017 Catalog Launch Prep Part 2: Second Prize. Peekaboo Pullback cards and handbag created with the Floral Boutique DSP and Watercolor Wings.

Linda Vich Creates: 2017 Catalog Launch Prep Part 2: Second Prize. Peekaboo Pullback cards and handbag created with the Floral Boutique DSP and Watercolor Wings.

Linda Vich Creates: 2017 Catalog Launch Prep Part 2: Second Prize. Peekaboo Pullback cards and handbag created with the Floral Boutique DSP and Watercolor Wings.

They are so pretty yet so simple to create!


Monday, April 3, 2017

Stamping Mistake? Learn How I Fixed Rather Than Trashed This Card!

Linda Vich Creates: Stamping Mistake? Learn How I Fixed Rather Than Trashed This Card! Textural card created with Butterflies Thinlits.
It was with great pleasure that I sat down to create this thank you card for a friend. She had told me the type of sentiment she wanted and I chose the Floral Phrases stamp set. After she decided on the colors and style, I showed her a couple of cards in the style she wanted and we had a plan!

I started by cutting a standard card base from Crumb Cake and two mattes from Very Vanilla. Next, using Sahara Sand, I stamped the leafy image from the Number of Years stamp set all over one of the mattes.

One of the edge stamps from the Timeless Textures stamp set was stamped around the edge of the matte. Finally, I stamped the distressed leafy image in Cherry Cobbler in two opposing corners of the matte.

A piece of the Regals Designer Paper Stack was adhered to the middle of the matte. Two lengths of the Sale-A-Bration gold metallic ribbon were adhered to hide the seam of the DSP. Linen thread was then wrapped around the matte and secured at the back using Fast Fuse. The matte was then adhered to the card front using Dimensionals.

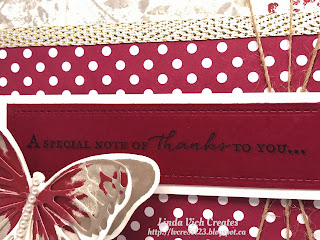
Using my MISTI, the sentiment from the Floral Phrases stamp set was stamped three times on a strip of Cherry Cobbler using Crumb Cake. I had wanted to use a stitched die for the sentiment but it was too long to fit  a Stampin Up die, even if I extended one of the stitched squares into a rectangle. As a work-around I used Lawn Cuts Stitched Borders to create my own stitched rectangle. I then matted this strip onto a strip of Very Vanilla. This was then adhered to the card front using Dimensionals.

On a piece of Very Vanilla, I stamped two identical butterflies using the Watercolor Wings stamp set and Sahara Sand, Crumb Cake and Cherry Cobbler inks. The two butterflies were die cut, one with Bold Butterfly Framelits and one with the Butterflies Thinlits dies. The two butterflies were adhered together using Glue Dots. A strip of pearls was adhered to the body of the top butterfly. After shaping the wings a bit, the butterfly was adhered to the card front using Foam Adhesive Strips.

Linda Vich Creates: Stamping Mistake? Learn How I Fixed Rather Than Trashed This Card! Textural card created with Butterflies Thinlits.

Linda Vich Creates: Stamping Mistake? Learn How I Fixed Rather Than Trashed This Card! Textural card created with Butterflies Thinlits.

For the remaining matte, it was prepared in the same way as the one for the card front with the exception that the stamp was stamped off each time as well as stamping the corner stamps in Sahara Sand as well. The sentiment was stamped using Crumb Cake.

The smaller butterfly was stamped on Very Vanilla using Sahara Sand, Crumb Cake and Cherry Cobbler. The Bold Butterfly Framelits and one with the Butterflies Thinlits dies were used to die cut the butterflies. They were adhered together and to the matte using Glue Dots.

Linda Vich Creates: Stamping Mistake? Learn How I Fixed Rather Than Trashed This Card! Textural card created with Butterflies Thinlits.

Linda Vich Creates: Stamping Mistake? Learn How I Fixed Rather Than Trashed This Card! Textural card created with Butterflies Thinlits.

Lastly, I used the Envelope Punch Board to create a matching envelope from Crumb Cake. It was stamped on the front using Crumb Cake and the leafy stamp from the Number of Years stamp set. The envelope was lined with a matching piece of Regals Designer Paper Stack. Mary Fish has a great tutorial for an envelope liner.

Linda Vich Creates: Stamping Mistake? Learn How I Fixed Rather Than Trashed This Card! Textural card created with Butterflies Thinlits.

Linda Vich Creates: Stamping Mistake? Learn How I Fixed Rather Than Trashed This Card! Textural card created with Butterflies Thinlits.

After finishing the card, I noticed that the sentiment on the front of the card was not totally distinct after having dried completely. How exasperating!

I knew that I would have to use a darker ink to correct the look of the sentiment. With hopes that I didn't have to remake the sentiment strip, I used some of my trusty Un-Du to remove the butterfly and sentiment strip. The card front and strip were completely saturated with the Un-Du solution so I used my heat tool to dry them.

Next, I used my MISTI to stamp the sentiment on the clear matte from my Stamp-a-ma-jig using a bright color of ink. I then placed my sentiment strip under the matte and played with it until I thought that both sentiments were in total alignment. I then carefully removed the plastic matte and secured the sentiment strip with magnets. I then inked up the sentiment with Early Espresso and re-stamped the sentiment.

Upon careful examination, I discovered that the restamp was not in exactly the same spot as the original. However, by happy accident, the stamping looked like it had been planned "shadow" stamping because the lighter, originally stamped sentiment acted as a shadow for the newer, crisply stamped sentiment! BONUS! It actually now had a kind of 3D quality to it!

Linda Vich Creates: Stamping Mistake? Learn How I Fixed Rather Than Trashed This Card! Textural card created with Butterflies Thinlits.
Original sentiment stamped in Crumb Cake.

Linda Vich Creates: Stamping Mistake? Learn How I Fixed Rather Than Trashed This Card! Textural card created with Butterflies Thinlits.
Sentiment Restamped in Early Espresso. Click on the
image to view a larger size to see the 3D shadowed detail.
So, the moral of this story is . . . if you make a stamping mistake, think about it and attempt a fix before having to trash your card completely. You might be pleasantly surprised!


>

Tuesday, November 15, 2016

Beautiful Butterfly Birthday

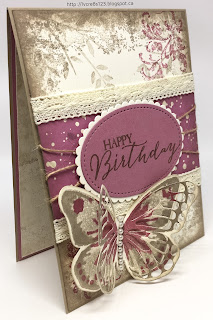
Linda Vich Creates: Beautiful Butterfly Birthday. Timeless Textures combines with beautiful butterflies to produce a elegant vintage-style card.
On Sunday it was my mother's 91st birthday. Quite a milestone! I wanted to create a very special card for her. I looked through Pinterest for ideas and decided to CASE one by Areli Johnson.

I started by cutting a 4.25 x 5.5" vertical card base from Crumb Cake. I also cut a Very Vanilla matte on which to stamp.

A stamp from the Number of Years stamp set was used to stamp a random leafy pattern all over the card stock using Sahara Sand. I then used an edge stamp from one of my all time favorite sets, Timeless Textures. I stamped this all around the edges of the card stock, again using Sahara Sand.

Choosing another stamp from the same set, I switched to Sweet Sugarplum and stamped in the top right and bottom left corners.

I cut a piece of the Playful Palette DSP and adhered it to the centre of the matte and then added some lace trim (it's a retired one from a Stampin' Up kit but it was unmarked so not sure which one) to the top and bottom of the DSP. Linen Thread was wrapped around the centre of the DSP and adhered to the back with Fast Fuse.

The sentiment, from the Butterfly Basics stamp set, was stamped with Crumb Cake on Sweet Sugarplum card stock and then die cut using an oval die from the Stitched Shapes Framelits. A scalloped oval from the Layering Ovals Framelits was die cut from Very Vanilla and adhered to the stamped oval. The finished piece was adhered over the linen thread using Dimensionals.

Next, I used my MISTI to stamp two butterflies using the Watercolor Wings stamp set. I used Sahara Sand and Sweet Sugarplum and stamped two of the same butterflies and then die cut one using the Bold Butterfly Framelits and one using the Butterflies Thinlits. The two were adhered together and then adhered to the card front using Glue Dots. A strip of pearls was added to the body.

For inside the card, I stamped a Very Vanilla matte using the same two stamps from Timeless Textures but stamped each in Sahara Sand after first stamping off. I also stamped the smaller butterfly, from the Butterfly Basics stamp set, two times using Sweet Sugarplum. One was die cut using the Bold Butterfly Framelits, and one using the Butterflies Thinlits. This was adhered near the top of the matte (not the best place as I discovered!) to complete the card.

I also decided to stamp the envelope and used my Envelopes Liners Framelits to line the envelope with matching paper.

Linda Vich Creates: Beautiful Butterfly Birthday. Timeless Textures combines with beautiful butterflies to produce a elegant vintage-style card.

Linda Vich Creates: Beautiful Butterfly Birthday. Timeless Textures combines with beautiful butterflies to produce a elegant vintage-style card.

Linda Vich Creates: Beautiful Butterfly Birthday. Timeless Textures combines with beautiful butterflies to produce a elegant vintage-style card.

I'm pretty pleased with how the card turned out! Who wouldn't love a combination of Timeless Textures and butterflies?

Here's a picture of my Mom carefully studying the card I gave her.


And here is a picture of her holding one of the nighties I gave her!


All in all I think my mom had a happy day!


Thursday, June 25, 2015

Watercolor Wings: A Study In Neutrals

Linda Vich Creates: Watercolor Wings: A Study In Neutrals. A stunning combo of neutral card stocks combined with glitzy butterflies and stamped flowers from Indescribable Gift and you have a recipe for a successful card!It's always such a delight when a card you've envisioned comes together!

Last night I started playing with a card that had been rolling around in my mind for about a day.

I got my mattes all cut and my stamping and die cutting pretty much done. Usually I finish a project, even if it is late but I was still recovering from a late night from the previous project so I headed to bed!

This morning, I was able to finish my card and I am more than pleased with how it turned out!

I started by stamping the large butterfly in the Watercolor Wings set on Very Vanilla card stock.

I used Sahara Sand to stamp the first stamp, Crumb Cake for the second and Tip Top Taupe for the third. I die cut it with the Bold Butterfly Framelits.

I then used the Butterflies Thinlits Dies to cut a detailed butterfly from Gold Glimmer paper. I also cut a small detailed butterfly from Gold Foil paper using the Bold Butterfly Framelits.

I stamped the inked butterfly with Versamark and then heat embossed it with Clear Stampin' Emboss Powder. I repeated the process to produce a smooth as glass shiny butterfly!

I attached the Gold Glimmer butterfly to the stamped butterfly using Crystal Effects and then attached the smaller Gold Foil butterfly on top. I liked the beautiful contrast of the clear embossed butterfly through the openings in the Gold Glimmer butterfly!

Next, I used my MISTI to stamp the flowers from Indescribable Gift in Tip Top Taupe on a 4 3/8" square Crumb Cake matte. I also stamped the sentiment from the Watercolor Wings stamp set.
I adhered the stamped matte to a Very Vanilla 4 5/8" matte using Fuse Fast.

Using Sticky Strip, I adhered a strip of Vanilla 5/8" Satin Ribbon across the bottom of the matte and then added a strip of Gold Sequin Trim.

I adhered a 5 1/4" matte of Tip Top Taupe to the 5 1/2" Very Vanilla card base using Fuse Fast. I then adhered the top matte to the card base using Dimensionals.

The butterfly was attached in the bottom right corner using both Crystal Effects and a couple of Dimensionals.

A 5 1/4" Crumb Cake matte was stamped with a section of the same flower stamp, using Tip Top Taupe, and then the matte was adhered to the inside of the card.

Linda Vich Creates: Watercolor Wings: A Study In Neutrals. A stunning combo of neutral card stocks combined with glitzy butterflies and stamped flowers from Indescribable Gift and you have a recipe for a successful card!


Linda Vich Creates: Watercolor Wings: A Study In Neutrals. A stunning combo of neutral card stocks combined with glitzy butterflies and stamped flowers from Indescribable Gift and you have a recipe for a successful card!
Close-up detail of butterfly

I just love the look of the gold and the neutral colors together. The Tip Top Taupe works especially well with the Crumb Cake.

What will you or have you created with the Watercolor Wings stamp set? Let me know in the comments below!

Built for Free Using: My Stampin Blog

Saturday, June 20, 2015

Butterfly Thinlits Meet Watercolor Wings

Linda Vich Creates: Butterfly Thinlits Meet Watercolor Wings. Our hostess, Carolyn!Carolyn, the lady whose home our stamping group meets in each month, is a very special lady.

A past Stampin' Up! demonstrator herself, each month she welcomes us into her lovely craft room. She ensures that the tables are set with a sheet of grid paper for each stamper and that other tools like her Big Shot and heat tool are nearby if we need to use them.

On the odd occasion when I have run out of paper or ink or another necessary item, she generously shares from her personal stash.

Because she is so special, and Friday was our last stamping class before the summer, I wanted to make her a card to thank her for all that she does for us.

Carolyn is partial to teal colors and I thought that the new Watercolor Wings stamp set would create a very pretty butterfly to adorn her card!

I recently found out that the Bold Butterfly Framelits, Butterflies Thinlits and Butterfly Basics and the Watercolor Wings stamp were all designed to work together! There are countless combinations for using the the stamps and the matching dies, the only thing limiting you is your imagination!

Linda Vich Creates: Butterfly Thinlits Meet Watercolor Wings. A boldly inked butterfly from Watercolor Wings is showcased behind the detailed die cut from the Butterfly Thinlits.

I started by stamping the three parts of the butterfly with Coastal Cabana, Bermuda Bay and Island Indigo. I didn't bother with stamping the body since I knew I would be adding the detailed die cut above it.

I die cut the butterfly using the Bold Butterfly Framelits and then die cut a detailed butterfly from Bermuda Bay card stock using the Butterfly Thinlits.

I glued the stamped butterfly to a white matte and then glued the body of the die cut one to it, bending the wings up slightly.

Using my MISTI and Island Indigo ink, I stamped the sentiment on Whisper White card stock. and then die cut it using the Tags & Labels Thinlits die. I cut a second larger tag from Bermuda Bay. The white matte was adhered to an Island Indigo matte. I adhered the white tag to the Bermuda Bay one using Fuse Fast.

I fastened a length of Bermuda Bay Sequin Trim around the matte and adhered the tag over it using Dimensionals.

I adhered a white matte to an Island Indigo card base and then used Dimensionals to adhere the decorated matte.

Linda Vich Creates: Butterfly Thinlits Meet Watercolor Wings. A boldly inked butterfly from Watercolor Wings is showcased behind the detailed die cut from the Butterfly Thinlits.

For the inside of the card, I stamped a smaller butterfly in the bottom right corner of a Naturals White card stock matte and adhered it to the inside of the card.

Linda Vich Creates: Butterfly Thinlits Meet Watercolor Wings. A boldly inked butterfly from Watercolor Wings is showcased behind the detailed die cut from the Butterfly Thinlits.

For the finishing touch, I painted over the butterfly die cut, on the front of the card, with my Wink of Stella pen to give a bit of extra glimmer.

Linda Vich Creates: Butterfly Thinlits Meet Watercolor Wings. A boldly inked butterfly from Watercolor Wings is showcased behind the detailed die cut from the Butterfly Thinlits.
Close-up showing the glimmer from the Wink of Stella pen.

How about you–have you tried the Watercolor Wings and the matching dies yet? If you haven't, you'll love them!
Built for Free Using: My Stampin Blog