Showing posts with label endless thanks. Show all posts

Thursday, June 1, 2017

2017 Catalog Launch Prep Part 2: Second Prize

Linda Vich Creates: 2017 Catalog Launch Prep Part 2: Second Prize. Peekaboo Pullback cards and handbag created with the Floral Boutique DSP and Watercolor Wings.
Navy and white always pack a punch! No wonder that I chose to create with these colors and the lovely Floral Boutique DSP for the Second Prize at my 2017 Catalog Launch! This blog post is part two in a three part series. Be sure to check out Part One.

I started by creating a handbag to contain my set of cards. I used a tutorial from Kirsteen Gill. Her tutorial creates a box in a bag which really means that you first create a shallow box for your cards and then add a bag to it.

I knew that I wanted my finished "box" to measure 1.5 x 6" so I used the handy calculator on Kirsteen's page to find out how large my starting piece of card stock should be. I ended up cutting my piece of Night of Navy to 8 x 3." I then scored each side at 1" (the depth of the box) and then cut up on the score lines at each end to create tabs. I applied liquid adhesive to these tabs and adhered them to the rest of the card stock to create the basic box.

Next, I cut two pieces of the Floral Boutique DSP at 6 x 12." I adhered these with Tear & Tape on the short side with an overlap of one inch and then trimmed the length to 15.5" according to Kirsteen's calculator. I put Tear & Tape all along the length of one side of the DSP  and up one of the short sides. I then carefully adhered the DSP around the box, ensuring that the DSP was flush with the bottom edge of the box and adhered the edges when I reached the end. This formed the "bag" part of the box.

I then cut two, 2 x 11" strips of Night of Navy and scored lengthwise at one inch. After folding on the score line, I used my fingers to curve the strip, breaking the fibers. Taking one strip, I fitted it around the top edge of my bag. I inserted the nozzle of my liquid glue at spots to glue it along the outside to keep it in place. I repeated with the second strip. It was necessary to trim the ends of the first strip slightly because where the strips overlapped, the strips didn't meet up precisely.

For the straps of the handbag, I cut two strips, 1 x 11" and scored each lengthwise, leaving 1 1/2" from each end not scored. I placed Tear & Tape on one edge and adhered the other to it.

Using my Piercing Tool, I held one end of a strap in place while I made a hole. I then removed the strap, added a little glue to the end and replaced it on the bag, fitting a retired brad into the hole. I repeated this with the three other straps to complete the handbag.

Linda Vich Creates: 2017 Catalog Launch Prep Part 2: Second Prize. Peekaboo Pullback cards and handbag created with the Floral Boutique DSP and Watercolor Wings.

It was then easy to create the Peekaboo Pullback cards to fill the handbag. My cards were a CASE of the cards by Lyssa Griffin Zwolanek.

To make these cards, I cut four standard card bases from Thick Whisper White card stock. I then cut four pieces of the Floral Boutique DSP, 4 x 5.5". On the long side of the DSP, I used my Stampin' Trimmer to make a cut that was 2" in length at the 2 3/4" mark.

For each DSP piece, I folded back the paper from the cut to form little triangles. Using a pencil, I marked the edges of the folded back part on all four card fronts so I would know where to stamp.

Using my MISTI, I stamped the sentiments from the now retired Endless Thanks stamp set on the card fronts using Night of Navy. I stamped two horizontally, and two vertically so that the cards would have two different orientations. After stamping, I erased the pencil marks.

I then adhered the DSP pieces to each card front and applied a Dimensional under each folded back triangle.

For the butterflies, I again used my MISTI and I used Night of Navy ink. For the largest overall stamp, I stamped off once before stamping the butterfly on Whisper White. I used the Night of Navy full strength for the three other stamps to create the butterfly. I then used the Fold Butterfly Framelits to die cut the butterflies. Each was attached to a card front using a Dimensional.

Linda Vich Creates: 2017 Catalog Launch Prep Part 2: Second Prize. Peekaboo Pullback cards and handbag created with the Floral Boutique DSP and Watercolor Wings.

Linda Vich Creates: 2017 Catalog Launch Prep Part 2: Second Prize. Peekaboo Pullback cards and handbag created with the Floral Boutique DSP and Watercolor Wings.

Linda Vich Creates: 2017 Catalog Launch Prep Part 2: Second Prize. Peekaboo Pullback cards and handbag created with the Floral Boutique DSP and Watercolor Wings.

Linda Vich Creates: 2017 Catalog Launch Prep Part 2: Second Prize. Peekaboo Pullback cards and handbag created with the Floral Boutique DSP and Watercolor Wings.

They are so pretty yet so simple to create!


Monday, April 4, 2016

Gift From The Garden Corner Fold Card

Linda Vich Creates: Gift From The Garden Corner Fold Card. Botanical Gardens DSP serves as both backdrop and embellishment for this lovely Corner Fold card.
I love to make cards with lots of flowers and embellishments but sometimes simple is good!

Today's card has a great look but is quite easy to make. It has a lot of layers but if you cut all your materials, all you have left is to put it together!

The card technique I am using is called a Decorative Corner Fold. What is nice about this card is that it folds flat for mailing but stands up very well! There are many different ways to embellish your card. You'll find a few ideas in this Pinterest search result. I consulted a video tutorial at Debby's Designs to get the details on how to make this card.

I cut a 5 1/2 x 8 1/2" card base from Cajun Craze and scored it on the long side at 2 1/8, 4 1/4, and 6 3/8." I also cut a piece of Cajun Craze at 1 x 5 1/2" and scored it vertically at 1/2." While I had my Cajun Craze card stock out, I also punched two, 1" circles and one, 2 1/2" circle using my circle punches.

For mattes, I chose Delightful Dijon and cut four pieces, 5 1/4 x 1 7/8." I also punched a 2" circle from the same card stock. I chose a flowered piece of paper from the Botanical Gardens DSP and cut three pieces, 5 x 1 5/8"; I also cut a piece of Whisper White to the same size to use for the sentiment on the back of the card.

On the 2" circle of Delightful Dijon, I stamped a watering can from the Gift For The Garden stamp set. I stamped the sentiment above it using a stamp from the Endless Thanks stamp set. Both stamps were done in Cajun Craze. Delightful Dijon was used to ink the edges of the die cut.

Using Cajun Craze again, I stamped the sentiment from the Gift From The Garden stamp set onto the Whisper White card stock. I then proceeded to ink the edges of this piece, and all the DSP pieces with the Cajun Craze ink. The pieces of Delightful Dijon card stock were inked with their matching ink.
I used my bone folder to crease all the folds in the card base and then adhered all the Delightful Dijon mattes and then all the DSP and the sentiment on Whisper White using Fast Fuse Adhesive.

Next, I took the long strip of Cajun Craze and creased it on its 1/2" score line. I applied Fast Fuse to one half of the strip on the mountain side of the fold. I lined this up with one side of the card base and adhered it to the wrong side of the card. I then applied adhesive to the second side and folded the card flat over top of it to connect the two ends of the card. This formed the "box" of the card.

I flattened the card so that the sentiment panel was at the back of the card. I folded the 1" circles in half and applied adhesive to one half of each of them. After determining where I was going to mount the large circle die cuts, I adhered the half-circles on either side of the centre score line about 1 1/2" from the top of the card.

The stamped circle die cut was adhered to the Cajun Craze die cut using Dimensionals. I then added adhesive to the remaining half of each 1" circle that had been glued to the card front and then placed the large die cuts on top. This allowed the die cuts to pivot as the card was either flattened or stood up.

Linda Vich Creates: Gift From The Garden Corner Fold Card. Botanical Gardens DSP serves as both backdrop and embellishment for this lovely Corner Fold card.

Linda Vich Creates: Gift From The Garden Corner Fold Card. Botanical Gardens DSP serves as both backdrop and embellishment for this lovely Corner Fold card.

Linda Vich Creates: Gift From The Garden Corner Fold Card. Botanical Gardens DSP serves as both backdrop and embellishment for this lovely Corner Fold card.

Even though the sentiment I chose had to be stamped in landscape format on the card, I am sure that the recipient won't mind. After all, the viewer would not be looking at both the card front and the card back at the same time, right?

I chose not to embellish this card further, allowing the patterned paper to take centre stage under the die cut.


Feel free to save this color combo if you would like to use it for inspiration for some of your own cards!


Wednesday, March 16, 2016

Helping Me Grow Thank You For Global Design Project


No creating on Monday. My granddaughter, Raine, was sick so she spent the day with me. She didn't want to do anything but lay on the couch so we immersed ourselves in Barney and Curious George. Luckily, whatever she had didn't last long and the next day she was back to her usual self and off to daycare.

Today I designed two simple thank you cards using the Helping Me Grow stamp set.

I started by cutting standard card bases from Basic Black card stock and mattes from Kraft. Using my MISTI to help me with alignment, I positioned my daisy stamp and then decided to insert the thank you sentiment into the actual stamped area so I used my Post-It Label Roll to mask over a section on the bottom right of the card. Using Jet Black Stazon ink, I stamped the daisy.

After removing the masking, I changed to the thank you sentiment stamp from the Endless Thanks stamp set. I stamped it in the place where the masking had created a space in the flower stems. After the ink was dry, I adhered the stamped matte to the card front using Dimensionals.

I threaded a black 4-holed button onto two separate pieces of Linen Thread and then placed glue dots on the back of the button. Positioning the button next to the sentiment, I tied the threads inside the card. To complete the card while keeping it simple, I used the Curvy Corner Trio Punch to punch the corners of a Naturals Ivory card stock matte and then adhered it with Fast Fuse Adhesive.


The second card was also stamped with Jet Black Stazon ink but this time the Hyacinths (at least I think that's what they are!) were stamped on the Kraft matte and the thank you sentiment was stamped at the top. A length of Basic Black 3/8" Stitched Ribbon was taped around the bottom of the matte and then a separate piece was knotted in the front. The matte was then adhered to the card front using Dimensionals. A sprinkling of black sequins completed the card front.

The inside was kept simple but elegant by using the Curvy Corner Trio Punch again on Naturals Ivory card stock.


I've entered this card in the Global Design Project #027. The theme this time is Thank You cards.

#gdp027

Why not click on the image above and come and play?


Monday, November 23, 2015

Acorn Thank You

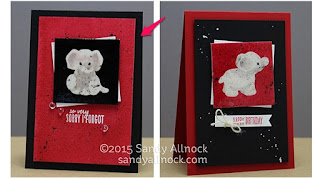
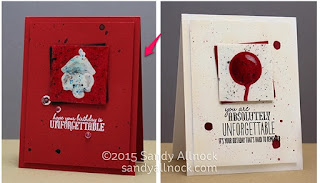
I absolutely love reading posts and watching Periscope broadcasts by Sandy Allnock! That girl has some serious art talent! Not only can she put a card together but her skill at coloring, drawing, and painting is second to none!

Sandy recently posted a couple of cards that she had CASEd and now I am posting a couple of cards that I CASEd from hers!

I am casing two of her four images:

Cards by Sandy Allnock.

Card by Sandy Allnock.

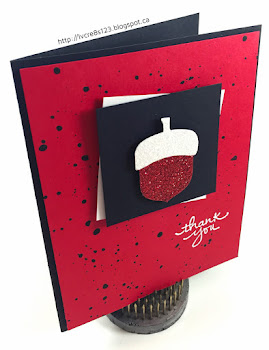
I started by punching my two different acorns from Dazzling Diamonds, Real Red, and Black Glimmer papers. Before gluing the tops on using the Fine Tip Glue Pen, I used a Real Red and a Basic Black Stampin' Write Marker to edge around each acorn to hide the white core of the Glimmer paper.

I then cut square mattes of 2.5" from Real Red, Basic Black and Whisper White card stock. I formed a stack with black and white and one with red and black. These were adhered together using Dimensionals.

Two card bases were cut, one from Basic Black and one from Real Red. Both cards used Real Red mattes which were adhered to the card bases using Dimensionals.

After adhering the mattes I realized that I hadn't yet created the paint fleck effect on the mattes so I went ahead and did it anyway, though I managed to get some paint on the card bases!

To create the fleck effect, I used Brusho powdered watercolor paint. I tapped out a little black paint and mixed it with water. After loading a brush with the paint, I tapped another brush against it to create the spatter.

Using MISTI, I stamped the sentiment from the Endless Thanks stamp set using Versamark and then heat embossed it using white embossing powder.

I adhered the square mattes to each card front and then the acorn on top of the mattes; both were adhered using Dimensionals.


I did not add mattes to the inside of these cards. Instead, I wrote in them using a white gel pen.

I really like both cards but I think the card with the Basic Black card base stands out more due to the high contrast between the two colors. However, I do love the red on red and the black and white acorn looks stunning on top! It uses the soon to be retiring Black Glimmer Paper.

Which card do you like best? Drop me a comment below!

Built for Free Using: My Stampin Blog