Showing posts with label layering squares framelits. Show all posts

Wednesday, August 8, 2018

Sponging And The Tropical Chic Bundle

Linda Vich Creates: Sponging and Tropical Chic. Sponging with ink adds a lot of dimension to the Tropical Chic die cuts on this card.
Sitting down to play in my craft room today I was drawn, once again, to work with the Tropical Chic Bundle. I was inspired by a card designed by Vicki Papaioannou.

I started by cutting a square of Watercolor paper slightly bigger than the square die found in the Tropical Thinlits Dies. I chose to work with Watercolor paper instead of Whisper White because I find it more forgiving when sponging.

Granny Apple Green was sponged over the whole piece and then I sponged wide edges with Garden Green, followed by some Crumb Cake.

The watercolor paper was die cut using the square die with the palm leaves. It should be noted that this die does not cut the square edge around the piece itself; this was die cut using the #9 square from the Layering Squares Framelits. (See my Numbered Die Sets.) Due to the sponging of the piece prior to die cutting,  the resulting leaves had a very dimensional look, possessing both shadows and highlights and gradations of color.

A 4.75 x 6" Crumb Cake card front was cut and I used sponges with both Crumb Cake and Soft Suede to ink it after carefully masking off the back of the card base using Post It Notes.

Granny Apple Green was selected for the matte and was embossed using the Layered Leaves Embossing Folder. (This embossing folder makes a great tie in with the Tropical Chic Bundle!) The edges of the matte were sponged with both Granny Apple Green and Garden Green. It was adhered to the card front using a piece of fun foam to provide even dimension across the card.

Next, I cut a Crumb Cake matte to go behind the green die cut. The the die cut was glued on top using liquid adhesive. The completed matte was adhered to the card front using Dimensionals.

I used sponges to color two more pieces of Watercolor paper and then on one, stamped the sentiment using Versamark. This was heat embossed using Gold Stampin' Emboss Powder and then die cut using the outline die for the palm branch. The other piece was used to die cut a palm branch and large palm leaf. All die cuts were sponged with Garden Green and a touch of Soft Suede inks.

The sentiment and two other die cuts were adhered to the card front using Dimensionals. For a little added interest, some of the now retired Glitter & Clear Epoxy Shapes were adhered.

For inside the card, I used another piece of Watercolor paper and stamped it repeatedly with the palm branch stamp using Garden Green. I then added a few stamps of the same branch using Granny Apple Green. The edges were sponged with both Granny Apple Green and Garden Green before adhering the matte using liquid adhesive.

Linda Vich Creates: Sponging and Tropical Chic. Sponging with ink adds a lot of dimension to the Tropical Chic die cuts on this card.
This shows the result of the sponging on the Watercolor paper.
(This the only photo of my process I remembered to snap!)

Linda Vich Creates: Sponging and Tropical Chic. Sponging with ink adds a lot of dimension to the Tropical Chic die cuts on this card.

Linda Vich Creates: Sponging and Tropical Chic. Sponging with ink adds a lot of dimension to the Tropical Chic die cuts on this card.


Product List


Thursday, October 12, 2017

Peace, Joy, and Love

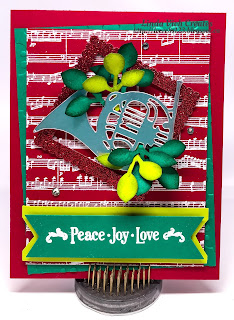
Linda Vich Creates: Peace, Joy, and Love. A colorful and festive card that uses the Musical Instruments Framelits and the Sheet Music stamp set.
When I created the card in my Rustic Musical Season blog post, I had actually planned to create two cards that day, using some of the same stamps and framelits. However, time got away from me and I didn't get the second card finished until now!

I started by using my MISTI to stamp the Sheet Music background stamp with Whisper White onto Real Red card stock. I heat embossed it with White Stampin' Emboss Powder.

Cutting a slightly larger matte from Emerald Envy, I dry embossed it using the Holly Embossing Folder. These were stacked and adhered, haphazardly, onto a Real Red 4.75 x 6" card front.

I used the Musical Instruments Framelits to die cut the French horn from Silver Foil as well as a few more horns from Whisper White. I stacked and adhered the horns together. I used a silver Sharpie to edge the horn.

On Red Glimmer paper I used my #9 scalloped square and #6 plain square from the Layering Squares Framelits to die cut a frame. I adhered the frame at an angle on the card front using Mini Dimensionals. The horn was adhered on top of the frame, again using the Mini Dimensionals.

Using Emerald Envy and Lemon Lime Twist card stock, I punched leaves and then sponged them with either Emerald Envy or Pear Pizzazz. I also shaped them a little with a bone folder. These were adhered around the horn using liquid adhesive.

The sentiment was stamped with Whisper White on Emerald Envy and then heat embossed using White Stampin' Emboss Powder. The Triple Banner Punch was used to flag the ends. A strip of Lemon Lime Twist was used to matte the sentiment and was hand trimmed after adhering it to the sentiment and then adhered to the card front with Dimensionals. A few rhinestones were added for a touch of bling.

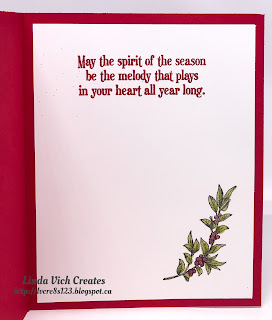
On the Whisper White matte inside the card, the sentiment was stamped with Real Red and heat embossed using the now retired Real Red Glitter Embossing Powder. The leaves were stamped with Memento and then colored using the new Stampin' Blends. Wink of Stella added some glitz to the leaves and berries to complete the card.

Linda Vich Creates: Peace, Joy, and Love. A colorful and festive card that uses the Musical Instruments Framelits and the Sheet Music stamp set.

Linda Vich Creates: Peace, Joy, and Love. A colorful and festive card that uses the Musical Instruments Framelits and the Sheet Music stamp set.


Love how this card turned out! The colors of Real Red, Emerald Envy and Lemon Lime Twist are such a fun combination! Be sure to save the color combo below if you'd like to use it for your own projects!

Linda Vich Creates: Peace, Joy, and Love. A colorful and festive card that uses the Musical Instruments Framelits and the Sheet Music stamp set.


>

Wednesday, June 7, 2017

Watercolor Blocks Thank You Cards

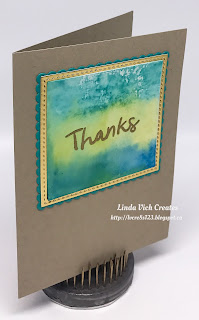
Linda Vich Creates: Watercolor Blocks Thank You Cards. Watercolor hues reminiscent of tropical beaches are the focal point of these quick and easy thank you note cards that use the Thankful Thoughts stamp set.
A quick and easy card for you today! I used the now retired Crumb Cake Note Card & Envelopes and teamed them up with a fun little watercolor technique.

To begin with, I used the #4 stitched square from the Stitched Shapes Framelits to die cut Gold Foil. I then used the #9 scalloped square from the Layering Squares in either Bermuda Bay or Pacific Point to matte the foil.

Next, I cut squares of Watercolor Paper to fit onto the gold mattes.

Using my Clear D Block, I scribbled onto it using my Stampin' Write Markers. I used Bermuda Bay, Lemon Lime Twist and Pacific Point. After spritzing it with water, I pressed the block onto the watercolor paper. The result was different each time!

After drying each of these well with my heat tool, I used my Embossing Buddy and then stamped the sentiment from the Thankful Thoughts stamp set in Versamark and then heat embossed with Gold Stampin' Emboss Powder.

All three mattes were stacked and adhered together with liquid adhesive and then adhered to the card front using Fast Fuse. No Dimensionals were used because there is not any extra room with the matching envelopes!

Quick and easy with a lovely result!

Linda Vich Creates: Watercolor Blocks Thank You Cards. Watercolor hues reminiscent of tropical beaches are the focal point of these quick and easy thank you note cards that use the Thankful Thoughts stamp set.


Linda Vich Creates: Watercolor Blocks Thank You Cards. Watercolor hues reminiscent of tropical beaches are the focal point of these quick and easy thank you note cards that use the Thankful Thoughts stamp set.

Linda Vich Creates: Watercolor Blocks Thank You Cards. Watercolor hues reminiscent of tropical beaches are the focal point of these quick and easy thank you note cards that use the Thankful Thoughts stamp set.

I hope you try this technique for yourself! If you'd like to use the same color combo, be sure to grab the graphic below.


Wednesday, May 31, 2017

Colorful Seasons in Berry Burst

Linda Vich Creates: Colorful Seasons in Berry Burst. Vibrant Berry Burst takes centre stage in this card that uses the Color Theory DSP and displays an Adirondack chair as a focal point.
With only two sleeps until the 2017 Catalog goes live, I was itching to use some of the products from my demonstrator Pre-order today!

With Berry Burst as my new favorite In Color, I chose a sheet of paper from the Color Theory DSP and some Berry Burst card stock. I cut a standard card base from the card stock and cut a matte from the DSP.

From another piece of the card stock I die cut the Adirondack chair using the Seasonal Layers Thinlits. After die cutting a piece of Thick Whisper White using a square from the Stitched Shapes Framelits and a square of Basic Black using the Layering Squares, I adhered the chair to the Whisper White using liquid adhesive and then adhered that to the Basic Black square.

The sentiment from the Colorful Seasons stamp set was stamped in Basic Black at the bottom of the DSP matte. I then decided to use a thin Basic Black matte under the DSP matte and adhered the two together.

I wrapped a length of Basic Black Baker's Twine around the matte and then adhered the square with the chair on top using Dimensionals. The large matte was then adhered to the card front using Dimensionals.

For inside the card, I adhered a Whisper White matte. After die cutting a branch from Early Espresso, I used liquid adhesive to adhere it to the bottom of the matte. Using Berry Burst ink, I stamped the three flowers on Whisper White and then die cut them. They were adhered to the branch using Glue Dots to complete the card.

Linda Vich Creates: Colorful Seasons in Berry Burst. Vibrant Berry Burst takes centre stage in this card that uses the Color Theory DSP and displays an Adirondack chair as a focal point.

Linda Vich Creates: Colorful Seasons in Berry Burst. Vibrant Berry Burst takes centre stage in this card that uses the Color Theory DSP and displays an Adirondack chair as a focal point.

Linda Vich Creates: Colorful Seasons in Berry Burst. Vibrant Berry Burst takes centre stage in this card that uses the Color Theory DSP and displays an Adirondack chair as a focal point.

Linda Vich Creates: Colorful Seasons in Berry Burst. Vibrant Berry Burst takes centre stage in this card that uses the Color Theory DSP and displays an Adirondack chair as a focal point.

I hope you have enjoyed this blog post! Why not leave me a comment to let me know you stopped by?


Wednesday, April 12, 2017

Mini Egg Carton Easter Treats

Linda Vich Creates: Mini Egg Carton Easter Treats. Three cheerfully embellished mini egg cartons ready to share some Easter treats!
I was one of the lucky ones who ordered and received the mini egg cartons early into the Occasions Catalog. Today I got to use them and I'm so sorry I didn't buy more even though they are being retired!

Besides being just overly cute in their "mini-ness" they are so much fun to color using the Stampin' Spritzers!

I started by filling a Stampin' Spritzer almost to the top with 70% alcohol and then added 40 drops of Night of Navy reinker (I wanted this color to be really dark rather than muted) and shook it up.

Placing an egg carton in my "spray booth" (an old shoebox) I proceeded to spray the outside of the box. I was surprised by how well it turned out! Spraying the outside of the egg carton took about 2/3 of the mixture.

I labelled the spritzer and then mixed up another one, this time using Sweet Sugarplum and using only 20 drops of reinker. After spraying, I mixed one more batch using Tempting Turquoise, again using 20 drops of reinker. This carton took pretty much the whole batch of color but since I couldn't seem to get all the color out of the Stampin' Spritzer, I labelled it and set it aside for another time.

The cartons dried quite quickly on their own while I cut up paper to embellish the boxes.

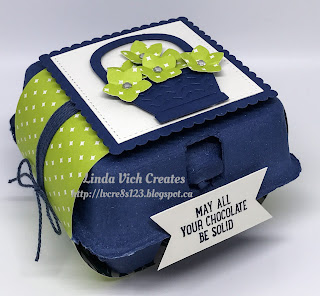
For the Night of Navy box I created a belly band using some of the new Eastern Elegance DSP. I also wound some Night of Navy Baker's Twine around the belly band, securing it with a little Fast Fuse Adhesive. I die cut a stitched square from some of the new Thick Very Vanilla using the Stitched Shapes Framelits and a scalloped square from Night of Navy using a die from the Layering Squares Framelits. These were adhered together using liquid adhesive.

The Basket Builder Framelits were used to cut the basket from Night of Navy and the flowers from the DSP. The basket was assembled using liquid adhesive and the flowers were shaped using a stylus from my Heartfelt Creations Deluxe Flower Shaping Kit.

The basket was adhered to the Very Vanilla square using Dimensionals and the flowers with Glue Dots. Rhinestones were added to the flower centres. The completed square was added to the belly band using Dimensionals. The sentiment was stamped on a strip of Thick Very Vanilla using Night of Navy and then the ends flagged using the Banner Triple Punch. It was adhered to the egg carton using Foam Adhesive Strips. I used Fringe Scissors on Night of Navy card stock to create my own fill for the egg carton.

Linda Vich Creates: Mini Egg Carton Easter Treats. Three cheerfully embellished mini egg cartons ready to share some Easter treats!

Linda Vich Creates: Mini Egg Carton Easter Treats. Three cheerfully embellished mini egg cartons ready to share some Easter treats!

Linda Vich Creates: Mini Egg Carton Easter Treats. Three cheerfully embellished mini egg cartons ready to share some Easter treats!

Linda Vich Creates: Mini Egg Carton Easter Treats. Three cheerfully embellished mini egg cartons ready to share some Easter treats!

For the Sweet Sugarplum egg carton, I started by stamping flowers on Watercolor paper using Basic Black Archival ink. After heat setting, I used my Watercolor Pencils and Clear Wink of Stella to color in the flowers, die cutting them using the Basket Builder Framelits.

The basket pieces were die cut from Tip Top Taupe and Early Espresso and assembled using liquid adhesive. The stitched square was die cut from the Succulent Garden DSP and the scalloped square from Mint Macaron. After adhering them with liquid adhesive, the basket was adhered with Dimensionals and the flowers with Glue Dots. Rhinestones were added to the centres.

Lace doily halves were added to the back of the scalloped square and then a length of the now retired Glitter Ribbon Combo was tied around the egg carton, anchoring the ribbon with a glue dot on top of the box. The squares were then adhered to the top of the box using Dimensionals. A strip of Sweet Sugarplum had its ends flagged and the sentiment was stamped with Tip Top Taupe. It was adhered to the top using Foam Adhesive Strips and rhinestones added. Fringe scissors and Mint Macaron was used for fill.

Linda Vich Creates: Mini Egg Carton Easter Treats. Three cheerfully embellished mini egg cartons ready to share some Easter treats!

Linda Vich Creates: Mini Egg Carton Easter Treats. Three cheerfully embellished mini egg cartons ready to share some Easter treats!

Linda Vich Creates: Mini Egg Carton Easter Treats. Three cheerfully embellished mini egg cartons ready to share some Easter treats!

Finally, the Tempting Turquoise egg carton was created. It was done in the same way as the previous carton but Festive Birthday DSP and Tempting Turquoise was used for the squares, Melon Mambo and Pumpkin Pie for the basket, Pumpkin Pie, Melon Mambo, Tempting Turquoise, Crushed Curry and Emerald Envy for the eggs, Chocolate Chip for the bunny and Melon Mambo 3/8" Stitched Ribbon. The sentiment was stamped with Melon Mambo on Thick Whisper Whtie. Fill was created using Melon Mambo card stock and Fringe Scissors.

Linda Vich Creates: Mini Egg Carton Easter Treats. Three cheerfully embellished mini egg cartons ready to share some Easter treats!

Linda Vich Creates: Mini Egg Carton Easter Treats. Three cheerfully embellished mini egg cartons ready to share some Easter treats!

Linda Vich Creates: Mini Egg Carton Easter Treats. Three cheerfully embellished mini egg cartons ready to share some Easter treats!

Linda Vich Creates: Mini Egg Carton Easter Treats. Three cheerfully embellished mini egg cartons ready to share some Easter treats!

Here's a final look at all three projects, though it's hard to take a photo of all three together in my Foldio 2 setup!

Linda Vich Creates: Mini Egg Carton Easter Treats. Three cheerfully embellished mini egg cartons ready to share some Easter treats!

I'm so pleased with how these all came together–I can't wait to give them to the recipients!