Showing posts with label christmas. Show all posts

Friday, September 29, 2017

Rustic Musical Season

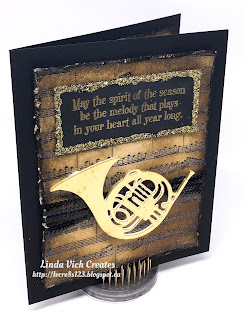
Linda Vich Creates: Rustic Musical Season. Sheet music, distressing and a gold instrument combine to create this vintage Christmas card.
I couldn't wait to play with the new Sheet Music background stamp because I love the use of music notes with Christmas projects! One year, I got two sheets of music duplicated (for personal use only) and distressed it to use as place mats for my Christmas dinner.

With today's card, I started by using my MISTI to stamp the notes with Versamark and then Basic Black, on Whisper White, so that I could emboss them with Clear Stampin' Emboss Powder. I then used sponges with Crumb Cake, Soft Suede and Early Espresso to distress the embossed matte. I also used the now retired Distress Tool to roughen the edges.

On a scrap of Basic Black, I stamped the sentiment from the Musical Season stamp set with Versamark and heat embossed it with Gold Stampin' Emboss Powder. I distressed the edge and then used the retired 2-Way Glue Pen and some Gold Stampin' Glitter on the edges.

While my sentiment was drying, I die cut the horn from Gold Foil as well as three other horns from Whisper White. I adhered them all together with liquid adhesive and then inked the edge of the horn with a Gold Sharpie. Unfortunately, I couldn't do the inside parts because the pen nib was too thick for the openings.

After wrapping a length of the Mini Black Sequin Trim around the matte and securing with tape, I adhered the matte to a 4.75 x 6" Basic Black card base. I adhered the horn and the sentiment with Dimensionals.

For the inside matte, I followed the distress routine already used but kept the middle lighter. I stamped and heat embossed the sentiment and adhered the matte to complete the card.

Linda Vich Creates: Rustic Musical Season. Sheet music, distressing and a gold instrument combine to create this vintage Christmas card.


Wednesday, November 25, 2015

Glints of Gold With Wonderland

Last Friday, I had the pleasure of visiting my friend, Charlene, and working in her new craft room!

Wow! What a change from the bare basement in which she used to work to a sophisticated, secret hideaway tucked behind the wall-to-wall bookcase in her new rec room area!

Her new area is bright, functional, and welcoming! She has a large work table in the middle, designed to sit four, with storage on one end, as well as additional space to set up tables if she hosts a large group of stampers.

Counters with white cupboards above and drawers below are along one wall, giving her plenty of work and storage space for her Big Shot and Paper Trimmer and other tools.

The white contrasts beautifully with the Lucky Limeade wall color–it looks amazing! Though it is still a work in progress, her craft room is definitely a wonderful space in which to work! I would have posted pictures but her craft area and rec room are to be featured in an upcoming magazine issue so I do not want to spoil the surprise!

While at Charlene's, I was able to work on two different cards and start some coloring with my Zig Clean Color Real Brush Markers. Of course, as is often the case when you travel somewhere to craft, you can't totally complete a project because the sentiment stamps or the embellishments with which you came are not the ones you need! However, I made a good start and was able to finish my two cards when I returned home. I have one of those cards to show you today.

To my dismay, Wonderland is on the Retiring Products List from the Holiday Catalog :( I love working with this stamp and have seen many lovely renditions of the stamp. Be sure you order yours before it disappears!

I wanted to use the stamp with Night of Navy but I thought it would look very nice paired with Soft Suede. I cut my card base from Soft Suede to make a 5 x 7" card.

I had previously stamped on Vellum card stock using Versamark and heat embossed the trees using Gold Stampin' Emboss Powder.

The Oval Framelits Collection were used to cut an oval from a 4.25 x 5.5" matte of Night of Navy and then I placed the vellum behind it and taped it in place. Because I liked the look of the Night of Navy through the vellum, rather than the Soft Suede, I cut a second Night of Navy matte and adhered it behind the vellum.

Wrapping two lengths of the 3/8" White Glitter ribbon around the bottom of the matte, I then covered the seam between the two pieces using a length of the Gold Sequin Trim.

I chose one of the wooden Snowflake Elements and covered it with glue using the 2-Way Glue Pen. I sprinkled on a coating of Dazzling Diamonds Glitter and set it aside to dry.

The matte was adhered to the card base using Dimensionals and then I used the Fine Tip Glue Pen to attach a few loose gold sequins to the top of the matte.

Once the snowflake was dry, I used the Fine Tip Glue Pen again to adhere a large gold sequin to the centre of the flake and then placed a rhinestone in its centre for a little added sparkle.

I adhered some glue dots on top of the Gold Sequin Trim and then bundled some Gold Metallic Thread and secured it to the glue dots. I used more glue dots to attach the snowflake on top of the thread.

Close up detail of the embellishment cluster.

For the inside of the card, I used a matte of the now retired Naturals White card stock. Using Night of Navy, I stamped the trees to the bottom right of the card and also added the sentiment from the same set. The matte was adhered to the card using Fast Fuse Adhesive.

To finish the card, I used the Fine Tip Glue Pen to add tiny drops of glue to the trees and then added some Dazzling Diamonds Glitter to give them a subtle hint of sparkle!


I definitely like the richness of pairing Night of Navy with the Soft Suede! Have you tried this combo before? Drop me a note below!

You may like to read my other posts where I feature the soon to be retiring stamp set, Wonderland.


Built for Free Using: My Stampin Blog


Friday, November 13, 2015

Who's Hiding In The Woods?

Have you been lamenting the long list of back orders at Stampin' Up? It has been a frustrating few months for customers and demonstrators alike but stock is slowly being replenished and back orders are being filled.

The other day I received my long awaited Woodlands Embossing Folder. Yippee!

I had been viewing pin after pin on Pinterest showing all the neat ways Woodland could be used. I was specially intrigued by the technique of stamping "behind" the tree trunks.

I didn't have any of the old car stamps but I did have a deer stamp. What would be more apt than a deer in the woods?

I watched two really good video tutorials on the technique, one by a demonstrator nicknamed, Frenchie, and one by Dee Slater. The technique involves applying ink to the inside of the top piece of the embossing folder, either directly (by stroking the embossing folder with the ink pad) or with a sponge. Then the image that you want behind the trees get stamped on the embossing folder as well.

Next, a piece of card stock is placed in the folder, the folder is closed and then the folder is run through the Big Shot as usual.

I tried a few test pieces using various ink colors before deciding on using Soft Sky for the background and Baked Brown Sugar for the deer.

As per the tutorials, I applied Soft Sky ink to the inside of the Woodland folder and then stamped the deer from the now retired hostess set, Warmth & Wonder, using Baked Brown Sugar. I wasn't totally pleased with my results—the background was a touch streaky, and the deer was a little splotchy. The streaky background didn't bother me too much but the deer needed some help. I carefully touched up the deer using my Baked Brown Sugar Stampin' Marker.

Next, I applied some Smoky Slate ink to the tree trunks using a sponge dauber. I trimmed the panel to 3.75 x 5" and then inked the edges using both Baked Brown Sugar and Soft Suede inks.

I inked the edges of a Soft Sky matte using Lost Lagoon and then adhered the embossed panel. I taped a length of 3/8" Lost Lagoon ribbon around the left side and then tied a short piece in a knot around it.
I adhered this panel to a card base of Baked Brown Sugar.

Using a piece of Gold Cording Trim, I threaded on a Basic Gold Metal Button and tied it onto the ribbon.

On a piece of Whisper White I stamped the "merry" sentiment, from the now retired Pennant Parade stamp set, using Lost Lagoon and then die cut it using the smallest tag die from the Tags & Labels Framelits. I inked the edges of the tag and then used some more Gold Cording to hang it from the button.

I cut another Soft Sky matte for the inside of the card, inking the edges with Lost Lagoon. I stamped a deer in the bottom left corner using Soft Suede and then adhered the matte using Fuse Fast Adhesive.


I must say that I'm liking the color combo of Soft Sky and Baked Brown Sugar! What do you think? Drop me a comment below!

Built for Free Using: My Stampin Blog
Saturday, September 26, 2015

Pretty in Pink Poinsettia

Linda Vich Creates: Pretty In Pink Poinsettia. A pretty pink poinsettia adorns this Softly Falling embossed card. Silver Glimmer paper strips and a sequin-filled sentiment pocket complete this stunning Christmas card.I often wake up with an idea for a card. Today was no exception and since it was one of my days off, I was excited to create what I had envisioned!

I started by stamping the petals for a poinsettia using Pink Pirouette ink on Pink Pirouette card stock. I punched them using the coordinating Festive Flower Builder Punch. I also punched out three larger petals from Silver Glimmer paper for leaves and the centre parts of the flower.

Though you won't be able to see it in the photos, I used my Wink of Stella pen to trace over the stamping on each petal, giving each a subtle yet noticeable shimmer. I then folded each leaf in half and out again to give each petal a bit of dimension.

I used my 3/4" Circle Punch to punch out two Pink Pirouette circles to act as bases for the petals. Using my Silicone Craft Sheet and a glue gun, I proceeded to glue four larger petals to one of the 3/4" circles. Once the four were in place–clock fashion at 12, 3, 6 and 9–I glued the remaining four large petals in between the first four.

I glued the four smaller petals to the second 3/4" circle, again in clock fashion, and then topped them with the two double petals criss-crossed on top. I then glued the base for these petals onto the larger petals.

Next I glued the silver centre parts of the flower and finished up by gluing the three silver leaves to the back of the finished flower. What a pretty flower this made!

I cut a 5 x 7" card base from Whisper White Thick card stock. I glued a 3/4" strip of Silver Glimmer paper down each side, using the Fine Tip Glue Pen.

Using the Softly Falling Embossing Folder, I embossed a 5 x 6" piece of Whisper White Thick card stock. This card stock really holds the embossing very well!

On a 1 1/2 x 2 1/4" piece of Whisper White card stock I stamped the sentiment from the Embellished Ornaments stamp set. I first inked the stamp with Versamark and then Pink Pirouette and stamped using the MISTI This allowed me to re-stamp again using the Pink Pirouette to get a nicely colored sentiment which I heat embossed using Clear Stampin' Emboss Powder.

Using a sponge dauber I inked the edges of the tag in Pink Pirouette. I then used my Fuse to create a plastic pocket for the sentiment from a page protector, first fusing the bottom and sides and then adding in a selection of pink and silver sequins.

I left the top plastic about 1" in length but trimmed the back piece of the plastic even with the top of the tag. I then threaded the plastic through a jumbo size of silver paper clip and folded the long top plastic piece down the back of the tag. I fused three lines on the back, starting nearest the paper clip and spacing down about 1/4" each time.

An important tip about sequins . . . because they are so full of static, and the plastic pocket also holds a lot of plastic, I take a few precautions to try to eliminate as much static as possible. I pour my selection of sequins onto a dryer sheet and rub them down good with it. Before pouring them into the plastic pocket I stick a rolled up dryer sheet in there and rub it around. Finally, I pour the sequins into the plastic pocket from the other dryer sheet. This seems to help a lot!

I took my completed sentiment pocket and clipped it onto the top right of the embossed sheet of Whisper White. I applied Mounting Tape to back and then adhered it to my card base. I used a few little pieces of the Mounting Tape to adhere the poinsettia to the bottom left of the card.

My last touch was for the inside of the card. Using the poinsettia from the Reason For The Season stamp set and Versamark, I stamped a poinsettia on the bottom right of the card. I heat embossed this with Silver Stampin' Emboss Powder.

Linda Vich Creates: Pretty In Pink Poinsettia. A pretty pink poinsettia adorns this Softly Falling embossed card. Silver Glimmer paper strips and a sequin-filled sentiment pocket complete this stunning Christmas card.

Linda Vich Creates: Pretty In Pink Poinsettia. A pretty pink poinsettia adorns this Softly Falling embossed card. Silver Glimmer paper strips and a sequin-filled sentiment pocket complete this stunning Christmas card.

I love how this card turned out! The glitter of the Glimmer paper, the Wink of Stella shimmer on the poinsettia and the twinkle of the sequins all combine to produce a beautiful Christmas card!

Built for Free Using: My Stampin Blog