Showing posts with label mixed media. Show all posts

Tuesday, November 3, 2015

Color Burst Projects

As you should be able to tell from the date of my last post, babysitting and working are taking the majority of my time these days. Don't get me wrong—I'm loving the time I get to spend with my granddaughter! However, by the time she gets picked up and we get supper done with, I'm about DONE for the evening!


However, I have had the odd moment to create but just haven't had the chance to blog about it. Today, I have two projects, both using Color Bursts.

My first card is a card that I designed for my friend, Charlene.


I started by using the Earth Tone set of Color Bursts on a piece of watercolor paper.

I sprinkled tiny bits of Merlot, Burnt Orange, and Yellow Ochre on the paper and then spritzed them with water. I tilted the paper to make the paint run in different directions, adding more powder and water until I was pleased with how it was taking shape. I then added in some Terre Verte (green) to increase the richness of the colors. Once I was totally pleased with the effect, I dried the piece with my heat tool.

I then mounted the oak leaf from the Vintage Leaves stamp set on an acrylic block and sprayed it with water. I pressed it down onto the colored watercolor panel and held it in place for about 30 seconds. When I removed the stamp, there was a little bit of pooled water which I absorbed with a paper towel. I then repeated this procedure on the rest of the panel.

I dried the panel again and then threw a few droplets of water onto the panel as well, letting them sit for a few seconds before blotting with a paper towel.

Because I was planning to use Embossing Paste on top of the watercolors and I wasn't sure if the paste would reactivate the watercolors, I decided to use Ranger Distress Micro Glaze to seal the surface. Just a little bit goes a long way with this stuff! You simply get a little bit on your finger and then rub it into the surface of your work. After it is completely covered, you take a paper towel and just buff the piece, removing any excess.

The next step was to lay my Garden Leafy Stems stencil, from Memory Box, across my watercolor piece and secure both it and my watercolor paper to my craft mat using some washi tape. I then applied Dreamweaver Gold Embossing paste with a palette knife. When complete, I simply lifted the stencil off of my work and set it aside to dry.

The next day, (it didn't take that long to dry but I didn't have time to get back to the card until then!) I inked the edges of the watercolor piece with Black Soot Distress Ink and then finished with a fine line of Ranger Archival Ink.

I stamped the sentiment using the same archival ink and the Endless Birthdays stamp set. I then knotted a piece of Cherry Cobbler Sheer Linen ribbon around the panel and also added a length of Gold Sequin Trim. I then mounted the panel, using Foam Tape, to a Cherry Cobbler card base.

Around the edges of a matte of Natural Ivory card stock I stamped the oak leaf, using Delightful Dijon. I then inked the edges of the matte using Cherry Cobbler ink.


I love the richness of the colors in this card, especially accompanied by the gold embossing paste!

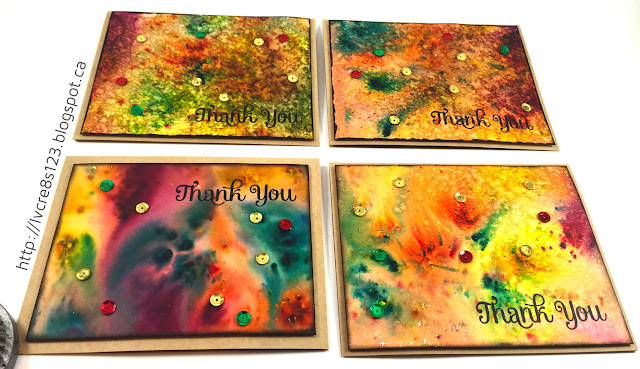
My next Color Burst project was thank you cards for my stamping group. For these, I used Color Bursts on 9 x 11" sheets of watercolor paper and then cut them down to size as mattes.

For the blue set, I used Indigo and Terre Verte for the colors, finishing with some green, blue and crystal sequins. The color on these is very smooth in appearance as I let the colors dry naturally after moving the watercolor paper to get the paint to flow.


For this second set of cards, I used Merlot, Burnt Orange, Yellow Ochre and Terre Verte. The color in these cards is rougher in appearance, except for two, because I dried and then spritzed again with water, creating a droplet pattern. To these cards I added green, red, and gold sequins.


Both sets of watercolors were trimmed to matte size and edged with Ranger Archival Ink. The sentiment was also stamped with archival ink, using the now retired Four You stamp set. The blue set of cards were mounted on Night of Navy card bases and the fall color set were mounted on Kraft card bases, using Foam Tape.

Have you tried Color Bursts yet? I just love playing with them and next time I use them, I want to try using stencils with them. I'm looking forward to the results!


Built for Free Using: My Stampin Blog

Saturday, August 8, 2015

And Now For Something Completely Different!

Linda Vich Creates: And Now For Something Completely Different! Art journal page illustrating the poem, "Mother To Son" by Langston Hughes.For a long time now, I have been admiring art journaling pages, created using a variety of mixed media techniques. In particular, I enjoy the layouts created by Vicky Papaioannou and often watch her videos of how she creates her art journal layouts.

Over a little while I have been collecting various supplies–gesso, gel medium, molding paste, distress paints, gelatos, stencils and just recently purchased a Moleskin Art Plus Sketchbook. It was a 5.5 x 8.5" in size.

Finally, I decided I was ready to take the plunge! Now, what to do a layout about?
A lot of art journal layouts start with a prompt of some sort. It could be a theme, a technique, a quote, etc. I decided to use a poem.

Back in my teaching days in Sagkeeng, the English teacher at the high school presented a wonderful poem written by Langston Hughes to the class. The poem was called "Mother To Son" and basically the mother was encouraging her son to keep going when the going got tough and the poem used a staircase as a very effective metaphor.

To start the process of the layout, I used Soft Gel Matte to glue two journal pages together for either side of the layout. I used my Heat Tool to dry the pages and then covered both pages of my layout with the same gel and adhered some Tim Holtz Tissue Paper to both pages. Gel was also brushed over top of the tissue. I dried this and then trimmed off the excess tissue paper.

At this point, I used old pages from a magazine to put between the pages I was working on and the other pages in the book.

Next, I brushed Liquitex Gesso over the tissue, alternating with a bit of water. This served to make the print from the tissue recede without covering it completely.

I then began to color the background of the layout. I wanted a dark purple but the Seedless Preserves Distress Paint I had seemed a bit bright so I thought I would mix it a bit with Spun Sugar. I dabbed on paint and spritzed with water and then used a brush to apply it to the pages.

Linda Vich Creates: And Now For Something Completely Different! Art journal page illustrating the poem, "Mother To Son" by Langston Hughes.

The color was still too bright. I thought I could "dirty up" the color so after drying it, I brushed on some Gathered Twigs Distress Ink. That helped a bit but in restrospect, I probably should have laid down some black paint and then applied the purple on top to make it the dark purple that I had wanted. This is where my lack of art training failed me!

Linda Vich Creates: And Now For Something Completely Different! Art journal page illustrating the poem, "Mother To Son" by Langston Hughes.

Linda Vich Creates: And Now For Something Completely Different! Art journal page illustrating the poem, "Mother To Son" by Langston Hughes.

Next, I added a border around my pages by brushing on Vintage Photo Distress Paint around the edges and brushed it with a wet brush. I dried and then repeated this step. I also brtushed Walnut Stain Distress Paint around edges and brushed with a wet brush; dried again with my Heat Tool.

Linda Vich Creates: And Now For Something Completely Different! Art journal page illustrating the poem, "Mother To Son" by Langston Hughes.

Linda Vich Creates: And Now For Something Completely Different! Art journal page illustrating the poem, "Mother To Son" by Langston Hughes.

Linda Vich Creates: And Now For Something Completely Different! Art journal page illustrating the poem, "Mother To Son" by Langston Hughes.

Linda Vich Creates: And Now For Something Completely Different! Art journal page illustrating the poem, "Mother To Son" by Langston Hughes.

I used the Tim Holtz Clockwork Stencil with Black Soot Distress Ink and dauber to add some interest.

Linda Vich Creates: And Now For Something Completely Different! Art journal page illustrating the poem, "Mother To Son" by Langston Hughes.

I mixed Light Molding Paste with Tarnished Brass Distress Paint and used the Tim Holtz Burlap Stencil to add texture to the pages.

Linda Vich Creates: And Now For Something Completely Different! Art journal page illustrating the poem, "Mother To Son" by Langston Hughes.

This was where I forgot about taking pictures as I went! The last thing I did to the background was to take a small paintbrush and mix a little gesso with water and flick the brush to create paint spatters on the layout. I repeated the process with black by mixing a little Black Soot Distress Ink with the gesso.

I printed a photo of a staircase that I had taken in an abandoned house near Beausejour. The photo was in black and white but I decided to color it in Photoshop before printing it out on Whisper White card stock. I trimmed the photo to size and applied gel medium on top of photo to seal it and allow me to further work with it.

Because the color of the photo was not quite what I needed, I brushed on Gathered Twigs Distress Ink with wet brush to alter the color so it would work better with the layout. I dried it and then inked the edges of the photo with Vintage Photo Distress Ink. I then applied gel medium to photo to adhere it to the page, as well as over top of it, and dried it.

I printed the poem on Whisper White card stock and cut out each line of the poem. I first brushed gel medium over each piece to prevent the ink from running but still some of it ran. Next time I will try to seal it by using Distress Micro Glaze by Tim Holtz.

I inked each line of the poem with Antique Linen and inked the edges with Vintage Photo Distress inks. Gel medium was used to glue all the lines down and also cover them with the gel.

I used one of the border stamps from the Indigoblu Rugged Edge Stamp set with Ranger Archival ink to add a border to my pages. I also added a border of Black Soot Distress Ink to the pages before giving each page one last coat of gel medium (This is where I definitely made an error! Note to Self: Do not put gel medium over molding paste!)

Linda Vich Creates: And Now For Something Completely Different! Art journal page illustrating the poem, "Mother To Son" by Langston Hughes.


Linda Vich Creates: And Now For Something Completely Different! Art journal page illustrating the poem, "Mother To Son" by Langston Hughes.

Linda Vich Creates: And Now For Something Completely Different! Art journal page illustrating the poem, "Mother To Son" by Langston Hughes.


At this point, I considered my art journal layout to be complete! However, the next morning, I realized that I had forgotten to use the special Crackle Paste I had purchased for this layout! I applied it just over the photo and spoiled my layout! I thought this stuff was supposed to dry clear and provide a crackle finish but it didn't! It kindo f took on the color of the photo but lighter and gave a grainy texture but not what I wanted! Next time I will use Tim Holtz's Crackle Paint in Clear Rock Candy! If you are interested in reading the poem, be sure to click on the photos to see an enlarged version.

This was definitely a learning experience for me! With the exception of the crackle paste issue and brushing the gel medium over the molding paste, I'm pleased with my layout! I look forward to creating my next one soon!

Have you tried art journaling?Leave me a comment below!

Monday, July 20, 2015

Remarkable You and a Mixed Media Technique

I hope you all are enjoying this wonderful summer! My husband and I have been enjoying spending time with our granddaughter, Raine. She's growing up so fast but she is such a total delight!

I've snuck in a few photos of her to show you below!

Linda Vich Creates: Remarkable You and a Mixed Media TechniqueLinda Vich Creates: Remarkable You and a Mixed Media Technique

Linda Vich Creates: Remarkable You and a Mixed Media TechniqueLinda Vich Creates: Remarkable You and a Mixed Media Technique

Though I thought that when she was napping (and she is a GREAT napper) I would have time to make some cards, it appeared that Grandma sometimes needed a nap then, too!

Regardless, I was able to put together a card today and dabble with a mixed media technique.
I started by creating a watercolor background using four reinkers–Rich Razzleberry, Blackberry Bliss, Coastal Cabana and Bermuda Bay. I simply wet my paper well with a spray bottle and then dabbed on color. I dried with my heat tool and added a bit more where I thought it was needed and then dried it completely.

Next, I chose to use the stripes mask from the Dots and Stripes Masks set. I adhered my watercolored matte to my craft matte and then adhered the mask over it.

I added a few drops of Bermuda Bay reinker to some Golden Gel Medium Light Molding Paste and mixed it well using an old gift card. I then proceeded to wipe the molding paste from bottom to top of the mask over the watercolored matte, being sure to swipe the excess paste from the matte. I then lifted the mask straight up and off of the watercolor and set it aside to dry.

Meanwhile, I used my MISTI to stamp the flower from the Remarkable You stamp set with Versamark onto both a piece of Blackberry Bliss and a piece of Bermuda Bay card stock. I heat embossed both with Gold Stampin' Emboss Powder and then fussy cut them. They were adhered to the watercolor matte with Dimensionals.

The sentiment was also stamped with Versamark and heat embossed. It was die cut using the Lots of Labels Framelits and then trimmed down slightly.

Once it was completely dry, I trimmed up the watercolor matte and wrapped a length of Gold Sequin Trim around it and then adhered the sentiment on top, using Dimensionals.

A piece of paper from the Bohemian Designer Series papers was adhered to a Bermuda Bay card base using Snail Adhesive and then the watercolor matte was adhered on top using Dimensionals.

I love how the use of the Molding Paste turned out! Because it was only thinly applied, some of the watercolored background showed through, making it look kind of like a two-toned ombré stripe! It gives a nice dimensionality to the matte as well.

Linda Vich Creates: Remarkable You and a Mixed Media Technique. Molding Paste mixed with Bermuda Bay reinker creates lovely, dimensional stripes over a watercolored background provides a stunning backdrop for embossed flowers from Remarkable You.

Linda Vich Creates: Remarkable You and a Mixed Media Technique. Molding Paste mixed with Bermuda Bay reinker creates lovely, dimensional stripes over a watercolored background provides a stunning backdrop for embossed flowers from Remarkable You.

Linda Vich Creates: Remarkable You and a Mixed Media Technique. Molding Paste mixed with Bermuda Bay reinker creates lovely, dimensional stripes over a watercolored background provides a stunning backdrop for embossed flowers from Remarkable You.

I'm looking forward to more experiments with Molding Paste on future cards so stay tuned! Let me know in the comments below if you have tried Molding Paste in your card making.


Built for Free Using: My Stampin Blog