Showing posts with label touches of texture. Show all posts

Monday, January 30, 2017

So Detailed With Stamped Embossing

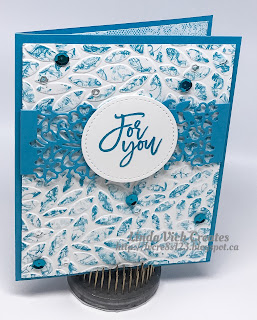
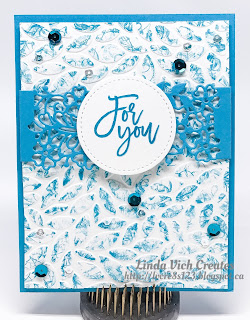
Linda Vich Creates: So Detailed With Stamped Embossing. Tempting Turquoise and Whisper White provide a fresh color scheme for this card that pairs stamped embossing with the So Detailed Thinlits.
Today's card uses a technique called Stamped Embossing which I used on the cards on the blog post, Catalog Party Prep Part 5.

Because I wanted a fresh and clean color scheme, I chose to use Tempting Turquoise and Whisper White. I started bu cutting the following:

  • Tempting Turquoise card base, 4.25 x 5.5"
  • two, 4 x 5.25" mattes, one Whisper White, one Thick Whisper White
Choosing the Thick Whisper White matte, I embossed it using the Petal Burst Embossing Folder. Then, using a stamp from the now retired First Sight stamp set, I lightly stamped repeatedly over the embossed paper, continuing until it was necessary to ink up again and then stamping some more until I was pleased with the resulting pattern I achieved.

I then die cut a piece of Tempting Turquoise with a die from the So Detailed Thinlits. I used some Removable adhesive to hold the die cut in place over the matte and then used my Simply Scored tool to score on either side of the matte so that I could fold the die cut edges neatly and adhere them at the back of the matte. The matte was adhered to the card front using Dimensionals.

Using my MISTI, I stamped the sentiment, from the now retired Thoughtful Branches, on Thick Whisper White using Tempting Turquoise and then Versamark, finishing by heat embossing with Clear Stampin' Emboss Powder. The sentiment was the die cut using a circle from the Stitched Shapes Framelits. The sentiment was adhered with Dimensionals over the So Detailed die cut.

For the inside of the card, the Whisper White matte was stamped using stamps from the Touches of Texture stamp set. Unfortunately, I got some extra ink on the edge of the flower stamp and it stamped onto the matte. :(

Linda Vich Creates: So Detailed With Stamped Embossing. Tempting Turquoise and Whisper White provide a fresh color scheme for this card that pairs stamped embossing with the So Detailed Thinlits.
Photo shows ink smudge above flowers

I really didn't want to stamp the matte again so I used my trusty Mono Sand Eraser to lightly erase the ink smudge.

Linda Vich Creates: So Detailed With Stamped Embossing. Tempting Turquoise and Whisper White provide a fresh color scheme for this card that pairs stamped embossing with the So Detailed Thinlits.
Ink smudge removed thanks to the Mono Sand Eraser

After adhering the finished matte inside the card, I added a few sequins to the card front to complete the card.

Linda Vich Creates: So Detailed With Stamped Embossing. Tempting Turquoise and Whisper White provide a fresh color scheme for this card that pairs stamped embossing with the So Detailed Thinlits.

Linda Vich Creates: So Detailed With Stamped Embossing. Tempting Turquoise and Whisper White provide a fresh color scheme for this card that pairs stamped embossing with the So Detailed Thinlits.

Linda Vich Creates: So Detailed With Stamped Embossing. Tempting Turquoise and Whisper White provide a fresh color scheme for this card that pairs stamped embossing with the So Detailed Thinlits.


Friday, July 8, 2016

Swirly Bird Wreath

Linda Vich Creates: Swirly Bird Wreath. Swirly Bird wreath card in neutrals, gold, and In Colors.
Have you been playing with the new In Colors? I can't get enough of them! I really like the way that they play so nicely with our other Stampin' Up colors.

Today's card started with neutrals–Basic Black and Very Vanilla–and touches of gold.

I cut a standard card base from Very Vanilla and topped it with a matte of Basic Black on the left side. Using the grunge stamp from the Swirly Birds stamp set, I stamped in Versamark and heat embossed with Gold Stampin' Emboss Powder. I added one more grunge stamp from the Touches of Texture stamp set and heat embossed it as well. To carry the gold theme a little farther, I added a thin strip of Gold Foil Paper down the right side of the Basic Black matte.

Using the Swirly Scribbles Thinlits, I die cut the largest swirly circle from Very Vanilla and adhered it to the card front using liquid adhesive. I then stamped three of the smallest swirls from the Swirly Birds stamp set with Sweet Sugarplum on Very Vanilla. I stamped two of the larger swirls in Mint Macaron and also two leaves in Emerald Envy. The bird was stamped in Rose Red. These were all die cut and then adhered to the card front using Dimensionals.

For the inside of the card, three of the larger swirls were stamped in Sweet Sugarplum and die cut. Two of the smaller leaves were stamped with Emerald Envy inside the card and the swirls adhered over them using Glue Dots.

Linda Vich Creates: Swirly Bird Wreath. Swirly Bird wreath card in neutrals, gold, and In Colors.

Linda Vich Creates: Swirly Bird Wreath. Swirly Bird wreath card in neutrals, gold, and In Colors.

I love how well the colors all worked together to create this simple yet effective card! Feel free to save this color combo if you would like to use it.

Linda Vich Creates: Swirly Bird Wreath. Swirly Bird wreath card in neutrals, gold, and In Colors.


Saturday, July 2, 2016

It's A Good Day

Linda Vich Creates: It's A Good Day. The crisp colors of white and navy come together in this stunning card that uses the Floral Boutique DSP.
Last night I was clicking through my Evernote app looking at various card techniques when I spotted the Double Pleated Card technique from Iced Images. Instantly I knew what I was going to do with this technique.

I started by selecting one of the papers from the Floral Boutique DSP and trimming it to 5 x 10". I scored it, on the long side, at 1" and then 1.5" and repeated this pattern of one inch and then a half inch across the sheet.

Turning the sheet over, I marked both at 2 and 3" on each short end and then lined up my sheet at an angle in my Stampin' Trimmer with the 2" mark and the scored mark closest to it on either side of the centre fold in the sheet. Then I lined up at the 3" mark and the scored mark closest to it on the other side of the paper. I repeated this by switching to the other end of the paper. This gave me a diamond-shaped piece of paper.

Turning over to the side of the DSP I wanted to display, I alternated mountain and valley folds until I reached the middle scored section. I then switched to the other end of the paper and repeated this process until my entire sheet was pleated and met in the centre. I used Fast Fuse Adhesive to secure the pleats.

The length of this pleated piece measured 5" and the width was 4" so I cut a matte from Thick Whisper White card stock in this size. Using the Petal Burst Embossing Folder, I dry embossed the matte and then used Fast Fuse to adhere the pleated piece to it. A length of the now retired Night of Navy Seam Binding was adhered across the middle of the pleated piece. This panel was then adhered to a Night of Navy matte using Dimensionals. A Thick Whisper White card base with a finished size of 4.75 x 6" was then used.

I used the Botanical Builders Framelits to die cut a flower from the Thick Whisper White and stamens from Night of Navy card stock. These were shaped with my Mcgill Paper Blossom Tool Kit. The stamens were adhered with liquid glue and the flower adhered to the card front with a Dimensional. A pearl was added to the centre of the flower.

A piece of white Baker's twine tied together a length of pearl trim from the now retired Love Blossoms Embellishment Kit. These were adhered with glue dots. The sentiment from the Best Birds stamp set was stamped on Night of Navy using Versamark and heat embossed with White Stampin' Emboss Powder.

The Layering Circles Framelits were used to die cut the sentiment and then the now retired 1 1/4" Scalloped Circle Punch was used to cut a Thick Whisper White matte. These were adhered to the card front using Dimensionals.

Inside the card I adhered a strip of the same DSP and also stamped some flowers from the Touches of Texture stamp set to complete the card.

Linda Vich Creates: It's A Good Day. The crisp colors of white and navy come together in this stunning card that uses the Floral Boutique DSP.

Linda Vich Creates: It's A Good Day. The crisp colors of white and navy come together in this stunning card that uses the Floral Boutique DSP.

Don't you just love the crisp look of Night of Navy and Whisper White? It makes me think of wash day when clean white sheets could be seen billowing on a clothesline!

Have you used the Floral Boutique DSP yet? These papers are part of the Floral Boutique Suite found in the catalog on pages 76-77. I'm sure you will want to pair them with the matching Washi Tape, Solid Night of Navy Baker's Twine, Detailed Floral Thinlits Dies and Floral Phrases stamp set. I think this is one of the nicest suites in the catalog! Place your order with me today so you can enjoy creating with this wonderful suite!


Friday, July 1, 2016

Pop of Paradise For My Daughter

Linda Vich Creates: Pop of Paradise For My Daughter. An inked and embossed brick matte serves as the backdrop for this stunning Pop of Paradise flamingo card.
I couldn't wait to begin my summer holidays, on Canada Day, by designing a card for my daughter Courtney.

Courtney has just finished her first year of a two year course to become a Licensed Practical Nurse. Her course is actually four years compressed into two and she has been working very hard to maintain her "A" grades which is no small feat considering she and her boyfriend are also raising their own soon to be three-year-old daughter!

For Courtney's final practicum of the year, she was placed in a care home in the south end of Winnipeg. When she learned of her placement, she was a little nervous about accidentally doing something wrong there because the home was for Jewish patients and there were strict rules about not bringing any food or water into the facility unless it was kosher.

She was also worried that she might inadvertently offend a patient by doing procedures, etc. that might conflict with their beliefs.

As it turned out, the staff at the care home were completely impressed with her and could not stop telling her how well she was doing and that they had never had a student like her before!

Just before she finished her practicum, the Director of Care took Courtney aside to tell her how impressed she was with her and offered her a summer job! Unfortunately, Courtney was unable to take it because she had to look after her own daughter during the summer (as well as preparing assignments ahead of starting classes in September so she could then concentrate on studying for tests) while her daughter's daycare provider took holidays.

When Courtney explained this to the Director of Care, she was told to return after she completed her nurse training because they would offer her a job at that time! Of the group of students that did their practicum at the same care home, she was the only one who was offered a job!

We are so very proud of her so I wanted to create a special card for her.

Choosing my Brick Wall Embossing Folder, I inked up the top flap with Melon Mambo using my now retired Brayer. I did this in order to create pink grout lines between the bricks.

I carefully placed a matte of Thick Whisper White card stock on the opposite flap of the folder and closed the folder. I ran it through my Big Shot and then carefully removed the embossed and inked matte to work with it.

Oh oh . . . I'd done it again! I was making a vertical card but needed the bricks in a horizontal format. Unfortunately, I had not placed the matte in the folder correctly. So, what to do? I used this first matte as my test piece for coloring the bricks!

I used Sponge Daubers with Smoky Slate, Basic Gray, Basic Black and Melon Mambo to color the bricks. At the end, I used a Stampin' Sponge to sponge softly around the whole matte with Basic Black. I was quite pleased with how the bricks turned out!

Linda Vich Creates: Pop of Paradise For My Daughter. An inked and embossed brick matte serves as the backdrop for this stunning Pop of Paradise flamingo card.
Love the color I achieved on the bricks but too bad the
bricks were the wrong orientation for my card!
After inking/embossing another matte, I set forth to color bricks again. So what happens this time? I liked the first matte better! Oh well! I'll use the first matte in a future project.

I used my MISTI to stamp the flamingo from the Pop of Paradise stamp set in Melon Mambo on Thick Whisper White card stock. Next, I used a tip learned from fellow demonstrator, Bibi Cameron in a video on her site. I cleaned the stamp without moving it and then took a Rose Red Stampin' Write Marker and added color to the stamp on the wing, neck, body, and legs to provide shadowing.

I also used the Basic Black marker to color the end of the flamingo's beak to make it look like a real flamingo. The MISTI ensured that I was able to stamp successfully in the exact same place each time.

Linda Vich Creates: Pop of Paradise For My Daughter. An inked and embossed brick matte serves as the backdrop for this stunning Pop of Paradise flamingo card.

I then used Versamark to stamp three leaves and heat embossed them using Silver Stampin' Emboss Powder. And then came the fun part–fussy cutting the flamingo and leaves. Not so fun but effective! I applied liquid glue to the bottom of the leaves and adhered them to the matte.

The Layering Circles Framelits were used to cut a Melon Mambo scalloped matte and a plain circular matte from Silver Glimmer Paper. These were glued together with liquid glue.

Thick Melon Mambo Baker's Twine was wrapped around the matte and taped to the back. Glue dots were used to adhere a circular arrangement made from the now retired Silver Cording Trim. The circle mattes were adhered on top of this using Dimensionals and the flamingo adhered on top, also with Dimensionals.

The sentiment from the Crazy About You stamp set was stamped in Versamark on Basic Black card stock and heat embossed with White Stampin' Emboss Powder. The ends of the strip were flagged using the Banner Triple Punch. The strip was attached to the bottom of the matte with Dimensionals.
The finished brick matte was adhered with Dimensionals to a Melon Mambo matte, and then that to the front of a Basic Black card base.

I stamped with Melon Mambo on a Whisper White matte using the grunge stamp from the Touches of Texture stamp set. The sentiment was stamped with Basic Black to complete the card.

Linda Vich Creates: Pop of Paradise For My Daughter. An inked and embossed brick matte serves as the backdrop for this stunning Pop of Paradise flamingo card.

Linda Vich Creates: Pop of Paradise For My Daughter. An inked and embossed brick matte serves as the backdrop for this stunning Pop of Paradise flamingo card.

Linda Vich Creates: Pop of Paradise For My Daughter. An inked and embossed brick matte serves as the backdrop for this stunning Pop of Paradise flamingo card.

I am so very pleased with how this card turned out and can't wait to give it to my daughter!