Showing posts with label woodland embossing folder. Show all posts

Thursday, October 4, 2018

Pleasant Pheasants Meet Buffalo Check

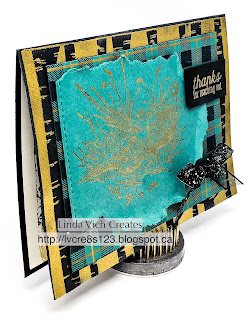
Linda Vich Creates: Pleasant Pheasants Meet Buffalo Check. Gold embossed pheasants nestle on a plaid background atop a card front embossed with the Woodland embossing folder to give the card added texture and interest.
Genealogy research seems to have taken over my life in past weeks! I have recently located a number of details about my grandparents and back even into the 1600's. I'm trying to achieve a balance between genealogy, work, and Stampin' Up.

Today I got to play with the Pleasant Pheasants stamp set. I have had a card taking shape in my head for the last week or so and today I was able to bring it to fruition.

I started by stamping the pheasants with Versamark onto an oversized matte of Tranquil Tide. I heat embossed with Gold Stampin' Emboss Powder and once it had cooled, I proceeded to tear the edge around the birds. I then used a stitched die from the Stitched Labels Framelits to add a line of stitching on the left side.

Next, I used Memento Tuxedo Black ink with the Buffalo Check stamp to create a matte on Tranquil Tide. I stamped three times to get a good strong pattern.

After trimming the matte down to size, I used a Gold Metallic Sharpie to draw lines extra lines on the plaid to jazz it up a notch.

An old brayer was used to apply Versamark to the Woodland Embossing Folder and, after using the Embossing Buddy on a 4.75 x 6" card front, I ran it through the Big Shot. Next, I heat embossed the card front using Gold Stampin' Emboss Powder.

I tied a length of the Black Glittered Organdy Ribbon around the plaid matte and then adhered the pheasant matte using both liquid adhesive (on the stitched side) and Dimensionals. The plaid matte was then adhered to the card front using Dimensionals.

The sentiment from the Sea of Textures stamp set was stamped with Versamark on Basic Black and then heat embossed in gold. It was adhered using Dimensionals.

Inside the card, a Thick Very Vanilla matte was stamped with the trees from Winter Woods and embossed with gold.

Linda Vich Creates: Pleasant Pheasants Meet Buffalo Check. Gold embossed pheasants nestle on a plaid background atop a card front embossed with the Woodland embossing folder to give the card added texture and interest.


Linda Vich Creates: Pleasant Pheasants Meet Buffalo Check. Gold embossed pheasants nestle on a plaid background atop a card front embossed with the Woodland embossing folder to give the card added texture and interest.


Product List


Wednesday, September 21, 2016

Thoughtful Branches in Copper

Linda Vich Creates: Thoughtful Branches in Copper. Masculine birthday card using Thoughtful Branches with copper foil and copper embossing.
I needed a masculine birthday card for my brother's birthday this week and decided that I could use the Thoughtful Branches set again but with a more masculine color scheme.

A card base was cut from Pacific Point card stock for a 5.5 x 5.5" card. On this I adhered a copper foil matte with Dimensionals and cut another matte from Cajun Craze. I dry embossed the Cajun Craze matte using the Woodland Embossing Folder and adhered it to the foil matte using Dimensionals.

I used Versamark to stamp the leaf canopy from the Thoughtful Branches stamp set on Very Vanilla and then heat embossed them with Copper Embossing Powder. I die cut the leaves using the coordinating die. I also die cut the tree trunk from Pacific Point.

Pieces of Adhesive Strips were used to adhere the tree to the Cajun Craze matte and then adhered the leaf canopy over it, using more Adhesive Strips.

I stamped two banners from the Thoughtful Banners stamp set on Pacific Point and heat embossed with copper, and stamped the sentiment from the Sweet Cupcake stamp set on one, heat embossing also with copper.

The Duet Banner Punch was used to punch the two banners and then I trimmed the one with the sentiment and layered it on top of the other with Dimensionals. The complete banner was then adhered with Dimensionals over the base of the tree.

Using Pacific Point, I stamped the bird on Very Vanilla and die cut it with the matching die. It was adhered to the tree using rolled up glue dots. Clear Wink of Stella gave the bird a little shimmer.
I used Versamark to stamp three of the leaves from the Thoughtful Branches on Very Vanilla and heat embossed them with copper. They were die cut with the matching die.

A Very Vanilla matte was cut for inside of the card and the edges inked with Cajun Craze. The sentiment was stamped in Basic Black and then the leaves adhered to the matte using both liquid adhesive and Dimensionals.

Linda Vich Creates: Thoughtful Branches in Copper. Masculine birthday card using Thoughtful Branches with copper foil and copper embossing.

Linda Vich Creates: Thoughtful Branches in Copper. Masculine birthday card using Thoughtful Branches with copper foil and copper embossing.

I really like the Pacific Point blue with the Cajun Craze and the copper! I think that the card has a definite masculine feel to it though I believe this card would also appeal also to females! What do you think? Leave me a comment below!


Wednesday, December 9, 2015

May Your Season Sparkle


Writers have been known to remark that when they write, their characters often take over, seeming to develop a mind of their own and change the plot as they see fit.

In creating art, it seems that this can also be true; what you sit down to create may not always be what you end up with because the tools and media you use react in ways that may not be what you intended.

Tonight I sat down to craft a card with my beloved Woodland Embossing Folder. (Have you heard? Stampin' Up is bringing it out of retirement and putting it into the new annual catalog due out in May! How great is that??)

On Pinterest I have seen many different backgrounds used with the folder but I hadn't seen red. I thought that using Real Red would be very festive and I could pair it with a nice green and a coordinating ribbon and have cheery Christmas card.

I started by inking up the inside of the folder (the side with the Sizzix on top) using a brayer and Real Red ink. I then placed my Thick Whisper White card stock on the uninked side of the folder, closed it, and ran it through the Big Shot.

When I opened the folder, I was not as pleased as I thought I would be. I needed the red to be stronger. Because the embossed paper seemed to be still clinging to the other side of the folder, I re-inked the folder, closed it, and smoothed all over it with my hands to press the ink into the paper.

It still didn't look as I had imagined it would.

I used my Basic Black Stampin' Write marker to touch up the birch trees but that still wasn't the answer.
I thought that by playing around with matte colors and the card base color, I could make it look better. Black seemed to be right for a thin matte layer but red for the card base didn't seem to look great. Mossy Meadow was too dark and Garden Green didn't look quite right either. I decided against Old Olive because it was too light.

I still couldn't get it looking quite right.

With nothing to lose, I turned to a crafting girl's best friend–glitter!

I employed a technique that Jenny Day demonstrated in this video. I covered the entire embossed panel with Versamark ink and then sprinkled Heat & Stick powder all over it. I heated it just until it was completely wet looking and then sprinkled Dazzling Diamonds Glitter over the whole thing. I heated it once again to seal in the glitter.

Now, it was looking better! See, almost anything can be improved with glitter!

I started playing with matte and card base colors again only to realize that my tree background was no longer red–it had taken on a rosy hue due to the covering of glitter!

Instead of Real Red card stock, I needed Rose Red for my card base; I used black for the matte. Before adhering the panel to the black matte, I used a sponge dauber with some Basic Black Archival to ink up the sides.

I wrapped some Silver Sequin Trim around the bottom of the panel, securing it at the back with tape. The sentiment, from the Sparkly Seasons Stamp Set seemed appropriate so I stamped it in Basic Black Archival on Whisper White and then punched it out using the Large Oval Punch.

I used the Scalloped Oval Punch on the Rose Red card stock and then layered the sentiment on it with Dimensionals. The label was then adhered to the card front over the sequin trim.

The finishing touch for the card was to add some rhinestones to frame the sentiment and provide a little added sparkle!

Though I set out to create one card, I ended up with a different version of the card but one I may not have created except by trying out an idea!


Have you tried out an card making idea only to end up with something else? Drop me a comment below about it!

Built for Free Using: My Stampin Blog

Thursday, November 26, 2015

Woodland and Wonderland: Together And Doing Fine!

Today I want to share with you the second card that I started while crafting at Charlene's last Friday.

I am madly in love with both Wonderland and the Woodland folder! Ever since I first saw Pinterest posts on the two, I have been dying to experiment with them.

Whereas the Wonderland trees can be stamped in every color of the rainbow and look nice, the cards created with the Woodland embossing folder seem to be, for the most part, done with traditional birch colors of white and a little gray or taupe added for interest, but they are nonetheless fabulous!

When you marry these two products in the same card, how could it not be anything but stunning?

My card is a CASE of the card by Billie Moan:

Card by Billie Moan

I started by cutting a piece of the Thick Whisper White card stock (love how elegantly this embosses!) 4.25 x 5.75" in size. I absolutely love how the new embossing folders are 6" in size, giving you lots of possibilities to use them in larger cards!

Next, I took the Woodland embossing folder and laid it open on my craft mat. I took my Tip Top Taupe and swiped the stamp pad across the side marked Sizzix, down near the bottom of the folder. I then used Lost Lagoon to swipe the upper part of the folder.

I inked up Wonderland using Mossy Meadow and stamped it right on the folder, and repeated this process right across the folder, being sure to clean my stamp between inkings.Placing my card stock on the un-inked side of the folder, I carefully closed it and ran it through my Big Shot. Beautiful results!

I used a sponge dauber to ink the edges of the embossed panel with Tip Top Taupe and then used my Early Espresso Stampin' Write Marker to outline the marks on the trees. Wow! That technique alone gives a whole lot of punch to these trees and it really only takes a few minutes to accomplish, using the brush end of the marker.

The finished piece was adhered  to a Mossy Meadow matte using Fast Fuse Adhesive and then I wrapped a length of Blackberry Bliss ribbon around the bottom of the panel, securing it at the back with tape.

I stamped the sentiment from the soon to be retiring Festive Fireplace Stamp Set on Whisper White card stock using Blackberry Bliss ink. I die cut the sentiment using the Chalk Talk Framelits.

Mossy Meadow ink added definition to the edges of the tag and it was adhered on top of the ribbon using Dimensionals. Two rhinestones gave it a little extra sparkle. The finished matte was then mounted on a 6.5 x 5" Blackberry Bliss card base using Dimensionals.

For the inside, I stamped the tops of the Wonderland trees in Mossy Meadow along the bottom of a piece of the now retired Naturals White card stock. I finished by inking the edges of the matte using Mossy Meadow and adhered it using Fast Fuse Adhesive.


Have you tried either the Wonderland Stamp Set or the Woodland Embossing Folder yet? Don't miss out on purchasing these two great products! Order yours TODAY! For a full list of both retiring and sale products, click here.

To see my other uses of Wonderland and Woodland, click the links below:

Wonderland: My Go-To Stamp
Color Burst Christmas and Wonderful Wonderland
Glints Of Gold With Wonderland
Who's Hiding In The Woods?


Built for Free Using: My Stampin Blog

Friday, November 13, 2015

Who's Hiding In The Woods?

Have you been lamenting the long list of back orders at Stampin' Up? It has been a frustrating few months for customers and demonstrators alike but stock is slowly being replenished and back orders are being filled.

The other day I received my long awaited Woodlands Embossing Folder. Yippee!

I had been viewing pin after pin on Pinterest showing all the neat ways Woodland could be used. I was specially intrigued by the technique of stamping "behind" the tree trunks.

I didn't have any of the old car stamps but I did have a deer stamp. What would be more apt than a deer in the woods?

I watched two really good video tutorials on the technique, one by a demonstrator nicknamed, Frenchie, and one by Dee Slater. The technique involves applying ink to the inside of the top piece of the embossing folder, either directly (by stroking the embossing folder with the ink pad) or with a sponge. Then the image that you want behind the trees get stamped on the embossing folder as well.

Next, a piece of card stock is placed in the folder, the folder is closed and then the folder is run through the Big Shot as usual.

I tried a few test pieces using various ink colors before deciding on using Soft Sky for the background and Baked Brown Sugar for the deer.

As per the tutorials, I applied Soft Sky ink to the inside of the Woodland folder and then stamped the deer from the now retired hostess set, Warmth & Wonder, using Baked Brown Sugar. I wasn't totally pleased with my results—the background was a touch streaky, and the deer was a little splotchy. The streaky background didn't bother me too much but the deer needed some help. I carefully touched up the deer using my Baked Brown Sugar Stampin' Marker.

Next, I applied some Smoky Slate ink to the tree trunks using a sponge dauber. I trimmed the panel to 3.75 x 5" and then inked the edges using both Baked Brown Sugar and Soft Suede inks.

I inked the edges of a Soft Sky matte using Lost Lagoon and then adhered the embossed panel. I taped a length of 3/8" Lost Lagoon ribbon around the left side and then tied a short piece in a knot around it.
I adhered this panel to a card base of Baked Brown Sugar.

Using a piece of Gold Cording Trim, I threaded on a Basic Gold Metal Button and tied it onto the ribbon.

On a piece of Whisper White I stamped the "merry" sentiment, from the now retired Pennant Parade stamp set, using Lost Lagoon and then die cut it using the smallest tag die from the Tags & Labels Framelits. I inked the edges of the tag and then used some more Gold Cording to hang it from the button.

I cut another Soft Sky matte for the inside of the card, inking the edges with Lost Lagoon. I stamped a deer in the bottom left corner using Soft Suede and then adhered the matte using Fuse Fast Adhesive.


I must say that I'm liking the color combo of Soft Sky and Baked Brown Sugar! What do you think? Drop me a comment below!

Built for Free Using: My Stampin Blog