Showing posts with label swirly scribbles thinlits. Show all posts

Thursday, November 17, 2016

Sheltering Tree and a Joyful Wreath

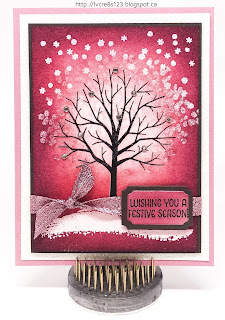
Linda Vich Creates: Sheltering Tree and a Joyful Wreath. An emboss resist technique that results in a pretty winter scene glowing with color!
I had such a fun night last night with the ladies in my second stamping group! We shared a few giggles as they worked on their cards.

The first card I designed was actually made last, just so we could all keep our hands and work stations clean so as not to contaminate the second card!

The emboss resist card was CASEd from Lisa Brown.

To create this card, a standard card base was cut from Sweet Sugarplum card stock. Two mattes were cut, one from Dazzling Diamonds Glimmer paper and one from Early Espresso. A piece of Watercolor paper was also cut.

The MISTI was used to stamp the tree, from the Sheltering Tree stamp set, three times with Early Espresso on the Watercolor paper and then it was heat set.

The paper was placed back into the Misti and the Embossing Buddy was used. The stamp was cleaned and then the tree stamp was re-inked using Versamark. The image was then heat embossed using Clear Stampin' Emboss Powder.

The Embossing Buddy was used again before stamping both the snowdrift and snowflake stamps using Versamark. The images were heat embossed using White Stampin' Emboss Powder.

Once again, the Embossing Buddy was used and then the leaf canopy stamp was used with Versamark. It was then heat embossed with the now retired Iridescent Stampin' Emboss Powder. The purpose of this stamp step was to create ice crystals in the tree.

It was very important to use the Embossing Buddy before inking each time because with using so many embossing powders, it would be very easy to end up with a "blob" on your paper!

The next step was to sponge color onto the image. A sponge was used first with Sweet Sugarplum to cover the entire paper with ink. Next, Rose Red was sponged everywhere except within the branches themselves. Lastly, Rich Razzleberry was sponged on the very edges and deep into the corners. The result of all this inking was a wonderful glowing image that softened from light to dark.

The completed image was adhered to the Early Espresso matte and then some Sweet Sugarplum Glitter Ribbon knotted around it. This was then adhered to the Dazzling Diamonds matte using Dimensionals. Finally, the whole thing was adhered to the Sweet Sugarplum card front.

The sentiment, from the Merry Mice stamp set, was stamped on Sweet Sugarplum and then die cut with a die from the Tags & Labels Framelits. Early Espresso was also die cut to act as a matte. The sentiment was inked with Rose Red and Rich Razzleberry and then adhered to the Early Espresso matte. The tag was adhered over the ribbon using Dimensionals.

To complete the card, rhinestones were added to the branches of the tree.

Linda Vich Creates: Sheltering Tree and a Joyful Wreath. An emboss resist technique that results in a pretty winter scene glowing with color!


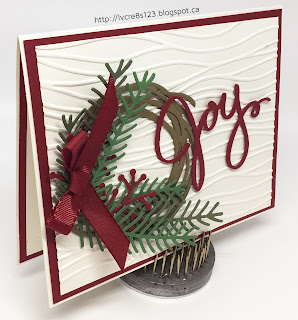
The second card only involved a little bit of stamping but it used a lot of texture from both die cuts and dry embossing. It was CASEd from Mary Fish.

A standard card base was cut from Very Vanilla as well as two mattes of the same size. Two more mattes were cut from Cherry Cobbler.

One of the Very Vanilla mattes was dry embossed using the Seaside Embossing Folder. This was adhered to one of the Cherry Cobbler mattes and then adhered to the card front.

The second Very Vanilla Matte was stamped with pine sprigs, from the Christmas Pines stamp set, using Always Artichoke. The stamp was stamped off once, very lightly, before stamping the image on the bottom right of the matte. This image was then adhered to a Cherry Cobbler matte and then adhered inside the card.

Two "wreaths" were die cut from Soft Suede using a die from the Swirly Scribbles Thinlits. These were offset and adhered to the card front using liquid adhesive. Pine sprigs, in both Garden Green and Always Artichoke as well as Cherry Cobbler berries were layered over the wreath and adhered using liquid adhesive. A bow of Cherry Cobbler was adhered on the left of the wreath using Glue Dots.

The sentiment in Cherry Cobbler was die cut using a die from the Wonderful Wreath Framelits and adhered to the card front using rolled up Glue Dots to complete the card.


Linda Vich Creates: Sheltering Tree and a Joyful Wreath. A lovely Christmas card filled with texture from both Pretty Pines Thinlits and the Seaside Embossing Folder.

Linda Vich Creates: Sheltering Tree and a Joyful Wreath. A lovely Christmas card filled with texture from both Pretty Pines Thinlits and the Seaside Embossing Folder.


Linda Vich Creates: Sheltering Tree and a Joyful Wreath. A lovely Christmas card filled with texture from both Pretty Pines Thinlits and the Seaside Embossing Folder.

Linda Vich Creates: Sheltering Tree and a Joyful Wreath. A lovely Christmas card filled with texture from both Pretty Pines Thinlits and the Seaside Embossing Folder.


I think that this card is exceptionally pretty because of all the texture and the wonderful color scheme. Feel free to steal this color scheme if you'd like to use it!

Linda Vich Creates: Sheltering Tree and a Joyful Wreath. A lovely Christmas card filled with texture from both Pretty Pines Thinlits and the Seaside Embossing Folder.


I hope you've enjoyed viewing these card projects! Drop me a note below to let me know what you think!

Thursday, October 6, 2016

A Halloween Treat, A Ghost, and Other Creepy Stuff

Linda Vich Creates: A Halloween Treat, A Ghost, and Other Creepy Stuff. A ghastly group of Halloween projects created with Swirly Scribbles Thinlits, Pyramid Pals Thinlits, Cookie Cutter Halloween and the Cookie Cutter Builder Punch.
Today I'm sharing with you a few of the 3D projects that I displayed for my new stamping group.

First up is a little Halloween Treat Box. This project was CASEd from Lisa's Christmas project. I used a piece of Basic Black card stock to make the box itself and then the belly band was cut from a sheet of the Halloween Night Specialty DSP.

To embellish the box with pumpkins, I cut two of the circles from Pumpkin Pie using the Swirly Scribbles Thinlits and used both the Petite Petals and Blossom Bunch Punches to punch leaves from Garden Green.

I used the Tags & Labels Framelits to cut a tag from Thick Whisper White and then used the stamps from the Spooky Fun stamp set with Basic Black and Pumpkin Pie.

One of our clear bags was used for candy and I tied it off with our now retired Pumpkin Pie 1/4" Cotton Ribbon.

Linda Vich Creates: A Halloween Treat, A Ghost, and Other Creepy Stuff. A Halloween treat box made with Halloween Night Specialty DSP and the Swirly Scribbles Thinlits.

Linda Vich Creates: A Halloween Treat, A Ghost, and Other Creepy Stuff. A Halloween treat box made with Halloween Night Specialty DSP and the Swirly Scribbles Thinlits.


For my ghost, I used the Pyramid Pals Thinlits to cut vellum for the ghost's body. All but the back of the ghost was adhered with Fast Fuse. For the back I used glue dots to allow the ghost to be opened to insert and turn on the tea light. To complete the ghost, I simply added googly eyes.

Doesn't he look cute? I think a grouping of these would look lovely in a dark corner for Halloween!

Linda Vich Creates: A Halloween Treat, A Ghost, and Other Creepy Stuff. A ghost created by using vellum, a tea light and the pyramid pals thinlits.

Linda Vich Creates: A Halloween Treat, A Ghost, and Other Creepy Stuff. A ghost created by using vellum, a tea light and the pyramid pals thinlits.


Lastly, I made three sets of Halloween earrings. These are really a lot of fun to make!

I used Jet Black Stazon ink and my MISTI to stamp onto Frosted Ruff N' Ready Shrinky Dinks plastic. After I was sure that they were dry, I used a sharpie marker to color red onto the Vampire while leaving the skeleton and mummy as they were stamped.

I used the 1/4" Circle Punch to put holes at the top of each and then used my piercing tool to hold each piece, through the hole, on a heat resistant surface. I heated each piece with my Heat Tool. While heating, the plastic billows and curves and then eventually shrinks and flattens into the final size, one-third the size of the original and nine times thicker!

To complete the earrings, I used 4 and 6 mm jump rings and earring wires.

Linda Vich Creates: A Halloween Treat, A Ghost, and Other Creepy Stuff. Halloween earrings made by using Cookie Cutter Halloween, Cookie Cutter Builder Punch, and Shrinky Dinks plastic.

Linda Vich Creates: A Halloween Treat, A Ghost, and Other Creepy Stuff. Halloween earrings made by using Cookie Cutter Halloween, Cookie Cutter Builder Punch, and Shrinky Dinks plastic.

Linda Vich Creates: A Halloween Treat, A Ghost, and Other Creepy Stuff. Halloween earrings made by using Cookie Cutter Halloween, Cookie Cutter Builder Punch, and Shrinky Dinks plastic.


I look forward to making more earrings in the future by using other stamps and dies!


Friday, July 8, 2016

Swirly Bird Wreath

Linda Vich Creates: Swirly Bird Wreath. Swirly Bird wreath card in neutrals, gold, and In Colors.
Have you been playing with the new In Colors? I can't get enough of them! I really like the way that they play so nicely with our other Stampin' Up colors.

Today's card started with neutrals–Basic Black and Very Vanilla–and touches of gold.

I cut a standard card base from Very Vanilla and topped it with a matte of Basic Black on the left side. Using the grunge stamp from the Swirly Birds stamp set, I stamped in Versamark and heat embossed with Gold Stampin' Emboss Powder. I added one more grunge stamp from the Touches of Texture stamp set and heat embossed it as well. To carry the gold theme a little farther, I added a thin strip of Gold Foil Paper down the right side of the Basic Black matte.

Using the Swirly Scribbles Thinlits, I die cut the largest swirly circle from Very Vanilla and adhered it to the card front using liquid adhesive. I then stamped three of the smallest swirls from the Swirly Birds stamp set with Sweet Sugarplum on Very Vanilla. I stamped two of the larger swirls in Mint Macaron and also two leaves in Emerald Envy. The bird was stamped in Rose Red. These were all die cut and then adhered to the card front using Dimensionals.

For the inside of the card, three of the larger swirls were stamped in Sweet Sugarplum and die cut. Two of the smaller leaves were stamped with Emerald Envy inside the card and the swirls adhered over them using Glue Dots.

Linda Vich Creates: Swirly Bird Wreath. Swirly Bird wreath card in neutrals, gold, and In Colors.

Linda Vich Creates: Swirly Bird Wreath. Swirly Bird wreath card in neutrals, gold, and In Colors.

I love how well the colors all worked together to create this simple yet effective card! Feel free to save this color combo if you would like to use it.

Linda Vich Creates: Swirly Bird Wreath. Swirly Bird wreath card in neutrals, gold, and In Colors.


Wednesday, June 8, 2016

Color Blocking and Pun Intended

Linda Vich Creates: Color Blocking and Pun Intended. Pop of Pink papers add some real pizzazz to this color blocked card, complete with camera in a nest of glossy swirls.
I was in the mood for some in-your-face contrast when I sat down to craft today. Pop of Pink DSP immediately sprang to mind, with its crisp Basic Black, Whisper White, and Melon Mambo.

Choosing two sheets of the DSP to work with, I cut them to size for a 4.75 x 6" card. I used Fast Fuse to adhere them to a Melon Mambo card base.

My next step was to stamp the camera from the Pun Intended stamp set onto Thick Whisper White using Basic Black Archival ink and my MISTI. I stamped it a couple of times to get a really rich black and then cleaned the stamp before inking and stamping with Versamark.

I heat embossed with Clear Stampin' Emboss Powder to really make the camera show up and then fussy cut it. I used Clear Wink of Stella to add shine to the flash and other white sensors on the camera.

I die cut the two largest swirls from the Swirly Scribbles Thinlets from Basic Black and Melon Mambo. They were stamped over with Versamark and heat embossed with Clear Stampin' Emboss Powder two times to provide a really glossy and smooth coating.

The sentiment was stamped with Versamark on Basic Black and heat embossed with White Stampin' Emboss Powder and both ends were flagged with the Banner Triple Punch. A second banner was created from Melon Mambo. The two were attached with Dimensionals and adhered to the card front also with Dimensionals.

The die cut swirls were adhered using rolled up Glue Dots and then the camera was adhered with double Dimensionals over top of them. A Basic Black card stock strip adhered down the left side completed the front of the card.

A Whisper White matte was cut for the inside of the card. The dots from the Swirly Birds stamp set were stamped repeatedly in the bottom right corner using Melon Mambo and then the camera was stamped on top using Basic Gray Archival ink. The matte was adhered with Fast Fuse to finish the card.

Linda Vich Creates: Color Blocking and Pun Intended. Pop of Pink papers add some real pizzazz to this color blocked card, complete with camera in a nest of glossy swirls.

Linda Vich Creates: Color Blocking and Pun Intended. Pop of Pink papers add some real pizzazz to this color blocked card, complete with camera in a nest of glossy swirls.

I love the "punchiness" of this card! The heat embossed swirls looks like strings of licorice and make a nice little nest for the camera.


Monday, June 6, 2016

Swirly Bird Meets Love & Affection

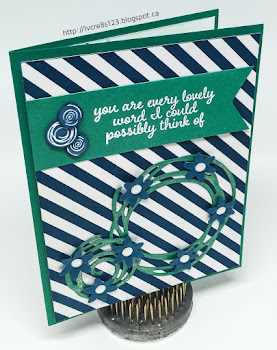
Linda Vich Creates: Swirly Bird Meets Love & Affection. Swirly Bird stamps and matching dies are combined with angled stripes in this Emerald Envy and Dapper Denim color-schemed card.
So nice to actually get my hands on Swirly Bird and the coordinating Swirly Scribbles dies! Cards using these products are all over Pinterest.

I started my card by cutting a standard card base from Emerald Envy card stock. I also cut a matte from the retired Irresistibly Yours Specialty DSP.

Using my brayer, now retired, I inked up the matte using Dapper Denim and then carefully wiped off the excess using a paper towel.

Using the dies, I cut two of the swirls from Emerald Envy and coated them with Clear Wink of Stella. While they were drying, I punched the small flowers from Dapper Denim using the Blossom Bunch Punch. I used my McGill Paper Blossom Tool Kit to shape the flowers a bit.

Using my new Marsupial Layering Tool, I adhered my matte to the card base using Dimensionals. I used dots of glue on the back of the swirls to glue them to the bottom of the card front.

Glue dots were used to adhere the tiny flowers to the swirls and then I added White Perfect Accents to the centres.

The sentiment from the Love & Affection was stamped on a strip of Emerald Envy using Versamark and then heat embossed with White Stampin' Emboss Powder. I then used the Triple Banner Punch to flag the end. Fast Fuse adhered the strip to the top of the card front.

On a scrap of Whisper White I stamped three little swirls from the Swirly Bird stamp set, using Dapper Denim. I fussy cut these and then edged them with the Dapper Denim marker so that no white was evident. These were attached to the sentiment strip using glue dots.

On a Whisper White matte on the inside of the card, I used the "dots" stamp from the Swirly Bird set to stamp using Dapper Denim, both full-strength and stamped-off. I then stamped two sizes of the tiniest swirls stamps in Emerald Envy on top of the dots to complete the card.

Linda Vich Creates: Swirly Bird Meets Love & Affection. Swirly Bird stamps and matching dies are combined with angled stripes in this Emerald Envy and Dapper Denim color-schemed card.

Linda Vich Creates: Swirly Bird Meets Love & Affection. Swirly Bird stamps and matching dies are combined with angled stripes in this Emerald Envy and Dapper Denim color-schemed card.

Have you had the chance to play with Swirly Bird yet? If not, place an order with me!