Saturday, July 8, 2017

Fabulous Flamingo Thank You

Linda Vich Creates: Fabulous Flamingo Thank You. Stylized Fabulous Flamingo card in rich browns with gold
Had another play with Fabulous Flamingo today. This time I wanted to create a more stylized flamingo rather than a realistic one.

After deciding that I wanted to create a matte covered with the palm leaves, I made the decision to use a 5 x7" card because otherwise, not a lot of the matte would be seen. I cut a card base and a 5 x 7" matte from Soft Suede.

Using Versamark, I stamped the palm leaf in a random pattern over the entire matte. I then heat embossed using Gold Stampin' Emboss Powder.

The flamingo was stamped on Very Vanilla using my MISTI since it is so suited to multi-step stamping. I stamped first with Early Espresso, then Sahara Sand 2X, and finally, Versamark for both the legs and the last body layer. I then heat embossed with gold.

The largest of the Lots of Labels Framelits was used to die cut the flamingo. Using Early Espresso, the sentiment was stamped on the bottom of the die cut. Three loose gold sequins were adhered next to the flamingo using liquid adhesive.

Linda Vich Creates: Fabulous Flamingo Thank You. Stylized Fabulous Flamingo card in rich browns with gold


I cut a 1" strip of Early Espresso and adhered it across the embossed matte using Fast Fuse. I topped the strip with a length of the now retired Gold Sequin Trim. The matte was then adhered to the card front using Fast Fuse. The die cut was adhered in the centre of the card front using Dimensionals.

For an inside matte for the card, I stamped the second part of the sentiment on Very Vanilla using Early Espresso and then used Versamark to stamp the palm leaf all around the edges of the matte. After embossing with gold, the matte was adhered inside the card.

Linda Vich Creates: Fabulous Flamingo Thank You. Stylized Fabulous Flamingo card in rich browns with gold

Linda Vich Creates: Fabulous Flamingo Thank You. Stylized Fabulous Flamingo card in rich browns with gold

Linda Vich Creates: Fabulous Flamingo Thank You. Stylized Fabulous Flamingo card in rich browns with gold
Close up of flamingo showing gold embossing  

Linda Vich Creates: Fabulous Flamingo Thank You. Stylized Fabulous Flamingo card in rich browns with gold

I'm not a "browns" person but I quite like how this turned out!


Thursday, July 6, 2017

Crafting Forever on Marbled Background

Linda Vich Creates: Crafting Forever on Marbled Background. The 2017-2019 In Colors are featured in this card set that uses Marbled and Crafting Forever.
How fun is it to play with something new? With so many products in the new catalog, it is hard to choose what to work with first! In the end, I chose Crafting Forever and the Marbled stamps with which to create a set of cards using our new In Colors.

I cut a standard card base and matte in each of the five new colors: Powder Pink, Fresh Fig, Lemon Lime Twist, Berry Burst and Tranquil Tide. I also cut a matte from Whisper White for the inside of the card.

Using my MISTI because it handles large background stamps so well, I stamped the Marbled stamp over each matte using the matching color.

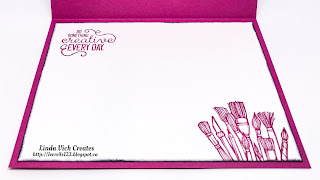
Setting these mattes aside, I stamped the pot of brushes in each color on Thick Whisper White and then die cut it using the #4 oval from the Stitched Shapes Framelits. I used the #7 scalloped oval from the Layering Ovals Framelits to cut mattes from Basic Black and then adhered each stamped image using liquid adhesive. On the Whisper White mattes, I stamped both the sentiment and the tops of the brushes in each of the colors.

I used a sponge dauber to ink the edges of the inside and outside mattes using Basic Black. After tying a length of Black Shimmer Ribbon around each colored matte, it was an easy matter to assemble the cards using Dimensionals and Fast Fuse.

Linda Vich Creates: Crafting Forever on Marbled Background. The 2017-2019 In Colors are featured in this card set that uses Marbled and Crafting Forever.

Linda Vich Creates: Crafting Forever on Marbled Background. The 2017-2019 In Colors are featured in this card set that uses Marbled and Crafting Forever.

Linda Vich Creates: Crafting Forever on Marbled Background. The 2017-2019 In Colors are featured in this card set that uses Marbled and Crafting Forever.

Linda Vich Creates: Crafting Forever on Marbled Background. The 2017-2019 In Colors are featured in this card set that uses Marbled and Crafting Forever.

Linda Vich Creates: Crafting Forever on Marbled Background. The 2017-2019 In Colors are featured in this card set that uses Marbled and Crafting Forever.

Linda Vich Creates: Crafting Forever on Marbled Background. The 2017-2019 In Colors are featured in this card set that uses Marbled and Crafting Forever.

Linda Vich Creates: Crafting Forever on Marbled Background. The 2017-2019 In Colors are featured in this card set that uses Marbled and Crafting Forever.

The Marbled stamp gives a luscious look when stamping with an ink that matches the card stock! I'm anxious to try it with embossing powder. And how fun is that Black Shimmer Ribbon? These photos don't show the shimmer but it is gorgeous!

I hope you've enjoyed my card set today. If you visit, I'd love you to leave me a comment below!


Saturday, July 1, 2017

Fabulous Flamingo Shadow Box Frame

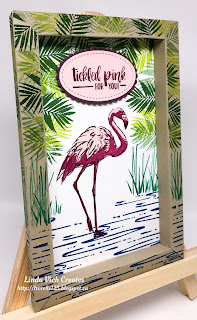
Linda Vich Creates: Fabulous Flamingo Shadow Box Frame. A vibrant shadow box frame showcases the Fabulous Flamingo stamp set.
It's a bit busy at our house right now. My daughter, her boyfriend, and her daughter Raine have moved in with us until after we return from vacation on August 13. This means that our household currently consists of four adults, one soon-to-be-four-year-old, three cats, one kitten and two dogs! Are we crazy? Probably!

Because of this, I'm surprised that I actually finished my project today–the one day off that I have for this Canada Day weekend :(

Today I tried two new things. I broke open my Fabulous Flamingo stamp set and I combined that with a new technique . . . a shadow box. And I did this with my granddaughter by my side, with her little table and chair and the stamping kit I had given her for Christmas. Today she was fascinated by cutting up paper into little tiny pieces! I think I'll get her started with mosaics . . . she's a natural!

Anyway, I had seen a few flamingo posts on Pinterest so I knew basically what I wanted to stamp but first I needed to learn how to create a shadow box. The best tutorial I found was on Joyce Rossiter's blog but the original directions came from Mary Ann Rossiter.

As I do with a lot of tutorials, I tried out the technique by creating it first with a piece of scrap paper. It was actually quite simple to create but I'm glad I tried it out first.

After figuring out the dimensions of the image that would be contained within the frame, I set to stamping. I used my MISTI since it is such a good tool for using with multi-step stamps.

I first tried a color combo of Powder Pink and Flirty Flamingo but in the end, I stamped my flamingo using first Berry Burst, Powder Pink, and finally Fresh Fig. When using the stamp set, I stamped according to the following image:


After stamping the flamingo on Whisper White, I used Pacific Point to stamp the water and then Emerald Envy for the reeds, stamping off to create some contrast.

I stamped the palm leaves around the top and sides of the matte using Lemon Lime Twist and Garden Green, again, stamping some off for added contrast and color.

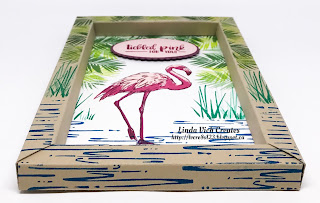
With the matte completed, I started on the actual shadow box frame. Using a 8.5 x 11" piece of Crumb Cake, I scored each side at .5, 1, 1.5, and then 2". Turning the card stock so that the 11" piece was at the top, I scored at 2.5" but only down to 1". This was also done at 2.5" from the right side of the same piece. I then turned the paper 180° and repeated these two score lines.

I folded and burnished each fold line and then cut out a portion from each corner (see image #5 on Joyce Rossiter's blog).

Because I wanted to stamp on the edge of the frame, I needed to mask the fold I needed and stamp it before assembling the frame. I was able to stamp all but one side correctly and then discovered that for the last side, I stamped on the wrong fold! This meant that I had to remask all the other sides again so that I had stamped on two adjacent folds for each side. (After completing this project, I decided that the next shadow box I created would be stamped on three folds–inside, top, and outside because I really liked the look of the continuous stamping!)

With the stamping complete, I adhered my stamped matte to the inside panel of the frame and then applied Tear & Tape adhesive according to images #8 and 9 and assembled the frame.

The two long sides were adhered first and then the bottom and top. The top was the hardest to adhere correctly but I persevered.

To finish off the shadow box, I stamped the sentiment on Powder Pink card stock with Berry Burst and die cut it with the #2 stitched oval of the Stitched Shapes Framelits. It was matted on Fresh Fig die cut using the #3 oval in the Layering Ovals Framelits. It was adhered with Dimensionals.

Linda Vich Creates: Fabulous Flamingo Shadow Box Frame. A vibrant shadow box frame showcases the Fabulous Flamingo stamp set.

Linda Vich Creates: Fabulous Flamingo Shadow Box Frame. A vibrant shadow box frame showcases the Fabulous Flamingo stamp set.

Linda Vich Creates: Fabulous Flamingo Shadow Box Frame. A vibrant shadow box frame showcases the Fabulous Flamingo stamp set.

Linda Vich Creates: Fabulous Flamingo Shadow Box Frame. A vibrant shadow box frame showcases the Fabulous Flamingo stamp set.

I quite like how this project turned out! I already have ideas for another shadow box as well as ideas for different ways to stamp the flamingo.

Have you used the Fabulous Flamingo stamp set yet? Drop me a line below with a link to your project!