Showing posts with label circles collection framelits. Show all posts

Tuesday, May 30, 2017

2017 Catalog Launch Prep Part 1: Third Prize

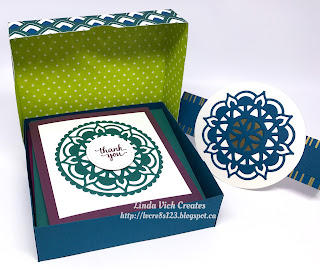
Linda Vich Creates: 2017 Catalog Launch Prep Part 1: Third Prize. Box of five note cards using the 2017-2019 In Colors and Eastern Palace Suite.
When starting my preparations for my 2017 Catalog Launch, I knew that I wanted to showcase the new 2017-2019 In Colors. To do that, I decided to use the Eastern Palace Bundle.

I made five, four inch card bases by cutting one from each color–Powder Pink, Fresh Fig, Berry Burst, Lemon Lime Twist and Tranquil Tide.

Using the Eastern Medallions #3 and #2 together, I cut out medallions from each of the five colors and then used the #8 Scalloped Circle from the Layering Circles to fully cut them from the colors. I cut mattes from Whisper White and used liquid adhesive to adhere each medallion to a matte.

On Thick Whisper White, I stamped the sentiment in each of the five colors and then die cut them using the #1 stitched circle from the Stitched Shapes Framelits. These were adhered to the centres of the medallions using Dimensionals. These mattes were then adhered to the card bases using Fast Fuse.

Whisper White mattes were cut for the inside of the cards and they were sponged with each of the five colors and then adhered inside the cards.

In assembling the cards, the colors were contrasted on the cards so that the sentiments matched the card bases and the inside sponging matched the medallions. These colors worked so nicely together!

To contain the cards, I used the 1/16" rule of box making via Catherine Pooler. The box bottom was made from Dapper Denim card stock and the top from a sheet of the exquisite Eastern Palace Specialty DSP! I used a circle punch to punch half circles in each side to make it easier to open.

I used a strip of the beautiful foiled paper with a strip of Dapper Denim on top to create a belly band for the box. Since the strips were not long enough, I adhered them to Thick Very Vanilla die cut with the #8 circle from the Layering Circles and then adhered a larger circle of card stock on top of it, cut with the #7 circle from the now retired Circles Collection Framelits.

Linda Vich Creates: 2017 Catalog Launch Prep Part 1: Numbering on retired Circles Collection Framelits.

A medallion was cut from Dapper Denim using the #2, #3, and #4 dies. Layering Circle #1 was used to die cut a piece of Gold Foil which was adhered behind the medallion. The completed medallion was adhered on top of the large Very Vanilla Circle to complete the box.

Linda Vich Creates: 2017 Catalog Launch Prep Part 1: Third Prize. Box of five note cards using the 2017-2019 In Colors and Eastern Palace Suite.

Linda Vich Creates: 2017 Catalog Launch Prep Part 1: Third Prize. Box of five note cards using the 2017-2019 In Colors and Eastern Palace Suite.

Linda Vich Creates: 2017 Catalog Launch Prep Part 1: Third Prize. Box of five note cards using the 2017-2019 In Colors and Eastern Palace Suite.

Linda Vich Creates: 2017 Catalog Launch Prep Part 1: Third Prize. Box of five note cards using the 2017-2019 In Colors and Eastern Palace Suite.

Linda Vich Creates: 2017 Catalog Launch Prep Part 1: Third Prize. Box of five note cards using the 2017-2019 In Colors and Eastern Palace Suite.

Linda Vich Creates: 2017 Catalog Launch Prep Part 1: Third Prize. Box of five note cards using the 2017-2019 In Colors and Eastern Palace Suite.

Linda Vich Creates: 2017 Catalog Launch Prep Part 1: Third Prize. Box of five note cards using the 2017-2019 In Colors and Eastern Palace Suite.

I think that the box and the cards looked very impressive and I may make a set for myself in the future!


Tuesday, March 8, 2016

Botanical Wedding Card

It happened again the other day.

I was at work at Walmart, waiting on another customer, when I spotted a new magazine in the rack. I quickly recognized the colors of Blushing Bride and Very Vanilla, on a background of green and a card idea started bubbling on the fringes of my mind! Here's the magazine cover that sparked my creative juices:


My vision for this card was that of a bride's bouquet, complete with ribbons and pearls on a lovely green background. To be able to fit in both the bouquet and ribbons, I chose a 5 x 7" format for my card.

I cut a matte that was 4.75 x 6.5" so that it would fit within the embossing folder I wished to use–Craft Concepts Tuscan Tiles. After embossing, I used Garden Green ink with a sponge to color the raised portions of the embossing. I adhered the matte to a 5 x 7" Cucumber Crush card base.

Next, I chose a circle die from the Circles Collection Framelits Dies and used that as a frame to create my bouquet simply by laying it on top of my embossed matte and adding flowers within it.

Using the Botanical Builders Framelits Dies, I cut flowers from Blushing Bride and Pink Pirouette as well as a couple of centres from the Blushing Bride Glimmer Paper. I also punched flowers using one of the punches from the Itty Bitty Accents Punch Pack and one from the now retired Itty Bitty Shapes Punch Pack. I inked the edges of the pink flowers with Strawberry Slush and the Blushing Bride ones with Calypso Coral. I also shaped them using the McGill Paper Blossom Tool Kit.

I assembled the few flowers that needed centres and then started adding flowers to the circle die on my card front. I started by adding the largest flowers, filled in with the next largest small flowers and finally the smallest flowers. Once I was happy with the design, I snapped a photo for reference and then removed all but the largest flowers.

Circle die used to arrange the blossoms in a circle.

One by one, I used Multi Medium Matte to adhere each flower to the card front. Once I had filled up the circle, I removed the die and then added pearls to the centre of each blossom.

I used Glue Dots to adhere a bow of Pink Pirouette Seam Binding and a length of Blushing Bride Sequin Trim beneath the bouquet.

On vellum card stock I stamped the sentiment in Calypso Coral using the MISTI and both the Crazy About You and the Number of Years Stamp Sets. I also stamped in Versamark and then heat embossed with Clear Stampin' Emboss Powder. I die cut the sentiment using a die from the Large Numbers Framelits Dies. I placed two pearls on the front of the sentiment and then positioned glue dots below them on the opposite side to adhere the banner to the card front.

For the inside of the card, I cut a matte from the now retired Naturals White card stock. I used Cucumber Crush to stamp the sentiment from the Beautiful Ride Stamp Set and added some flowers from the Bloomin' Love Stamp Set using Calypso Coral. I added the couple stamp in Blushing Bride to the bottom of the card. I inked the edges with Blushing Bride and then adhered the matte with Fast Fuse to complete the card.


Close up details.


I love the richness created by the embossing and sponging on the card front and the flowers looks so nice on top of it!

Let me know what you think by dropping me a comment below!


Wednesday, December 16, 2015

Festive Color Burst Ornaments


Such a busy time of the year! I've been working on Christmas cards lately but can't show you those quite yet! In the meantime, I got a chance to use my Color Bursts again!

Ever since seeing the Delicate Ornaments Dies, I have been dying to use them with my Color Bursts! Finally got the chance and this is the result!

I started by using my Color Bursts on three separate pieces of watercolor paper. I used Yellow Ochre and Orange, Pthalo Green and Ultramarine Blue, and finally, Alizarin Crimson and Violet.

I used the method where I wet the papers first and then applied the colors, adding more water and color until I was satisfied with the results. I set them aside to dry while working on another project but then returned to them and zapped them with the heat tool to ensure they were completely dry.

I used two of the ornaments from the Delicate Ornaments Thinlits Dies and one circle from the Circles Collection Framelits to cut from each of the papers. I also cut three ornament toppers from Gold Foil paper.

I then used the Leafy Vine Embossing Folder from Taylored Expressions to emboss each ornament. To make the embossing more apparent, I sponged on Black Soot Distress Ink across each ornament and then applied to the sides to give them a bit of shape. Once this was completed, I used Distress Glaze to seal the paints and ink.

I decided to make the ornaments even more vibrant so I brushed on a coat of Crystal Effects and left them to dry overnight and then attached the toppers using the Fine Tip Glue Pen.
On a Garden Green matte I stamped the Watercolor Wash background stamp using Versamark and heat set it.

I decided on my arrangement for the ornaments and then adhered them to the matte using Dimensionals. After die cutting the sentiment, from the Wonderful Wreath Framelits Dies, from Gold Foil, I attached it to the ornaments using the Fine Tip Glue Pen.

Using my MISTI and one of the ornaments from the Embellished Ornaments Stamp Set, I stamped on the bottom right corner of a piece of the now retired Naturals White card stock in Blackberry Bliss and then also inked the edges of the matte using a sponge dauber. Fast Fuse Adhesive was used to adhere it inside the card.


Lastly, I added a few gold sequins to the front of the card using the Fine Tip Glue Pen.


So, what are your thoughts on this card? Drop me a comment below!

Built for Free Using: My Stampin Blog