Showing posts with label marsupial. Show all posts

Monday, August 22, 2016

Thoughtful Branches with Layering Squares

Linda Vich Creates: Thoughtful Branches with Layering Squares. Layering Squares Framelits are paired with Thoughtful Branches in a delightful technique that gives dimension to a flat card.
In my email today I found a delightful card technique that used both the Thoughtful Branches stamp set and the Layering Squares Framelits. Kelly Acheson provided an informative video tutorial for this technique in her blog post.

In choosing my color scheme for my card, I consulted my 2016-17 Stampin' Up! Color Coordinator. You can download and print your own Color Coordinator and Nicole Watt has a wonderful video tutorial that details the ways in which you can use the Color Coordinator to select colors.

I began with a Very Vanilla matte and stamped the flowers/tree canopy stamp from Thoughtful Branches using Blushing Bride full strength. I then stamped it several times around the image to produce a lighter halo effect. I cleaned my stamp and stamped again, positioning the stamp a little off centre, using Sweet Sugarplum. Lastly, I used Watermelon Wonder.

I stamped the stems with Wild Wasabi and then stamped the sentiment using my MISTI, which allowed me to double-stamp. I then finished by stamping two leaves.

Two of the Layering Squares Framelits were used to cut out a "frame" and a smaller square from the stamped flower section. The stamped matte was then adhered to a Watermelon Wonder matte, using my Marsupial Tool, leaving a hole where the card stock showed through.

I replaced the "frame" and then inset the smaller square piece, being sure that both stamped die cuts were lined up the way they had been originally. I then removed the square, applied Fast Fuse and replaced it after once again checking that I had the correct alignment. (Am I anal? Yes! However, when applying adhesive, I have a habit of turning the piece around so I needed to verify that it was positioned correctly!) I then removed the "frame" die cut.

I cut a standard card base from Very Vanilla and then used the Marsupial again to adhere the mattes.

I used the Foam Adhesive Strips to apply to the "frame" die cut and then inserted it carefully back into the space from which it came. I added a small bow, made by folding the now retired Wild Wasabi Seam Binding in half, adhered with Glue Dots. Inside the card, I simply stamped two leaves in the bottom right corner to complete the card.
Linda Vich Creates: Thoughtful Branches with Layering Squares. Layering Squares Framelits are paired with Thoughtful Branches in a delightful technique that gives dimension to a flat card.

Linda Vich Creates: Thoughtful Branches with Layering Squares. Layering Squares Framelits are paired with Thoughtful Branches in a delightful technique that gives dimension to a flat card.


What a fun little technique! This could be used in a number of ways and gives a nice little "pop" to a relatively flat card.

I selected the following colors for my color scheme. Feel free to save them for your own projects!

Linda Vich Creates: Thoughtful Branches with Layering Squares. Layering Squares Framelits are paired with Thoughtful Branches in a delightful technique that gives dimension to a flat card.


Tuesday, June 14, 2016

Flourish Thinlits For Global Design Project

Linda Vich Creates: Flourish Thinlits For Global Design Project. Shabby chic style card using the Flourish Thinlits.
I'm in love!

I had my first play today with the Flourish Thinlits and the coordinating stamp set, Flourishing Phrases. I was a little leery about die cutting them with my Big Shot because Stampin' Up has recommended that both the Precision Plate and the new Big Shot Platform be used with these detailed dies.

I'm happy to say that by using a dryer sheet with my magnetic platform, I was easily able to cut my card stock with these dies! To be sure, I ran it through twice but I might have only needed the one run through because the dies cut like butter for me!

Now because every Big Shot is a little bit different, you may not get the same results as me; you might need what is recommended by Stampin' Up and/or you may need to use some shims to cut successfully.

Choosing Soft Suede for my flourish die cut I then coordinated my mattes around that choice. I used a Soft Suede card base to make a 4.75 x 6" card and cut a matte from a piece of Dapper Denim in the 2016-2018 In Color DSP Stack. I also cut two tall and narrow mattes, one from Crumb Cake and one from Very Vanilla.

Some texture was added to the Very Vanilla matte by using the flourish from Timeless Textures to stamp with Sahara Sand after first stamping off. I repeated this process with the Crumb Cake matte with full-strength inking.

Next, I used the now retired Distress Tool to roughen the edges of both mattes and then inked the Very Vanilla matte with Soft Suede and the Crumb Cake one with Dapper Denim.

I lightly sponged Soft Suede onto two lengths of Linen Thread and wrapped them around the top and bottom of the Very Vanilla matte, securing on the back with Fast Fuse Adhesive.

My Marsupial Layering Tool was used to adhere the Dapper Denim matte to the card front and then the Crumb Cake matte was adhered on top. The Very Vanilla matte was adhered using Dimensionals.
After die cutting the flourish from Soft Suede, I cut two of the blossoms again, this time from Dapper Denim. I also punched 10 circles using the 1/4" Circle Punch. The flowers and the circles were glued onto the die cut and then it was glued to the card front.

The sentiment from the Garden in Bloom stamp set was inked with Soft Suede and stamped onto a strip of Soft Suede. The strip was then distressed and inked with Soft Suede. Dimensionals were used at one end of the strip and it was tucked between the two mattes on the card front.

Sahara Sand ink was used on the flourish to stamp the edges of a Very Vanilla matte, stamping off first. Then the large flourish stamp from the Flourishing Phrases stamp set was inked with Dapper Denim and stamped in the bottom right corner. The matte was distressed with the Distressing Tool and then the edges were inked with both Soft Suede and Dapper Denim. The matte was adhered with Fast Fuse inside the card.

Linda Vich Creates: Flourish Thinlits For Global Design Project. Shabby chic style card using the Flourish Thinlits.

Linda Vich Creates: Flourish Thinlits For Global Design Project. Shabby chic style card using the Flourish Thinlits.

Linda Vich Creates: Flourish Thinlits For Global Design Project. Shabby chic style card using the Flourish Thinlits.

I'm really liking this card, especially all the distressing and the wonderful color combination. Feel free to save this color combo if you'd like to use it for your own cards!


I'm entering this card in the Global Design Project #040. Why not come out and play with us?


My one regret is that I wish I had used a baby wipe to dab away a little of the ink from my stamp when stamping the Dapper Denim flourish inside the card. I think that a more distressed version of the stamp would have looked better with the other distressing on the card.

Have you had a chance to play with the Flourish Thinlits yet? Let me know what you think of them by leaving me a comment below!


Monday, June 6, 2016

Swirly Bird Meets Love & Affection

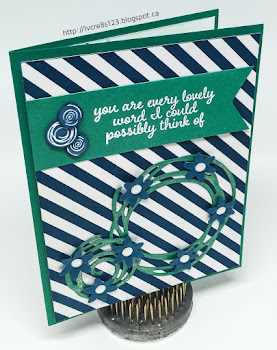
Linda Vich Creates: Swirly Bird Meets Love & Affection. Swirly Bird stamps and matching dies are combined with angled stripes in this Emerald Envy and Dapper Denim color-schemed card.
So nice to actually get my hands on Swirly Bird and the coordinating Swirly Scribbles dies! Cards using these products are all over Pinterest.

I started my card by cutting a standard card base from Emerald Envy card stock. I also cut a matte from the retired Irresistibly Yours Specialty DSP.

Using my brayer, now retired, I inked up the matte using Dapper Denim and then carefully wiped off the excess using a paper towel.

Using the dies, I cut two of the swirls from Emerald Envy and coated them with Clear Wink of Stella. While they were drying, I punched the small flowers from Dapper Denim using the Blossom Bunch Punch. I used my McGill Paper Blossom Tool Kit to shape the flowers a bit.

Using my new Marsupial Layering Tool, I adhered my matte to the card base using Dimensionals. I used dots of glue on the back of the swirls to glue them to the bottom of the card front.

Glue dots were used to adhere the tiny flowers to the swirls and then I added White Perfect Accents to the centres.

The sentiment from the Love & Affection was stamped on a strip of Emerald Envy using Versamark and then heat embossed with White Stampin' Emboss Powder. I then used the Triple Banner Punch to flag the end. Fast Fuse adhered the strip to the top of the card front.

On a scrap of Whisper White I stamped three little swirls from the Swirly Bird stamp set, using Dapper Denim. I fussy cut these and then edged them with the Dapper Denim marker so that no white was evident. These were attached to the sentiment strip using glue dots.

On a Whisper White matte on the inside of the card, I used the "dots" stamp from the Swirly Bird set to stamp using Dapper Denim, both full-strength and stamped-off. I then stamped two sizes of the tiniest swirls stamps in Emerald Envy on top of the dots to complete the card.

Linda Vich Creates: Swirly Bird Meets Love & Affection. Swirly Bird stamps and matching dies are combined with angled stripes in this Emerald Envy and Dapper Denim color-schemed card.

Linda Vich Creates: Swirly Bird Meets Love & Affection. Swirly Bird stamps and matching dies are combined with angled stripes in this Emerald Envy and Dapper Denim color-schemed card.

Have you had the chance to play with Swirly Bird yet? If not, place an order with me!