Showing posts with label adorning accents edgelits dies. Show all posts

Wednesday, June 1, 2016

Catalog Party Prep Part 2


The 2016-2017 Stampin' Up! Catalog is LIVE! You are all set to view it here and place your orders! It is a wonderful catalog, all 204 pages for you to explore!

Plus, for the month of June, when your order totals $400 before taxes and shipping, you will receive $40 more in Stampin' Rewards! Start making your list!

host-promo-header-NA


Today's post is Part 2 in my 5-part series. You can read Part 1 here. This lovely card set was CASEd from Stamper's Blog.

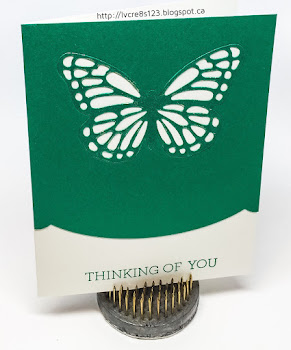
Linda Vich Creates: Catalog Party Prep Part 2. This set of In Color cards is all about lines, from the die cut border to the intricate lines of the inset butterflies.

A standard card base was cut from Thick Whisper White and then mattes in each of the five In Colors was cut 4.25 x 5.5". The now retired Adorning Accents Edgelits were used to trim a curved bottom into each matte.

The Butterflies Thinlits were used to cut a butterfly from the top of each matte and then the mattes were adhered to the front of each card base using Fast Fuse Adhesive. Each butterfly was coated with Wink of Stella and then Multi Medium Matte was used to glue each butterfly back into the opening in each matte.

The sentiment from the Crazy About You stamp set was stamped at the bottom of each card base in ink matching the matte to complete the cards.

Linda Vich Creates: Catalog Party Prep Part 2. This set of In Color cards is all about lines, from the die cut border to the intricate lines of the inset butterflies.

Linda Vich Creates: Catalog Party Prep Part 2. This set of In Color cards is all about lines, from the die cut border to the intricate lines of the inset butterflies.

Linda Vich Creates: Catalog Party Prep Part 2. This set of In Color cards is all about lines, from the die cut border to the intricate lines of the inset butterflies.

Linda Vich Creates: Catalog Party Prep Part 2. This set of In Color cards is all about lines, from the die cut border to the intricate lines of the inset butterflies.

Linda Vich Creates: Catalog Party Prep Part 2. This set of In Color cards is all about lines, from the die cut border to the intricate lines of the inset butterflies.

These cards are simple yet effective because they use only two colors that give good contrast and because the focus is only on lines!


Monday, February 22, 2016

Balloon Congratulations For Global Design Project

I made the deadline for the Global Design Project #023 this time! It was a close call because I was having a bit of difficulty coming up with a balloon design. However, I persevered and finished my card!


My card colors also allow me to participate again in the Stampin' Royalty Challenge #317.


I started by punching large and small balloons from Watercolor Paper using the Balloon Bouquet Punch. I used Stampin' Sponges to color each with either Bermuda Bay, Cucumber Crush or Watermelon Wonder.

I grew a bit frustrated with designing a balloon bouquet because the balloons just didn't look right. Not until I came up with my current design did I think to do a Google search for balloon bouquet examples!

To make my design work, I referenced the four design principles that I had learned when I studied Multimedia Design:
  1. Contrast
  2. Repetition
  3. Alignment
  4. Proximity
To make these four principles easy to remember, we used the word CRAP. There is a really good downloadable poster that summarizes these points here.

For my card, I chose to use Contrast and Repetition. For the Repetition principle, I lined up two rows of alternating colors of balloons to use as the focal point of my card. When I used a different color and varied the position of one of the balloons, I used the Contrast principle.

For my card base, I used Watermelon Wonder and chose a finished card size of 4 3/4 x 6". From a wavy Bermuda Bay design on one of the Shine On Specialty Designer Series Papers I cut a matte. I adhered the matte to the card front using Fast Fuse Adhesive.

Using a ruler, I lined up the first row of five balloons, overlapping each and alternating colors, across the card. The balloons were offset on the sides and top of the card; I adhered them with Fast Fuse Adhesive.

I adhered four of the balloons in the second row and then for the focal point balloon, I used a Watermelon Wonder balloon and popped it up on double Dimensionals for the top part of the balloon and a single for the bottom. I also moved the balloon slightly above the alignment of the row of balloons. Using a pair of scissors, I trimmed off the balloons where they overhung the card base.

Before adhering the Watermelon Wonder balloon, I tied a length of black twine, separated from one of the twines in the Baker's Twine Combo Pack, around the balloon. I took a small amount of Crystal Effects and ran it up and down the twine with my fingers and then I left it to dry. I then wound the twine tightly around a pencil to give it a corkscrew twirl.

Using one of the now retired Adorning Accents Edgelits dies, I cut scallop borders onto a strip of Watermelon Wonder card stock. I cut a strip of Bermuda Bay striped paper from the Shine On DSP and adhered it on top of the scalloped piece. Using Fast Fuse Adhesive, I adhered this strip over top of the end of the balloon string.

Using the handy reference for the Banner Triple Punch found on the Feeling Crafty With Bekka site, I cut a strip of Cucumber Crush card stock and flagged each end with the punch. I used my MISTI with Stazon ink to stamp the sentiment from the now retired Sky Is The Limit Stamp Set. Using my MISTI allowed me to stamp the sentiment three times for a nice black impression. I used a Stampin' Sponge with Cucumber Crush ink to ink the edges of the banner.

I adhered the banner with Dimensionals to the card stock strip on the card front.

To amp up the design of the card, I used my Clear Wink of Stella pen to generously glimmerize (I think I created a new word here!) the Watermelon Wonder balloon as well as adhere an assortment of coordinating sequins.


I think this card creates a colorful party atmosphere befitting any type of congratulatory occasion!

Hope you enjoyed learning a little bit about design and my card making process today. I'd love you to drop me a comment below!


Thursday, February 18, 2016

I'm Lost Without You

I finally got my hands on the Going Global Stamp Set! Once I got a good look at the various stamps, I envisioned a star-studded night sky artfully created with the use of printed vellum, Wink of Stella, and rhinestones.

Time to bling it up!

I started by cutting a Night of Navy standard card base as well as a strip that was about 1 x 5 1/2" in length. Also cut was a strip of Silver Foil 1 x 5 1/2" and a piece of vellum from the Botanical Gardens Designer Vellum Stack cut to just short of 4 1/4 x 5 1/2".

The now retired Adorning Accents Edgelits were used to trim the strips of card stock and foil. (To view another card that uses these, see Sale-a-Bration Freebie Sneak Peek.)

Using my MISTI, I stamped the sentiment on the die cut card stock using Versamark and heat embossed it using the Silver Stampin' Emboss Powder. I stamped the Big Dipper onto the vellum and also embossed it.

I adhered the vellum to the card base by putting little dots of Multi Medium Matte beneath the printed stars (where it wouldn't be seen) as well as along the base of the vellum. I adhered the die cut pieces of card stock and foil along the bottom of the card using Fast Fuse Adhesive.

Rhinestones were adhered to the stars in the Big Dipper. In addition, I used the Fine Tip Glue Pen to put little drops of glue on several of the vellum stars and then poured Dazzling Diamonds Glitter over top, knocking off the excess. One last bit of glitz–I added Wink of Stella to some of the stars that didn't receive any of the Dazzling Diamonds.

For the inside of the card I cut a matte from Whisper White. I used Night of Navy ink on my MISTI to stamp a portion of the compass stamp in the bottom right corner after stamping off twice. I finished the matte by inking the edges with a sponge dauber. It was adhered using Fast Fuse Adhesive.


Nice and blingy, huh? Remember, when in doubt, add glitter! And rhinestones. And Wink of Stella!

True to the title and card sentiment, I'm lost without you . . . my readers.

Your comments mean so much to me and encourage me to try new ideas and techniques to share with you! Thank you for taking the time to connect with me by leaving a comment below.


Friday, December 18, 2015

Sale-a-Bration Freebie Sneak Peek

I have a Sale-a-Bration sneak peek for you tonight!

My husband, when I first met him, was busy building a glider with his father. This was a special glider because it contained an engine allowing it to be self-propelled to soaring height rather relying on a tow plane.

Though the completed glider was sold many years ago, my husband still has an interest in flying and exercises it through remote controlled planes and helicopters.

Because of this, I thought the new stamp set, Sky Is The Limit, would be appropriate.

You will be able to earn Sky Is The Limit for FREE during Sale-a-Bration which starts January 4! You should be receiving your Sale-a-Bration brochure and Occasions Catalog this month from your demonstrator.

I chose Blackberry Bliss for a card base, knowing that would work well with the gold embossing I planned to use.

I cut a piece of vellum for a matte and embossed the top half of it using the Cloudy Day Embossing Folder. (My husband always remarks when there are puffy clouds in the sky that they are "flying clouds.") I then used Versamark to stamp the images of the plane and its cute little contrail and then heat embossed them using the Gold Stampin' Emboss Powder.

I glued the vellum matte to the top of the card base using the Fine Tip Glue Pen on just the top part of it. To cover the glue, I used the Adorning Accents Edgelits Dies to cut two pieces, one from Gold Foil paper and one from the 2014-2016 In Color DSP Stacks. These were glued together and then adhered to the top of the card front using Dimensionals.

I chose to stamp a Happy Birthday sentiment, using Blackberry Bliss, on the inside of the card on the now retired Naturals White card stock and also inked its edges with a sponge dauber.


I think this works for a masculine card, don't you?

The Sky Is The Limit stamp set will only be available for a short time when Sale-a-Bration begins so be sure to grab it before it disappears!

Built for Free Using: My Stampin Blog