Showing posts with label sheltering tree. Show all posts

Thursday, November 17, 2016

Sheltering Tree and a Joyful Wreath

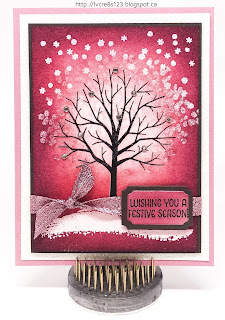
Linda Vich Creates: Sheltering Tree and a Joyful Wreath. An emboss resist technique that results in a pretty winter scene glowing with color!
I had such a fun night last night with the ladies in my second stamping group! We shared a few giggles as they worked on their cards.

The first card I designed was actually made last, just so we could all keep our hands and work stations clean so as not to contaminate the second card!

The emboss resist card was CASEd from Lisa Brown.

To create this card, a standard card base was cut from Sweet Sugarplum card stock. Two mattes were cut, one from Dazzling Diamonds Glimmer paper and one from Early Espresso. A piece of Watercolor paper was also cut.

The MISTI was used to stamp the tree, from the Sheltering Tree stamp set, three times with Early Espresso on the Watercolor paper and then it was heat set.

The paper was placed back into the Misti and the Embossing Buddy was used. The stamp was cleaned and then the tree stamp was re-inked using Versamark. The image was then heat embossed using Clear Stampin' Emboss Powder.

The Embossing Buddy was used again before stamping both the snowdrift and snowflake stamps using Versamark. The images were heat embossed using White Stampin' Emboss Powder.

Once again, the Embossing Buddy was used and then the leaf canopy stamp was used with Versamark. It was then heat embossed with the now retired Iridescent Stampin' Emboss Powder. The purpose of this stamp step was to create ice crystals in the tree.

It was very important to use the Embossing Buddy before inking each time because with using so many embossing powders, it would be very easy to end up with a "blob" on your paper!

The next step was to sponge color onto the image. A sponge was used first with Sweet Sugarplum to cover the entire paper with ink. Next, Rose Red was sponged everywhere except within the branches themselves. Lastly, Rich Razzleberry was sponged on the very edges and deep into the corners. The result of all this inking was a wonderful glowing image that softened from light to dark.

The completed image was adhered to the Early Espresso matte and then some Sweet Sugarplum Glitter Ribbon knotted around it. This was then adhered to the Dazzling Diamonds matte using Dimensionals. Finally, the whole thing was adhered to the Sweet Sugarplum card front.

The sentiment, from the Merry Mice stamp set, was stamped on Sweet Sugarplum and then die cut with a die from the Tags & Labels Framelits. Early Espresso was also die cut to act as a matte. The sentiment was inked with Rose Red and Rich Razzleberry and then adhered to the Early Espresso matte. The tag was adhered over the ribbon using Dimensionals.

To complete the card, rhinestones were added to the branches of the tree.

Linda Vich Creates: Sheltering Tree and a Joyful Wreath. An emboss resist technique that results in a pretty winter scene glowing with color!


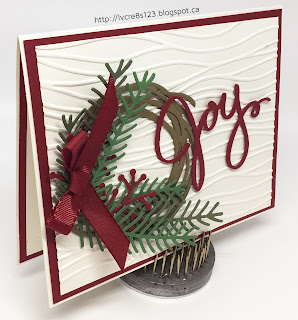
The second card only involved a little bit of stamping but it used a lot of texture from both die cuts and dry embossing. It was CASEd from Mary Fish.

A standard card base was cut from Very Vanilla as well as two mattes of the same size. Two more mattes were cut from Cherry Cobbler.

One of the Very Vanilla mattes was dry embossed using the Seaside Embossing Folder. This was adhered to one of the Cherry Cobbler mattes and then adhered to the card front.

The second Very Vanilla Matte was stamped with pine sprigs, from the Christmas Pines stamp set, using Always Artichoke. The stamp was stamped off once, very lightly, before stamping the image on the bottom right of the matte. This image was then adhered to a Cherry Cobbler matte and then adhered inside the card.

Two "wreaths" were die cut from Soft Suede using a die from the Swirly Scribbles Thinlits. These were offset and adhered to the card front using liquid adhesive. Pine sprigs, in both Garden Green and Always Artichoke as well as Cherry Cobbler berries were layered over the wreath and adhered using liquid adhesive. A bow of Cherry Cobbler was adhered on the left of the wreath using Glue Dots.

The sentiment in Cherry Cobbler was die cut using a die from the Wonderful Wreath Framelits and adhered to the card front using rolled up Glue Dots to complete the card.


Linda Vich Creates: Sheltering Tree and a Joyful Wreath. A lovely Christmas card filled with texture from both Pretty Pines Thinlits and the Seaside Embossing Folder.

Linda Vich Creates: Sheltering Tree and a Joyful Wreath. A lovely Christmas card filled with texture from both Pretty Pines Thinlits and the Seaside Embossing Folder.


Linda Vich Creates: Sheltering Tree and a Joyful Wreath. A lovely Christmas card filled with texture from both Pretty Pines Thinlits and the Seaside Embossing Folder.

Linda Vich Creates: Sheltering Tree and a Joyful Wreath. A lovely Christmas card filled with texture from both Pretty Pines Thinlits and the Seaside Embossing Folder.


I think that this card is exceptionally pretty because of all the texture and the wonderful color scheme. Feel free to steal this color scheme if you'd like to use it!

Linda Vich Creates: Sheltering Tree and a Joyful Wreath. A lovely Christmas card filled with texture from both Pretty Pines Thinlits and the Seaside Embossing Folder.


I hope you've enjoyed viewing these card projects! Drop me a note below to let me know what you think!

Saturday, July 16, 2016

Sitting Here Retirement Card

Linda Vich Creates: Sitting Here Retirement Card. The hanging swing from Sitting Here is the focal image of this lively and bright color schemed retirement card.
With my brother and sister-in-law visiting from Calgary, I haven't had much time to craft this week. Today, we had a retirement party to go to for our neighbors so I had to get a card made for them this morning!

I chose to use the Sitting Here stamp set for my focal image. I stamped the wooden swing on Whisper White card stock using Basic Black Archival ink. I then used the leaves from the Sheltering Tree stamp set to stamp with both Cucumber Crush and then Wild Wasabi (turning the stamp upside down). The image was then die cut using the now retired Circles Collection Framelits.

I used two more circles to cut both a Cucumber Crush and a Pacific Point frame. The edges were inked with Basic Black and then they were layered over the stamped image, adhering them with liquid adhesive.

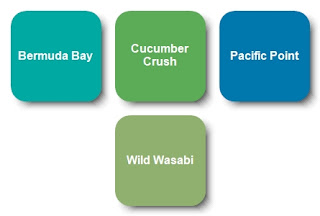
The pillows were stamped with Basic Black and then colored using Stampin' Write Markers in Pacific Point, Wild Wasabi, Cucumber Crush, and Bermuda Bay. A Basic Black marker was used to ink the edges of the fussy cut pillows. I then used a stylus from my McGill Paper Blossom Tool Kit to "puff up" the pillows like I did for the card in my Just Sitting Here post.

I cut a card base of 5.5 x 11" and then scored it at 2.75" from each end to create a gate fold card. I cut mattes from a piece of Cucumber Crush paper from the 2015-2017 In Color DSP Stack and adhered them to the front panels of the card after first inking the edges with Basic Black.

A Pacific Point 3/8" Stitched Ribbon was adhered to the back of the card and tied in a bow at the left side. Dimensionals were applied to the matted image but the adhesive was only removed from the side opposite the bow. This was done so that the card could be opened and also support the image on both sides.

The sentiment was cobbled together from two stamp sets–Wild About Flowers and Sweet Cupcake. It was stamped on Thick Whisper White using Basic Black. The sentiment was then die cut using a die from the Cupcake Cutout Framelits. A Pacific Point die cut was also made.

The Pacific Point die cut was cut in half, lengthwise, and then offset and glued to each side of the Whisper White die cut. It was adhered to the bottom of the stamped image on the card front.
The pillows were adhered to the stamped swing using doubled up Dimensionals.

For inside the card, a matte was cut from Thick Whisper White. The sentiment was stamped using Pacific Point and the tree was stamped using Soft Suede, Wild Wasabi and Cucumber Crush. The edges of the matte were inked with Wild Wasabi and then it was adhered with Fast Fuse Adhesive to complete the card.

A sheet of In Colors Envelope Paper was also used to create an envelope for the card, using the Envelope Punch Board. The envelope was not photographed.

Linda Vich Creates: Sitting Here Retirement Card. The hanging swing from Sitting Here is the focal image of this lively and bright color schemed retirement card.

Linda Vich Creates: Sitting Here Retirement Card. The hanging swing from Sitting Here is the focal image of this lively and bright color schemed retirement card.

I love the way this card came together and the color scheme really appeals to me! You can save it if you would like to use it for yourself!

Linda Vich Creates: Sitting Here Retirement Card. The hanging swing from Sitting Here is the focal image of this lively and bright color schemed retirement card.


Monday, March 23, 2015

Projects From Stamping Group

Linda Vich Creates: Projects From Stamping Group. A Lotus Blossom adorns a vibrant, card base created using a sun rays mask. Sea creatures abound in a 3D book card using stamps from By The Sea.Yikes! Our last Stamp Group night was VERY LONG!

Note to selfDo not attempt to teach two involved projects to stamp group on the same night!

I had been really looking forward to presenting my two projects to the group and the projects themselves were well received WHEN I presented them. When the ladies were still finishing their projects at 10:30 pm, they weren`t loving the projects quite so much :(

Be that as it may, the projects turned out very nicely and they got to practice a variety of techniques.

The first project of the evening was similar in style to the card in my Play MISTI For Me post. I chose this project because I thought it was a simple project that provided a lot of impact.

Also, I wanted the give the group the chance to work with my MISTI tool as well as the Lotus Blossom stamp set from the soon to be ending Sale-a-Bration catalog.

When I created the card, I utilized the MISTI so that I could use the magnets to hold the Sun Rays mask from the Hooray It's Your Day Project Kit on top of the matte. The ladies in class first adhered their matte to scrap paper using repositionable adhesive and then used Washi tape to adhere the mask over their matte.

Using Crushed Curry with a sponge dauber, color was stroked onto the matte, with a heavier application of ink applied in a type of "Corona" around the circular area of the mask.

Linda Vich Creates: Projects From Stamping Group. A Lotus Blossom adorns a vibrant, card base created using a sun rays mask. Sea creatures abound in a 3D book card using stamps from By The Sea.
Adding Crushed Curry

Next, the mask was rotated so that only half of the yellow ray was showing in each opening. Tangerine Tango was now stroked onto the matte.

Linda Vich Creates: Projects From Stamping Group. A Lotus Blossom adorns a vibrant, card base created using a sun rays mask. Sea creatures abound in a 3D book card using stamps from By The Sea.
After adding Tangerine Tango

Finally, the mask was repositioned a third time, showing an inked strip on either side of the opening with a white area in the middle; Real Red was stroked onto the matte.

After the application of each of Tangerine Tango and Real Red inks, the matte had to be carefully repositioned a the edges to ensure proper ink coverage all the way to the edge of the matte. Also, the Corona was enhanced each time with the new ink.


Linda Vich Creates: Projects From Stamping Group. A Lotus Blossom adorns a vibrant, card base created using a sun rays mask. Sea creatures abound in a 3D book card using stamps from By The Sea.
Completed inking

Once the matte was inked using the stencil, the card was edged with Cajun Craze.

The MISTI was used to stamp the sentiment from the Lovely Amazing You photopolymer stamp set, using Jet Black Stazon ink.

The MISTI was also used to stamp the lotus blossom on a 3.5" square of Whisper White.

The flower was stamped in reverse order from the directions for using the stamp set. The #3 stamp was inked with Crushed Curry and stamped first. Next, the #2 stamp was used to stamp with Tangerine Tango. It was reinked and stamped again to provide a rich, vibrant orange. Finally, the #1 stamp was used with Real Red to provide the final details of this amazing flower.

Using the 4th from centre Circle Collections Framelits Die, the lotus was cut out using the Magnetic Platform on the Big Shot. The 3rd from centre die was used to cut out a circle from Gold Glimmer paper. Another circle of Real Red was cut out using the 2" Circle Punch.

The Lotus was adhered to the Real Red circle using adhesive and then mounted with Dimensionals on the Gold Glimmer circle.

The inked matte was adhered to the Real Red card base using Dimensionals and then glue dots were placed in the un-inked white circle. Gold cord was adhered in a pleasing circular arrangement and then the Lotus stack of circles was adhered using Dimensionals to finish the card.

Linda Vich Creates: Projects From Stamping Group. A Lotus Blossom adorns a vibrant, card base created using a sun rays mask. Sea creatures abound in a 3D book card using stamps from By The Sea.
Adhering gold cord below embellishment
Linda Vich Creates: Projects From Stamping Group. A Lotus Blossom adorns a vibrant, card base created using a sun rays mask. Sea creatures abound in a 3D book card using stamps from By The Sea.

Linda Vich Creates: Projects From Stamping Group. A Lotus Blossom adorns a vibrant, card base created using a sun rays mask. Sea creatures abound in a 3D book card using stamps from By The Sea.


Linda Vich Creates: Projects From Stamping Group. A Lotus Blossom adorns a vibrant, card base created using a sun rays mask. Sea creatures abound in a 3D book card using stamps from By The Sea.


Built for Free Using: My Stampin Blog


Linda Vich Creates: Projects From Stamping Group. A Lotus Blossom adorns a vibrant, card base created using a sun rays mask. Sea creatures abound in a 3D book card using stamps from By The Sea.The second project was a 3D Book Card. I was inspired by the gorgeous card by Dawn Heuft that I pinned long ago on Pinterest. Following Dawn's video tutorial, I was able to create the Under The Sea card I had envisioned.

I used both Stampin' Up! and non Stampin' Up! materials to create this card.

To begin with, the inner "frame" of the card needed to be created by scoring and accordion-folding pieces of Lost Lagoon card stock. The folded pieces were then intertwined at each corner (easier to do than to describe with words!) and adhered with a drop of Tombow.

Next, the backdrop for the card was created by sponging ink onto a 4.25 x 5.5" piece of Whisper White. The colors used were, from the top, Pool Party, Lost Lagoon and Marina Mist. Using the coral stamp from the By The Sea stamp set, bits of coral were stamped using both Crisp Cantaloupe and Calypso Coral. The backdrop was adhered to the back of the frame using Sticky Strip.

I provided each lady with three shells and one seahorse (Sea Animals from Lin & Lene Design) die cut from Dazzling Diamonds Glimmer paper as well as a lobster (Deep Ocean Lobster from Memory Box) and a crab (Coastal Crab from Memory Box) die cut from Whisper White. A starfish was die cut from sandpaper.

A variety of inks were used to color each die cut, using sponge daubers:
  • Shells: Blushing Bride, Crisp Cantaloupe, Calypso Coral and Cajun Craze
  • Seahorse: Daffodil, Hello Honey, Crushed Curry, Tangerine Tango
  • Lobster: Marine Mist, Night of Navy, Elegant Eggplant, Cajun Craze, Calypso Coral, Pacific Point
  • Crab: Blushing Bride, Crisp Cantaloupe, Calypso Coral, Cajun Craze and white dots from a White Signo Uni-Ball Gel Pen
  • Starfish: Baked Brown Sugar, Chocolate Chip and white dots were added with a Chalk Marker
To create the three fish, we had to use a Mirror Stamping Technique to be able to create fish that were swimming to the right instead of the left.

The fish stamp in the By The Sea stamp set was swimming to the left and would not work right with the card. To bypass this obstacle we needed to use the leaf stamp from the Sheltering Tree stamp set.

This large photopolymer stamp was mounted on a clear block face down. This provided us with a large, smooth surface.

The fish stamp was inked using Tuxedo Black Memento Ink and then stamped onto the leaf stamp! This was then immediately stamped onto Whisper White card stock to produce a fish that was swimming in the correct direction!

The Mirror Stamping Technique does not have to be done using the Sheltering Tree stamp set; any photopolymer stamp set that has a very large stamp can be used. This is a handy technique to have in your stamping arsenal!

The fish was stamped three times and then was colored using Stampin` Write Markers in colors of Crushed Curry, Coastal Cabana, and Bermuda Bay. Each fish was fussy cut.

The cover of the book was cut from Lost Lagoon like the frame, 12 x 4 9/16`` in size and scored at 5.75`` from each end. Using Calypso Coral, the sentiment, from the now retired Sweet Essentials stamp set, was stamped on the front cover of the card.

The back of the cover was adhered to the back of the frame/backdrop using Sticky Strip. As well, Sticky Strip was placed on the spine of the frame and adhered to the cover.

A 30`` piece of Calypso Coral ribbon from the Best Year Ever Accessory Pack was adhered to the cover using Sticky Strip. The shells were adhered over the ribbon using Dimensionals.

The various sea creatures were temporarily arranged into the creases of the frame to find the best arrangement. They were then adhered using Crystal Effects. The seahorse and the starfish were adhered to the front of the frame.

A small amount of Crystal Effects was mixed with a drop of Soft Sky Party reinker and then droplets were placed on the backdrop to produce bubbles. In my card, the color of the bubbles was a bit dark. I should have used a bit more Crystal Effects.

Finally, the ribbon was tied in a bow to close the book card.

Linda Vich Creates: Projects From Stamping Group. A Lotus Blossom adorns a vibrant, card base created using a sun rays mask. Sea creatures abound in a 3D book card using stamps from By The Sea.


Linda Vich Creates: Projects From Stamping Group. A Lotus Blossom adorns a vibrant, card base created using a sun rays mask. Sea creatures abound in a 3D book card using stamps from By The Sea.


Built for Free Using: My Stampin Blog


In retrospect, this book card project was much too involved to pair with the first card at a stamping class! However, it would work fine as a single project for a class. Live and learn!

I really like this 3D book card idea. I already have another idea that I hope to be trying soon–stay tuned to the blog to see it!

Tuesday, January 6, 2015

Sale-a-bration, 2015 Occasions Catalog and Sweet Sunday Sketch Challenge


It's finally THE day! The 2015 Occasions Catalog is live and Sale-a-Bration is in full swing! If you are a customer of mine, by now you should have received your Sale-a-Bration brochure and 2015 Occasions Catalog. However, for your convenience, you may access both of these resources in PDF form by scrolling down and looking to the right on my blog.

There are SO many wonderful products in the Occasions Catalog and by placing an order of $60 you have several amazing products to select from for FREE from the Sale-a-Bration Brochure! I know you will want to receive them all so plan your purchases carefully. Sale-a-Bration only lasts from January 6 to March 31 and once it is over, it's over!

Click here to view a video tutorial on how you can use two of my favorite Freebies from Sale-a-Bration–Irresistibly Yours Designer Series Paper and Blendabilities!

As Sale-a-Bration continues, I will post about other products as well as share projects created with products from both the Occasions Catalog and the Freebies from Sale-a-Bration. Be sure to subscribe to my blog so you will not miss a post!

Now, let's take a look at the card I designed for the Sweet Sunday Sketch Challenge!


For this card, I used the free Irresistibly Yours paper and the Sheltering Tree stamp set from the Occasions Catalog.

Linda Vich Creates: Sale-a-Bration, 2015 Occasions Catalog and Sweet Sunday Sketch Challenge

To begin with, I cut a 5 x 7 card base from Chocolate Chip card stock. I then cut a panel from one of the Irresistibly Yours papers.

I used a combination of Pink Pirouette, Blushing Bride, Crisp Cantaloupe, Calypso Coral and Strawberry Slush to sponge a gradient from top to bottom on the panel. I then adhered the inked panel and a strip of Pink Pirouette to the card base.

Using the Banner Punch, I punched two banners, one from Crisp Cantaloupe and one from Strawberry Slush.

On a piece of Whisper White, I stamped the grass in Pear Pizzazz and then the tree base in Chocolate Chip. Of course, since I was using photopolymer stamps, I was sure to stamp on top of my Stampin' Pierce Mat like I mentioned in 3 Things To Know Before Using The Flower Patch Stamp Set.

For the leaves, I first inked up the stamp using Pink Pirouette. I then used the Thumping Technique to add more color to the leaves. To do this, I used my Crisp Cantaloupe and Strawberry Slush Stampin' Write Markers.

After stamping the leaves, I stamped the sentiment using Chocolate Chip. The stamped panel was then mounted on Dimensionals, with the little banners attached at the bottom right edge.

Because the card base was dark, I added an inner panel of Naturals White card stock to the inside, stamped with some of the leaves. This time for the Thumping Technique I added the Calypso Coral Stampin' Write Marker to give a bit more variety to the leaves.

Linda Vich Creates: Sale-a-Bration, 2015 Occasions Catalog and Sweet Sunday Sketch Challenge


Linda Vich Creates: Sale-a-Bration, 2015 Occasions Catalog and Sweet Sunday Sketch Challenge


Linda Vich Creates: Sale-a-Bration, 2015 Occasions Catalog and Sweet Sunday Sketch Challenge

The Sheltering Tree stamp set is wonderful to work with and I will use it again soon! I also enjoyed using the Irresistibly Yours paper–sponging is just one technique you can use with it to create your own one-of-a-kind paper. Be sure to place your $60 order with me so you can receive this paper as one of your freebies!

Built for Free Using: My Stampin Blog

Saturday, January 3, 2015

Bokeh Technique and Sneak Peek From 2015 Occasions Catalog

Do you ever feel like there are just too many products and too many techniques and not enough time to use them? If you're like me, this is a common complaint!

Because I get to work in my craft room in bits and pieces, I sometimes try to combine too many products and techniques into the same card just so I can use them! However, I sometimes get the balance just right like I did today!

Linda Vich Creates: Bokeh Technique and Sneak Peak From 2015 Occasions Catalog


Today's card makes use of the Bokeh Technique for the background of the card while also using new products from the 2015 Occasions Catalog which goes live on January 6. For this card I was able to use the Butterfly Thinlits Dies, the Sheltering Tree stamp set and the Bermuda Bay Sequin Trim.

I actually created the watercolor part of the backgrounds yesterday so they would be completely dry for today's work. I started by taping two pieces of watercolor paper to my craft mat using Washi tape. I was careful to keep my tape placement straight so I would have an even border when I was finished.

I followed the tutorial for the Bokeh Technique by placing 10 drops of water and three drops of Reinker in several little containers. I decided to try the technique using two different color combos:
  1. Melon Mambo, Totally Turquoise, and Crushed Curry
  2. Bermuda Bay, Old Olive, and Perfect Plum
Next, I filled my Aqua Pen with water and completely wet the surface of one piece of watercolor paper. I then dipped into one color and dabbed it around the paper. Immediately, I could tell that the color was too intense for what I was after but I persevered, adding each of the two other colors, allowing each color to bleed into the next. I continued till no white remained.

Linda Vich Creates: Bokeh Technique and Sneak Peak From 2015 Occasions Catalog

I then repeated the process with the other piece of watercolor paper and the second color combo. These colors kind of looked a little muddy to me when complete but they were more muted looking than the first set.

I will try this technique again in the future but I will not wet the paper so much to start with, preferring to spritz it as I go, if needed. I may also spritz and blot the paper to create a more muted look. In addition, I may use a ratio of 10 drops water to 1 drop of reinker.

I dried the pieces with my heat tool and then left them to dry completely overnight. I removed the washi tape which had been used to preserve a straight, white border and keep the paper from curling up as it got wet.

Next, I used the Circles Collection Framelits to cut the three smallest circles in a piece of Window Sheet to provide a template. I held this template over my first colored piece and used a sponge dauber to apply Brilliance Moonlight White pigment ink in one of the template openings.

I moved the template and repeated the process, alternating circle sizes and placement, being sure to overlap some of the circles as well as hanging some of the circles off the edge of the page.
I definitely thought the circles of white—or bokeh—enhanced the colored pieces, even the first, more intense color combo. Once completed, though, I chose the second color combo with which to work.

I trimmed down the colored panel to remove the white edges and then inked the edges using Perfect Plum ink. I cut mattes of Whisper White and Old Olive and a card base of Perfect Plum.
I used Fuse Fast to adhere each matte and then adhered some Whisper White Satin Ribbon with a strip of the Bermuda Bay Sequin Trim on top, using Sticky Strip. I then adhered the mattes to the card base.

I used Black Stazon ink to stamp the sentiment—from the Sheltering Tree stamp set—on vellum and used the Hexagon Punch to create a banner end. I used Tombow glue to adhere the banner to the top left and used glue dots to adhere a Vintage Faceted Button, topped with one of the loose sequins over the spot to hide the glue.

I die cut the largest of the Butterfly Thinlits from Bermuda Bay card stock and bent each wing up a bit. I then inked half of it with Versamark ink. I heat embossed it using non Stampin' Up! Kaleidoscope Embossing Powder. I repeated this step with the other half of the butterfly and then adhered it to the card front using glue dots.

To complete the card, I adhered four more loose sequins to the card front.
Here are a few shots of the card from different angles.

Linda Vich Creates: Bokeh Technique and Sneak Peak From 2015 Occasions Catalog

A close up to show the details of the sparkle!

Linda Vich Creates: Bokeh Technique and Sneak Peak From 2015 Occasions Catalog

Linda Vich Creates: Bokeh Technique and Sneak Peak From 2015 Occasions Catalog


I hope you will try the Bokeh Technique. I found it to be a lot of fun!


Built for Free Using: My Stampin Blog