Showing posts with label lots of labels framelits. Show all posts

Saturday, July 8, 2017

Fabulous Flamingo Thank You

Linda Vich Creates: Fabulous Flamingo Thank You. Stylized Fabulous Flamingo card in rich browns with gold
Had another play with Fabulous Flamingo today. This time I wanted to create a more stylized flamingo rather than a realistic one.

After deciding that I wanted to create a matte covered with the palm leaves, I made the decision to use a 5 x7" card because otherwise, not a lot of the matte would be seen. I cut a card base and a 5 x 7" matte from Soft Suede.

Using Versamark, I stamped the palm leaf in a random pattern over the entire matte. I then heat embossed using Gold Stampin' Emboss Powder.

The flamingo was stamped on Very Vanilla using my MISTI since it is so suited to multi-step stamping. I stamped first with Early Espresso, then Sahara Sand 2X, and finally, Versamark for both the legs and the last body layer. I then heat embossed with gold.

The largest of the Lots of Labels Framelits was used to die cut the flamingo. Using Early Espresso, the sentiment was stamped on the bottom of the die cut. Three loose gold sequins were adhered next to the flamingo using liquid adhesive.

Linda Vich Creates: Fabulous Flamingo Thank You. Stylized Fabulous Flamingo card in rich browns with gold


I cut a 1" strip of Early Espresso and adhered it across the embossed matte using Fast Fuse. I topped the strip with a length of the now retired Gold Sequin Trim. The matte was then adhered to the card front using Fast Fuse. The die cut was adhered in the centre of the card front using Dimensionals.

For an inside matte for the card, I stamped the second part of the sentiment on Very Vanilla using Early Espresso and then used Versamark to stamp the palm leaf all around the edges of the matte. After embossing with gold, the matte was adhered inside the card.

Linda Vich Creates: Fabulous Flamingo Thank You. Stylized Fabulous Flamingo card in rich browns with gold

Linda Vich Creates: Fabulous Flamingo Thank You. Stylized Fabulous Flamingo card in rich browns with gold

Linda Vich Creates: Fabulous Flamingo Thank You. Stylized Fabulous Flamingo card in rich browns with gold
Close up of flamingo showing gold embossing  

Linda Vich Creates: Fabulous Flamingo Thank You. Stylized Fabulous Flamingo card in rich browns with gold

I'm not a "browns" person but I quite like how this turned out!


Tuesday, November 8, 2016

Irresistible Cupcake

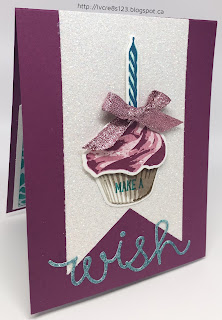
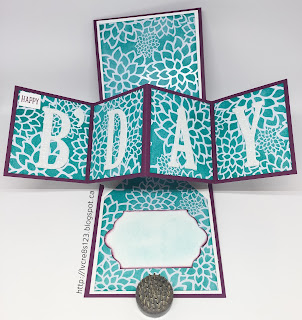
Linda Vich Creates: Irresistible Cupcake. A multi-step-stamped Sweet Cupcake graces the card front of this Pop Up Panel card while the inside flaunts a resist background brought to life by sponging with Bermuda Bay
It has been so hard waiting to blog about this card but I needed to wait until the recipient had received it! This is my very first Pop Up Panel card, AKA Pop and Twist card, AKA Twist and Pop card.

There are so many of these cards being displayed on the internet now and each one that I have seen has pushed me to try one of my own. Some of the cards are quite simply embellished and some are outright over-the-freakin'-top!

The tutorial that I chose to follow was one from Maymay Made It. I had previously looked at some other tutorials but found hers to be the easiest to follow.

There are three main pieces to this type of card: 1. card base 2. mechanism for the pop up and 3. the strip for the pop out panel.

I started by cutting a 4 1/4 x 11" card base from Rich Razzleberry. It was scored at 5 1/2". The mechanism for the pop up was cut from Whisper White at 8 1/2 x 10 3/4" and scored at 2 1/4", 4 1/4" and 6 1/4" on the short side and at 3 7/8", 5 3/8" and 6 6/8" on the long side. The strip for the pop out panel was cut at 3 x 11" from Rich Razzleberry. It was scored at 2 3/4", 5 1/2" and 8 1/4".

Four mattes for the pop out panel were cut from Irresistibly Floral DSP at 2 3/4 x 2 1/2". Two mattes, for the inside card panels were also cut at 3 3/4 x 5 1/2" before being trimmed to fit.

For each of the panels, I sponged them with Bermuda Bay ink to reveal the patterned resist. The two larger panels were trimmed to fit by tracing the mechanism for the pop up once it was created.

To create the pop up mechanism, after scoring, the four outer corners are cut away leaving a kind of T shape. The T has two wide pieces and two narrow pieces. Each of the narrow pieces had notches cut from each side to help get rid of some of the bulk from when the mechanism would be folded. Finally, using the score lines, the panels are folded to create an X at the centre. It is very hard to describe the actual construction of the pop out mechanism so you are best to view the video tutorial.

Once the pop out mechanism is created, the strip for the pop out panel is adhered to it. The four mattes were then adhered. Next, the two large panels for the inside of the card are trimmed by tracing the pointed shape of the pop out mechanism onto them. These mattes are then glued onto parts of the mechanism that actually form the white base matte inside the card. The mechanism was then glued to the inside of the Rich Razzleberry card base.

To finish embellishing the card, the large letters for the pop out panels were die cut from Dazzling Diamonds Glimmer paper using the Large Letter Framelits. "Happy" was stamped on a piece of Whisper White using Rich Razzleberry ink and a sentiment from the Sweet Cupcake stamp set.

Using the Lots of Labels Framelits, a tag was cut from Whisper White and edges inked with Rich Razzleberry. This was designed as a place to add greetings from the sender. Unfortunately, the Whisper White did not stay pristine! It picked up a smudge of Bermuda Bay so I compensated by lightly sponging more Bermuda Bay onto it!

For the front of the card, I cut a banner from Dazzling Diamonds Glimmer paper using the Banners Framelits. Using the Sweet Cupcake stamp set, I did multi-step stamping to create the cupcake, its wrapper and a candle. The cupcake used Sweet Sugarplum and Rich Razzleberry, the wrapper used Sahara Sand, Tip Top Taupe and Soft Suede, and the candle used Pool Party and Island Indigo. Each piece was die cut using the coordinating framelits.

"Make a" was stamped onto the cupcake wrapper and then the cupcake had a slit cut into it so the bottom of the candle could be inserted and taped to the back. The cupcake was popped up with Dimensionals onto the wrapper and adhered to the banner. Sweet Sugarplum Glitter Ribbon was tied in a bow and adhered to the base of the candle.

To complete the card, the "wish" sentiment was die cut from Dazzling Diamonds Glimmer paper using a die from the Cupcake Cutout Framelits. It was sponged with Bermuda Bay and adhered at the bottom of the banner.

Linda Vich Creates: Irresistible Cupcake. A multi-step-stamped Sweet Cupcake graces the card front of this Pop Up Panel card while the inside flaunts a resist background brought to life by sponging with Bermuda Bay

Linda Vich Creates: Irresistible Cupcake. A multi-step-stamped Sweet Cupcake graces the card front of this Pop Up Panel card while the inside flaunts a resist background brought to life by sponging with Bermuda Bay

This card was a joy to create, especially knowing that I would be sending it to my special online friend, Donna!


Saturday, February 20, 2016

Timeless Textures Thank You

Those of you who know me well, or at least follow my blog, know that I love texture. Because of this, I was immediately drawn to this card by Dena Rekow.

Dena's card employs texture in a few ways:

  1. By using a patterned paper
  2. By stamping with ink with the Timeless Textures Stamp Set
  3. By stamping with water
Yes, you read that right! Stamping with water is a really neat technique that produces texture by subtracting color! But I'm getting ahead of myself.

I decided to CASE Dena's card but change up the colors and use it for thank you cards for my stamping group.

I started by cutting a standard card base from Basic Black. I cut a skinny Island Indigo matte and finally a matte from a piece of the Typeset DSP.

I used Island Indigo with the mottled edge stamp from Timeless Textures to stamp around the outside of the matte. I then used another of the stamps to stamp a couple of times with Basic Black Archival ink on the matte itself.

I cut a tag for the card from Whisper White by using a die from the Lots of Labels Framelits Dies. I used a sponge dauber to color the entire tag with Bermuda Bay ink and then covered it again using Island Indigo ink. Using the swirly stamp from Timeless Textures, I spritzed it 4-5 times with my Mini Mister (until water beaded on the stamp). I then stamped it onto the paper and held it there for about 10 seconds.

What was left was a very light swirl stamp that deepened as it dried. I stamped it a second time and then made sure it was totally dry by zapping it with my Heat Tool. I then stamped the sentiment from the Crazy About You Stamp Set using Basic Black Archival ink.

I adhered the stamped matte to the Island Indigo matte using Snail Adhesive. A length of the 3/8" Basic Black Stitched Ribbon was knotted around the matte. This was then adhered with Dimensionals to the Basic Black card front.

The edges of the tag were inked with Basic Black Archival ink and then it was adhered with Dimensionals to the card front.

A matte of Whisper White was cut for the inside. (This is where I made an error but it was too late to correct. I should have used a Very Vanilla matte for the inside because the Typeset Paper has a Very Vanilla background rather than one that is white.) I inked the edges with the same stamp as on the front of the card and stamped one swirl stamp. The matte was adhered with Fast Fuse Adhesive to complete the card.


What is important to note about this card technique is that Clear Mount stamps were used. I'm not sure if Photopolymer stamps would work as well for this technique. In addition the stamps were "distressed" stamps so that weird effects from the water would be acceptable.

I will definitely use this technique again and I will try it with Photopolymer stamps to see if my hypothesis is valid. I'm thinking that the Awesomely Artistic Stamp Set might be a good one to try. The First Sight Stamp Set would also be another possibility. Even Kinda Eclectic could produce some neat results! It will be fun to experiment to see what works best!

I hope you try the water stamping technique–let me know how it works for you!


Tuesday, November 3, 2015

Halloween Round Up

Halloween was a real whirlwind this year! It seemed that no sooner were the candy, costumes, and decorations on the shelves at Walmart when Halloween night had come and gone!

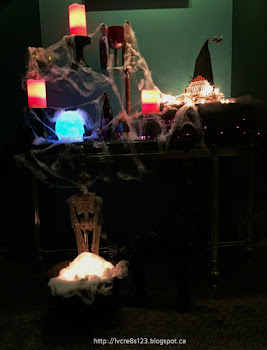
I had been looking forward to creating the Halloween Decor Project from Stampin Up and I was able to incorporate it into a spooky little scene in our hallway entrance that totally captivated my granddaughter, Raine!

For the first couple of times she was over, she would not walk past it at all, even if I held her! Gradually, she was able to go by if I was holding her and by Halloween night, she walked past it herself a couple of times!

Here's the hat by itself after I completed it:


And here it is in the Halloween display I created:


Luckily, I had a day off prior to Halloween in order to create some cards and gift bags.

For Steffan, I used my Zig Clean Color Real Brush Markers to color in a stamp from the Happy Witches stamp set by Hampton Art. I die cut the stamp as well as a Black Glimmer paper using the Lots Of Labels Framelits.

The sentiment from Halloween Expressions Mini from Inkadinkado was stamped with Archival ink on Cucumber Crush card stock. The edges were inked with the archival ink and then the matte was mounted on a Rich Razzleberry card base.

The die cuts were adhered to each other and then popped up on the matte using Dimensionals.


For Courtney, I cased this card. I used the wonderfully spooky stamp set, Witches' Night, to stamp the main image on Whisper White card stock using Basic Black Archival ink. I used Pumpkin Pie and Rich Razzleberry inks to sponge the image and then die cut it using the Lots of Labels Framelits, cutting a larger one from Black Glimmer paper. The colored image was also stamped with Versamark and then heat embossed with Clear Embossing Powder to make it shiny. The die cuts were adhered to each other.

On a strip of Rich Razzleberry I stamped the zig zag pattern stamp from the same stamp set and then adhered a strip of Black Glimmer paper over top. On a Pumpkin Pie matte, I stamped bats in each corner and then it was adhered to a Rich Razzleberry card base using Dimensionals.

The strips of Rich Razzleberry and Black Glimmer were adhered in the centre of the matte and then a black Spiderweb Doily was cut in half and adhered to the back of the die cut. The die cut was then adhered to the card front using Dimensionals.


 For Raine's gift bag, I used a piece of paper from the Happy Haunting DSP pack and the Gift Bag Punch Board to create her treat bag. To decorate it, I used a stamp from the Witches' Night stamp set to stamp on Pumpkin Pie card stock and then die cut it using the Lots of Labels Framelits. It was attached to the bag with a black spiderweb doily cut in half behind it.

I used both the Boo To You and the Seasonal Frame Thinlits Dies to die cut Boo! and Spooky from Pumpkin Pie card stock, three copies of each. The words were glued together using the Fine Tip Glue Pen. I used Versamark and Clear Embossing Powder to heat emboss the words to make them shiny.


Steffan's bag was made the same way but I used a different stamp on Real Red card stock and it was heat embossed to make it shiny. The stamp was die cut and adhered to Black Glimmer paper die cut and then adhered over a spiderweb showing the white side.

I used the Howl-o-ween Treat stamp set with StazOn ink to stamp the skull and bone on Dazzling Diamonds Glimmer paper. They were die cut using the Boo To You Framelits.


Finally, for Courtney's gift bag, I stamped the image from the Happy Witches stamp set on Rich Razzleberry card stock and die cut it. It was edged with Basic Black Archival ink. A larger die cut label in Pumpkin Pie was used behind it, with a black Spiderweb Doily sandwiched between.


Here's a picture of Raine in her costume taken by her daycare provider. They had a party that day and took their costumes to put on there. Prior to this, Raine had not been persuaded to try on her costume but when she saw all the other kids getting into their costumes, she figured it was ok to do the same!


Here's Raine after returning from walking door-to-door for over 1 1/2 hours! She had a ball and got a Walmart bag full of goodies!


Here she is, enjoying some of her candy stash!
 Hope you all had a good Halloween!

Built for Free Using: My Stampin Blog

Monday, July 20, 2015

Remarkable You and a Mixed Media Technique

I hope you all are enjoying this wonderful summer! My husband and I have been enjoying spending time with our granddaughter, Raine. She's growing up so fast but she is such a total delight!

I've snuck in a few photos of her to show you below!

Linda Vich Creates: Remarkable You and a Mixed Media TechniqueLinda Vich Creates: Remarkable You and a Mixed Media Technique

Linda Vich Creates: Remarkable You and a Mixed Media TechniqueLinda Vich Creates: Remarkable You and a Mixed Media Technique

Though I thought that when she was napping (and she is a GREAT napper) I would have time to make some cards, it appeared that Grandma sometimes needed a nap then, too!

Regardless, I was able to put together a card today and dabble with a mixed media technique.
I started by creating a watercolor background using four reinkers–Rich Razzleberry, Blackberry Bliss, Coastal Cabana and Bermuda Bay. I simply wet my paper well with a spray bottle and then dabbed on color. I dried with my heat tool and added a bit more where I thought it was needed and then dried it completely.

Next, I chose to use the stripes mask from the Dots and Stripes Masks set. I adhered my watercolored matte to my craft matte and then adhered the mask over it.

I added a few drops of Bermuda Bay reinker to some Golden Gel Medium Light Molding Paste and mixed it well using an old gift card. I then proceeded to wipe the molding paste from bottom to top of the mask over the watercolored matte, being sure to swipe the excess paste from the matte. I then lifted the mask straight up and off of the watercolor and set it aside to dry.

Meanwhile, I used my MISTI to stamp the flower from the Remarkable You stamp set with Versamark onto both a piece of Blackberry Bliss and a piece of Bermuda Bay card stock. I heat embossed both with Gold Stampin' Emboss Powder and then fussy cut them. They were adhered to the watercolor matte with Dimensionals.

The sentiment was also stamped with Versamark and heat embossed. It was die cut using the Lots of Labels Framelits and then trimmed down slightly.

Once it was completely dry, I trimmed up the watercolor matte and wrapped a length of Gold Sequin Trim around it and then adhered the sentiment on top, using Dimensionals.

A piece of paper from the Bohemian Designer Series papers was adhered to a Bermuda Bay card base using Snail Adhesive and then the watercolor matte was adhered on top using Dimensionals.

I love how the use of the Molding Paste turned out! Because it was only thinly applied, some of the watercolored background showed through, making it look kind of like a two-toned ombré stripe! It gives a nice dimensionality to the matte as well.

Linda Vich Creates: Remarkable You and a Mixed Media Technique. Molding Paste mixed with Bermuda Bay reinker creates lovely, dimensional stripes over a watercolored background provides a stunning backdrop for embossed flowers from Remarkable You.

Linda Vich Creates: Remarkable You and a Mixed Media Technique. Molding Paste mixed with Bermuda Bay reinker creates lovely, dimensional stripes over a watercolored background provides a stunning backdrop for embossed flowers from Remarkable You.

Linda Vich Creates: Remarkable You and a Mixed Media Technique. Molding Paste mixed with Bermuda Bay reinker creates lovely, dimensional stripes over a watercolored background provides a stunning backdrop for embossed flowers from Remarkable You.

I'm looking forward to more experiments with Molding Paste on future cards so stay tuned! Let me know in the comments below if you have tried Molding Paste in your card making.


Built for Free Using: My Stampin Blog

Wednesday, July 8, 2015

Gift From The Garden In Bold, Bright Colors

Linda Vich Creates: Gift From The Garden In Bold, Bright Colors. A boldly colored Brick Wall serves as a stunning backdrop to Cucumber Crush stamping using the Gift From The Garden stamp set from Stampin Up.As I have mentioned in past posts, if I have any spare time while working at Walmart, I amuse myself by making lists of potential color combos and drawing sketches for card ideas.

We've been so busy lately that I haven't had time to do much of this but there was a bit of a lull the other day so I had a chance to jot a few things down. Yesterday's card, in fact, was actually inspired by my careful examination of a potato chip bag! The color scheme was perfect and I knew I had to use it!

Though yesterday I completed my three-part "gardening" series, today's card also employs a gardening theme but the color scheme is one I thought of while working at Walmart.

I started by embossing a Whisper White matte with the new Brick Wall embossing folder. I have been wanting to use that one for so long!

I used sponge daubers to color in the bricks using Cajun Craze and Delightful Dijon and I inked the edges using Chocolate Chip. The matte was adhered to a Cajun Craze card base using Dimensionals.

The color I chose to complement the brick wall was one of our new In Colors, Cucumber Crush. Using my MISTI I stamped both the sentiment and the three plants on Whisper White card stock and then die cut them using two different sets of Framelits–Project Life Cards & Labels and Lots Of Labels. I inked the edges of the die cuts using the same ink.

Using a few swirls of Linen Thread to form a circle, I wrapped the circle with some Gold Metallic Thread. I kept the ends from unravelling by using a couple of drops of Crystal Effects. The "wreath" was adhered behind the sentiment die cut and then the sentiment and the plant die cuts were adhered to the card front using Dimensionals.

To complete the card, I would have used my Blendability Markers but I had returned them to Stampin Up. Instead, I used a YR23 Copic Marker to color some rhinestones and then affixed them to each die cut.

Linda Vich Creates: Gift From The Garden In Bold, Bright Colors. A boldly colored Brick Wall serves as a stunning backdrop to Cucumber Crush stamping using the Gift From The Garden stamp set from Stampin Up.

So, do you think of the color scheme? Drop me a note below!

My love for bold, bright colors was definitiely satisfied by creating this card! I will look forward to using the Brick Wall folder again as it was a pleasure to color it.


Built for Free Using: My Stampin Blog