Showing posts with label cookie cutter builder punch. Show all posts

Sunday, November 6, 2016

Christmas Crafting in Unseasonable November Heat

Linda Vich Creates: Christmas Crafting in Unseasonable November Heat. Pyramid Pals Thinlits were used to create jewel-toned treat boxes.
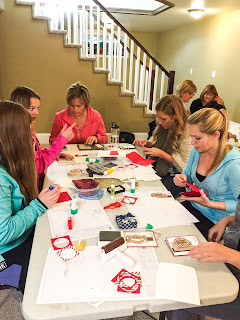
Though the last few days have been an unseasonable heat wave, today I had a sweet afternoon crafting Christmas cards with twelve lovely ladies!

In preparing for my card class, I created some little treat boxes using the Pyramid Pals Thinlits CASEd from Linda Parker. If you haven't used these yet, you will want to give them a try! They are so very easy to put together and they make lovely boxes for tiny treats such as a Ferrero Rocher.

I die cut twelve boxes in jewel tones and used my MISTI to simplify the job of stamping one of the trees from the Totally Trees stamp set on each of the four panels of the pyramid boxes. I heat embossed six of them with Silver Embossing Powder and six with Gold.

The 1/8" Circle Punch was used to punch was used to punch two holes in both the front and back panels. I inserted either gold or silver cording through the back holes and into the front ones.

Tear & Tape was used to adhere the panels, leaving the front panel open. I inserted the Ferrero Rocher and then tied the box closed.

Linda Vich Creates: Christmas Crafting in Unseasonable November Heat. Pyramid Pals Thinlits were used to create jewel-toned treat boxes.

Linda Vich Creates: Christmas Crafting in Unseasonable November Heat. Pyramid Pals Thinlits were used to create jewel-toned treat boxes.


The cards we made were so much fun to make!

The first card was CASEd from Chiaki Haverstick. A Real Red standard card base was cut and a Whisper White matte was embossed with the Softly Falling Embossing Folder and then adhered to the card front.

The Gingerbread Boy, from the Cookie-Cutter Christmas stamp set, was stamped on Thick Whisper White using Tip Top Taupe. It was punched with the coordinating punch and then heat embossed with a non-Stampin' Up Clear Embossing Powder from WOW. This particular powder was used because the proper "baked" color could not be achieved in any other way. If the Clear Embossing Powder from Stampin' Up had been used, the boy would have had a glossy appearance–definitely not cookie-like! Instead, this embossing powder had a matte finish that gave the boy just the right look!

The Layering Circle Framelits were used to die cut both Real Red card stock and a striped piece of the Candy Cane Lane DSP. Strips of first Early Espresso, then a different piece of the Candy Cane Lane DSP was layered on the card front. The circles were adhered together and then layered with the Gingerbread Boy adhered on top with Dimensionals.

The sentiment from the Merriest Wishes stamp set was stamped on the bottom right of the card front to complete the card.

Linda Vich Creates: Christmas Crafting in Unseasonable November Heat. Cookie Cutter Christmas was used to create this fun Christmas card!

Linda Vich Creates: Christmas Crafting in Unseasonable November Heat. Cookie Cutter Christmas was used to create this fun Christmas card!


The second card was CASEd from Inking Idaho. A standard card base was cut from Very Vanilla and two mattes, one from Real Red, one from Sahara Sand.

The sentiment, from the Christmas Pines stamp set, was stamped on the bottom right of the Sahara Sand matte using Emerald Envy. The Sahara Sand and Real Red mattes were adhered together and then adhered to the Very Vanilla card front.

The Brick Wall Embossing Folder was inked up with Sahara Sand using the now retired brayer. A strip of Very Vanilla card stock was laid inside the folder and then run through the Big Shot. This gave the bricks a lovely dirty looking grout. The bricks were further "dirtied" up using a sponge and ink. Another small piece of Very Vanilla was "dirtied up" and adhered to the top of the larger brick piece with Dimensionals. This piece of "fireplace" was then adhered at the left of the card front.

Real Red was used to stamp the stocking and the berries on Thick Whisper White and then die cut. The top for the stocking and the holly was also die cut. These pieces were adhered to the stocking and then adhered to the fireplace using Dimensionals.

The merry sentiment was die cut from Red Glimmer Paper using the Christmas Greetings Thinlits. To adhere the sentiment, a new technique was used. A sponge, attached to a binder clip, was used to "pounce" glue onto the back of the sentiment which was laying on a silicone matte; a pair of tweezers was already in place ready to place the sentiment on the card front.

Two pine sprigs were die cut from Emerald Envy using the Pretty Pines Thinlits and adherd to the top of the fireplace. The Blossom Builder Punch was used to punch to blossoms from Real Red. These were adhered together, offset, and glued on top of the pine sprigs. To complete the card, Gold Glitz Dazzling Details was added to the centre of the Poinsettia.


Linda Vich Creates: Christmas Crafting in Unseasonable November Heat. Pretty Pine Thinlits combine with Christmas Stocking Thinlits to create this lovely Christmas vignette.

Linda Vich Creates: Christmas Crafting in Unseasonable November Heat. Pretty Pine Thinlits combine with Christmas Stocking Thinlits to create this lovely Christmas vignette.

A lot of fun was had by all today!


Our lovely hostess Amy!


Saturday, October 29, 2016

Exciting Stampin' Up! News and Stamp Class Projects


Have you heard the news??

As of November 1, you will be able to purchase stitched dies from Stampin' Up! A collection of 12 stitched dies, four each of ovals, squares, and circles will be appearing in the new annual catalog in June but you can purchase them early!

View the video below for a look at these lovely dies!


To celebrate the release of these dies, Stampin' Up is offering a 25% discount on select stamp sets which coordinate with these dies! These stamp sets will only be on sale during the month of November.

Click photo for full size listing of stamps on sale.

Contact me to place your order for both the stitched dies and matching stamp sets of your choice!

On Thursday, I met with my second stamp group and we had a ball chatting about crafting and making two lovely projects.

A standard card base was cut from Real Red card stock. Two mattes were cut from Whisper White. One matte was embossed using the Softly Falling Embossing Folder. The edges were inked with Pool Party using a sponge and then it was adhered to the card front.

The igloo was cut from Thick Whisper White using the Layering Ovals. A backing was cut from Pool Party. The white piece was embossed using the Brick Wall Embossing Folder and then the two pieces of the igloo were glued together with liquid adhesive.

The outside of the igloo was inked with Pool Party as well as the lines between the bricks. Liquid glue was applied to the edges, around the doorway, and random spots on the igloo itself and then Dazzling Diamonds Glitter was applied.

The Eskimo from the Cookie-Cutter Christmas stamp set was stamped on watercolor paper using Stazon ink. After setting the ink with a heat tool, the Eskimo was colored by using Stampin' Write Markers with a Blender Pen.

The igloo and Eskimo were adhered to the card front using Dimensionals. The sentiment, from the Santa's Sleigh stamp set, was stamped with Basic Black on a strip of Pool Party. One end was flagged with scissors and then the sentiment was adhered to the card front using Snail Adhesive.

The matte for the inside was stamped in Pool Party with a brick stamp from the Ghoulish Grunge stamp set. The edges of the matte were inked with Pool Party and then the matte was adhered inside to complete the card.

Linda Vich Creates: Exciting Stampin' Up! News and Stamp Class Projects.This card features an Eskimo cut with the Cookie Cutter Builder Punch and an igloo created with the Layering Ovals.

Linda Vich Creates: Exciting Stampin' Up! News and Stamp Class Projects.This card features an Eskimo cut with the Cookie Cutter Builder Punch and an igloo created with the Layering Ovals.

Linda Vich Creates: Exciting Stampin' Up! News and Stamp Class Projects.This card features an Eskimo cut with the Cookie Cutter Builder Punch and an igloo created with the Layering Ovals.


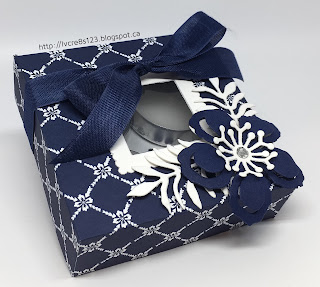
Our second project was a little box that holds four tea light candles. The project was CASEd from Square Fish Designs and there is a template there that shows the scoring lines for the project.

A piece of the Floral Boutique DSP was cut 9.5 x 5.25" and scored and cut according to the template mentioned above. The Layering Squares were used to cut a hole in the lid portion of the box and a piece of Window Sheet was adhered inside the lid using Snail Adhesive.

A frame for the outside was cut with the Layering Squares from Thick Whisper White. It was adhered outside the window using liquid adhesive. Tip: Apply liquid adhesive to the frame and lay it, glue side up on the desktop. Hold the unassembled box with the wrong side facing you. Look through the window in the lid to line up the frame and press to adhere.

The box was completed using liquid adhesive and the candles placed inside. The Botanical Builder Framelits were used to cut the flower, stamens, and leaves. These were attached to the box lid using liquid glue and Dimensionals. A rhinestone was added to the centre of the flower.

A piece of the now retired Night of Navy Seam Binding was tied in a bow around the box to complete it.

Linda Vich Creates: Exciting Stampin' Up! News and Stamp Class Projects. This box for four tea light candles is stunning when made from Floral Boutique DSP and embellished with flowers die cut with the Botanical Builder Framelits.

Linda Vich Creates: Exciting Stampin' Up! News and Stamp Class Projects. This box for four tea light candles is stunning when made from Floral Boutique DSP and embellished with flowers die cut with the Botanical Builder Framelits.

Linda Vich Creates: Exciting Stampin' Up! News and Stamp Class Projects. This box for four tea light candles is stunning when made from Floral Boutique DSP and embellished with flowers die cut with the Botanical Builder Framelits.

Fun was had by all and I look forward to our next class in November!


Thursday, October 6, 2016

A Halloween Treat, A Ghost, and Other Creepy Stuff

Linda Vich Creates: A Halloween Treat, A Ghost, and Other Creepy Stuff. A ghastly group of Halloween projects created with Swirly Scribbles Thinlits, Pyramid Pals Thinlits, Cookie Cutter Halloween and the Cookie Cutter Builder Punch.
Today I'm sharing with you a few of the 3D projects that I displayed for my new stamping group.

First up is a little Halloween Treat Box. This project was CASEd from Lisa's Christmas project. I used a piece of Basic Black card stock to make the box itself and then the belly band was cut from a sheet of the Halloween Night Specialty DSP.

To embellish the box with pumpkins, I cut two of the circles from Pumpkin Pie using the Swirly Scribbles Thinlits and used both the Petite Petals and Blossom Bunch Punches to punch leaves from Garden Green.

I used the Tags & Labels Framelits to cut a tag from Thick Whisper White and then used the stamps from the Spooky Fun stamp set with Basic Black and Pumpkin Pie.

One of our clear bags was used for candy and I tied it off with our now retired Pumpkin Pie 1/4" Cotton Ribbon.

Linda Vich Creates: A Halloween Treat, A Ghost, and Other Creepy Stuff. A Halloween treat box made with Halloween Night Specialty DSP and the Swirly Scribbles Thinlits.

Linda Vich Creates: A Halloween Treat, A Ghost, and Other Creepy Stuff. A Halloween treat box made with Halloween Night Specialty DSP and the Swirly Scribbles Thinlits.


For my ghost, I used the Pyramid Pals Thinlits to cut vellum for the ghost's body. All but the back of the ghost was adhered with Fast Fuse. For the back I used glue dots to allow the ghost to be opened to insert and turn on the tea light. To complete the ghost, I simply added googly eyes.

Doesn't he look cute? I think a grouping of these would look lovely in a dark corner for Halloween!

Linda Vich Creates: A Halloween Treat, A Ghost, and Other Creepy Stuff. A ghost created by using vellum, a tea light and the pyramid pals thinlits.

Linda Vich Creates: A Halloween Treat, A Ghost, and Other Creepy Stuff. A ghost created by using vellum, a tea light and the pyramid pals thinlits.


Lastly, I made three sets of Halloween earrings. These are really a lot of fun to make!

I used Jet Black Stazon ink and my MISTI to stamp onto Frosted Ruff N' Ready Shrinky Dinks plastic. After I was sure that they were dry, I used a sharpie marker to color red onto the Vampire while leaving the skeleton and mummy as they were stamped.

I used the 1/4" Circle Punch to put holes at the top of each and then used my piercing tool to hold each piece, through the hole, on a heat resistant surface. I heated each piece with my Heat Tool. While heating, the plastic billows and curves and then eventually shrinks and flattens into the final size, one-third the size of the original and nine times thicker!

To complete the earrings, I used 4 and 6 mm jump rings and earring wires.

Linda Vich Creates: A Halloween Treat, A Ghost, and Other Creepy Stuff. Halloween earrings made by using Cookie Cutter Halloween, Cookie Cutter Builder Punch, and Shrinky Dinks plastic.

Linda Vich Creates: A Halloween Treat, A Ghost, and Other Creepy Stuff. Halloween earrings made by using Cookie Cutter Halloween, Cookie Cutter Builder Punch, and Shrinky Dinks plastic.

Linda Vich Creates: A Halloween Treat, A Ghost, and Other Creepy Stuff. Halloween earrings made by using Cookie Cutter Halloween, Cookie Cutter Builder Punch, and Shrinky Dinks plastic.


I look forward to making more earrings in the future by using other stamps and dies!


Monday, September 12, 2016

September Projects for Stamping Group

Friday night was the beginning of the 2016-17 stamping year for my stamp group. It was so good to see everyone and catch up with their news from the summer.

To welcome them back, I made them each a little box that held a container of Tic Tacs, CASEd from Linda Parker.

Linda Vich Creates: September Projects for Stamping Group. Tic Tacs treat hold box created using Night of Navy and Floral Boutique Designer Washi Tape.

Linda Vich Creates: September Projects for Stamping Group. Tic Tacs treat hold box created using Night of Navy and Floral Boutique Designer Washi Tape.

Linda Vich Creates: September Projects for Stamping Group. Tic Tacs treat hold box created using Night of Navy and Floral Boutique Designer Washi Tape.

For our evening's projects, we made two fall–themed cards.

The first card introduced the group to the versatility of the Cookie Cutter Punch by using it to create this card using the scarecrow stamp image. The image was stamped on Thick Whisper White using Basic Black Archival ink and then colored with Stampin' Write Markers. Glue Dots allowed "straw" (Linen Thread pieces) to be adhered to the scarecrow's hands and feet. Soft Suede and a sponge dauber was used to provide a little definition to the "straw."

Pumpkins, from the Spooky Fun stamp set were also stamped and then colored with markers. Clear Wink of Stella gave them some shimmer.

The sentiment, from the Butterfly Basics stamp set was stamped on a Marina Blue matte using Basic Black. The stamped matte was offset over a white one with a strip of burlap ribbon wrapped around.

A matte from the Halloween Night DSP was cut and inked with Early Espresso and then adhered to a Marina Mist card base. The offset mattes were adhered with Dimensionals. The scarecrow was attached to the burlap ribbon using Dimensionals and the pumpkins were adhered with a Dimensional and an adhesive strip to complete the card.

Linda Vich Creates: September Projects for Stamping Group. Cookie Cutter Halloween scarecrow graces the front of this fall-themed card.

Linda Vich Creates: September Projects for Stamping Group. Cookie Cutter Halloween scarecrow graces the front of this fall-themed card.

The second card had a tie in to fall by "canning" some of the Fruit Stand DSP within the Jar Framelits and mounting the jar on a belly band that secured a Pinwheel Fold card. This idea was CASEd from Leena Girsa.

Though my example shows flowers within the jar, the other papers in the DSP pack displayed a variety of fruits—pears, strawberries and peaches.

The largest jar from the Jar of Love stamp set was stamped on Thick Whisper White using Smoky Slate; the lid was stamped with Basic Gray. The jar and lid were die cut with the coordinating Framelits. As well, a jar was die cut from Window sheet and the fruit DSP was die cut with the die for the jar contents.

Next, liquid glue was used to adhere the DSP to the jar die cut with the "glass" (window sheet) and the lid adhered with Glue Dots.

The folded card was created by first measuring and marking all four sides of a two-sided piece of DSP at 3" and 5" and then the paper was scored by aligning at the 3" mark on one side of the paper with the 5" mark on the adjacent side. This was repeated with each of the three remaining side. (I demonstrated this method with the group since none of them had purchased the Diagonal Board for the Simply Scored tool. If you have this, you need not do any of the above measuring and marking. Simply place the paper on the Diagonal Board and score at 3" on each side. Done!)

The scoring produced four small triangles which were snipped out with a pair of scissors. The paper was then flipped over and scored at 1" on each side.

The paper was then folded and burnished on all the score lines, with the 1" flaps being folded back to expose the contrasting side of the DSP.

A coordinating fruit (or flower) was stamped on the bottom corner of a Whisper White matte. This was adhered to a matte of complementary card stock (matching the belly band strip) and then adhered inside the opened card using Fast Fuse.

The flaps of the card were then folded inward, following either a clockwise or counter-clockwise direction (which ever produced the final pinwheel formation, with the last flap being tucked in to "lock" the card.

To create the belly band, a strip of complementary card stock was wrapped around the card and adhered together with a piece of burlap ribbon wrapped around it. The jar was attached to the band using Glue Dots.

Here's a tip for creating a belly band that is easily removed. Place the card stock strip under the card and fold one side of the strip around the card and crease firmly. Slide the card over about 1/8" from the crease and then wrap the other side of the strip around the card and crease and then adhere the ends of the strip together. This gives a finished look to the belly band and it is just the right size to it to easily slip off the card.

The sentiment, stamped in Pear Pizzazz on Thick Whisper White had its end flagged with the Triple Banner Punch and then was adhered in place using Glue Dots.

Linda Vich Creates: September Projects for Stamping Group. Pinwheel Fold card created using the Jar of Love stamp set and coordinating dies with Fruit Stand DSP.

Linda Vich Creates: September Projects for Stamping Group. Pinwheel Fold card created using the Jar of Love stamp set and coordinating dies with Fruit Stand DSP.

Linda Vich Creates: September Projects for Stamping Group. Pinwheel Fold card created using the Jar of Love stamp set and coordinating dies with Fruit Stand DSP.

We're off to a great start for our stamping year with many more projects to come!

Tic Tac Box


Scarecrow Card


Pinwheel Fold Card