Showing posts with label catalog launch 2017. Show all posts

Thursday, June 1, 2017

2017 Catalog Launch Prep Part 2: Second Prize

Linda Vich Creates: 2017 Catalog Launch Prep Part 2: Second Prize. Peekaboo Pullback cards and handbag created with the Floral Boutique DSP and Watercolor Wings.
Navy and white always pack a punch! No wonder that I chose to create with these colors and the lovely Floral Boutique DSP for the Second Prize at my 2017 Catalog Launch! This blog post is part two in a three part series. Be sure to check out Part One.

I started by creating a handbag to contain my set of cards. I used a tutorial from Kirsteen Gill. Her tutorial creates a box in a bag which really means that you first create a shallow box for your cards and then add a bag to it.

I knew that I wanted my finished "box" to measure 1.5 x 6" so I used the handy calculator on Kirsteen's page to find out how large my starting piece of card stock should be. I ended up cutting my piece of Night of Navy to 8 x 3." I then scored each side at 1" (the depth of the box) and then cut up on the score lines at each end to create tabs. I applied liquid adhesive to these tabs and adhered them to the rest of the card stock to create the basic box.

Next, I cut two pieces of the Floral Boutique DSP at 6 x 12." I adhered these with Tear & Tape on the short side with an overlap of one inch and then trimmed the length to 15.5" according to Kirsteen's calculator. I put Tear & Tape all along the length of one side of the DSP  and up one of the short sides. I then carefully adhered the DSP around the box, ensuring that the DSP was flush with the bottom edge of the box and adhered the edges when I reached the end. This formed the "bag" part of the box.

I then cut two, 2 x 11" strips of Night of Navy and scored lengthwise at one inch. After folding on the score line, I used my fingers to curve the strip, breaking the fibers. Taking one strip, I fitted it around the top edge of my bag. I inserted the nozzle of my liquid glue at spots to glue it along the outside to keep it in place. I repeated with the second strip. It was necessary to trim the ends of the first strip slightly because where the strips overlapped, the strips didn't meet up precisely.

For the straps of the handbag, I cut two strips, 1 x 11" and scored each lengthwise, leaving 1 1/2" from each end not scored. I placed Tear & Tape on one edge and adhered the other to it.

Using my Piercing Tool, I held one end of a strap in place while I made a hole. I then removed the strap, added a little glue to the end and replaced it on the bag, fitting a retired brad into the hole. I repeated this with the three other straps to complete the handbag.

Linda Vich Creates: 2017 Catalog Launch Prep Part 2: Second Prize. Peekaboo Pullback cards and handbag created with the Floral Boutique DSP and Watercolor Wings.

It was then easy to create the Peekaboo Pullback cards to fill the handbag. My cards were a CASE of the cards by Lyssa Griffin Zwolanek.

To make these cards, I cut four standard card bases from Thick Whisper White card stock. I then cut four pieces of the Floral Boutique DSP, 4 x 5.5". On the long side of the DSP, I used my Stampin' Trimmer to make a cut that was 2" in length at the 2 3/4" mark.

For each DSP piece, I folded back the paper from the cut to form little triangles. Using a pencil, I marked the edges of the folded back part on all four card fronts so I would know where to stamp.

Using my MISTI, I stamped the sentiments from the now retired Endless Thanks stamp set on the card fronts using Night of Navy. I stamped two horizontally, and two vertically so that the cards would have two different orientations. After stamping, I erased the pencil marks.

I then adhered the DSP pieces to each card front and applied a Dimensional under each folded back triangle.

For the butterflies, I again used my MISTI and I used Night of Navy ink. For the largest overall stamp, I stamped off once before stamping the butterfly on Whisper White. I used the Night of Navy full strength for the three other stamps to create the butterfly. I then used the Fold Butterfly Framelits to die cut the butterflies. Each was attached to a card front using a Dimensional.

Linda Vich Creates: 2017 Catalog Launch Prep Part 2: Second Prize. Peekaboo Pullback cards and handbag created with the Floral Boutique DSP and Watercolor Wings.

Linda Vich Creates: 2017 Catalog Launch Prep Part 2: Second Prize. Peekaboo Pullback cards and handbag created with the Floral Boutique DSP and Watercolor Wings.

Linda Vich Creates: 2017 Catalog Launch Prep Part 2: Second Prize. Peekaboo Pullback cards and handbag created with the Floral Boutique DSP and Watercolor Wings.

Linda Vich Creates: 2017 Catalog Launch Prep Part 2: Second Prize. Peekaboo Pullback cards and handbag created with the Floral Boutique DSP and Watercolor Wings.

They are so pretty yet so simple to create!


Tuesday, May 30, 2017

2017 Catalog Launch Prep Part 1: Third Prize

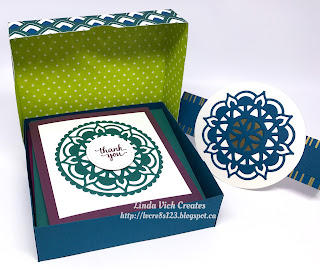
Linda Vich Creates: 2017 Catalog Launch Prep Part 1: Third Prize. Box of five note cards using the 2017-2019 In Colors and Eastern Palace Suite.
When starting my preparations for my 2017 Catalog Launch, I knew that I wanted to showcase the new 2017-2019 In Colors. To do that, I decided to use the Eastern Palace Bundle.

I made five, four inch card bases by cutting one from each color–Powder Pink, Fresh Fig, Berry Burst, Lemon Lime Twist and Tranquil Tide.

Using the Eastern Medallions #3 and #2 together, I cut out medallions from each of the five colors and then used the #8 Scalloped Circle from the Layering Circles to fully cut them from the colors. I cut mattes from Whisper White and used liquid adhesive to adhere each medallion to a matte.

On Thick Whisper White, I stamped the sentiment in each of the five colors and then die cut them using the #1 stitched circle from the Stitched Shapes Framelits. These were adhered to the centres of the medallions using Dimensionals. These mattes were then adhered to the card bases using Fast Fuse.

Whisper White mattes were cut for the inside of the cards and they were sponged with each of the five colors and then adhered inside the cards.

In assembling the cards, the colors were contrasted on the cards so that the sentiments matched the card bases and the inside sponging matched the medallions. These colors worked so nicely together!

To contain the cards, I used the 1/16" rule of box making via Catherine Pooler. The box bottom was made from Dapper Denim card stock and the top from a sheet of the exquisite Eastern Palace Specialty DSP! I used a circle punch to punch half circles in each side to make it easier to open.

I used a strip of the beautiful foiled paper with a strip of Dapper Denim on top to create a belly band for the box. Since the strips were not long enough, I adhered them to Thick Very Vanilla die cut with the #8 circle from the Layering Circles and then adhered a larger circle of card stock on top of it, cut with the #7 circle from the now retired Circles Collection Framelits.

Linda Vich Creates: 2017 Catalog Launch Prep Part 1: Numbering on retired Circles Collection Framelits.

A medallion was cut from Dapper Denim using the #2, #3, and #4 dies. Layering Circle #1 was used to die cut a piece of Gold Foil which was adhered behind the medallion. The completed medallion was adhered on top of the large Very Vanilla Circle to complete the box.

Linda Vich Creates: 2017 Catalog Launch Prep Part 1: Third Prize. Box of five note cards using the 2017-2019 In Colors and Eastern Palace Suite.

Linda Vich Creates: 2017 Catalog Launch Prep Part 1: Third Prize. Box of five note cards using the 2017-2019 In Colors and Eastern Palace Suite.

Linda Vich Creates: 2017 Catalog Launch Prep Part 1: Third Prize. Box of five note cards using the 2017-2019 In Colors and Eastern Palace Suite.

Linda Vich Creates: 2017 Catalog Launch Prep Part 1: Third Prize. Box of five note cards using the 2017-2019 In Colors and Eastern Palace Suite.

Linda Vich Creates: 2017 Catalog Launch Prep Part 1: Third Prize. Box of five note cards using the 2017-2019 In Colors and Eastern Palace Suite.

Linda Vich Creates: 2017 Catalog Launch Prep Part 1: Third Prize. Box of five note cards using the 2017-2019 In Colors and Eastern Palace Suite.

Linda Vich Creates: 2017 Catalog Launch Prep Part 1: Third Prize. Box of five note cards using the 2017-2019 In Colors and Eastern Palace Suite.

I think that the box and the cards looked very impressive and I may make a set for myself in the future!


Monday, May 29, 2017

2017 Catalog Launch Party

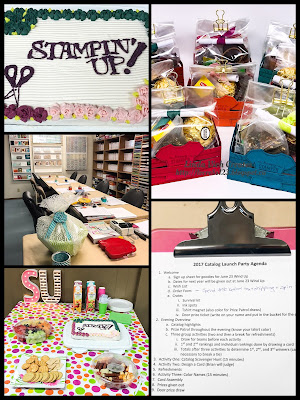
Linda Vich Creates: 2017 Catalog Launch Party. Collaged photo showing decor for catalog launch party.
Woohoo! Friday night was party night for our stamping group as we celebrated the eagerly anticipated, soon to be released new catalog!

Between babysitting, work, and company at our house, I had had little time to prepare let alone create other things and blog about them in the days leading up to the launch. However, I will be sharing a series of blog posts about what I created for the launch later this week.

One of the things that is most fun to plan for the launch is the food and decor. This year my daughter created a wonderful cake for our party, complete with the five new In Colors! Though she was not too happy with her creation, my ladies and I loved it! The cake looked stunning on the food table since the rest of the food I had to purchase rather than make due to time constraints.

After Christmas this year, I was lucky enough to purchase some of the lovely Heidi Swap Marquee Letters at half price. They looked great after I added some of the Pop of Pink DSP to them! Here is a close up of the letters:

Linda Vich Creates: 2017 Catalog Launch Party. Photo showing decor for catalog launch party.


Though the tablecloth had a few extra colors, it did look very festive and showcased shades close to Lemon Lime Twist and Berry Burst. Following the In Colors color scheme–though it can't be seen in the photo–the Door Prize was packaged in a large Lemon Lime Twist colored bowl!

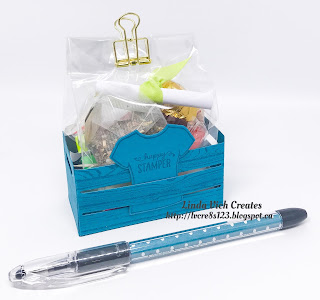
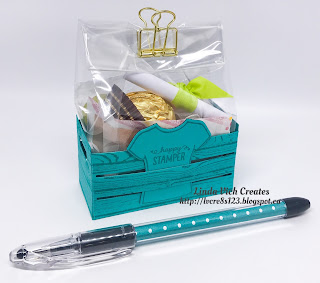
Also prepared as treats for each lady was a Mini Crate–in her favorite Stampin' Up! color. It was created by stamping card stock with the Hardwood stamp and then constructing the crates after die cutting with the Wood Crates Thinlits. The crates were loaded with a Catalog Survival Kit, two un-inked Ink Spots, a door prize draw ticket, and a T-Shirt magnet. These were accompanied by a pen filled with matching DSP.

Linda Vich Creates: 2017 Catalog Launch Party. Mini crates created with the Wood Crate Thinlits Dies and filled with a catalog survival kit and other goodies.

Here are close ups of all eight crates:

Linda Vich Creates: 2017 Catalog Launch Party. Mini crates created with the Wood Crate Thinlits Dies and filled with a catalog survival kit and other goodies.

Linda Vich Creates: 2017 Catalog Launch Party. Mini crates created with the Wood Crate Thinlits Dies and filled with a catalog survival kit and other goodies.

Linda Vich Creates: 2017 Catalog Launch Party. Mini crates created with the Wood Crate Thinlits Dies and filled with a catalog survival kit and other goodies.

Linda Vich Creates: 2017 Catalog Launch Party. Mini crates created with the Wood Crate Thinlits Dies and filled with a catalog survival kit and other goodies.

Linda Vich Creates: 2017 Catalog Launch Party. Mini crates created with the Wood Crate Thinlits Dies and filled with a catalog survival kit and other goodies.

Linda Vich Creates: 2017 Catalog Launch Party. Mini crates created with the Wood Crate Thinlits Dies and filled with a catalog survival kit and other goodies.

Linda Vich Creates: 2017 Catalog Launch Party. Mini crates created with the Wood Crate Thinlits Dies and filled with a catalog survival kit and other goodies.

Linda Vich Creates: 2017 Catalog Launch Party. Mini crates created with the Wood Crate Thinlits Dies and filled with a catalog survival kit and other goodies.

Now for the evening's activities! As you can see from one of the previous photos, I had a full agenda planned for the night!

After a few brief highlights of the new catalog, (it was not brand new to my ladies since all but two had received theirs in the mail earlier) we moved on to some team events.

The ladies drew pieces of ribbon from a bag to determine teams–either Tranquil Tides or Berry Bursts–and this was repeated before each of the three activities.

The first activity was a Catalog Scavenger Hunt where the ladies had to hunt through the catalog for the products shown in cropped catalog photos and write them down on a sheet. They only got 15 minutes to find all 20 items so they had to work quickly!

Following the Scavenger Hunt, and after choosing new teams, the ladies had to work as a group to design a card and then create their individual copies of it as one of their projects for the night. Each group was given the same card stock, patterned paper, ribbon, stamps, stamp pad, and embellishments to use. Brian, our host Carolyn's husband, acted as a judge and decided on which group's design was awarded first or second. Both groups came up with lovely designs!

Linda Vich Creates: 2017 Catalog Launch Party. Cards designed as a group activity.

Linda Vich Creates: 2017 Catalog Launch Party. Cards designed as a group activity.

After a bit of an intermission for refreshments and some of the gorgeous cake, we reassembled for the third activity of the evening. New teams were chosen and the ladies had to decipher clever word clues for 30 of the Stampin' Up! colors within a 15 minute time limit!

Linda Vich Creates: 2017 Catalog Launch Party. Stampers busy completing the three activities for the catalog launch.

Next, they were able to relax after competing on teams and complete their remaining project for the evening.

Linda Vich Creates: 2017 Catalog Launch Party. The 2017-2019 In Colors are featured on this card that uses debossing from the Celebrations Duo Embossing Folders.

A piece of Thick Whisper White was debossed using the Celebrate folder from the Celebrations Duo Embossing Folders. The image was then stamped, using the five 2017-2019 In Colors, with a splotch stamp from the Happy Celebrations stamp set.

The sentiment was stamped with Basic Black ink. The stamped piece was then distressed using the now retired Distressing Tool and then adhered with Fast Fuse to a thin, Tranquil Tide matte.

A piece of the Berry Burst Finely Woven Ribbon was folded and stapled to the top of the matte using the now retired Handheld Stapler. The matte was then adhered to a Lemon Lime Twist card front using Dimensionals. Three sequins were adhered to the card front using Glue Dots.

For inside the card, the larger splotch stamp was stamped with Lemon Lime Twist on a Whisper White matte and then the sentiment was stamped on top using Basic Black. The matte was adhered inside to complete the card.

Linda Vich Creates: 2017 Catalog Launch Party. The 2017-2019 In Colors are featured on this card that uses debossing from the Celebrations Duo Embossing Folders.

Linda Vich Creates: 2017 Catalog Launch Party. The 2017-2019 In Colors are featured on this card that uses debossing from the Celebrations Duo Embossing Folders.

Linda Vich Creates: 2017 Catalog Launch Party. The 2017-2019 In Colors are featured on this card that uses debossing from the Celebrations Duo Embossing Folders.

While the ladies were busy completing their cards, I calculated the final results of our three activities to determine a first, second, and third place winner. Since I only had three prizes, I had to use a special method for determining these rankings.

Prior to the launch, I chose two envelopes–one for First and one for Second. Inside each envelope I placed four playing cards–6, 7, 8, 9 and 2, 3, 4, 5, respectively. With each activity, each team placed either First or Second. I had each team member draw a card from the appropriate envelope and I recorded the number. This was done after each activity. I then tallied the scores for each person to arrive at a First, Second, and Third. In the case of a tie (or ties), I simply had the participants draw a card from the deck with the highest card promoting that lady up a rank.

Prizes for First, Second, and Third were sets of cards and envelopes that I had created. Blog posts will be done for each of these later this week.

Finally, we had the draw for the door prize to complete the evening. Don't these ladies look happy with their prizes?

Linda Vich Creates: 2017 Catalog Launch Party. Happy prize winning ladies!

It was such a fun night but also somewhat bittersweet as some of the ladies will not be able to return for classes in September. We will definitely miss them!

I hope you have enjoyed reading about our 2017 Catalog Launch! If you are in the Winnipeg area and would like to craft with us, please get in touch–we'd love to have you join us!