Showing posts with label dictionary stamp. Show all posts

Saturday, May 2, 2015

Revving Up For Retirement

I had a slight mishap on Thursday that kept me home from work but luckily I was feeling much better on Friday so that I could continue as planned with my stamping group. To find out what happened, check out my Facebook post here.

My stamping ladies were busy last night, creating cards using products that are on the retiring list. It was good to work with these favorite products before they disappear!

Linda Vich Creates: Revving Up For RetirementLinda Vich Creates: Revving Up For Retirement

Our first card was a departure from my usual colors and style but I wanted to create something that had a vintage feel to it.

Linda Vich Creates: Revving Up For Retirement. Vintage look is achieved with the use of neutral inks and embellishments in this Petal Potpourri card.


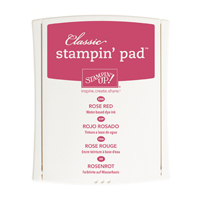
To begin with, we distressed a Whisper White matte and a smaller piece of the same using a sponge and the retiring Baked Brown Sugar ink.

Next, MISTI came into play when we used the retiring Dictionary background stamp with Soft Suede ink. It was stamped off once and then gave a nice hint of text to the distressed matte. To further distress it, the Distressing tool was used and then the edges were inked with Soft Suede.

We used the retiring On Film Framelits to cut a frame from Watercolor paper and then sponged it with Early Espresso. We used the frame to determine where to stamp the two flowers from the Petal Potpourri stamp set.

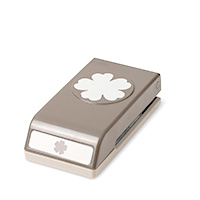
Two flowers were stamped on the matte using Baked Brown Sugar and one was stamped on the smaller distressed piece, using Soft Suede. The centre of that flower was colored with Hello Honey using a sponge dauber and the flower was punched with the Flower Medallion punch. Its edges were then inked with Soft Suede.

A strip of Sahara Sand Lace and the previously retired Soft Suede Taffeta ribbon were adhered to the bottom of the matte and then it was adhered to a Soft Suede card base using Dimensionals.
The frame was adhered to the matte with glue dots and then the punched flower was adhered inside but overlapping the frame using doubled-up Dimensionals.

The Hello You thinlits were used to die cut the word "you" and the banner punch was used to cut two banners from Dazzling Diamonds Glimmer paper. These were each sponged with Baked Brown Sugar and the banners were edged with Soft Suede.

"You" was adhered with glue to the top of the card. The banners were angled and adhered to the bottom right of the frame. A dragonfly bead was painted with Tim Holtz Tarnished Brass Distress Paint and then adhered on top of the banners using Crystal Effects.

The sentiment, Amaze Me, from the Crazy About You stamp set, was stamped with Early Espresso at the bottom of the card base.

To complete the card, an inside matte was created from a piece of the retiring Naturals White card stock. A flower was stamped in the bottom right corner using Soft Suede and then the edges were inked with Baked Brown Sugar.

Linda Vich Creates: Revving Up For Retirement. Vintage look is achieved with the use of neutral inks and embellishments in this Petal Potpourri card.

Linda Vich Creates: Revving Up For Retirement. Vintage look is achieved with the use of neutral inks and embellishments in this Petal Potpourri card.


Built for Free Using: My Stampin Blog


Inspiration for a Mother's Day card came from a creation by the Stampin' Stud.

We used a card base of Calypso Coral. A matte of the retiring Strawberry Slush was embossed with the Spring Flowers Embossing Folder and the edges inked with Calypso Coral. It was adhered to the card base with Dimensionals.

Linda Vich Creates: Revving Up For Retirement. A Mother's Day card is embellished with sponged vellum flowers and adorned with Gold Glimmer leaves.

A strip of Irresistably Yours was sponged with gold ink, heat set, and then the white leaves brought back by rubbing with paper towel.

The 1 3/4" and the 1 1/4" Scallop Circle Punches were used to punch circles from Gold Glimmer and Calypso Coral papers. The smaller circle's edges were inked with Strawberry Slush. The circles were then layered onto a 1/4 of a Tea Doily and adhered under the strip of leafy resist paper.

A square of vellum was sponged with a combination of Hello Honey, Pumpkin Pie, Strawberry Slush, and Blackberry Bliss. The Fun Flower punch was used twice, the Pansy Punch once and the Petite Petal Punch was used once.

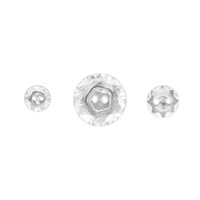
The punched flowers were crumpled gently to give them some dimension and then a piercing tool was used to poke a hole in the centre of each. They were then attached together with a Candy Base Brad. A rhinestone which had been colored with a R24 Copic marker was added to the brad.

Glue dots were used to secure a length of Gold Baker's Twine in a pleasing circular arrangement and then the completed flower was adhered with Dimensionals on the left side of the leafy strip. The retired Secret Garden Framelits were used to die cut some leaves from Gold Glimmer paper and they were tucked under the flower and adhered with glue.

For the inside of the card, a matte of the retiring Naturals Ivory had its edges inked with gold and then the flowers and sentiment from the Mother's Love stamp set were stamped using Strawberry Slush and Crisp Cantaloupe, respectively.

Linda Vich Creates: Revving Up For Retirement. A Mother's Day card is embellished with sponged vellum flowers and adorned with Gold Glimmer leaves.

Linda Vich Creates: Revving Up For Retirement. A Mother's Day card is embellished with sponged vellum flowers and adorned with Gold Glimmer leaves.


Built for Free Using: My Stampin Blog


Lots of inky hands at the end of the night but some lovely cards were produced and a good time was had by all! Though it will be sad to see the products we used retire, the space they leave behind will be filled with more great products with which to create!

What products will you be sad to see retire? Leave me a comment below!

Saturday, November 22, 2014

Here's Hoping It's Subtle

A new card today, based on a color scheme that germinated while I was working at Walmart the other day.

Those of you who read this blog regularly know that I have a big crush on Blackberry Bliss. Well, this time I decided to use just a few hints of Blackberry Bliss so this card is my attempt at subtlety!

The structure of the card comes from the Card Challenge #163 over at Freshly Made Sketches.


I decided to rotate the sketch 90 degrees to make it a vertical orientation.

I cut a 5 x 7" card base from Soft Suede and then stamped the Dictionary stamp onto a piece of Sahara Sand using Sahara Sand ink. I used my distressing tool to rough up the edges.

I used a sponge dauber to ink the edges with both Sahara Sand and Soft Suede ink. I then adhered it to a Blackberry Bliss matte so that only a thin matte edge was seen.

I needed a paper for the bottom section of the card but none of the papers I had looked quite right so I made my own using the same technique as the card in my blog post, Creative Gathering. This time I used Soft Suede and Blackberry Bliss ink on Sahara Sand card stock.

It was just what I needed! The paper was adhered to the bottom portion of the card front. The matted piece was adhered over top of it, sandwiching some Linen Thread between it and the card base, to add a little visual interest and texture to the top of the card.

I then used the Bordering Blooms stamp set to stamp a border in Soft Suede on a strip of Sahara Sand. I inked the edges with Blackberry Bliss and adhered it across the bottom of the card front.

I used a flower punch from the now retired, Itty Bitty Shapes Punch Pack, to punch several flowers from Blackberry Bliss. These I glued in an alternating pattern across the strip. I added tiny pearls to the centres of the flowers.

I stamped a sentiment from the Bloom With Hope stamp set on the top part of the stamped matte, using Blackberry Bliss. To draw more attention to the sentiment, I added another flower to complete the card.

In retrospect, I wish I had done a couple of things differently.

First, I would not have put so many flowers on the strip itself and I would have tried to place them more randomly rather than them being so symmetrical.

Secondly, I think the Soft Suede card front needs some sort of subtle stamped texture. It just looks a little too smooth to me.

Linda Vich Creates: Here's Hoping It's Subtle

Linda Vich Creates: Here's Hoping It's Subtle

Linda Vich Creates: Here's Hoping It's Subtle


So, what do you think? Did my card turn out to be a little bit more subtle this time? Do you agree with my suggestions for improvement of the card? Let me know in the Comments below!


Built for Free Using: My Stampin Blog

Sunday, September 28, 2014

Emboss Resist Watercolored Card

I've long admired the creativity of fellow Demonstrator, Allison Okamitsu. I have several of her creations pinned on Pinterest. Now that she is on the Artisan Design Team for Stampin' Up! she will have even more exposure for her work.

Back in May, a watercolored card of hers caught my eye and I have been wanting to try the technique she used.


I thought her card was so pretty! I was also intrigued that she used her Silhouette Cameo to cut the word hello from a digital Stampin' Up! kit! Here's the card that her technique inspired:


This was such fun to create!

First, I used Versamark and the Dictionary stamp on watercolor paper. I used white embossing powder to heat emboss it. I used my mister to spray the paper with water and then used Blackberry Bliss, Bermuda Bay, and Rich Razzleberry ink with my Aqua Pen to brush on ink. After it dried, I distressed the edges and then adhered it to a Whisper White card base using Dimensionals.

I punched out flowers using the Pansy and Petite Petals punches and used my non Stampin' Up! flower shaping tools to give a little shape to the petals. For the larger flower, I used one of the pretty Faceted Buttons; the smaller flowers got rhinestone centres.

I used the Decorative Label Punch on Whisper White and inked the edges with both Blackberry Bliss and Lost Lagoon. The sentiment is from the World of Dreams stamp set, stamped in Blackberry Bliss.

The two feathers were stamped with Versamark on vellum and heat embossed with white embossing powder. The Feathers Framelits simplified the job of cutting out the feathers. They were tucked under the larger flower to look like leaves.

I loved using this technique and will definitely be using it a lot in the future!