Showing posts with label stitched shapes. Show all posts

Tuesday, April 4, 2017

Floating Reinker and Watercolored Rose Wonder

Linda Vich Creates: Floating Reinker and Watercolored Rose Wonder. A vibrantly watercolored Rose Wonder sits atop a hexagon-embossed Blushing Bride background.
For my daughter's birthday, I chose to work with a rose theme since she loves roses. Because of this, I chose to use the Rose Wonder stamp set and the Rose Garden Thinlits.

I started by stamping the rose image on Shimmery White card stock using Versamark. I also stamped the leaves, but did them separately because I knew I would be cutting them out separate from the rose. I heat embossed the images using White Stampin' Emboss Powder.

The Floating Reinker Technique seemed to be a nice fit for this card so I got out my Aqua Pen and added water to all the spaces in the rose, making sure that they weren't too wet or too dry but just right :) I then picked up Blushing Bride reinker on my Aqua Pen and touched it to the water in various spots on the rose. This caused the ink to fill the sections with color. After cleaning my pen, I repeated this process using Rose Red to fill the remaining sections.

In working with the leaves, I also used my Aqua Pen but this time I chose to paint with the Cucumber Crush reinker. Because of the nature of the paper, the ink dried quickly so I was able to paint over sections to intensify the color in places, making the leaves look more realistic. I zapped both the leaves and the rose with my heat tool to be sure they were completely dry before continuing.

My next step was to use the Rose Garden Thinlits to cut out the rose and leaves using the now retired 6 x 6" Glimmer paper in Sweet Sugarplum and Mint Macaron. I used Connie Stewart's method of adhering detailed die cuts to glue the die cuts to the rose and leaves. After I was sure they were well adhered, I fussy cut around them, snipping off any extra pieces that were not needed.

Two mattes were die cut, one Mint Macaron and one Blushing Bride. I used the Hexagons Dynamic Embossing Folder to emboss the Blushing Bride matte and then adhered it to the Mint Macaron one using liquid adhesive.

After determining the correct placement, I used Dimensionals for the leaves and Foam Adhesive Strips for the rose and adhered them to the embossed matte. I wrapped Thick Cucumber Crush Baker's Twine around the bottom of the matte, securing it to the back with Fast Fuse. The matte was then adhered to a Rose Red card front using Foam Adhesive Strips.

Using the MISTI, the sentiment from the Rose Wonder stamp set was stamped in Cucumber Crush on Mint Macaron and then stamped again with Versamark so that it could be heat embossed using Clear Stampin' Emboss Powder. An oval from the Stitched Shapes Framelits was used to die cut the sentiment. It was adhered to the card front using Foam Adhesive Strips.

A Thick Whisper White matte was cut for inside the card. The Rose Wonder stamp was used to stamp offset on the right side of the matte using Versamark. It was heat embossed using White Stampin' Emboss Powder. Blushing Bride and Mint Macaron inks were sponged over the embossing and then the matte was adhered inside to complete the card.

Linda Vich Creates: Floating Reinker and Watercolored Rose Wonder. A vibrantly watercolored Rose Wonder sits atop a hexagon-embossed Blushing Bride background.

Linda Vich Creates: Floating Reinker and Watercolored Rose Wonder. A vibrantly watercolored Rose Wonder sits atop a hexagon-embossed Blushing Bride background.

Linda Vich Creates: Floating Reinker and Watercolored Rose Wonder. A vibrantly watercolored Rose Wonder sits atop a hexagon-embossed Blushing Bride background.

I'm very pleased with how it turned out and my daughter loved it! If you would like to use the color scheme from this project, feel free to save the following image.

Linda Vich Creates: Floating Reinker and Watercolored Rose Wonder. A vibrantly watercolored Rose Wonder sits atop a hexagon-embossed Blushing Bride background.

I am definitely going to miss Cucumber Crush! I love its vibrancy and find that it works well, in small doses, with several of our Stampin' Up! colors. If you love it too, be sure to stock up on it before it's too late! Place an order today in my online store.


Friday, February 24, 2017

Marblelized Thank You Cards

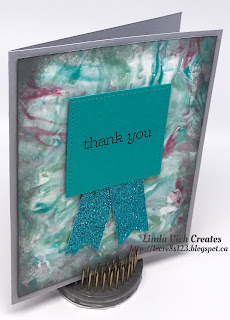
Linda Vich Creates: Shaving Cream Thank You Cards. Simple thank you cards that sport marblelized backgrounds topped with stitched sentiments with glimmer paper banners.
Today's cards use a technique that has been on my to do list for some time but which I just hadn't got around to trying. I had several cards to make so I thought that using shaving cream to produce a marblelized effect would be appropriate since several similar yet different backgrounds can be made at one time. An excellent tutorial can be found here.

The cards also use the 6 x 6" Glimmer Paper Assortment Pack, one of the new FREE Sale-A-Bration items that can be earned by placing a $60 order!

I started by cutting 4 x 5.25" mattes from Whisper White. I then sprayed shaving cream onto a foam plate (one that was larger than my matte) and smoothed the surface of the cream with a piece of cardboard saved from some packaging.

Next, I placed drops of reinker–Mint Macaron, Bermuda Bay, and Sweet Sugarplum–randomly on the shaving cream. I used a wooden dowel to drag through the drops both vertically and horizontally (and sometimes circularly). There is no right way of doing this–feel free to experiment!

I placed one of my mattes face down into the shaving cream and then removed it, checking to be sure I had color in all areas of the matte. If not, I re-dipped the matte.

I let the matte sit for a minute or two and then scraped off the shaving cream, leaving behind a marbled ink pattern. The matte was then set aside to dry while I repeated the process with other mattes.

Because the ink pattern tends to lose its crispness after producing a few mattes, I rinsed off the plate and began again. It was fun to try different "patterns" created with the wooden dowel. Sometimes I would only apply drops of Mint Macaron and Bermuda Bay, stir it with the dowel, and then add a few drops of the Sweet Sugarplum and stir it briefly with the dowel. It is important when working with colors that are complements on the color wheel, (red and green; blue and orange, purple and yellow) not to stir them together too much because the color will quickly turn to mud.

After my mattes were dry, I sponged the edges with Basic Gray ink and then adhered the mattes to standard card fronts cut from Smoky Slate.

The sentiment, from the now retired Happy Watercolor stamp set was stamped on either Sweet Sugarplum, Mint Macaron or Bermuda Bay card stock and then die cut using a square from the Stitched Shapes Framelits.

The Triple Banner Punch was used to flag the ends of Glimmer paper that matched the card stock used for the sentiment and these strips were adhered behind the sentiment. The sentiment piece was adhered to the card front using Dimensionals to complete each card.

Linda Vich Creates: Shaving Cream Thank You Cards. Simple thank you cards that sport marblelized backgrounds topped with stitched sentiments with glimmer paper banners.

Linda Vich Creates: Shaving Cream Thank You Cards. Simple thank you cards that sport marblelized backgrounds topped with stitched sentiments with glimmer paper banners.

I hope you will give this technique a try! Between colors and patterns, the possibilities are endless! What colors will you use and what patterns will you produce?


Saturday, December 31, 2016

Elegant Dragonfly Thank You

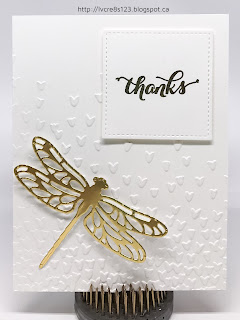
Linda Vich Creates: Elegant Dragonfly Thank You. Elegant thank you card created in white and gold, topped with a stunning gold dragonfly die cut.
I just couldn't help myself.

In sending thank you cards to my stamp club members, I just had to choose the Detailed Dragonfly Thinlits to use on my cards! By combining it with a stunning embossing folder, Stitched Shapes Framelits, gold embossing and gold foil, I was able to create an elegant card very quickly.

I cut a standard card base from Thick Whisper White and also cut a 4.25 x 5.5" matte from Whisper White which I embossed using the new Falling Petals Embossing Folder. The embossed matte was adhered to the card front using Fast Fuse.

Next, I die cut a square using the Stitched Shapes Framelits. Using Versamark, I stamped the sentiment, from the now retired Another Thank You stamp set, and heat embossed it using Gold Embossing Powder. I used Dimensionals to adhere it to the card front.

Finally, I die cut the lovely dragonfly from Gold Foil and used an adhesive strip to adhere it to the front of the card.

Linda Vich Creates: Elegant Dragonfly Thank You. Elegant thank you card created in white and gold, topped with a stunning gold dragonfly die cut.

Linda Vich Creates: Elegant Dragonfly Thank You. Elegant thank you card created in white and gold, topped with a stunning gold dragonfly die cut.

If I were you, I would put this set at the top of your wish list for the new 2017 Occasions Catalog. I know mine is going to get a LOT of use!