So, have you tried the latest paper crafting trend–creating your own wood grain? A lady in my Stamping Enablers Facebook group posted a
tutorial for creating your own wood grain panels using Distress inks and glue and several people have been trying the technique.
Basically, you score a piece of watercolor paper to look like planks, flip the sheet over and rub distress inks over it. You can add water to help the colors blend but that's it! I hadn't given my new mini distress inks a good work out yet so this was a good project for them!
I knew before starting that I would be using one of my panels to make a Valentine so for my first effort, I assembled a number of red inks as well as some of my neutrals. I used a strip of watercolor paper to swatch out my inks as a reference before beginning.
I wanted to use the rough side of the watercolor paper for my wood so I scored on the opposite side. I decided to use a score of every half inch.
I then started dragging my lightest red down the panel. I then alternated between my other reds, adding strips of color around the panel until I was totally satisfied. During the process, I also sprayed water a few times and blotted with a paper towel and then added more ink. I also added in some of my neutrals. In the end, I used all of these: Candied Apple, Barn Door, Fired Brick, Aged Mahogany, Hickory Smoke, Ground Espresso, and Black Soot.
This is what my first attempt looked like:
 |
| First attempt at wood tutorial |
My first try and I was hooked on this technique! I decided to try a few other color combinations while I had the inks at hand. You'll probably see these used in other projects sometime soon!
Here are some more that I did:
 |
| Second attempt with additional, smaller scale, scored panel |
 |
| Third attempt. I'm definitely hooked! |
Eventually, I turned back to my first red panel and die cut three hearts from it, angling my hearts so that the planks ran at an angle. For the smaller hearts, it would have been better if I had had a smaller scale of wood panel because you can't see much more than one or two planks in the die cuts. I learned from this so I created a smaller scale panel for the teal color that I wanted to work with on a future project.
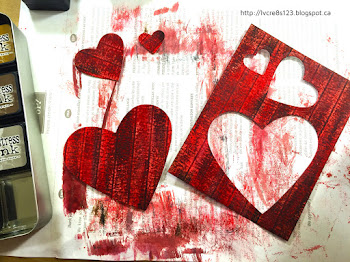 |
| Die cuts from panel. |
After die cutting the hearts, I inked the edges with Aged Mahogany and then used my Distress Glaze to seal the colors so that they wouldn't come off on anything else as I worked with them.
I cut a matte from Coastal Cabana and embossed it using the Happy Heart Embossing Folder. I inked the edges using Early Espresso.
On a piece of Thick Whisper White I stamped the sentiment, using my MISTI; I used Early Espresso and then Versamark, heat embossing it with Clear Stampin' Emboss Powder. To give the tag a little interest, I used the Curvy Corner Trio Punch on the corners. I then inked the edges using both Aged Mahogany and Candied Apple.
I adhered both the tag and the heart die cut to the embossed matte using Dimensionals. I tied a length of Thick Coastal Cabana Twine around the matte and then adhered it to a Early Espresso card base using Dimensionals.
For the inside, I sponged the edges of a Whisper White matte using Coastal Cabana and then adhered the two smaller hearts using Fast Fuse Adhesive and Glue Dots.
To complete the card, I added a variety of sequins to the heart and a single red heart sequin to the tag.
My card will be entered in the following challenges:
I encourage you to try the
woodgrain tutorial and then link me to your results. It's so much fun!