Showing posts with label embossing paste. Show all posts

Wednesday, June 14, 2017

Fresh Spring Climbing Orchids

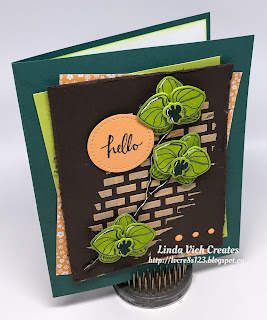
Linda Vich Creates: Fresh Spring Orchids. Lemon Lime Twist Climbing Orchids are featured on this card, displayed on a backdrop of Peekaboo Peach embossing paste bricks.
Edited: It appears that I am somewhat "orchid dyslexic" in that it was brought to my attention that my orchids were upside down! :(  This has been corrected. :)

Woke up with a Spring-like color scheme and card idea in my head this morning. Glad that I didn't have to work today and got to try it out!

I tried several new things on my card today but the first thing I tried was the new Embossing Paste because I knew I would need to let it dry before I could complete my card. I used the new Palette Knives to mix up some of the paste with Peekaboo Peach reinker and then used the brick design from the Pattern Party Decorative Masks to apply the paste to an Early Espresso matte. I set it aside to dry while I worked on the other parts of the card.

On Watercolor paper, I used my MISTI to stamp the two smaller petals and the centre from the Climbing Orchid stamp set using Tranquil Tide. I repeated the stamping three times and then heat set the ink so that I could then stamp it with Versamark. I heat embossed the images using Clear Stampin' Emboss Powder. I stamped enough petals for three complete blooms and then die cut them using the Orchid Builder Framelits.

I also stamped and clear embossed the largest complete orchid onto a Whisper White matte for inside the card. I used a sponge to sponge over and around the orchid using Lemon Lime Twist. I also sponged the edges of the matte before adhering it inside a 4.75 x 6" Tranquil Tide card base.

Using Lemon Lime Twist, I sponged color onto each piece of the orchids. I used Dimensionals to assemble each orchid.

The Seasonal Layers Thinlits were used to Idie cut a branch from Early Espresso and then I played with the arrangement of the orchid pieces on the branch. I trimmed a few of the branches to get the look and placement of the orchids that I wanted.

Once the embossing paste was dry–I left it for a couple of hours though it might have been dry before that– I used rolled up Glue Dots to adhere the branch to the Early Espresso matte. Dimensionals were used to adhere the orchids. Next, I used the now retired Distress Tool to distress the edges of the matte.

I cut two mattes of the same size as the Early Espresso one, a Lemon Lime Twist and a flowered paper from the now retired 2016-2018 In Color DSP Stack. These I stacked under the Early Espresso matte, adjusting them to be angled out from the top matte. Once I got them in the position I liked, I held the centre of the papers and added liquid adhesive in between the layers to adhere them together. They were then adhered to the card front using liquid adhesive. The Early Espresso matte was adhered on top of them using Dimensionals.

The sentiment was stamped with Early Espresso on Peekaboo Peach and then die cut with the #1 Circle from the Stitched Shapes Framelits. It was adhered to the card front using Dimensionals.

At the last minute, I decided to try adding shadows and highlights to the branch and the orchids, similar to what Vicky Papaioannou does (of course she does it much better than me!). I used an Early Espresso Stampin' Write Marker to add a shadow line to the branch and then used a Sharpie Extra Fine Point Poster Paint White Marker to add highlights to the branch and the orchids. Obviously, I need some practice with this but I don't think they look too bad!

Lastly, I added three Peekaboo Peach Enamel Shapes to the card front to complete the card. This creates a visual triangle of Peekaboo Peach that includes the patterned paper, the sentiment and the enamel shapes. This is an excellent design principle to use in cardmaking as well as scrapbooking and other layouts.

Linda Vich Creates: Fresh Spring Orchids. Lemon Lime Twist Climbing Orchids are featured on this card, displayed on a backdrop of Peekaboo Peach embossing paste bricks.

Linda Vich Creates: Fresh Spring Orchids. Lemon Lime Twist Climbing Orchids are featured on this card, displayed on a backdrop of Peekaboo Peach embossing paste bricks.

Linda Vich Creates: Fresh Spring Orchids. Lemon Lime Twist Climbing Orchids are featured on this card, displayed on a backdrop of Peekaboo Peach embossing paste bricks.

Though I do like the color scheme, I go back and forth between liking and not liking the card. What do you think? Does this color scheme and design work? Drop me a comment below to let me know what you think!

If you do like the color scheme, feel free to grab it for use in your own projects!

Linda Vich Creates: Fresh Spring Orchids. Lemon Lime Twist Climbing Orchids are featured on this card, displayed on a backdrop of Peekaboo Peach embossing paste bricks.


Tuesday, November 3, 2015

Color Burst Projects

As you should be able to tell from the date of my last post, babysitting and working are taking the majority of my time these days. Don't get me wrong—I'm loving the time I get to spend with my granddaughter! However, by the time she gets picked up and we get supper done with, I'm about DONE for the evening!


However, I have had the odd moment to create but just haven't had the chance to blog about it. Today, I have two projects, both using Color Bursts.

My first card is a card that I designed for my friend, Charlene.


I started by using the Earth Tone set of Color Bursts on a piece of watercolor paper.

I sprinkled tiny bits of Merlot, Burnt Orange, and Yellow Ochre on the paper and then spritzed them with water. I tilted the paper to make the paint run in different directions, adding more powder and water until I was pleased with how it was taking shape. I then added in some Terre Verte (green) to increase the richness of the colors. Once I was totally pleased with the effect, I dried the piece with my heat tool.

I then mounted the oak leaf from the Vintage Leaves stamp set on an acrylic block and sprayed it with water. I pressed it down onto the colored watercolor panel and held it in place for about 30 seconds. When I removed the stamp, there was a little bit of pooled water which I absorbed with a paper towel. I then repeated this procedure on the rest of the panel.

I dried the panel again and then threw a few droplets of water onto the panel as well, letting them sit for a few seconds before blotting with a paper towel.

Because I was planning to use Embossing Paste on top of the watercolors and I wasn't sure if the paste would reactivate the watercolors, I decided to use Ranger Distress Micro Glaze to seal the surface. Just a little bit goes a long way with this stuff! You simply get a little bit on your finger and then rub it into the surface of your work. After it is completely covered, you take a paper towel and just buff the piece, removing any excess.

The next step was to lay my Garden Leafy Stems stencil, from Memory Box, across my watercolor piece and secure both it and my watercolor paper to my craft mat using some washi tape. I then applied Dreamweaver Gold Embossing paste with a palette knife. When complete, I simply lifted the stencil off of my work and set it aside to dry.

The next day, (it didn't take that long to dry but I didn't have time to get back to the card until then!) I inked the edges of the watercolor piece with Black Soot Distress Ink and then finished with a fine line of Ranger Archival Ink.

I stamped the sentiment using the same archival ink and the Endless Birthdays stamp set. I then knotted a piece of Cherry Cobbler Sheer Linen ribbon around the panel and also added a length of Gold Sequin Trim. I then mounted the panel, using Foam Tape, to a Cherry Cobbler card base.

Around the edges of a matte of Natural Ivory card stock I stamped the oak leaf, using Delightful Dijon. I then inked the edges of the matte using Cherry Cobbler ink.


I love the richness of the colors in this card, especially accompanied by the gold embossing paste!

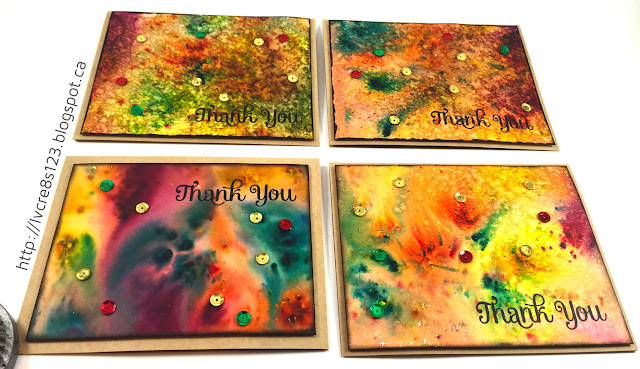
My next Color Burst project was thank you cards for my stamping group. For these, I used Color Bursts on 9 x 11" sheets of watercolor paper and then cut them down to size as mattes.

For the blue set, I used Indigo and Terre Verte for the colors, finishing with some green, blue and crystal sequins. The color on these is very smooth in appearance as I let the colors dry naturally after moving the watercolor paper to get the paint to flow.


For this second set of cards, I used Merlot, Burnt Orange, Yellow Ochre and Terre Verte. The color in these cards is rougher in appearance, except for two, because I dried and then spritzed again with water, creating a droplet pattern. To these cards I added green, red, and gold sequins.


Both sets of watercolors were trimmed to matte size and edged with Ranger Archival Ink. The sentiment was also stamped with archival ink, using the now retired Four You stamp set. The blue set of cards were mounted on Night of Navy card bases and the fall color set were mounted on Kraft card bases, using Foam Tape.

Have you tried Color Bursts yet? I just love playing with them and next time I use them, I want to try using stencils with them. I'm looking forward to the results!


Built for Free Using: My Stampin Blog