Showing posts with label large numbers framelits dies. Show all posts

Thursday, March 16, 2017

Poppin' Box Birthday Card

Linda Vich Creates: Poppin' Box Birthday Card. Succulents decorate this box that holds a 3D surprise for the recipient
After seeing so many of these really neat box cards that when opened allow a box to spring out I decided that I wanted to tackle one for my neighbor, Debby, for her birthday. Jan B recently posted a tutorial for one so I gave it a try!

I will not try to describe how this card was created since Jan did such a good job and I think you really need the video to see how this is done.

I did CASE Jan's design but changed it up by adding some succulents to the card box decoration and the letters/numbers I added to the pop up cube were H, B, 2, and U. I also used some of the now retired Sweet Sugarplum Ribbon from the Glitter Combo Pack.

The box was decorated with DSP from the 2016-2018 In Color DSP Stack and Whisper White. The cube was created with Sweet Sugarplum card stock and decorated with both Sweet Sugarplum and Dazzling Diamonds Glimmer Paper. The Large Letters and the Large Numbers Framelits were used to cut the characters for on the cube.

For the succulents, I used Mint Macaron card stock and sponged the pieces with Sweet Sugarplum and the tips with Rich Razzleberry. To dress the succulents up, I added some of the metal rimmed pearls.

Here is a very short video to show hwat the card would look like when a recipient opened it.


Linda Vich Creates: Poppin' Box Birthday Card. Succulents decorate this box that holds a 3D surprise for the recipient

Linda Vich Creates: Poppin' Box Birthday Card. Succulents decorate this box that holds a 3D surprise for the recipient

Linda Vich Creates: Poppin' Box Birthday Card. Succulents decorate this box that holds a 3D surprise for the recipient

Linda Vich Creates: Poppin' Box Birthday Card. Succulents decorate this box that holds a 3D surprise for the recipient

Linda Vich Creates: Poppin' Box Birthday Card. Succulents decorate this box that holds a 3D surprise for the recipient

Linda Vich Creates: Poppin' Box Birthday Card. Succulents decorate this box that holds a 3D surprise for the recipient

I'm really pleased with how this project turned out! Have you tried one of these box cards yet? Give Jan's tutorial a try!


Thursday, January 12, 2017

2017 New Year's Cards

Linda Vich Creates: 2017 New Year's Cards. Fireworks in gold and silver embossing burst behind gold glimmer numerals on this festive New Year's card.
This year, since I ran out of time to do my own Christmas cards, I decided to try something different . . . I created and sent New Year's cards!

As soon as I saw the It's A Celebration stamp set, I knew that I wanted to use it for fireworks and I envisioned this card. Before actually creating the card, I saw several similar cards on Pinterest so it seems that many of us had the same idea!

I started by cutting a standard card base from Basic Black. I also cut two mattes: one Whisper White and another Basic Black.

Because I knew I would be cutting the numerals for 2017 from Gold Glimmer paper, I wanted to echo that "glimmer" by using a matte of the same. However, I didn't want to use up a whole lot of Gold Glimmer paper in the process.

Instead, I cheated.

I used Versamark to ink the edges of the Whisper White matte and then heat embossed using Gold Tinsel Embossing Powder by Recollections.

This technique of embossing just the edges of a matte can be used to mimic either glimmer or foil paper as well. I find that sometimes the Gold Embossing Powder doesn't match with the Gold Foil paper so this is a way to achieve a consistency between embossed sentiments with a matte of the same color. (This is similar to the old style "dickie" of the sixties where a collar with some attached fabric was worn to mimic a turtleneck being worn under a shirt!)

On the Basic Black matte, I used Versamark and the fireworks stamps, heat embossing some with Gold and some with Silver Stampin' Emboss Powder. This matte was adhered to the Gold Embossed Whisper White matte which was adhered to the card base.

After die cutting the numerals from Gold Glimmer using the Large Numbers Framelits Dies, I used Adhesive Strips to adhere the numerals to the card front.

A simple Whisper White matte adhered inside the card was stamped with Happy New Year.

Linda Vich Creates: 2017 New Year's Cards. Fireworks in gold and silver embossing burst behind gold glimmer numerals on this festive New Year's card.

I hope you enjoyed this card and you are enjoying 2017–it's going to be a GREAT year!


Saturday, August 20, 2016

Spiderman Birthday

Linda Vich Creates: Spiderman Birthday. Super hero birthday card created for my granddaughter.
They say that time flies when you are having fun. How true is that? We've certainly enjoyed the last few years we've had with our granddaughter, Raine. On Sunday Raine turns three years old! So glad that this little girl–correction–big girl is in our lives!

Because Raine is really into Spiderman and the other super heroes right now, I thought if fitting to make her a Spiderman birthday card. I CASEd this card from Sharon Lim.

I started with a standard card base cut from Pacific Point and a Real Red matte. I embossed the matte using the Tangled Webs Embossing Folder from Taylored Expressions. The matte was adhered to the card front using Fast Fuse Adhesive.

For the eyes, I used the Sweet & Sassy Framelits to cut two hearts, one from Whisper White and one from Basic Black. I cut each in half with my Stampin' Trimmer and then layered them using liquid adhesive. These were adhered to the card front using Dimensionals.

On a Whisper White matte cut for the inside of the card, I stamped the sentiment from Number of Years using both Real Red and Versamark ink and then heat embossed it using Clear Stampin' Emboss Powder. The large number three was stamped in Pacific Point (Raine's favorite Color is blue) and Versamark on a scrap of Whisper White and then heat embossed using Recollections Blue Blaze Sparkle Embossing Powder. I then restamped it in Versamark and heat embossed with Clear Stampin' Emboss Powder. It was die cut using the coordinating Large Numbers Framelits and then popped up using Dimensionals to finish the card.

Linda Vich Creates: Spiderman Birthday. Super hero birthday card created for my granddaughter.

Linda Vich Creates: Spiderman Birthday. Super hero birthday card created for my granddaughter.

I can't wait to see Raine's expression when she opens her card!

"Spiderman, Spiderman, does whatever a spider can . . . "


Thursday, January 28, 2016

Have A Cuppa Valentine

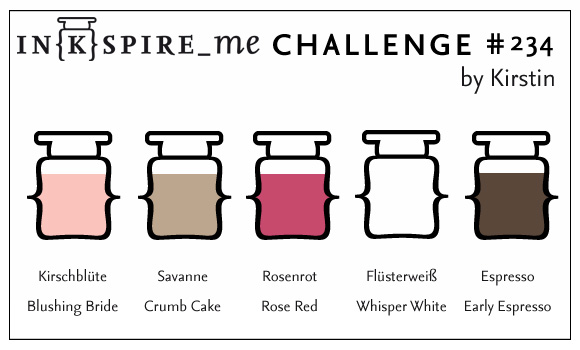
This morning I drew inspiration from the colors in the Inkspire_Me Challenge. The colors were lovely and coincided nicely with the Love Blossoms Designer Series Paper Stack. Of course they were also awesome colors for a valentine!


For this challenge, I knew I wanted to use the Cups & Kettle Framelits to create a card that represented a couple. To do this I wanted to use two cups facing each other with the steam wafting up to a heart above the cups.

The biggest challenge in creating this card was deciding on the patterned papers! Of course, all the papers in the Love Blossoms Designer Series Paper Stack coordinated but designing with patterns can be tricky. You have to choose colors and patterns wisely so that they don't overpower each other or look too busy. I finally decided on a Crumb Cake pattern for a strip at the bottom of the card and two Rose Red patterns for the cups.

I planned to divide the bottom and top by using a Blushing Bride ribbon from the Love Blossoms Embellishment Kit. This kit has all kinds of goodness in it! Satin ribbon, pearl trim, metallic doilies, sequins, glittered enamel dots as well as beautiful Rose Red bow clips!

For the upper part of the card, I needed to stamp on it so I would have chosen Whisper White but somehow all that bare whiteness was too much! That's when I got the idea to do a color wash on the background using Blushing Bride. This would give a lovely rest from the patterned paper while still providing some lovely texture.

I initially tried using the Watercolor Wash background stamp but it wasn't quite right. In the end, I decided to do a freehand wash so that I could control the amount of color I put onto the watercolor paper.

Using a flat paintbrush, I stroked on plain water to wet the watercolor paper. I then mixed clean water with some Blushing Bride reinker to create a very soft color and brushed it onto the paper. I used my heat tool to dry it and reshape it to its former flat state.

I used my heat tool to thoroughly dry the paper and then adhered a strip of Crumb Cake patterned paper to the bottom of it. I adhered a length of the ribbon over the top part of the patterned paper–it was starting to look really nice!

I used a cup die from the Cups & Kettle Framelits to die cut two cups, flipping one so that I had two cups that faced each other. I then also die cut some self-adhesive fun foam and adhered this to the back of each cup because I wanted added thickness for the cups. I used a sponge dauber and Early Espresso to ink all the edges to provide dimension and cover the white edges.

Using a Crumb Cake Stampin' Write Marker, I colored the modern heart from the A Nice Cuppa Stamp Set and stamped it at the top of the watercolor panel. I used the marker rather than the stamp pad because I wanted a looser looking, imperfect heart–one that could have been formed from steam perhaps?

At this point, I used foam tape to adhere the panel to a Crumb Cake card base. I chose the foam tape because I feel it works better with painted watercolor paper to keep it flat but popped up.

I cut a length of Metallic Gold Baker's Twine and unravelled it to get the gold thread. I placed a few glue dots on the spots that would be covered by the cups and then cut little pieces of the thread and stuck them down. Using Dimensionals, I adhered the cups and then played with the threads until they sort of stuck up like steam.

Using the banner die from the Large Numbers Framelits I cut a piece of watercolor paper. I gave it a Blushing Bride wash and dried it thoroughly. I then used Rose Red ink to stamp the sentiment. Because the sentiment stamp also contained a heart, I masked that with tape before inking and then removed it to stamp the sentiment itself. I inked the edges of the banner with Early Espresso and then adhered it across the two cups using Dimensionals.

I used the Confetti Hearts Border Punch to punch out hearts from both Crumb Cake and Rose Red card stock. I used glue to adhere them to the watercolor paper. My final task was to add little glimmer to the hearts by using my Clear Wink of Stella Glitter Brush.


I'm pleased with how this card turned out and it gave me a chance to use up a lot of patterned paper!


Tuesday, January 26, 2016

Valentine For Global Design Project

I am off work until Saturday so I am looking forward to some creative time in my craft room!

With Valentine's Day just around the corner, hearts seem to be front and centre on cards!

My card today is a 5 x 7" card designed for the Global Design Project #20.

The assignment this week is to CASE the Designer. While CASE generally means Copy And Share Everything, for the Global Design Project it translates as Copy And Selectively Edit. This enables the participants to be inspired by various things–colors, pattern or even the theme of the card–and truly make a design of their own.

I actually have a couple of ideas in mind for this challenge which I hope to work on this week but today's card has me focusing on the large heart, little hearts, and the twine from Connie's card design.

I cut a 5 x 7" card base from Crumb Cake card stock as well as a matte of 4.25 x 6.25". I cut 4.5 x 6.5" and 3.75 x 4" mattes from Very Vanilla. I also cut a small piece of Blushing Bride to go behind the smaller Very Vanilla matte.

Using a heart from the Hearts Collection Framelits Dies I die cut the smaller Very Vanilla matte. I then die cut five of the smallest heart die and punched several hearts using a punch from the Itty Bitty Accents Punch Pack. In addition, I used the Confetti Hearts Border Punch to punch some tiny hearts from Blushing Bride card stock.

I used one of my Tsukineko Fastastix Brushes to ink the edges of all the small hearts and used a Stampin' Sponge to ink the edges of both Very Vanilla mattes with Blushing Bride ink. Glue dots were used to adhere the Very Vanilla hearts around the cut out heart on the matte and then I used my Fine Tip Glue Pen to adhere the tiniest Blushing Bride hearts. I added some Wink of Stella to each Blushing Bride heart for a hint of glimmer.

Dimensionals were used to adhere the heart-encrusted matte to the Blushing Bride matte. The smaller Crumb Cake matte was adhered to the larger Very Vanilla matte using Fast Fuse Adhesive.

Linen thread was wrapped around the two mattes and secured with tape. Two Blushing Bride card stock hearts were punched and another die cut. They had their edges inked and a coat of Wink of Stella was applied to each. Once dry, the hearts were adhered on top of the linen thread using Dimensionals and glue dots. The mattes were then adhered tot he card front using Fast Fuse Adhesive.

Using my MISTI, the sentiment was stamped with Crumb Cake and Versamark on Very Vanilla and heat embossed with Clear Stampin' Emboss Powder. The sentiment was die cut using the banner die from the Large Numbers Framelits Dies. The sentiment was adhered to the bottom of the card front using Dimensionals.

A matte of Very Vanilla was cut for inside the card. A border stamp and Crumb Cake ink was used at the bottom and was heat embossed with Clear Stampin' Emboss Powder. The edges were inked with Blushing Bride and then the matte was adhered with Fast Fuse Adhesive.


I love the color scheme of this card but I'm not sure if I really like the card. I am somewhat troubled by the large Blushing Bride area inside the heart cut out but not sure what else to do with it.

Sometimes it is difficult to decide when a card is "finished!" Does this ever happen to you? Do you think this card is finished or do you have a suggestion for how I could improve it? Leave me a comment below!


Tuesday, January 12, 2016

Bloomin' Masculine Valentine

Linda Vich Creates: Bloomin' Masculine Valentine. Kraft and black combine in this masculine styled card using the Bloomin' Heart Thinlits Die and the Bloomin' Love stamp set.
It happened again last night.

Just as I was falling asleep, my mind provided me with a card idea, this time using the Bloomin' Heart Framelits Dies and the Bloomin' Love stamp set. It was not until I started writing this blog post that I realized what a perfect Valentine card this would be for a man!

The first thing I did was to decide that the standard A2 card would be too small for what I had envisioned so I went with my next favorite size, 4.75 x 6."

I cut a Basic Black card base and then cut a matte measuring 4.25 x 5.5" from Kraft card stock. I positioned the Bloomin' Heart Framelits Die centred horizontally but near the top of the matte. Of course, I used my Big Shot Sandwich that I detailed in my blog post, Solid Gold Tips For Using The Bloomin' Heart Thinlits Die, to ensure a clean cut. However, this time I set aside the actual heart die cut for another time and kept the matte for my card. I used a sponge dauber with Basic Black Archival to ink the edges of the matte and inside the heart die cut.

I cut another Kraft card stock matte of the same size and ran it through my paper crimper so that the lines ran vertically on the matte. I then took my Basic Black Archival ink pad and slid it over the top of the matte, adding ink to the ridges. I used the same technique in Love For the Lotus.

Next, I used Versamark and the heart from the Bloomin' Love Stamp Set to stamp on a piece of Kraft card stock and then heat embossed it with Black Stampin' Emboss Powder. To avoid a horrible black mess, I was sure to use my Embossing Buddy before inking. This is definitely necessary when using black! I then fussy cut the heart.

I ran a length of Basic Black Stitched ribbon around the bottom of the die cut matte and then used the Botanical Builder Framelits Dies to cut flowers and leaves both from black and Kraft card stock. I used Dimensionals, Glue Dots and the Fine Tip Glue Pen to adhere these. I added some tiny rhinestones, colored black with a Copic marker, to the centre of the smallest blossoms.

I adhered the die cut matte to the crimped matte using Dimensionals and then to the card front using Fast Fuse Adhesive.

I decided to add a hint of gold to the card so I bundled up some Gold Metallic Thread and secured it with glue dots to the crimped matte showing through the heart die cut. I adhered the heat embossed heart over the thread bundle using Dimensionals.

I stamped the sentiment with the banner stamp, again on Kraft card stock, and then die cut it using the Large Numbers Framelits Dies. I adhered it to the top of the card front using Dimensionals.

For the inside of the card, I cut a matte from the now retired Naturals Ivory card stock, and stamped a border image at the bottom using Basic Black Archival Ink. Using a sponge dauber, I inked the sides using Crumb Cake ink and then adhered the matte using Fast Fuse Adhesive to complete my card.

Linda Vich Creates: Bloomin' Masculine Valentine. Kraft and black combine in this masculine styled card using the Bloomin' Heart Thinlits Die and the Bloomin' Love stamp set.

Linda Vich Creates: Bloomin' Masculine Valentine. Kraft and black combine in this masculine styled card using the Bloomin' Heart Thinlits Die and the Bloomin' Love stamp set.


I've entered this card in the Global Design Project because I felt it fit nicely with their sketch for #GDP018.


Drop me a comment below and let me know how you've used the Bloomin' Heart or Bloomin' Love sets!