Showing posts with label lovely amazing you. Show all posts

Tuesday, May 1, 2018

Bittersweet Thank You

Linda Vich Creates: Bittersweet Thank You. Distressed wood background is topped with greenery and flowers using Petals & More, Sweet Cake Framelits, and punches.
Last Wednesday evening, I had the pleasure of attending an evening in the lounge at the Portage Avenue Marigold Restaurant in Winnipeg. It was great to see a lot of old friends but it was sad to think that in a few short days the Marigold Restaurant would close its doors forever. The Marigold had been a favorite watering hole for its faithful patrons including my husband, who had been a regular there for 37 years.

Wally Woo, who passed away on July 1, 2016, came to Canada from China at the age of 15 with only $8.00 in his pocket but went on to found the string of Marigold restaurants in Winnipeg, with  the Marigold on Portage Avenue remaining his favorite. He put in long hours each day at the restaurant up to shortly before his death at 82.

Another important person at the restaurant was the manager, Jean. She also put in long hours but always maintained a professional and pleasant demeanor, connecting with each patron and remembering birthdays and other special occasions. I made this card to thank her for her hard work at Marigold's.

The 5 x 7" card base was cut from Coastal Cabana and then two Coastal Cabana panels were cut for the front of the card and embossed using the Pinewood Planks embossing folder. I referred to the excellent tutorial by Nicole Watt on Distressed Wood using Bermuda Bay, Lemon Lime Twist, Island Indigo, Crumb Cake and Whisper White inks with sponge daubers to create the colorful wood.

The sentiment, from the now retired Lovely Amazing You stamp set, was stamped with Island Indigo on Coastal Cabana and then die cut using the #3 oval from the Stitched Shapes Framelits. Island Indigo was sponged around the shape and then it was glued to a scalloped matte die cut from the Myths & Magic Glimmer paper using a scalloped die from the Layering Ovals Framelits. The completed sentiment was then glued to two Delicate White Doilies which had been sponged with Crumb Cake. These were attached to the front of the card with Dimensionals.

Both Linen Thread and Gold Metallic Thread were used to create swirls and attached to the card using Glue Dots. The "greenery" was die cut from Myths & Magic Glimmer paper using Petals & More Thinlits and leaves punched from Island Indigo and Soft Suede using the leaf punch. Little filler stems were die cut from Bermuda Bay and Coastal Cabana using the Sweet Cake Framelits. Leaves and stems were sponged with ink and then attached using liquid adhesive.

The flowers were punched using the retiring Pansy Punch and the retired Petite Petals Punch using Coastal Cabana and Bermuda Bay card stock. Flowers were stacked, pierced in the centre with a Piercing Tool and then fastened with a brad. Each flower was then sprayed with water and each individual layer scrunched up into a final bud shape. These were left to dry overnight and then carefully disassembled. Each petal was sponged with Crumb Cake and then liquid adhesive was used to assemble each flower. Crystal Effects was used to fasten each bloom to the card front.

Linda Vich Creates: Bittersweet Thank You. Distressed wood background is topped with greenery and flowers using Petals & More, Sweet Cake Framelits, and punches.

Linda Vich Creates: Bittersweet Thank You. Distressed wood background is topped with greenery and flowers using Petals & More, Sweet Cake Framelits, and punches.


It gave me such joy to create this card for Jean and I was so glad that she loved receiving it!

Thank you for visiting my blog today.


Tuesday, June 13, 2017

Tie Dye Thank You Cards

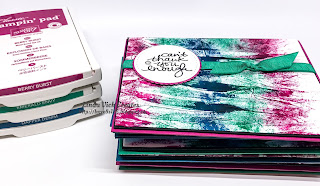
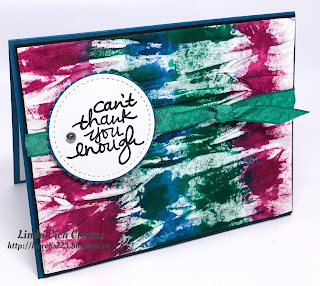
Linda Vich Creates: Tie Dye Thank You Cards. Vibrant tie dye backgrounds using Berry Burst, Emerald Envy and Dapper Denim inks, take centre stage on these thank you cards.
Yesterday, I had a most productive day! I was able to blog, do a couple of projects, and make thank you cards using a new technique!

I never actually got to try tie dye as a kid but I was impressed with the results of using the technique for card making after reading Cindee Wilkinson's blog post.

For my attempt at tie dye, I used a very lively and bright color scheme. If you like it, feel free to save it for use with your own projects.

Linda Vich Creates: Tie Dye Thank You Cards. Vibrant color scheme using Berry Burst, Emerald Envy, and Dapper Denim.

I started by scrunching up a 12 cup size coffee filter and then opened it up again. I then gathered the filter to form pleats. Using a wadded up baby wipe, I proceeded to dab on my colors. After applying ink to both sides, I carefully opened up the filter and added ink wherever needed. I made eight of these and then set them aside to dry while working on other things.

When they were dry, I adhered them to 4 x 5.25" pieces of Thick Whisper White. To adhere them, I coated one side with a glue stick and then pressed the filter down onto it, being careful to retain the pleated look for added texture.

Once all eight were adhered, I trimmed each piece to about 1/2" on all four sides. I then used Fast Fuse to adhere each edge down, forming proper corners on all four sides. I used the Fast Fuse to adhere each tie dye piece to a thin Basic Black matte.

Around each matte I knotted a length of ribbon, in one of the three colors. The sentiment, from the now retired Lovely Amazing You stamp set, was stamped with Basic Black on Thick Whisper White and then die cut using the #2 stitched circle die from the Stitched Shapes Framelits. The #4 scalloped circle from the Layering Circles Framelits was used to die cut a matte from one of the three colors. These mattes were adhered to the stitched mattes using liquid adhesive.

Standard card bases were cut in the three different colors and the tie dye mattes were adhered with Dimensionals. The sentiments with mattes of the same color as the card base were adhered onto the card fronts with Dimensionals. A rhinestone was added to each sentiment for a little bling.

For inside the card, Whisper White mattes were stamped with all three colors using a stamp from the Happy Celebrations stamp set.

Linda Vich Creates: Tie Dye Thank You Cards. Vibrant tie dye backgrounds using Berry Burst, Emerald Envy and Dapper Denim inks, take centre stage on these thank you cards.

Linda Vich Creates: Tie Dye Thank You Cards. Vibrant tie dye backgrounds using Berry Burst, Emerald Envy and Dapper Denim inks, take centre stage on these thank you cards.

Linda Vich Creates: Tie Dye Thank You Cards. Vibrant tie dye backgrounds using Berry Burst, Emerald Envy and Dapper Denim inks, take centre stage on these thank you cards.

Linda Vich Creates: Tie Dye Thank You Cards. Vibrant tie dye backgrounds using Berry Burst, Emerald Envy and Dapper Denim inks, take centre stage on these thank you cards.

Linda Vich Creates: Tie Dye Thank You Cards. Vibrant tie dye backgrounds using Berry Burst, Emerald Envy and Dapper Denim inks, take centre stage on these thank you cards.


Linda Vich Creates: Tie Dye Thank You Cards. Vibrant tie dye backgrounds using Berry Burst, Emerald Envy and Dapper Denim inks, take centre stage on these thank you cards.


This technique is really fun and addicting and I love the texture this produces! Each time the results are different. Next time I use this technique I am going to experiment with other tie dye patterns.


Thursday, June 2, 2016

Catalog Party Prep Part 3

Linda Vich Creates: Catalog Party Prep Part 3. Ornately embossed vellum and card stock butterflies rest on the Softly Falling snow white background of these lovely In Color cards.
Today I bring you Part 3 in my 5-part series. You can view Part 1 and Part 2 if you missed them.

My card set today was CASEd from a card designed by demonstrator Annette Stewart but I can't link to it because it is displayed on the demonstrators' forum :(

I started with a standard card base cut from Thick Whisper White. I used the Softly Falling Embossing Folder to emboss the card front.

Using the Bold Butterfly Framelits, I die cut large, solid butterflies from each of the five In Colors and also five from vellum. I also used the Butterflies Thinlits to die cut small, intricate butterflies from the five In Colors and five from vellum.

On each of the vellum butterflies, I used my Embossing Buddy and then used the ornate stamp from the First Sight stamp set to stamp with Versamark. I then heat embossed using White Stampin' Emboss Powder. Because vellum is much more fragile than card stock, care must be taken to warm up the heat gun for a few seconds before attempting to heat emboss the vellum so as not to warp it.

Each vellum butterfly was attached to a matching card stock butterfly with glue dots. The smaller butterfly units were then attached to the larger ones also using glue dots. A large pearl was added to hide the glue dots. The wings were bent slightly to provide movement as well as to reveal both the ornate vellum wings and the colorful card stock below.

The sentiment from the Lovely Amazing You stamp set was used to stamp with ink that matched the card stock of the butterflies. Round punches were used to punch both Whisper White and In Color card stock circles. The circles were adhered together with Fast Fuse and then attached to the card fronts using Dimensionals. The completed butterfly for each card was also attached with Dimensionals to complete the cards.

Linda Vich Creates: Catalog Party Prep Part 3. Ornately embossed vellum and card stock butterflies rest on the Softly Falling snow white background of these lovely In Color cards.

Linda Vich Creates: Catalog Party Prep Part 3. Ornately embossed vellum and card stock butterflies rest on the Softly Falling snow white background of these lovely In Color cards.

Linda Vich Creates: Catalog Party Prep Part 3. Ornately embossed vellum and card stock butterflies rest on the Softly Falling snow white background of these lovely In Color cards.

Linda Vich Creates: Catalog Party Prep Part 3. Ornately embossed vellum and card stock butterflies rest on the Softly Falling snow white background of these lovely In Color cards.

Linda Vich Creates: Catalog Party Prep Part 3. Ornately embossed vellum and card stock butterflies rest on the Softly Falling snow white background of these lovely In Color cards.

Don't these butterflies look lovely in all five new colors? It is hard for me to pick a favorite! I think the embossing from the Softly Falling Embossing Folder also adds a lovely bit of subtle texture.


Wednesday, January 13, 2016

I Never Promised You A Rose Garden, Or Did I?

Linda Vich Creates: I Never Promised You A Rose Garden, Or Did I? A Dazzling Diamonds Rose Garden die cut adorns the front of a Night of Navy card.
Hi there! I hope it is warm where you are today–where I am is frigid! However, cold temperatures are a good excuse to stay inside and make cards, right?

Today I worked on two cards, the first of which was on my Evernote list that I mentioned in my Solid Gold Tips For Using The Bloomin' Hearts Framelits Die.

Have you tried using Evernote yet? I have been slowly re-organizing my crafting supplies from another app that no longer meets my needs.

Evernote is wonderful for organizing your crafting supplies (and everything else) because you can tag everything with a few key words and then just do a search to bring up all your Valentine's Day stamps, for instance.

Kathleen Driggers has a wonderful video tutorial on how to create a stamp inventory using Evernote.

What is really cool about the program is that you can run it on your computer, the web, your iPhone (or Android) or your iPad (or Android tablet). So, when you go shopping for craft supplies, you won't buy duplicates of things and you'll end up being able to buy more new things!

One of my favorite purchases from the 2016 Occasions Catalog was the Bundle of the Rose Garden Thinlits Dies and the Rose Wonder Stamp Set. My first card uses both but primarily the dies to create a one layer card.

To start with, I die cut the large rose and leaf combo using Dazzling Diamonds Glimmer paper. Because this die has a lot of intricacy, I used my special Big Shot sandwich because I wanted a clean cut but I also wanted to catch all the pieces that were cut out by the die so I could use them in the future.
I used the Fine Tip Glue Pen to carefully add adhesive to the die cut and then placed it on the front of a Night of Navy, 4.75 x 6" card front. After putting it into place, I put a piece of scrap paper over top and smoothed over it with my hands to ensure it was adhered.

Next, I stamped a sentiment from the Lovely Amazing You Stamp Set (love this stamp set!)  using Versamark and heat embossed it using white Stampin' Emboss Powder.

Because the card base was dark, I created a matte for the inside of the card using Whisper White card stock. I stamped leaves at the bottom of the card using Night of Navy and then lightly sponged over them using the same ink.

Linda Vich Creates: I Never Promised You A Rose Garden, Or Did I? A Dazzling Diamonds Rose Garden die cut adorns the front of a Night of Navy card.

Linda Vich Creates: I Never Promised You A Rose Garden, Or Did I? A Dazzling Diamonds Rose Garden die cut adorns the front of a Night of Navy card.

This is a very simple yet effective card to create and can be done fairly quickly! The picture really doesn't do this card justice because you can't see the glimmer from the Dazzling Diamonds paper.

The second card was a little more labor intensive but fun to create!

Linda Vich Creates: I Never Promised You A Rose Garden, Or Did I? Patterned paper Rose Garden die cut filled with Dazzling Diamonds adds glitz to a Bermuda Bay and Melon Mambo birthday card.

I knew that I wanted to try cutting the rose from a sheet of patterned paper. I chose to use the Have A Cuppa Designer Series Paper Stack and selected a sheet of hearts in shades of Bermuda Bay, Melon Mambo and Basic Gray. I chose to use Bermuda Bay and Melon Mambo card stock to coordinate with it. I cut a strip of the patterned paper and adhered it to the left edge of a Bermuda Bay matte.

I used the thinlits to cut out the rose and leaves from a sheet of the patterned paper and I adhered this to a Bermuda Bay matte. I retrieved the dryer sheet on which were stuck the Dazzling Diamonds pieces from my previous card and carefully fit each piece into the openings in the rose die cut. Once I had them all in place, I used the Fine Tip Glue Pen to glue each fragment back into place. To hold each piece while applying the glue, I used my Embellie Gellie Tool, a useful product for holding and releasing little things.

After getting all the pieces in place, I decided that I needed a bit more definition for the rose, so I outlined the rose with a Basic Black Stampin' Write Marker. I liked what it did but it made me feel that I should outline the whole thing! I decided THAT was not happening!

Moving on from there, I stamped the sentiment on Thick Whisper White and then die cut it. This was actually two separate stamps–the sentiment and the little frame around it. I find it easiest to stamp the sentiment first and then line up the frame stamp over it. Then it's an easy matter to line up the thinlit over it to die cut it. I adhered the sentiment onto the card front with Dimensionals.

To provide a bit more definition to the matte, I used a sponge dauber to ink the edges with Basic Black Archival ink. I used my Handheld Stapler to staple a scrap of Melon Mambo Stitched Ribbon onto the top left of the matte. After adhering the finished matte to a Melon Mambo card base, I added a few crystal sequins from Pretty Pink Posh.

For the inside of the card, I stamped a section of the rose onto a Whisper White matte using Versamark and then heat embossed it with Clear Stampin' Emboss Powder. I used both Melon Mambo and Bermuda Bay inks with sponges to add a little color to the petals and leaves and then inked the remaining edges with Basic Black Archival ink using a Sponge Dauber.

Linda Vich Creates: I Never Promised You A Rose Garden, Or Did I? Patterned paper Rose Garden die cut filled with Dazzling Diamonds adds glitz to a Bermuda Bay and Melon Mambo birthday card.

Linda Vich Creates: I Never Promised You A Rose Garden, Or Did I? Patterned paper Rose Garden die cut filled with Dazzling Diamonds adds glitz to a Bermuda Bay and Melon Mambo birthday card.


What do you think?

I think it is really cool that you can create at least two cards using the Rose Garden Thinlits Dies! However, you could go on forever, because as you use the outline of the rose for one card, you cut another paper for the insides of the rose and then you have another outline to create another card and so on and so on . . . :) Kind of like a never-ending card!

I hope you've enjoyed reading about these two cards–enjoy your day!


Saturday, February 21, 2015

Watercolor Workout

Linda Vich Creates: Watercolor Workout. Bold and vibrant watercolor background provides the ideal setting for sparkly Floral Frenzy leaves and a few punched flowers, colored with Blendabilities.


Today was a day that made me happy because I got to play in my craft room all day! I put on my Creative Mozart music (supposed to be good for creativity) and set out to create some new watercolor backgrounds.

I decided to try out some watercolor brushes, rather than use my Aqua Pen because I wanted a larger brush. Obviously you get what you pay for . . . I picked up a pack of brushes at Walmart and as I painted, I kept losing bristles on the paper! I guess I'll have to invest in some better brushes if I want to keep creating these types of cards!

To aid me in my quest for watercolor mastery, I purchased an online course from Online Card Classes. The class I got is called Watercolor For Card Makers. I have taken a course from this site before and it is well worth the fee!

For my class, it is an independent study as the real time class has already run. However, for $25, I get 11 lessons with printable PDF's for each as well as 5-6 videos per lesson showing the techniques for each lesson. I also get access to the forum and gallery and have lifetime access to the course and videos! I can even download the videos or I can watch them on the web.

I'm definitely going to enjoy working through the lessons as they not only work with real watercolor paints but inks, distress inks, markers, and pencils. There are several different teachers as well so you get to experience a number of different styles of watercolor techniques.

Today, I played with getting my paper sufficiently wet to allow me to have a proper flow for the paint to move around and blend.

I used Melon Mambo, Bermuda Bay and Crushed Curry ink refills along with my new, albeit cheap, watercolor brushes! I had time to create three backgrounds. One, I probably will not use at all, the other I may use and the other I will share with you on the card I created!

After my watercolor background had been created and dried with my heat tool, I cut it down to 4 x 5" and to make the colors really pop, I cut a thin black matte 4 1/8 x 5 1/8."

I cut another matte, slightly larger at 4 3/8 x 5 3/8" and inked the edges with Melon Mambo, using a sponge dauber.

Using Jet Black Stazon ink, I stamped the sentiment from the Lovely Amazing You stamp set. I punched a tiny heart from Silver Glimmer Paper, using the now retired Small Heart Punch, and adhered it with a glue dot near the sentiment.

I cut a set of leaves out of Dazzling Diamonds Glimmer Paper using the Flower Frenzy Bigz L Die and adhered them to the left side of the watercolor using glue dots. The Pansy Punch and the Petite Petals Punch provided flowers from Silver Glimmer Paper which I colored using Blendabilities.

For the flower centres I used rhinestones and a Faceted Vintage Button; all were colored with Blendabilities. The larger flower was adhered with a Dimensional, the smaller flowers with glue dots.

I love the vibrant colors teamed with the sparkle from the leaves and flowers! I think that the glimmer paper reinforces the water droplet marks on the watercolor.

Linda Vich Creates: Watercolor Workout. Bold and vibrant watercolor background provides the ideal setting for sparkly Floral Frenzy leaves and a few punched flowers, colored with Blendabilities.


Linda Vich Creates: Watercolor Workout. Bold and vibrant watercolor background provides the ideal setting for sparkly Floral Frenzy leaves and a few punched flowers, colored with Blendabilities.


Some details:


Linda Vich Creates: Watercolor Workout. Bold and vibrant watercolor background provides the ideal setting for sparkly Floral Frenzy leaves and a few punched flowers, colored with Blendabilities.


Linda Vich Creates: Watercolor Workout. Bold and vibrant watercolor background provides the ideal setting for sparkly Floral Frenzy leaves and a few punched flowers, colored with Blendabilities.


What do you think? Leave me a comment below!

Built for Free Using: My Stampin Blog