Showing posts with label beautiful you. Show all posts

Saturday, June 24, 2017

June Wind Up and Projects

Linda Vich: June Wind Up and Projects. Balloons and a paper pieced stamp from Beautiful You produce a stunning layered card.
Friday night was our last stamping class until September. It was bittersweet because so many ladies, from our group, for various reasons, will not be returning to the group in the fall. However, we did have a lovely time by starting the night with goodies and socialization.

I was the lucky recipient of a beautiful card and a gift card to a local spa! It will be such a treat to look forward to using!

After gorging ourselves on various appetizers and desserts, it was a bit difficult to get going on crafting but we managed!

Our first card was a CASE from demonstrator Michelle Carter.

This card was not hard to make though it looks complicated!

A standard card base from Berry Burst was used as well as a small matte of 2.75 x 4". In addition to these, two Whisper White mattes were used, 2.5 x 3.75" and two 4 x 5.25". A piece of the Fresh Florals Designer Paper in Berry Burst was also cut 4 x 5.25" with it cut further at 2.25" to produce two strips.

The larger Whisper White matte was adhered to the card front using Fast Fuse. The larger strip of DSP was adhered onto the white matte.

The Beautiful You stamp set was used and the lady was stamped twice, using Basic Black–once onto the smallest Whisper White matte and once onto the smaller strip of DSP. The stamp on the DSP was fussy cut so that the dress and the hat were able to be glued onto the stamped image on the white card stock. This was then matted with the Berry Burst and adhered to the card front using Dimensionals.

From the remaining strip of DSP, two balloons were punched using the Balloon Bouquet Punch and three balloons were punched from scraps of Berry Burst card stock. Two card stock balloons were glued to the card front with one DSP balloon adhered over top using a Dimensional. The strings were drawn in using a fine point Sharpie.

Inside the card, the sentiment was stamped in Basic Black on a Whisper White matte and then two balloons, one from card stock and one from DSP were adhered, overlapping, on the side of the matte; strings were drawn in like before.

Linda Vich: June Wind Up and Projects. Balloons and a paper pieced stamp from Beautiful You produce a stunning layered card.

Linda Vich: June Wind Up and Projects. Balloons and a paper pieced stamp from Beautiful You produce a stunning layered card.

Linda Vich: June Wind Up and Projects. Balloons and a paper pieced stamp from Beautiful You produce a stunning layered card.


For the second card, the stampers had a choice of either a Sunset Silhouette or a Tropical card.

For the Sunset card, a standard card base of Pumpkin Pie was cut as well as a thin Basic Black matte and a Shimmery White matte.

The Embossing Buddy was used to remove any marks from touching the matte. Using Watercolor Pencils, bands of color were scribbled onto the Shimmery White matte using a vertical orientation. An Aqua Pen was then used to soften the pencil strokes into a watercolor wash. The heat tool was used to dry the matte and then, using the MISTI, the sentiment from the Colorful Seasons stamp set and the birds from the High Tide stamp set were stamped three times with Basic Black to produce a very black print.

After getting matte as flat as possible, the Adirondack chair was die cut from Basic Black using the Seasonal Layers Thinlits and then adhered to the matte using a sponge and liquid adhesive. The matte was then adhered to the Basic Black matte with Fast Fuse and then adhered to the card front using Dimensionals.

A leaf was stamped on the remaining Whisper White matte using Pumpkin Pie and then edges inked with Real Red before the matte was adhered inside the card.

Linda Vich: June Wind Up and Projects. Watercolor pencils are used to create a wash as the backdrop for this Sunset Silhouette, complete with an Adirondack chair die cut with the Seasonal Layers Thinlits.

Linda Vich: June Wind Up and Projects. Watercolor pencils are used to create a wash as the backdrop for this Sunset Silhouette, complete with an Adirondack chair die cut with the Seasonal Layers Thinlits.

Linda Vich: June Wind Up and Projects. Watercolor pencils are used to create a wash as the backdrop for this Sunset Silhouette, complete with an Adirondack chair die cut with the Seasonal Layers Thinlits.

Linda Vich: June Wind Up and Projects. Watercolor pencils are used to create a wash as the backdrop for this Sunset Silhouette, complete with an Adirondack chair die cut with the Seasonal Layers Thinlits.


For the Tropical card, a standard card base of Bermuda Bay was used with a thin Pacific Point matte as well as one from Shimmery White.

Like the previous version of the card, the Embossing Buddy was used to remove any marks from the Shimmery White matte and then Watercolor Pencils were used to lightly scribble alternating bands of Pacific Point and Bermuda Bay using a horizontal orientation this time. The Aqua Pen was used and then the heat tool was used to dry the matte. Using the MISTI, the sentiment was stamped in Versamark and heat embossed using White Stampin' Emboss Powder.

After getting matte as flat as possible, the Adirondack chair, branch and three flowers was die cut from Thick Whisper White using the Seasonal Layers Thinlits. The branch was trimmed in places and then the chair, branch and flowers were adhered to the matte using liquid adhesive. The watercolored piece was then matted with Pacific Point and then adhered to the Bermuda Bay card front using Dimensionals.

A flower was stamped on the remaining Whisper White matte using Bermuda Bay and the edges inked with Pacific Point before the matte was adhered inside the card.

Linda Vich: June Wind Up and Projects. Watercolor pencils are used to create a wash as the backdrop for this Tropical card, complete with an Adirondack chair and branch with blossoms die cut with the Seasonal Layers Thinlits.

Linda Vich: June Wind Up and Projects. Watercolor pencils are used to create a wash as the backdrop for this Tropical card, complete with an Adirondack chair and branch with blossoms die cut with the Seasonal Layers Thinlits.

Linda Vich: June Wind Up and Projects. Watercolor pencils are used to create a wash as the backdrop for this Tropical card, complete with an Adirondack chair and branch with blossoms die cut with the Seasonal Layers Thinlits.

Linda Vich: June Wind Up and Projects. Watercolor pencils are used to create a wash as the backdrop for this Tropical card, complete with an Adirondack chair and branch with blossoms die cut with the Seasonal Layers Thinlits.

Hopefully, everyone will enjoy a lovely summer if Mother Nature cooperates and I will prepare for September!


Monday, January 16, 2017

Beautiful You Trio

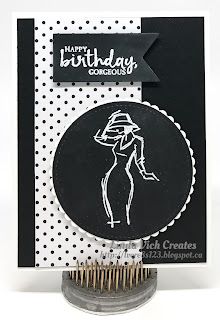
Linda Vich Creates Beautiful You Trio. Coordinated set of cards using Beautiful You.
I had a lovely breakfast out with my daughter this morning! It was great to catch up and hear about her nursing practicum placement from last week. She is doing really well and has had great comments from her supervisors.

Back at home this afternoon, I was able to play in my craft room for awhile. I was excited to finally get to create the cards I had been envisioning since I first saw the Beautiful You stamp set. With my love for contrast, I just knew I had to create some cards in black and white.

I started by stamping each image and sentiment in Versamark on Basic Black. Each was heat embossed with White Stampin' Emboss Powder.

The images were die cut using the largest square, oval, and circle of the Stitched Shapes Framelits. Two of the sentiments were die cut with the Banners Framelits, and one with a smaller stitched square. Each image and the one sentiment were matted with a coordinating scalloped die from the Layering Squares, Circles and Ovals Framelits, cut from Thick Whisper White.

Three standard card bases were cut from Thick Whisper White and mattes from Basic Black. Strips of polka dot paper from the Pop of Pink DSP were layered over the black mattes and the mattes were adhered to the card fronts.

Dimensionals were used to adhere the images and sentiments to the card fronts.

Linda Vich Creates Beautiful You Trio. Coordinated set of cards using Beautiful You.

Linda Vich Creates Beautiful You Trio. Coordinated set of cards using Beautiful You.

Linda Vich Creates Beautiful You Trio. Coordinated set of cards using Beautiful You.


Have you purchased Beautiful You yet? If not, you can purchase the Clear-Mount Set here or Wood Mount here.


Friday, December 30, 2016

My 12 Favorite Projects From 2016

As we reach the end of the year, it is both a time for reflection and goal setting. I'd like to take this opportunity to look back at the projects I've created this year. Be sure to click on each image to be taken to the pertinent blog post for all the details.

January

My favorite for January is actually a tie for two images! I absolutely fell in love with the Sky Is The Limit stamp set and knew that I would use it often–it was perfect for masculine cards!


In creating a Valentine for a man, it is sometimes difficult to create a card not full of flowers and frilly hearts! For this card, I felt that the combination of Kraft card stock and black worked well for a masculine Valentine. You can see that I managed to squeeze in a few flowers but they are "masculine" flowers! I also think that the the various textural elements work well for a masculine card.


February

My favorite for February is one that earned me the Top Picks award for the Stampin' Royalty challenge #316.


March

Anyone that knows me well knows that I am partial to unusual combinations, whether that be food, colors, textures, etc. For the Global Design Project #025, I was required to use a color combo that I wouldn't have picked for myself. In working with it, I chose to use the Brick Wall embossing folder as an actual wall as a backdrop for a window that showcased a very simple stamp set–Vivid Vases. I was very pleased with my completed card!


April

My favorite for April also uses the Brick Wall embossing folder but the card it is used on is totally different. This particular card enabled me to take part in an International Blog Hop organized by Kylie Bertucci! I also enjoyed trying a new technique–painting with alcohol in my Aqua Pen and reinkers.


May

My favorite for this month was the project I designed for the International Blog Hop that I mentioned  previously. I utilized my all time favorite color, Blackberry Bliss, and added a lot of textural and glitzy elements to put this gate fold card over the top!


June

My favorite for this month actually comes from a set of cards I created as a prize for my Catalog Launch Party! The technique that I used was new to me but it was oh such fun! The technique involves using an embossing folder with a large surface, in this case butterflies, and then stamping very lightly several times over the entire embossed image using a a flourish stamp. The stamping is repeated until the ink is totally used up on the stamp and then it is re-inked and stamped again. This technique provides a lot of dimension.


July

July's favorite card also uses the Brick Wall embossing folder and makes uses of several textural elements to create a truly dimensional card.


August

My favorite for this month combines both colors and textures and uses a bundle, Thoughtful Branches, that I was very disappointed was available for only a short time.


September

September's favorite also uses the Thoughtful Branches Bundle as well as a a dots stamp from the Swirly Birds stamp set. It is a fun technique that produces a lot of texture and color.


October

My favorite for October uses a combination of Kraft card stock and black in a non-traditional sort of Christmas card. I think this card would work well for a masculine card but I know that I would love to receive a card like this one as well!


November

My November favorite is a card I taught at one of my stamp groups. It uses a lot of textural elements–embossing, die cuts, ribbon–to produce a pleasing Christmas card!


December

Though my cards for December were few and far between, I do have a favorite. The card was my first use of a new stamp set from the Occasions Catalog, Beautiful You, and also my first play with the new Watercolor Pencils. In addition, I also got to use the Stitched Shapes Framelits which I absolutely love!


I hope that you've enjoyed my review of my favorite stamping projects throughout 2016! I said at the beginning of this post that the end of the year was a time for both reflection and goal setting. The review of my favorite projects takes care of reflection.

I am hoping that you, my blog readers, will help me with goal setting. I would like to know what sorts of techniques and projects you would like to see and read about in the 2017. This will help me to formulate my goals for the coming year! I would appreciate you leavng me a comment below.

I wish each and every one of you a Happy New Year and all the best for 2017!

Tuesday, December 20, 2016

Beautiful You

Linda Vich Creates: Beautiful You. Watercolor pencils blended with Clear Wink of Stella add flair to a stamp from the Beautiful You stamp set.
By now, you may have received your Stampin' Up! Occasions Catalog and Sale-a-Bration Brochure. If you have, you know that you are seriously going to want most of the items in the catalog! If you haven't yet received them, be prepared to be blown away!

I have had my demonstrator pre-order for some time now but have not had the opportunity to play with my new toys. If you live in Canada and would like to be able to order new goodies before anyone else, contact me today about becoming a Stampin' Up! Demonstrator!

Today's card uses one of the new stamp sets and it is probably going to be one of my favorites!

To begin, I stamped both the woman and the sentiment, from the Beautiful You stamp set, using Basic Black Archival ink on Watercolor paper. The stamped images were then die cut using the Stitched Shapes Framelits.

I used two of the new Watercolor Pencils to add a little color on the left side of the woman's dress and hat and then used my Clear Wink of Stella to work the color over the rest of the image, providing both shadow and highlight.

My first time using the Watercolor Pencils was definitely a delight! They go on easily and I love the shimmery blending when using the Wink of Stella with them! They can also be blended using the Aqua Painter or the Blender Pens.

A standard card base was cut from Emerald Envy and matte from Basic Black. I also cut a matte from a sheet of the Playful Palette DSP. The DSP was adhered to the Basic Black matte and then a length of the Sweet Sugarplum Glitter Ribbon was laid vertically and taped to the back of the matte. The matte was then adhered to the card front using Dimensionals.

The stitched squares were then layered on the card front using Dimensionals to complete the card.

Linda Vich Creates: Beautiful You. Watercolor pencils blended with Clear Wink of Stella add flair to a stamp from the Beautiful You stamp set.

I know I will be using this stamp set again soon, along with the Watercolor Pencils!