Showing posts with label festive embossing folder. Show all posts

Monday, March 20, 2017

Make A Medallion Thank You

Do you ever see a color combination that just speaks to you? This happened to me recently when I was viewing several St. Patrick's Day cards.

I don't really celebrate St. Patrick's Day though I do remember that one year, my daughter Courtney decided to color her hair green for school on St. Patrick's Day! I had created a scrapbooking layout to preserve that moment in time.

Linda Vich Creates: Make A Medallion Thank You. Scrapbooking layout from a past St. Patrick's Day.

This layout used a lot of brilliant green to reflect Courtney's hair color. However, the colors that I chose for my card were a bit more sedate: Basic Black, Emerald Envy, and Gold. Feel free to save this color combo for use in your own creations!

Linda Vich Creates: Make A Medallion Thank You. A rich color scheme of Basic Black, Emerald Envy and Gold is combined with the Make A Medallion stamp set for this thank you card.

I started by cutting a standard card base from Emerald Envy, and two mattes–one Basic Black, one Whisper White. I used the Festive Embossing Folder to emboss the Basic Black Matte and adhered it to the card front using Fast Fuse Adhesive.

Next, I used my Make a Medallion stamp set to create the focal image for my card. Using my MISTI, I stamped one part onto a piece of Emerald Envy using Emerald Envy ink. I moved the paper to the upper portion of my MISTI and lined up the remaining ring of the medallion on top. Before stamping, I used my Embossing Buddy to be sure I would have no stray embossing powder. I used Versamark to stamp this ring and then heat embossed it using Gold Stampin' Emboss Powder.

A circle die from the Stitched Shapes Framelits was used to die cut the stamped medallion. A scalloped circle, from the Layering Circles Framelits, was used to die cut some Gold Glimmer paper and then the medallion was layered on top using Glue Dots.

The sentiment was stamped in Versamark and heat embossed in gold. Foam Adhesive Strip was used to adhere the sentiment to the medallion. The medallion was then adhered to the card front using Dimensionals. A length of the now retired Silky Emerald Ribbon was tied in a bow and adhered under the medallion with a glue dot.

To create just a bit of interest for the inside of the card, the Gold Wink of Stella pen was "flicked" to produce glittery gold splatter on the Whisper White matte. It was then adhered inside the card.

Linda Vich Creates: Make A Medallion Thank You. A rich color scheme of Basic Black, Emerald Envy and Gold is combined with the Make A Medallion stamp set for this thank you card.

Linda Vich Creates: Make A Medallion Thank You. A rich color scheme of Basic Black, Emerald Envy and Gold is combined with the Make A Medallion stamp set for this thank you card.

Linda Vich Creates: Make A Medallion Thank You. A rich color scheme of Basic Black, Emerald Envy and Gold is combined with the Make A Medallion stamp set for this thank you card.

Linda Vich Creates: Make A Medallion Thank You. A rich color scheme of Basic Black, Emerald Envy and Gold is combined with the Make A Medallion stamp set for this thank you card.

The embossing on the black may be hard to see unless you click on an image above for an enlarged version.

I think that the Emerald Envy goes really well with gold against the black background!


Friday, January 13, 2017

Hoping For Sunshine

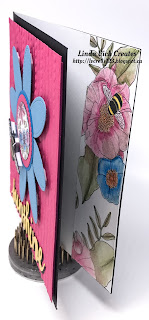
Linda Vich Creates: Hoping For Sunshine. The Stitched Shapes Framelits are used to  create a brightly watercolored flower that adorns an embossed matte.
Tonight I was supposed to be teaching a stamping class but it ended up being postponed until Sunday so I got some play time!

With all the frigid temperatures we've been having, most people are longing for sunshine and warmer temperatures. I decided to make a card to reflect that hope.

With this one card, I was able to use a number of products and a try a few techniques.

I started by die cutting a small circle from a piece of the Inside The Lines paper. This designer paper is one of the FREE Sale-A-Bration products you can receive by placing a $60 order!

I used my new Watercolor Pencils to color it and blended with my Clear Wink of Stella pen. If you haven't yet purchased these, you should put them at the top of your list! They are wonderful! They can be used alone or with an Aqua Painter or Blender Pen or my personal favorite, Wink of Stella. My only complaint? I want more of them–in all of Stampin' Up's wonderful colors!

After coloring, I matted it with a Mambo Melon scalloped circle and then with a Pacific Point circle. I then die cut petals from Marina Mist using an oval from the Stitched Shapes Framelits. I used liquid adhesive to adhere them to the back of the circles.

Next I stamped a bee from the Dragonfly Dreams stamp set on watercolor paper using Basic Black Archival ink. I colored in the stripes of the bee with a watercolor pencil and then fussy cut the bee. Unfortunately, I cut off one of his antennas so I had to stamp another bee which I die cut with the Detailed Dragonfly Thinlits. I cut the wings off this one and glued it under the colored bee. I then used a Basic Black Stampin' Write Marker to trace the edges of the bee to cover up the white spots.

I cut a matte from Melon Mambo and embossed it with the Festive Embossing Folder. I used a piece of adhesive foam to adhere the matte to a Basic Black card front. I then adhered the flower to the matte using Dimensionals. The bee was added using Adhesive Strips.

I die cut the sentiment from both Daffodil Delight and Basic Black using a die from the Sunshine Wishes Thinlits. I gave the yellow piece a coat of Wink of Stella before using liquid adhesive to adhere the black behind the yellow, offset to create a shadow effect. The sentiment was then adhered to the card front.

I cut a Whisper White matte for inside the card and adhered a strip of the Inside The Lines paper down the right side. I used my Watercolor Pencils and Wink of Stella to color the strip to complete the card.

Linda Vich Creates: Hoping For Sunshine. The Stitched Shapes Framelits are used to  create a brightly watercolored flower that adorns an embossed matte.

Linda Vich Creates: Hoping For Sunshine. The Stitched Shapes Framelits are used to  create a brightly watercolored flower that adorns an embossed matte.

Linda Vich Creates: Hoping For Sunshine. The Stitched Shapes Framelits are used to  create a brightly watercolored flower that adorns an embossed matte.

Linda Vich Creates: Hoping For Sunshine. The Stitched Shapes Framelits are used to  create a brightly watercolored flower that adorns an embossed matte.

I'm hopeful that the warm thoughts I was thinking while creating this card will bring some warmer weather our way! What's the weather like where you are? Does it affect the type of cards you make?