Showing posts with label kinda eclectic. Show all posts

Sunday, November 9, 2014

Making It Sparkle

Last night our stamping group met and we had a great time! It was my turn to sit back and have fun while one of the other members of our group, Shawna, taught the class. We got really inked up as we were playing with Alcohol Inks, both on foil and on vellum.

This is the card Shawna created using foil. It was inked and embossed. Beautiful!

Linda Vich Creates: Making It Sparkle

For this card, we stamped the butterfly on vellum and then colored it with Alcohol inks. After cutting it out, we mounted it on a card front that had been misted with ink and attached sequins and a word that had been cut out with the help of a Silhouette machine.

Linda Vich Creates: Making It Sparkle

Shawna is very talented and has just opened her Etsy store, Blue Painted Dragonfly Designs. You can check out her Facebook page as well–be sure to give her a like!

Today was great for me as well because I didn't have to work! In fact, I have the entire weekend off–woohoo!

I was up fairly early and sent in our Stampin' Up! order from last night. I then headed to Winnipeg for a bit of a haircut and on the way homeI decided to stop at Dollarama in Selkirk to pick up some foam tape.

BIG MISTAKE!

All of their Christmas decorations and crafting supplies were out so I had to buy the stuff while it was still available, of course! I walked out with two very full bags!

Back at home, I decided to choose a card challenge to get me started. I chose the Friday Mashup.


This was quite an interesting challenge because you could do one of three things:
  • create a project using the Diamond Dust Technique found here.
  • create a project using these colors: Island Indigo, Garden Green & Rich Razzleberry
OR
  • create a project using the technique and the colors.
I was a little leery of the color combo but decided to go with the flow and create a card following the third option.

The sparkle suggested Christmas to me and it also reminded me of the Bright & Beautiful stamp set. I mean, stars twinkle and when they do, they look like they're sparkling, right?

I chose the medium star and inked it up using my Stampin Write Markers in Garden Green and Island Indigo. I used the markers because I wanted to ink certain sections of the stamp and it has quite an intricate design.

If you recall from yesterday's post, when using markers on the stamps you need to huff on the stamp to refresh the ink before stamping it. I stamped it on Whisper White and the star looked fabulous just like that! However, I went ahead and used one of the Stars Framelits to die cut the star.

I thought that the starburst from Kinda Eclectic would look neat behind the star. That idea required a matte. I cut a square matte from Garden Green card stock and stamped the Starburst in Versamark. I heat embossed it using a Sparkly Silver embossing powder.

I used Island Indigo to ink the edges of the matte, using a sponge dauber. To enhance the embossing, I cut a second matte from Silver Glimmer paper and adhered the stamped matte to it. These eventually mounted on a Rich Razzleberry matte which would be adhered to a card base of the same color.

Following the tutorial, I completely covered the star with Versamark and heat embossed it with a Iridescent embossing powder. It got so vibrant and sparkly!

Then I made a pleasant discovery involving the book plate framelit from the Apothecary Accent Framelits. I'll share it with you in the form of a picture tutorial.

Here are what the framelits look like when cut. The book plate is on the top right.

Linda Vich Creates: Making It Sparkle

I cut a book plate from Garden Green.

Linda Vich Creates: Making It Sparkle


 Next, I grabbed my Tag Topper Scalloped punch.

Linda Vich Creates: Making It Sparkle

I centred the book plate and stuck it into the punch a far as it would go.

Linda Vich Creates: Making It Sparkle

After punching both ends, this is the result.

Linda Vich Creates: Making It Sparkle

Cool, huh? The reason I thought of this technique was because I knew you could modify one of the Chalk Talk Framelit tags in the same way but that tag doesn't look as ornate as this one.

I stamped the sentiment with Versamark and heat embossed with the same Sparkly Silver embossing powder. I then inked the edges of the book plate with Island Indigo.

Because I now had holes in the tag, I was able to add a a now retired Island Indigo ribbon to it and make it into a slider. The book plate was just a bit too wide for the front of the card so I trimmed it a bit. It still looked very ornate!

I played with the placement of the matte and the book plate and then adhered both to the Rich Razzleberry matte. I added some Dimensionals to the back of the book plate and some Sticky Strip to the ends of the ribbon, wrapping them around the back of the Rich Razzleberry matte.

A few rhinestones for added glitz and my card was complete!

Linda Vich Creates: Making It Sparkle


Linda Vich Creates: Making It Sparkle

A couple of close ups so you can see the effect of the Diamond Dust Technique.

Linda Vich Creates: Making It Sparkle

Linda Vich Creates: Making It Sparkle


I hope you'll try the Diamond Dust Technique–I know I'll be using it again!

Built for Free Using: My Stampin Blog

Friday, November 7, 2014

Stampin' Up! Giveaway and Fab Friday Challenge

Project Life fans and those who should be fans will want to enter the contest that Stampin' Up! is hosting. Simply click the image below to enter and have a chance at winning either your choice of Card & coordinating Accessory Pack or the grand prize of every current Project Life by Stampin' Up! product available!

WOW!

Don't miss your chance–register to win before November 30 by clicking the image below.

Linda Vich Creates: Stampin' Up! Giveaway and Fab Friday Challenge

Other than the above announcement, it was kind of a dreary day today. It only got worse as the day went on . . . rain, wind . . . the dogs didn't even want to venture outside!

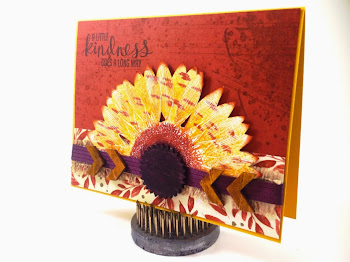
To stoke my creative juices, I opted for the color challenge at the Fab Friday Stampin Challenge blog.

Linda Vich Creates: Stampin' Up! Giveaway and Fab Friday Challenge


Small wonder, right? Blackberry Bliss was on the menu! (Have I mentioned that is my FAVORITE color?)

I gathered some scraps of each color and played around to see which I would use for the card base, which would be accent colors, etc. I also decided to use the now retired Sunflower stamp which lent itself nicely to stamping with all three of the colors.

Because the Sunflower is a HUGE stamp, I turned it on its back to ink it. I used a sponge daubers to ink the outer petals with Crushed Curry, the ring around the flower centre with Cajun Craze, and finally the centre with Blackberry Bliss.

I decided that the Crushed Curry petals might need a bit more life to them so I used the Thumping Technique. This technique requires you to ink up a stamp normally and then use a darker color of one or more Stampin Write Markers to tap on the stamp (sort of like beating with a drumstick on a drum) using the painting tip of the marker. Finally, I huffed (technical term) on the stamp to refresh the applied ink.

I left the stamp on its back and carefully laid Whisper White card stock on top of it and then a sheet of scrap paper. This allowed me to smooth all over the surface of the stamp without inking up my hand on the exposed bits of it. I use this procedure for all large and/or background stamps.

The resulting print was quite to my liking and the thumping produced some interesting flecks in the petals.

I proceeded to cut the flower in half with my Stampin Trimmer and then fussy cut one of the halves.

I intended to mount the flower on the edge of a Cajun Craze matte but decided to add a strip of Designer Paper from the Color Me Autumn paper pack. That added additional interest to the design but I still needed more.

Out came the burlap ribbon but it looked too pristine so I cut off the sewn edges and removed some short strands to fray it out a bit. That helped. I layered the sunflower half on top of it and followed that with Blackberry Bliss ribbon. Better but still needed a bit more something.

I chose to distress the Cajun Craze matte by using Cajun Craze ink with the Gorgeous Grunge stamps. Much better! I added the Blackberry Bliss sentiment from the Kinda Eclectic stamp. but something still wasn't quite right.

I dug around in my embellishments drawer and twirled my Stack & Store Caddy till I found my Essential Wooden Elements. I chose a circle with a starburst edge and four chevrons.

I used my Stampin Write markers to color the wooden pieces. In coloring the starburst with Blackberry Bliss I inked up myself rather well. This ink then transferred itself to the chevrons when I colored them with Crushed Curry. I decided that it gave them a good grungy feel, in keeping with the style of the card. (Some mistakes actually turn out for the better!)

Because I wanted the embellishments to be held firmly, I used Crystal Effects to adhere them on top of the ribbon. They were the crowning touch to my card!

Linda Vich Creates: Stampin' Up! Giveaway and Fab Friday Challenge

Linda Vich Creates: Stampin' Up! Giveaway and Fab Friday Challenge


Here's a close up so you can see more details of the burlap.

Linda Vich Creates: Stampin' Up! Giveaway and Fab Friday Challenge


I think my card has a shabby chic style to it, don't you?

Built for Free Using: My Stampin Blog

Saturday, August 16, 2014

Flower Patch Meets Kinda Eclectic

I was totally inspired by Nance Lempinen-Leedy, a fellow demonstrator, in her combination of Kinda Eclectic and the Starburst Framelits. She designed this little box for the display board at Convention. Isn't it darling?


I love how she got the idea to stamp and emboss the sunburst from Kinda Eclectic and cut it out with the Starburst Framelits. The added twist she used, though, is to cut between the lines of the stamp. Genius!
I applied this concept but paired it with a flower built with stamps from Flower Patch.


Mounting the round flower onto the square mattes works well because circles and squares together are aesthetically pleasing. The sentiment works to balance the square mattes on the rectangular card front.
Here is an angled shot of my card.


This close up shows the dimension achieved by using Dimensionals.


I have been using Fuse Fast adhesive lately, as an alternative to Sticky Strip. There is a learning curve to using this adhesive as it is not as easy to use as Snail Adhesive, until you know the trick! Check out this really good video by Patty Bennett, so you will feel comfortable using it, too!

Thanks for visiting today!


Monday, July 28, 2014

Stampin' Up! Loot and an Anniversary Card

It was nice to chill out with my husband before supper and talk over how our days had gone. My feet definitely appreciated the soak in the water!

Feet in pool

I had had great plans for my day off, but I had to do a quick grocery shop BEFORE breakfast because we were out of orange juice! After breakfast, I was able to organize my loot from the Stampin' Up! Convention into the Krafts Inventory I use on my iPad. If you ever want to catalog your supplies (and I urge you to do so if only to calculate what they are worth) I highly recommend this database! It is very easy to use and you can tailor the records to the details you need eg. stamp name, price, tags (to make it easier to find what you need), photo, etc.

After cataloguing my supplies, I created a belated anniversary card for my husband. No, I didn't forget our anniversary (it was actually on Friday) but I just hadn't had time to make a card!
Luckily, I had a design in mind, using my new favorite stamp set, Kinda Eclectic.

Anniversary Card

I cut a standard card base from Blackberry Bliss Cardstock and a matte from Lost Lagoon. Using Blackberry Bliss ink I stamped the sentiment from the See Ya Later Alligator stamp set in the bottom right corner. The matte looked too plain so I used my piercing tool and one of the templates from the Essentials set to add a border.

I used my Scalloped Tag Topper Punch to create a ribbon slider and then heat embossed the slider using Gold Embossing Powder after first stamping the sun from Kinda Eclectic with Versamark ink.
I used one of the new Mini Metallic Clothespins to anchor a heart cut from Dazzling Diamonds to the slider. I also punched a smaller heart and colored it with my Blackberry Bliss Stampin Marker and attached it with Dimensionals to the larger heart.

Blackberry Bliss ribbon was threaded through the ribbon slider and fastened to the back of the Lost Lagoon matte. I adhered the matte to the card base using Dimensionals. To complete the card I added some rhinestones to the O's in the sentiment. Here are some close ups but they don't do justice to the Dazzling Diamonds paper or the rhinestones.

Card Detail

Card Detail

I'm pleased with how it turned out and my husband loved it, even if it was late!
After supper, I was able to photograph the stamp sets I received for free at the Convention—almost a $100 in total! The two sets underneath the others are from the new Holiday catalog (wait till you see it!) so I can only show you a portion of them.

Loot

I also scored a couple of paper packs, some Washi tape, an accessory pack for Stampin Up Project Life, and some of the new Mini Metallic Clothespins.

Free loot!

We also received a red iPad bag. Pretty nifty, huh? All in all, we scored a pretty nice haul of products, never mind what we were able to purchase from the new Holiday Catalogue! (Can't show you any of those products yet but I will say this, "YOU. WILL. LOVE. IT!")